
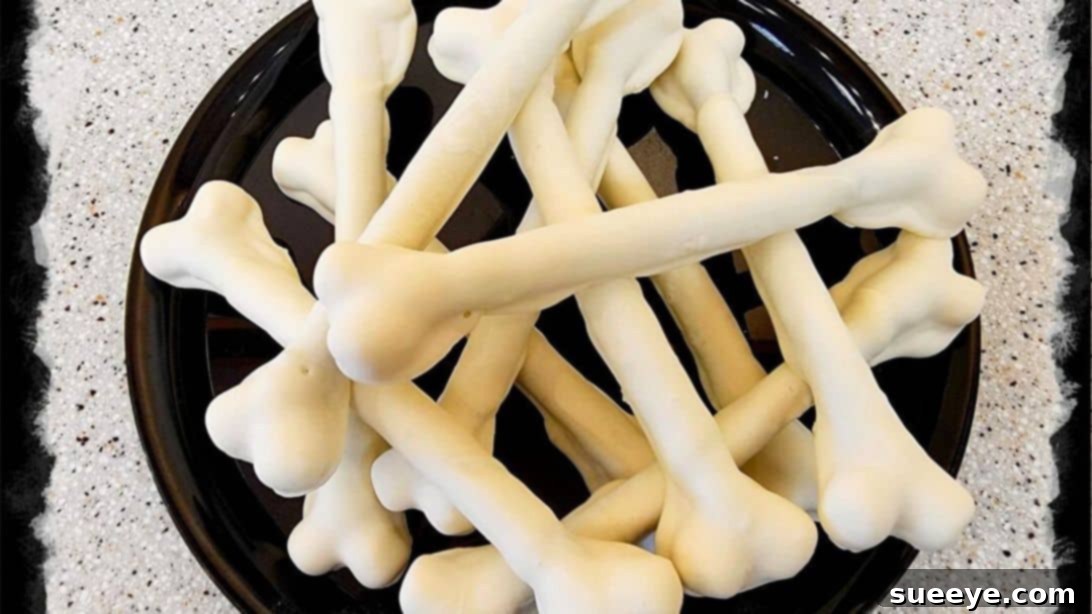
Spooktacularly Simple Halloween Pretzel Bones: The Ultimate Kid-Friendly Treat Recipe
As the air turns crisp and the leaves begin to fall, a sense of eerie excitement fills the atmosphere – Halloween is just around the corner! If you’re searching for the perfect treat to delight ghosts, goblins, and ghouls of all ages, look no further. We’ve unearthed a recipe that’s as charming as it is easy to make: these delightful Halloween Pretzel Bones, inspired by the creative kitchen of Miss Annie’s Home and Kitchen. Forget complicated concoctions; this recipe is a true testament to simplicity, fun, and deliciousness, making it an ideal activity for the whole family.
Imagine crunchy pretzels, soft marshmallows, and a dreamy coating of white chocolate coming together to create an edible skeleton fit for any Halloween bash. These spooky treats are not only incredibly simple to assemble, but they also offer a fantastic opportunity for kids to get involved in the kitchen. From melting chocolate to assembling the “bones,” little hands will love helping to create these eerie edible masterpieces. They’re guaranteed to be a hit at any Halloween party, a delightful addition to lunchboxes, or a charming handout for trick-or-treaters.
Why These Halloween Pretzel Bones Are a Must-Try
There are countless reasons why these pretzel bones should be at the top of your Halloween treat list. First and foremost, the ingredient list is refreshingly short – you only need three core items! This makes them incredibly budget-friendly and easy to source, even if you’re planning a last-minute Halloween celebration. The combination of textures is another winning factor: the satisfying crunch of pretzel sticks perfectly contrasts with the pillowy softness of mini marshmallows, all encased in a smooth, sweet shell of white chocolate. It’s a symphony of textures and flavors that will appeal to almost everyone.
Beyond their deliciousness, these pretzel bones are visually striking. Their bone-like appearance is perfectly on theme for Halloween, adding a touch of playful spookiness to your snack spread. They’re versatile too! Serve them as a standalone treat, arrange them on a platter with other ghoulish goodies, or elevate the experience by pairing them with a decadent dark chocolate fondue for a truly immersive Halloween dessert experience. We’re confident they’ll vanish quicker than a vampire in sunlight!
Looking for more spine-tingling snack inspiration? Don’t miss these other must-try Halloween delights: Dracula Apple Teeth for a healthy yet creepy snack, Witch Finger-Shaped Cookies for a truly eerie baked good, and the vibrant Halloween Poison Punch Recipe to complete your party menu. Each offers a unique way to celebrate the season with creativity and flavor.
Simple Ingredients for Spooky Halloween Pretzel Bones
One of the best aspects of this recipe is its minimal ingredient list. You likely have some of these staples in your pantry already, making preparation a breeze. Here’s what you’ll need:
- Pretzel Sticks: These form the “shaft” of our spooky bones. Their salty crunch provides a wonderful counterpoint to the sweet components. You can opt for traditional brown pretzels, or even use gluten-free alternatives if needed.
- White Mini Marshmallows: These soft, fluffy morsels will create the distinctive “knuckles” at each end of the pretzel stick, giving them their bone-like appearance. Ensure they are fresh and pliable for easy insertion.
- White Chocolate: This is the magic coating that transforms everything into convincing white bones. Use good quality white chocolate chips, melting wafers, or a bar broken into pieces for the best melting consistency and flavor.
That’s it! Just three simple ingredients stand between you and a batch of wonderfully eerie Halloween treats.
Step-by-Step Guide: Crafting Your Own Halloween Pretzel Bones
Creating these pretzel bones is a straightforward process, making it enjoyable for chefs of all skill levels. Follow these detailed steps to bring your spooky snacks to life:
Step 1: Preparing Your White Chocolate for Dipping
The first crucial step is to perfectly melt your white chocolate. Proper melting ensures a smooth, even coating for your pretzel bones. Begin by breaking your white chocolate (whether it’s a bar or block) into small, uniform pieces. If using chips or wafers, you can skip this step. Place the chocolate into a microwave-safe bowl. Heat the chocolate in short bursts – typically 15 to 30 seconds at a time – stirring thoroughly after each interval. White chocolate can seize or burn easily, so it’s vital to heat it gently and stir frequently to distribute the heat. Continue this process until the chocolate is completely melted and beautifully smooth, with no lumps remaining. Alternatively, for a more controlled melt, you can use a double boiler method by placing the chocolate in a heat-safe bowl set over a pot of simmering water, stirring until smooth. This method helps prevent scorching.
Step 2: Assembling the Pretzel Bone Structure
Now comes the fun part: transforming ordinary pretzel sticks into spooky bones! Take a pretzel stick and carefully insert one white mini marshmallow onto each end. Gently push the marshmallow onto the pretzel stick, ensuring it’s snug but not pushed all the way through, leaving a small stub of pretzel visible within the marshmallow if desired. The goal is to create the classic bone shape. Repeat this process with all your pretzel sticks. As a creative alternative, if you prefer the “V-shaped” knuckles often seen in professional photos, dip the ends of the pretzel stick into the freshly melted white chocolate first, then immediately attach two mini marshmallows to each end, forming a slight “V” or “Y” shape. The melted chocolate will act as a glue, securing the marshmallows in place before the final coating.
Step 3: Coating Your Pretzel Bones in White Chocolate
With your pretzel bone structures ready, it’s time for their ghostly white coating. Prepare a baking sheet by lining it with parchment paper or a silicone baking mat; this will prevent the chocolate from sticking as it sets. Carefully take each assembled pretzel stick (with marshmallows on both ends) and dip it entirely into the melted white chocolate. Use a spoon to gently ladle chocolate over any uncovered areas, ensuring a full, even coat. Once fully covered, carefully lift the pretzel bone using a small strainer or a fork. Gently tap off any excess chocolate to ensure a smooth finish and prevent pooling. Delicately place each coated pretzel bone onto your prepared baking sheet, leaving a small space between each one to prevent them from sticking together. Continue this process until all your pretzel bones are beautifully enrobed in white chocolate.
Step 4: Setting and Serving Your Spooky Creations
The final step is to allow your chocolate-covered pretzel bones to set. Leave them undisturbed on the parchment-lined baking sheet at room temperature until the chocolate has fully hardened. Depending on the ambient temperature and humidity, this can take anywhere from 30 minutes to an hour. For quicker setting, you can carefully place the baking sheet in the refrigerator for 15-20 minutes, but be mindful of condensation forming if left too long. Once the chocolate is firm to the touch, your Halloween Pretzel Bones are ready to be served! Arrange them artfully on a serving plate, perhaps alongside other Halloween-themed snacks, or package them individually as delightful party favors or trick-or-treat handouts. Enjoy the smiles and shrieks of delight as everyone savors these delightful and easy-to-make spooky treats!
Tips for Perfect Halloween Pretzel Bones Every Time
To ensure your pretzel bones are as perfect as they are delicious, consider these helpful tips:
- Quality Chocolate Matters: Using good quality white chocolate will yield a smoother melt and a better-tasting coating. Compound chocolate (often labeled as “candy melts”) is also a great option as it melts very smoothly and hardens quickly without tempering.
- Preventing Lumps: When melting chocolate, avoid overheating. If your chocolate seems a bit thick, you can stir in a tiny amount (1/2 teaspoon) of vegetable oil or coconut oil to thin it slightly, making dipping easier.
- Marshmallow Placement: For extra security, you can dab a tiny bit of melted chocolate on the ends of the pretzel sticks before attaching the marshmallows. This acts as an additional adhesive.
- Cleanup: Line your workspace with newspaper or wax paper to catch any drips and make cleanup a breeze.
- Customization: Don’t stop at just white! After the white chocolate has set, you can drizzle melted dark chocolate or even colored candy melts over them to add veins, cracks, or other spooky details. Edible glitter or sprinkles can also add a festive touch.
Creative Variations and Serving Suggestions
While the classic white pretzel bone is wonderfully effective, there’s plenty of room for creative customization:
- Chocolate Varieties: Experiment with milk or dark chocolate for a different flavor profile, or even use colored candy melts (orange, green, purple) for vibrant, non-bone-like Halloween pretzel sticks.
- Spooky Details: Before the chocolate sets, sprinkle with edible black glitter, crushed Oreo cookies for “dirt,” or tiny candy eyes to give them a more ghoulish personality.
- Different Pretzel Shapes: While sticks work best for bones, you could use pretzel rods or even mini pretzel twists for different Halloween-themed shapes.
- Dipping Delight: As mentioned, a dark chocolate fondue creates an amazing contrast and an interactive dessert experience. Consider adding a few drops of peppermint extract to your fondue for a festive twist.
- Halloween Platter: Arrange the pretzel bones on a large platter with other Halloween treats like candy corn, gummy worms, spiderweb sugar cookies, and carved fruit for a truly impressive spread.
- Gift or Party Favors: Once fully set, place individual pretzel bones in clear cellophane bags tied with orange and black ribbon. They make charming take-home favors for party guests or delightful gifts for teachers and friends.
Making it a Family Affair: Involving Kids Safely
These Halloween Pretzel Bones are an ideal project for getting children involved in the kitchen. Here’s how they can help safely:
- Marshmallow Attachment: Younger children can easily help push the mini marshmallows onto the pretzel sticks. This is a great task for developing fine motor skills.
- Dipping (with supervision): Older children can assist with dipping the pretzels into the melted chocolate, under close adult supervision, especially if the chocolate is hot.
- Decoration: All ages can enjoy adding sprinkles, edible glitter, or small candies before the chocolate sets.
- Arranging: Kids can help arrange the finished bones on a serving platter or package them up.
- Safety First: Always supervise children, especially when working with hot chocolate or sharp utensils. Teach them about food safety and hygiene.
By involving children, you’re not just making treats; you’re creating cherished Halloween memories and fostering a love for cooking and creativity. These simple yet effective Halloween Pretzel Bones are more than just a snack – they’re a fun, edible craft that embodies the spirit of the season. So gather your ingredients, enlist your little monsters, and get ready to whip up a batch of these unforgettable spooky treats. Happy Halloween and happy baking!