
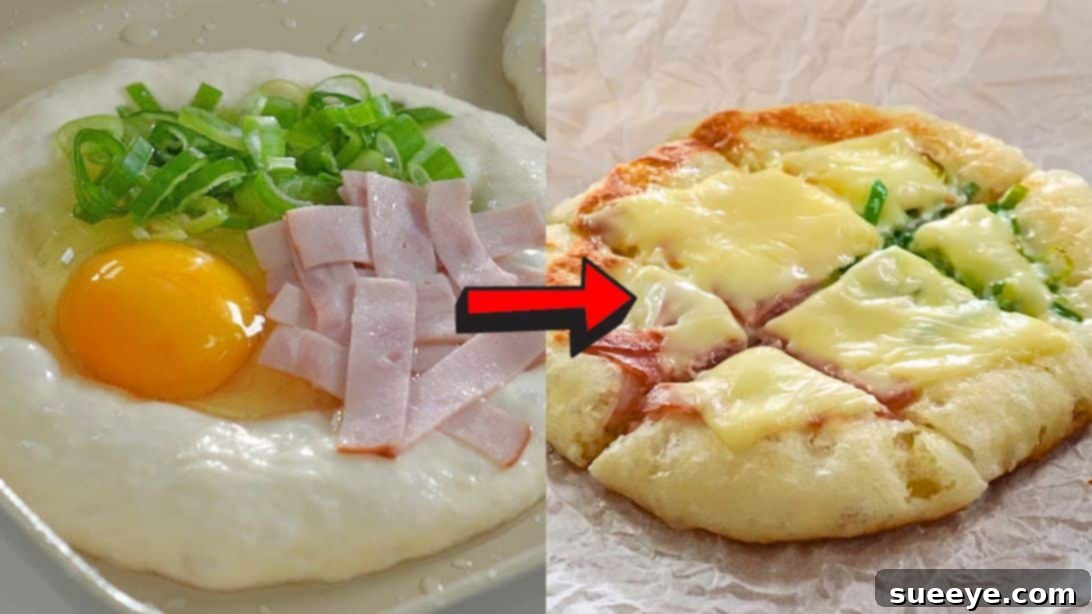
Easy One-Pan Egg Toast Breakfast: The Ultimate Fluffy Morning Delight
Are you searching for a breakfast recipe that combines incredible flavor with unmatched simplicity? Look no further than the **Easy One-Pan Egg Toast Breakfast**! This delightful recipe, inspired by the culinary genius of table diary 식탁일기, is a true breakfast revelation. Imagine starting your day with exceptionally soft and fluffy bread, perfectly encasing savory ham, gooey melted cheese, vibrant green onions, and a beautifully cooked egg – all achieved with minimal effort and just one pan!
This isn’t just a meal; it’s a breakfast solution designed for busy schedules without compromising on taste. Its unique preparation method yields a bread texture so soft and airy, it will genuinely amaze you. For years, this has been a go-to recipe in countless homes, consistently delivering delicious results that satisfy even the most discerning palates. Whether you’re a seasoned chef or just starting your culinary journey, you’ll find this recipe straightforward and incredibly rewarding. We’ve crafted a detailed, SEO-friendly guide, packed with clear instructions, helpful tips, and exciting variations, to ensure your one-pan egg toast turns out perfectly every single time. Get ready to elevate your breakfast game and discover the joy of this simple yet profoundly delicious dish. Continue reading for the complete instructions, or watch the video linked below for a visual walkthrough!
Gather Your Essential Ingredients for the Perfect Egg Toast
The beauty of this easy one-pan egg toast lies in its reliance on common, readily available ingredients. Most of these staples are likely already in your kitchen, making this a highly accessible and budget-friendly breakfast option. Quality ingredients will undoubtedly enhance the final taste and texture, so choose wisely!
- 1.6 cups (approximately 200g) All-Purpose Flour: This forms the base of our incredibly soft and unique bread. All-purpose flour is ideal for achieving the perfect balance of structure and tenderness, resulting in that desirable fluffy texture.
- 1/2 teaspoon Active Dry Yeast: The crucial leavening agent responsible for the amazing rise and airy pockets in our bread. Always ensure your yeast is fresh and active for optimal results. If your yeast is old, your dough may not rise properly.
- 2 1/2 teaspoons Granulated Sugar: Beyond simply adding a touch of sweetness, sugar plays a vital role in activating the yeast, providing it with food for fermentation, which helps the dough rise beautifully. It also contributes to the lovely golden-brown crust.
- 1/3 teaspoon Fine Sea Salt: A small but essential ingredient, salt is critical for balancing and enhancing all the flavors in the dough. It also helps to regulate the yeast’s activity, preventing it from over-proofing too quickly.
- 5.4 oz (approximately 150ml) Warm Water: The liquid component that hydrates the flour and activates the yeast. The water should be comfortably warm to the touch (around 105-115°F or 40-46°C) – hot enough to wake up the yeast but not so hot that it kills it. This recipe utilizes a relatively high moisture content, which is key to the dough’s sticky nature and, ultimately, its remarkable softness.
- 1 Large Egg: The star of the show, providing rich flavor, essential protein, and a delightful runny yolk if cooked to perfection (or a firmer set if preferred).
- 2-3 tablespoons Chopped Green Onion (Scallions): These add a wonderful freshness, a mild, zesty onion flavor, and a vibrant splash of color to your toast. Finely chopped chives can also be used as a more delicate alternative.
- 1/4 cup Diced Ham (cut into small thin pieces): Delivers a savory, salty kick and a satisfying texture. Feel free to use high-quality deli ham, leftover holiday ham, or even pre-cooked bacon bits for a different savory profile. Vegetarian alternatives like sautéed mushrooms or bell peppers work beautifully too!
- 1-2 Slices of Cheese (e.g., Cheddar, Mozzarella, Provolone): For that irresistible, gooey, and comforting melted layer. Cheddar offers a sharp, tangy taste, while mozzarella or provolone provides a milder, stretchier melt. Choose your favorite cheese to complement the other ingredients.
- Cooking Oil (for greasing the pan and hands): A neutral-flavored oil such as vegetable, canola, or light olive oil is essential. It prevents the dough from sticking to the pan and makes handling the sticky dough significantly easier.
Having all your ingredients precisely measured and prepared before you begin (a practice known as “mise en place”) will streamline the cooking process, ensuring a stress-free and enjoyable experience. Now, let’s dive into the simple yet effective steps to create this breakfast masterpiece!
Step-by-Step Guide to Your Delicious One-Pan Egg Toast
Follow these meticulously detailed instructions to achieve a perfectly fluffy, flavorful, and beautifully cooked egg toast every single time. Remember, patience, particularly during the dough’s fermentation, is a key ingredient for success!
Step 1: Preparing Your Wonderfully Fluffy Dough
Begin by combining the dry ingredients in a spacious mixing bowl. Add the all-purpose flour, active dry yeast, granulated sugar, and fine sea salt. Use a whisk or fork to mix these dry components thoroughly, ensuring they are evenly distributed. This helps prevent clumps and promotes consistent yeast activation. Next, gradually pour in the warm water. Using a sturdy spatula or a wooden spoon, start mixing the ingredients. Continue mixing for approximately 3 minutes. Initially, the mixture will appear shaggy and disjointed, but as you continue to stir, it will come together into a very soft, wet, and notably sticky dough. Do not be alarmed by its stickiness; this high hydration level is precisely what contributes to the exceptionally soft, airy, and moist texture of the finished bread. Avoid the temptation to add more flour, as this will result in a tougher bread. Once the ingredients are well combined and no dry pockets of flour remain, cover the bowl tightly with a lid or plastic wrap to prevent the dough from drying out. Place the covered bowl in a warm, draft-free environment. Ideal spots include a slightly warmed (then turned off) oven, a sunny countertop, or near a warm appliance. Allow the dough to ferment and rise until it has visibly doubled in size, which typically takes about 1 hour, depending on the warmth of your kitchen. This rising period is crucial for developing flavor and achieving that signature light and airy crumb structure.
Step 2: Preparing Your Pan and Hands for Effortless Dough Handling
While your dough is undergoing its magical rise, or once it’s beautifully proofed and ready, take a moment to prepare your cooking station. Lightly but thoroughly grease your frying pan with a thin, even layer of cooking oil. A high-quality non-stick pan is strongly recommended for this recipe to ensure easy flipping and prevent any sticking. Place the pan over low heat; the key here is to maintain a gentle, consistent temperature. You want the pan warm enough to start cooking, but not so hot that it scorches the dough or cooks it too quickly. Next, to tackle the naturally sticky dough without frustration, lightly rub your hands with a generous amount of cooking oil. This creates an essential non-stick barrier, allowing you to easily handle, form, and flatten the dough without it adhering to your fingers. It’s a simple trick that makes a huge difference! Ensure all your fillings – the egg, chopped green onion, diced ham, and cheese slices – are prepped and conveniently within arm’s reach for a smooth and uninterrupted cooking process.
Step 3: Skillfully Forming and Flattening the Dough in the Pan
Once your dough has successfully doubled in size and looks airy, gently deflate it by punching it down lightly to release the trapped gases. Then, carefully retrieve a portion of the dough. The ideal amount is roughly the size of a small tangerine or a golf ball – what the original recipe charmingly refers to as “a fistful.” With your hands still lightly oiled from the previous step, quickly and gently form this portion of dough into a neat, round ball. Carefully transfer the dough ball to the center of your lightly oiled, preheated pan. Using your fingertips, gently but firmly press down on the center of the dough, working outwards to flatten it into an even circular shape. As you flatten, consciously create a slightly raised edge or rim around the perimeter of the dough. This raised edge is crucial; it acts as a natural ‘crust’ or barrier, effectively creating a shallow well in the center. This well will securely hold the egg and other delicious fillings, preventing them from spilling out as they cook. Be mindful not to press or touch the very edges of the dough, preserving that natural barrier for containment.
Step 4: Cooking, Filling, and Serving Your Delicious Egg Toast
With your dough perfectly flattened and its protective well formed, it’s time for the delicious fillings. Carefully crack one fresh egg directly into the center well of the dough. Immediately and evenly sprinkle your chopped green onions and diced ham over the egg and around the edges of the dough. Next, place a lid securely on the pan. Cooking with a lid is a critical step; it traps steam, which helps to cook the dough evenly, ensures the egg sets beautifully without drying out, and creates a soft, moist environment for the bread. Continue to cook over low heat, monitoring closely. Cooking time will vary, but generally, it takes a few minutes per side. You’ll know it’s time to flip when the underside of the dough has turned a beautiful golden brown and the edges of the egg appear set. Using a wide, sturdy spatula, carefully and confidently flip the entire toast to cook the second side. Continue cooking until this side is also golden brown and the egg has reached your desired level of doneness – whether you prefer a gloriously runny yolk or a fully set one.
Once the second side is cooked to perfection, carefully flip the toast back to its original position (egg-side up). Immediately place one or two slices of your chosen cheese on top of the cooked egg and ham. Re-cover the pan with the lid. The trapped heat and steam will now work their magic, melting the cheese into a wonderfully gooey, irresistible layer. Cook for another minute or two, or just until the cheese is perfectly melted and perhaps even slightly bubbling. As soon as the cheese reaches this delectable state, your one-pan egg toast is ready to be enjoyed! Carefully transfer it to a plate. Repeat this entire process with the remaining portions of dough and ingredients to create more servings. Serve your egg toast immediately while it’s still warm; this is when the bread is at its absolute softest, the cheese is at its meltiest, and all the flavors are at their peak. For an extra touch, garnish with a sprinkle of fresh green onion. Enjoy this incredibly satisfying and easy-to-make breakfast!
Pro Tips and Delicious Variations for Your One-Pan Egg Toast
While the core recipe for this easy one-pan egg toast is phenomenal as is, there are numerous ways to perfect your technique and customize it to your personal taste. Here are some expert tips and inspiring variations to ensure every batch is a success and uniquely yours:
Ensuring Dough Success Every Time:
- Verify Yeast Activity: Before you even start, ensure your active dry yeast is viable. If your water isn’t at the correct temperature (too cold won’t activate, too hot will kill it) or if your yeast is past its prime, your dough won’t rise. A quick test: mix 1/2 teaspoon of yeast with a pinch of sugar and 1/4 cup of warm water. If it doesn’t foam up within 5-10 minutes, your yeast is likely inactive, and you should use a fresh batch.
- Optimal Rising Environment: A consistently warm and draft-free location is paramount for successful dough fermentation. If your kitchen is cool, try placing the covered bowl in an oven that has been briefly preheated to its lowest setting (and then turned off) or even on top of a warm, running appliance like a refrigerator or dishwasher.
- Embrace the Stickiness: Do not be intimidated by the dough’s sticky consistency! This is a deliberate feature due to its high hydration, which is the secret to its incredibly soft, airy, and moist final texture. Liberally oiling your hands, as instructed, is your ultimate weapon for handling this dough without any frustration.
Elevating Your Fillings and Toppings:
- Creative Vegetarian Options: Easily transform this into a delightful vegetarian meal by omitting the ham. Instead, try finely diced bell peppers (red, yellow, or green), thinly sliced sautéed mushrooms, fresh spinach (wilt it slightly beforehand), or halved cherry tomatoes. For vegetables with high moisture content, a quick pre-sauté can prevent a watery result.
- Alternative Meats: For a different savory profile, consider cooked sausage crumbles, crispy bacon bits, finely shredded cooked chicken, or even thinly sliced cooked turkey. These can be added in place of or in addition to the ham.
- Cheese Exploration: Don’t limit yourself to cheddar! Explore other fantastic melting cheeses like creamy mozzarella for a milder, stretchier texture, sharp provolone, spicy pepper jack for a kick, or even a blend of your favorite types for complex flavor.
- Herb Power-Up: A sprinkle of fresh parsley, cilantro, dill, or a dash of dried Italian herbs can introduce another layer of aromatic flavor and visual appeal to your egg toast.
- Introduce a Spicy Kick: If you enjoy a bit of heat, consider adding a pinch of red pepper flakes with your fillings or drizzling a touch of sriracha or your favorite hot sauce over the finished toast.
Achieving Cooking Perfection:
- The Low and Slow Rule: Cooking over consistently low heat is absolutely paramount for this recipe. This allows the dough to cook through evenly without burning the exterior, ensures the egg sets perfectly, and contributes to the bread’s soft interior. High heat will result in a burnt exterior and raw interior.
- The Magic of the Lid: The lid is your best friend in this recipe. It acts like a mini-oven, trapping steam to ensure the dough and egg cook thoroughly and evenly. This steaming action helps create a softer bread and a more consistently cooked egg. It’s also essential for achieving beautifully melted and gooey cheese.
- Customizing Egg Doneness: Adjust the cooking time according to your preference for the egg yolk. For a wonderfully runny, jammy yolk, cook for less time after flipping the toast. For a firm, fully set yolk, extend the cooking time slightly, ensuring the internal temperature is safe.
Why You’ll Fall in Love with This One-Pan Egg Toast Wonder
This Easy One-Pan Egg Toast isn’t just a fleeting trend; it’s a breakfast sensation that consistently delivers on all fronts: taste, convenience, and incredible versatility. Here’s why it deserves a permanent and cherished spot in your regular breakfast rotation:
- Unbeatable Flavor and Texture Combination: The harmony of the uniquely soft, incredibly fluffy bread with the savory goodness of ham, the comforting melt of cheese, the fresh bite of green onions, and a perfectly cooked egg creates a symphony of tastes and textures that is truly addictive and deeply satisfying.
- Ultimate Convenience for Busy Lives: The “one-pan” aspect is a dream come true, especially on hectic mornings. Minimal dishes mean significantly less cleanup, and the entire cooking process, from dough handling to plate, is surprisingly swift once your dough is proofed. It’s efficiency without compromise.
- Highly Customizable for Every Palate: As we’ve extensively explored in our variations section, this recipe serves as a wonderfully adaptable culinary canvas. It’s incredibly easy to modify with different fillings, cheeses, and herbs to perfectly suit various dietary preferences, available ingredients, or simply your morning mood.
- Economical and Budget-Friendly: Crafted from common, relatively inexpensive pantry staples, this recipe offers a remarkably delicious and satisfying meal without straining your wallet. It stands as an excellent, cost-effective alternative to frequenting cafes or buying pre-made breakfasts.
- A Family Favorite and Kid-Friendly: Its universally appealing taste, combined with the fun of its unique presentation and customizable nature, makes it a huge hit with children and adults alike. Involving younger family members in choosing their toppings or assisting with the gentle mixing can transform breakfast into an enjoyable and interactive family activity.
- Nutrient-Rich Start to Your Day: This breakfast provides a well-rounded and energizing start. You get quality protein from the egg and ham, essential carbohydrates for energy from the bread, and beneficial vitamins and minerals from the green onions. It’s a meal that truly nourishes.
Conclusion: Your New Favorite Breakfast Awaits!
There you have it – a comprehensive and enthusiastic guide to mastering the Easy One-Pan Egg Toast Breakfast. This exceptional recipe, a fantastic inspiration from the talented creators at table diary 식탁일기, genuinely simplifies your morning routine without ever compromising on the incredible taste or the quality of your meal. We sincerely hope this detailed article has inspired you to try this delightful dish and experience the sheer joy of biting into that soft, fluffy bread filled with savory goodness.
Don’t hesitate to experiment with different fillings, cheeses, and seasonings to truly make this recipe your own unique creation. It stands as a beautiful testament to how simple, wholesome ingredients can harmoniously come together to create something truly extraordinary and deeply comforting. Once you’ve experienced the ease and deliciousness, this easy one-pan egg toast is bound to become a cherished and frequently revisited staple in your kitchen. So go ahead, gather your ingredients, confidently follow our steps, and prepare to savor a breakfast that is as effortless to prepare as it is utterly delicious to eat!
Eager to discover even more simple, quick, and incredibly delicious recipes that are perfect for any home cook? Be sure to explore table diary 식탁일기’s channel on Youtube. They offer a rich treasure trove of culinary inspiration that’s guaranteed to spark your kitchen creativity!