
How to Revive a Dry Sharpie with Rubbing Alcohol: A Simple and Effective Hack
We’ve all been there: reaching for your trusty Sharpie to label a package, jot down an important note, or add a crucial detail to an art project, only to find it completely dried out. That moment of frustration as you realize your favorite marker is no longer working can be incredibly annoying, especially when you need it right away. The immediate thought might be to throw it away and rush to the store for a new one. But what if there was a simple, clever solution that could bring your marker back to life with minimal effort and expense? The good news is, there is!
This ingenious trick, popularized by creators like Crazy Russian Hacker on YouTube, involves a common household item and a little patience. You don’t need to be a DIY expert to master this hack; it’s accessible to anyone looking to extend the life of their markers and save a few dollars. Instead of contributing to landfill waste, you can learn to rejuvenate your dried-out Sharpies and other alcohol-based markers, making them perform like new again. Let’s dive into how you can easily fix a dry Sharpie using just a bit of rubbing alcohol.
The Unbearable Frustration of a Dry Marker
A dry marker always seems to strike at the most inconvenient times. Perhaps you’re in the middle of a crafting session, meticulously planning a school project, or simply trying to organize your home office. The sudden failure of a Sharpie can halt your progress and force an unplanned trip to the stationery store. This isn’t just an minor inconvenience; it can disrupt your workflow, especially if you rely on specific colors or tip sizes that aren’t readily available. Furthermore, the cost of replacing markers, while seemingly small individually, can add up over time, particularly for frequent users or creative professionals.
Beyond the immediate frustration and cost, there’s also the environmental aspect. Every marker we discard contributes to waste. By learning to revive your markers, you’re not just saving money and time; you’re also making a small but meaningful choice to reduce your consumption and environmental footprint. This simple hack aligns perfectly with a more sustainable lifestyle, transforming an ordinary disposable item into a reusable tool with an extended lifespan.
Why Do Markers Dry Out, and How Does Rubbing Alcohol Help?
Most permanent markers, including Sharpies, use an alcohol-based ink. The alcohol acts as a solvent, keeping the pigments fluid and allowing them to flow smoothly onto surfaces. When a marker dries out, it’s typically because the alcohol in the ink has evaporated over time. This evaporation can be accelerated if the cap is left off, even for short periods, or if the marker is stored improperly.
Rubbing alcohol (isopropyl alcohol) works as a fantastic solvent for these types of inks. When applied to the dried-out ink reservoir (often called the wick or felt core), it reintroduces the necessary solvent, allowing the solidified pigments to dissolve and become liquid again. This process effectively rehydrates the ink, bringing it back to a usable consistency. It’s a clever chemical trick that leverages the properties of the ink itself to reverse the drying process.
Essential Materials for Reviving Your Dry Sharpie
Gathering the right tools before you start is crucial for a smooth and successful marker revival. The good news is that most of these items are likely already in your home or easily acquired from a local pharmacy or hardware store.
- 91% Rubbing Alcohol (Isopropyl Alcohol): This concentration is ideal because it has a high alcohol content and low water content, making it very effective at dissolving the dried ink without introducing too much moisture that could dilute the ink’s vibrancy or permanence. Lower concentrations might work but less efficiently.
- An Eyedropper or Small Syringe: Precision is key when adding alcohol to the marker’s ink reservoir. An eyedropper, a clean medicine syringe, or even a small pipette will allow you to control the amount of alcohol applied, preventing over-saturation or spillage.
- Two Small Pairs of Pliers: These are essential for carefully disassembling the Sharpie. Two pairs allow you to grip different parts of the marker firmly and twist them apart without damaging the plastic casing. Needle-nose pliers or small slip-joint pliers work well.
- An Old, Dry Sharpie Marker: Of course, you’ll need the primary subject of this hack! This method works best on Sharpie brand markers, but it’s also effective for many other alcohol-based permanent markers.
- Paper Towels or a Scrap Cloth: These will be useful for protecting your work surface from any stray ink or alcohol, and for testing the marker once it’s revived.
- Safety Gloves (Optional but Recommended): While rubbing alcohol isn’t highly toxic, it can dry out your skin, and permanent marker ink can be messy. Gloves offer protection and keep your hands clean.
Step-by-Step Guide: Bringing Your Sharpie Back to Life
Follow these detailed steps to safely and effectively revive your dry Sharpie marker. Patience and a gentle approach will yield the best results.
Step 1: Prepare Your Workspace
Before you begin, set up a clean, well-ventilated area. Lay down paper towels or newspaper to protect your work surface from any spills of ink or rubbing alcohol. Ensuring good ventilation is important, as rubbing alcohol has fumes that can be irritating in confined spaces.
Step 2: Carefully Disassemble the Marker
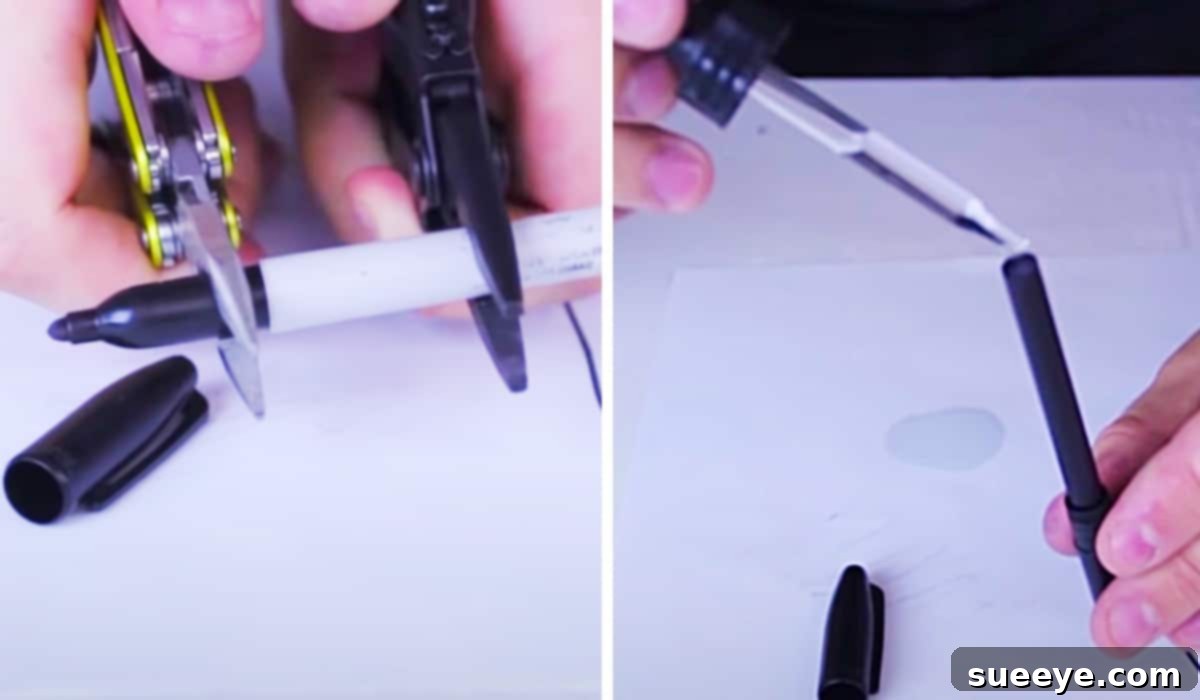
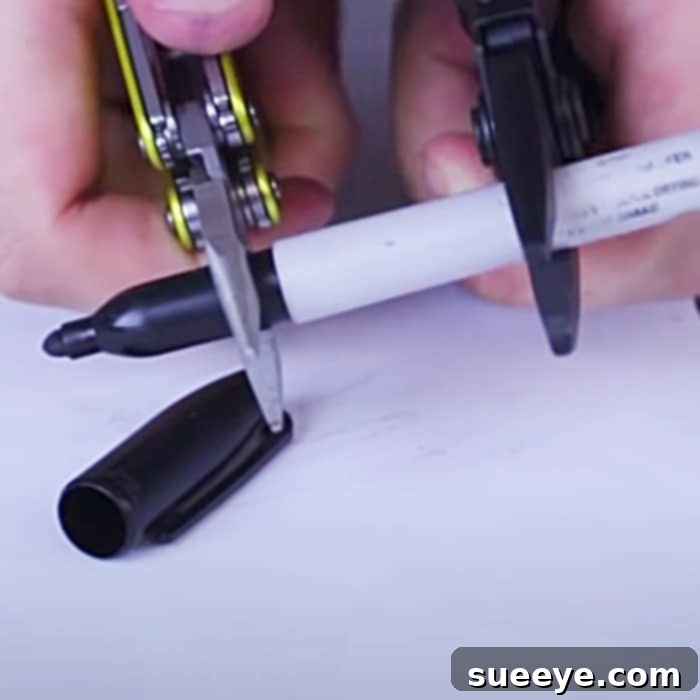
This is arguably the trickiest part, requiring a delicate touch. Most Sharpie markers are designed to be quite durable, but they can be taken apart with the right technique. You’ll use your two pairs of pliers for this. One pair will grip the barrel of the Sharpie, close to where the cap snaps on. The other pair will grip the conical tip section of the marker. Gently but firmly twist the two sections in opposite directions. The goal is to separate the tip housing from the main barrel, revealing the ink reservoir (the felt wick) inside. Do not force it aggressively; a steady, counter-rotating motion should eventually loosen the parts.
Step 3: Rehydrate the Ink Reservoir with Rubbing Alcohol
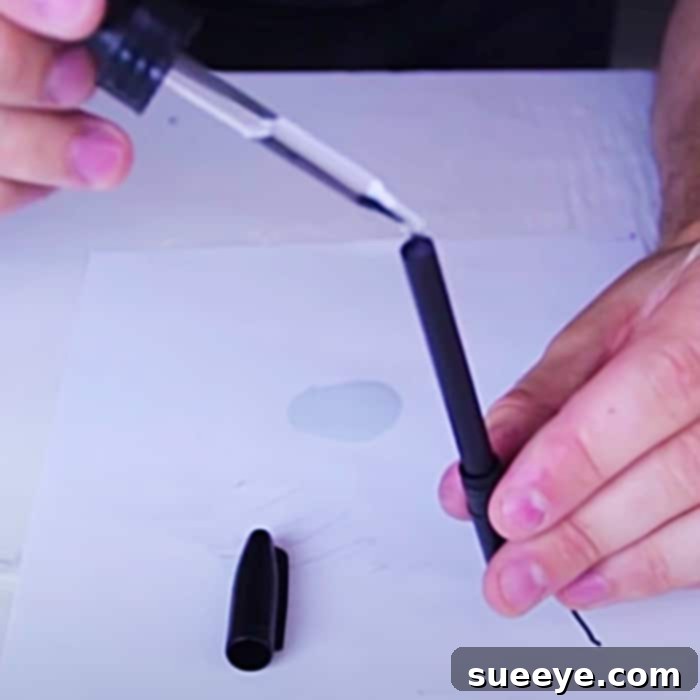
Once you’ve successfully separated the marker and exposed the felt ink wick, it’s time to apply the rubbing alcohol. Using your eyedropper or syringe, carefully squirt a few drops (start with 3-5 drops) of 91% rubbing alcohol directly onto the dry wick. You should see the felt material absorbing the alcohol. The goal is to moisten the wick without completely drenching it. You’ll notice the dry, crusty ink starting to dissolve and regain its color and fluidity. If the wick looks very dry, you can add a couple more drops, but be cautious not to overdo it, as too much alcohol can thin the ink excessively.
Step 4: Reassemble and Test Your Marker
After applying the alcohol, carefully reassemble the Sharpie by pushing the tip housing back onto the main barrel until it clicks securely into place. You might need to twist slightly again to ensure a tight fit. Once reassembled, gently shake the marker to help distribute the alcohol throughout the ink reservoir. Let it sit upright for a few minutes (tip down) to allow gravity to draw the rehydrated ink towards the nib.
Now comes the moment of truth: grab a piece of scrap paper and test your marker. You should find that the Sharpie writes smoothly and boldly again, just like a brand new one! If it’s still a bit faint, you can try repeating Step 3 with one or two more drops of alcohol, or simply let it sit for a longer period (30 minutes to an hour) before testing again. Sometimes, a stubborn marker needs a bit more time for the alcohol to fully reactivate the dried ink throughout the entire felt.
Beyond Sharpies: This Hack Works for Other Markers Too!
While this tutorial specifically focuses on Sharpie markers, the underlying principle applies to many other brands of alcohol-based permanent markers. If you have a dry marker from a different manufacturer that uses similar ink technology, chances are this rubbing alcohol hack will work wonders for it too. It’s always worth trying this revival method before discarding any dry marker that uses permanent, alcohol-soluble ink. This versatility makes the hack even more valuable for artists, crafters, students, and anyone who regularly uses markers.
The Many Benefits of Reviving Your Markers
Embracing this simple marker revival technique offers a surprising array of advantages:
- Significant Cost Savings: New markers aren’t expensive on their own, but buying replacements frequently adds up. This hack virtually eliminates the need for constant repurchasing, saving your hard-earned money over time.
- Environmental Friendliness: Every marker you revive is one less marker ending up in a landfill. This small act contributes to reducing waste and promotes a more sustainable approach to your supplies.
- Unmatched Convenience: No more emergency trips to the store! When a marker dries out, you can fix it at home in minutes, ensuring your projects stay on track without interruption.
- Extending the Life of Favorite Tools: We all have those specific markers that just feel right, or that perfect shade of color. This hack allows you to keep using your beloved markers for much longer, preserving their unique qualities.
- Resourcefulness and DIY Satisfaction: There’s a certain satisfaction that comes from fixing something yourself. This hack empowers you with a practical skill and makes you feel more resourceful.
Pro Tips for Preventing Dry Markers in the Future
Prevention is always better than cure. By adopting a few good habits, you can significantly reduce the chances of your markers drying out in the first place:
- Always Cap Tightly: This is the most crucial tip. Ensure the cap clicks firmly into place after every use to create an airtight seal and prevent alcohol evaporation.
- Store Horizontally: While some argue for vertical storage, storing markers horizontally helps keep the ink evenly distributed across the felt wick, preventing one end from drying out faster than the other.
- Check Caps Periodically: Even if you think you capped it correctly, sometimes caps can loosen. Give them a quick check, especially for markers stored for longer periods.
- Avoid Leaving Uncapped for Long Periods: Be mindful during use. If you’re pausing a project, even for a moment, take the extra second to recap your marker.
- Invest in Quality Markers: While not a direct prevention method, higher-quality markers often have better sealing caps and more robust ink systems, which can inherently extend their lifespan.
Important Safety Precautions When Using Rubbing Alcohol
While rubbing alcohol is a common household item, it’s essential to handle it with care due to its properties:
- Ensure Good Ventilation: Rubbing alcohol fumes can be strong. Work in a well-ventilated area, preferably near an open window or with a fan.
- Flammability: Isopropyl alcohol is highly flammable. Keep it away from open flames, sparks, and any heat sources. Do not smoke while using it.
- Skin and Eye Contact: Avoid direct contact with skin, as it can be drying. If it gets into your eyes, flush immediately with plenty of water and seek medical attention if irritation persists.
- Keep Away from Children and Pets: Store rubbing alcohol safely out of reach of children and pets to prevent accidental ingestion or misuse.
- Protect Surfaces: Alcohol can damage or discolor certain surfaces (e.g., varnished wood, some plastics). Always work on a protected surface.
Conclusion: A Simple Hack for Maximum Impact
The next time you encounter a dry Sharpie, resist the urge to toss it. With a little rubbing alcohol, two pairs of pliers, and a few minutes of your time, you can easily bring it back to life. This simple yet powerful hack not only saves you money and the inconvenience of a store run, but it also promotes a more sustainable and resourceful approach to your everyday supplies. Embrace the satisfaction of fixing something yourself and extend the useful life of your markers. Give this trick a try – you’ll be amazed at how effective it is!