
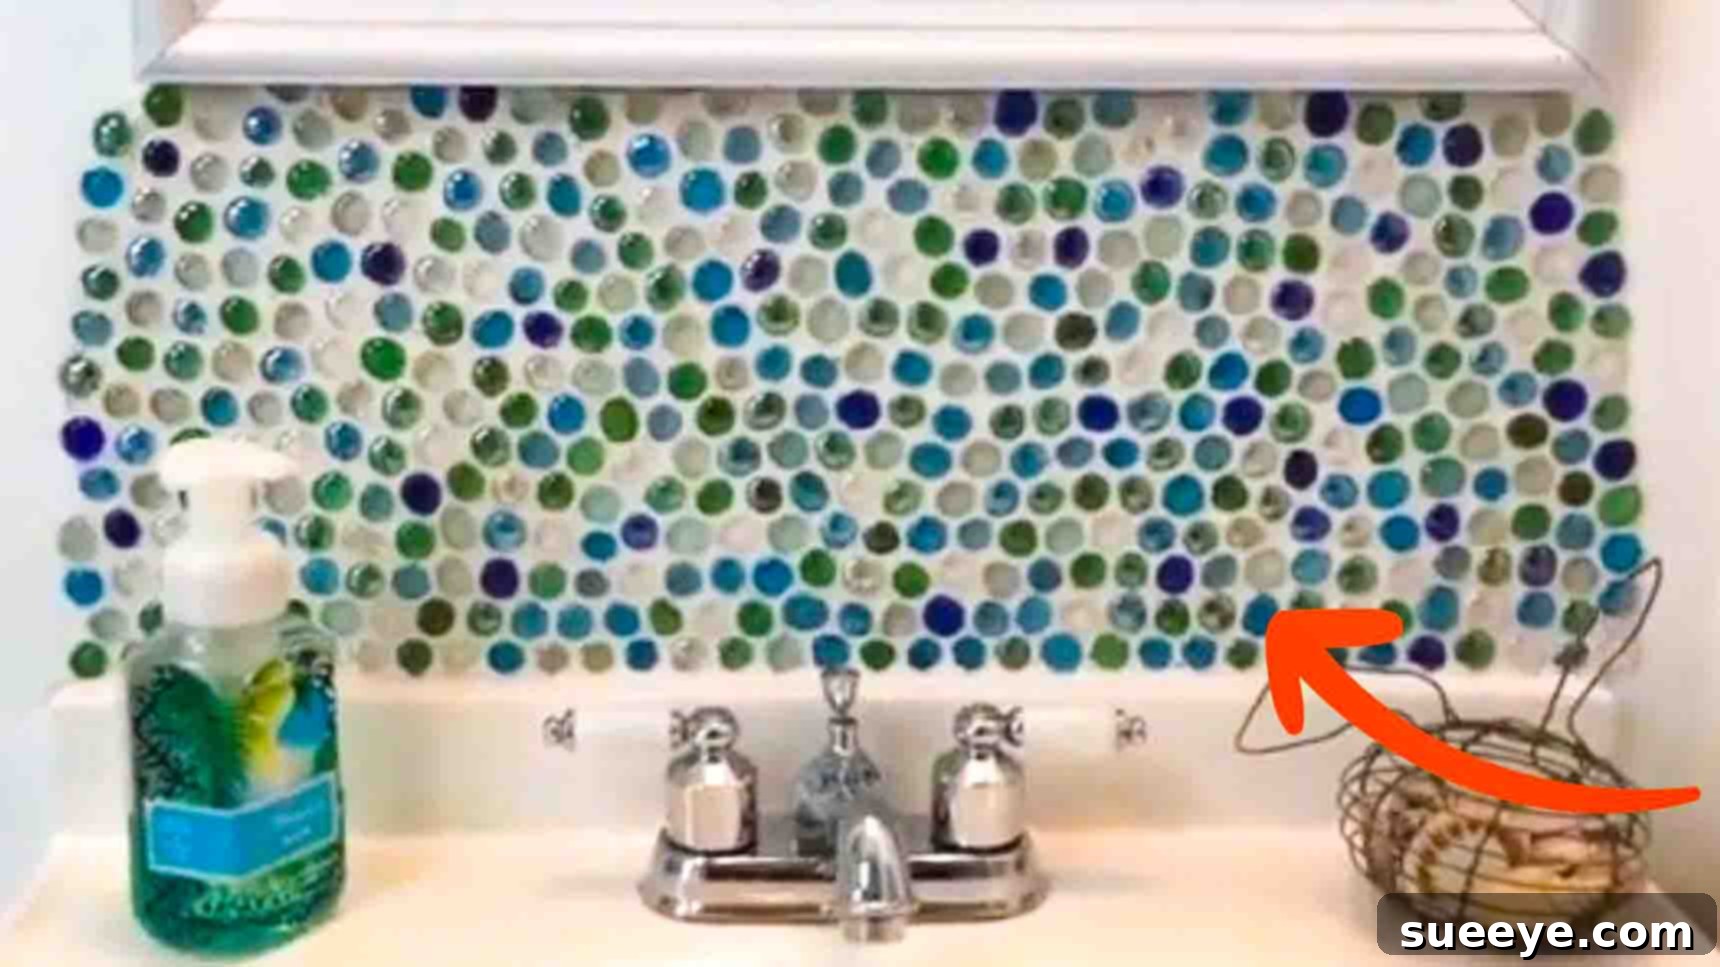
Who says updating your bathroom has to be an expensive ordeal? With a dash of creativity and a smart approach to sourcing materials, you can achieve a truly transformative look without draining your wallet. This ingenious DIY project, inspired by the creative insights of titi t.v on Youtube, demonstrates precisely how to elevate your bathroom’s aesthetic appeal dramatically. Imagine a bathroom vanity area that exudes a high-end, custom feel, all accomplished with materials primarily sourced from a dollar store.
This project is not just about saving money; it’s about infusing your personal style into your home with a unique and eye-catching feature. Utilizing simple dollar store vase filler gems, along with standard tile adhesive and grout mix, you can craft a stunning backsplash that will make your bathroom look ten times better. The beauty of this DIY lies in its simplicity and accessibility; it’s super easy to make, and the results are incredibly rewarding. You’ll be amazed at how this small addition can completely refresh and uplift the entire ambiance of your vanity space. The best part? You can confidently tackle this entire project on your own, enjoying the satisfaction of a handmade masterpiece. Let’s dive into the details and learn how to create this captivating gem backsplash, turning an ordinary bathroom into an extraordinary personal sanctuary.
Why Choose a DIY Gem Backsplash for Your Bathroom?
Opting for a DIY gem backsplash offers a myriad of benefits that extend beyond mere cost savings. It’s a smart choice for homeowners seeking a unique blend of affordability, personalization, and visual impact. Here’s why this project stands out as an excellent option for your next bathroom update:
Unbeatable Cost-Effectiveness
Traditional backsplashes can be prohibitively expensive, involving costly tiles, professional installation fees, and specialized tools. This DIY approach flips that narrative on its head. By utilizing readily available and incredibly affordable vase filler gems from dollar stores or craft shops, you drastically cut down on material costs. The primary expenses will be the adhesive, grout, and caulk – all standard home improvement items that are budget-friendly. This means you can achieve a high-end look without the high-end price tag, making a significant impact on your bathroom’s appearance for a fraction of what a conventional renovation would cost.
Unique Personalization and Style
Unlike pre-made tiles, vase filler gems come in a variety of shapes, sizes, and colors, offering endless possibilities for customization. You can arrange them in a mosaic pattern, create an ombre effect, or simply place them randomly for a sparkling, organic look. This project allows you to unleash your creativity, designing a backsplash that perfectly reflects your personal taste and complements your bathroom’s existing decor. No two gem backsplashes will ever be exactly alike, ensuring your bathroom has a truly unique and personalized touch that stands out.
Ease of Execution for All Skill Levels
One of the most appealing aspects of this project is its accessibility. You don’t need to be an experienced renovator or a skilled tiler to achieve professional-looking results. The process involves straightforward steps that are easy to follow, making it an ideal DIY project for beginners. The materials are forgiving, and minor imperfections can often be incorporated into the design’s charm. With clear instructions and a bit of patience, anyone can successfully complete this bathroom transformation.
Significant Aesthetic Impact
A backsplash, even a small one, plays a crucial role in defining the character of a bathroom vanity. The shimmering, faceted surfaces of the gems catch and reflect light, adding a touch of glamour and sophistication. This creates a focal point that instantly draws the eye, making the entire vanity area feel more luxurious and complete. It’s a small change that yields a surprisingly large visual impact, transforming a dull or outdated space into a bright and inviting one.
Durability and Easy Maintenance
Once properly installed and sealed with grout and caulk, your gem backsplash will be durable and resistant to moisture, making it suitable for the bathroom environment. The smooth surfaces of the gems are easy to wipe clean, and the grouted seams help protect the underlying wall from splashes and humidity. With minimal care, your sparkling backsplash will maintain its beauty for years to come, providing a lasting enhancement to your bathroom.
Essential Materials for Your Gem Backsplash: A Detailed Look
Gathering the right materials before you begin is crucial for a smooth and successful project. While the list is concise, understanding each item’s role will help you achieve the best results. Here’s a closer look at what you’ll need:
- Vase Filler Gems (three bags or as needed): These are the stars of your project! Look for flat-backed or relatively flat gems, as they adhere better to the wall. Dollar stores often carry a good selection in various colors and sizes. Consider buying a few extra bags to account for any breakage or if you decide to extend your backsplash area. The quantity will depend on the size of your vanity area.
- Pencil, for marking: Essential for precise measurement and outlining your backsplash area. A regular graphite pencil works perfectly.
- Ruler or Level: To ensure your marked lines are perfectly straight and level, giving your backsplash a professional and polished appearance. A long straight edge is highly recommended.
- Premixed Tile Adhesive: Opting for premixed adhesive saves you the trouble of mixing powders and water, making the process much simpler, especially for DIY beginners. Ensure it’s suitable for bathroom environments and tile applications. This adhesive provides the strong bond needed for your gems to stay in place.
- Small Notch Trowel: This specialized tool helps spread the tile adhesive evenly and consistently, creating ridges that allow for better adhesion and prevent excess build-up. A small trowel (e.g., 1/8-inch V-notch) is ideal for smaller items like gems.
- Grout Mixed with Water (1 cup grout to 1/2 cup water, approximate): Grout fills the spaces between your gems, providing stability, waterproofing, and a finished look. You can choose sanded or unsanded grout. For wider gaps between gems, sanded grout is typically recommended. The ratio provided is a good starting point, but always refer to your specific grout product’s instructions for the best mixing consistency.
- Caulk: Essential for sealing the joint where your finished gem backsplash meets the sink or countertop. This creates a waterproof barrier, preventing moisture from seeping behind your backsplash and protecting against mold and mildew. Silicone caulk offers excellent flexibility and water resistance for wet areas.
Additional Recommended Tools & Supplies:
- Bucket and Sponge: For washing gems, mixing grout, and wiping away excess grout.
- Clean Cloths: For general cleanup and buffing.
- Safety Gloves: Protect your hands from adhesive, grout, and caulk.
- Old Newspaper or Drop Cloth: To protect your countertop and floor from spills.
- Masking Tape (Painter’s Tape): Can be helpful for defining the backsplash area cleanly.
- Utility Knife or Caulk Gun: For applying caulk neatly.
- Small Rubber Float or Spreader: Ideal for applying grout evenly.
Step-by-Step Directions: Crafting Your Gem Backsplash
Creating your stunning gem backsplash is a straightforward process when approached systematically. Follow these detailed steps to ensure a beautiful and lasting result.
Step 1: Preparation and Layout Planning
Thorough preparation is the foundation of any successful DIY project. Start by ensuring your workspace is clean and ready. Your first task is to meticulously wash your vase filler gems. This is a crucial step often overlooked, as dust or residue on the gems can hinder proper adhesion. Place them in a colander, rinse them under running water, and perhaps even give them a gentle scrub to ensure they are free from any packaging dust or manufacturing oils. Once clean, spread them out on a clean towel or paper to air dry completely. Moisture on the gems will prevent the adhesive from bonding effectively.
While your gems are drying, turn your attention to the wall where your backsplash will be installed. The surface must be clean, dry, and smooth. Use a general all-purpose cleaner to remove any grease, grime, or soap scum from the wall, especially if it’s an existing bathroom vanity. Allow the wall to dry completely before proceeding.
Next, it’s time to envision your design. Carefully plan out the exact area where you intend to place the gems. Consider the height and width of your desired backsplash. Will it be a simple strip along the counter, or will it extend higher up the wall? Use your pencil and ruler or level to precisely mark out this area on the wall. Drawing clear, straight lines will serve as your guide, ensuring a crisp and professional edge to your finished backsplash. Take your time during this step; proper planning prevents crooked lines and uneven application, which can be difficult to correct later.
Step 2: Adhesive Application and Gem Placement
With your area marked and gems ready, it’s time for the exciting part! Begin by applying a thin, even coat of premixed tile adhesive to a small section of your designated backsplash area using your small notched trowel. The key here is to work in small sections. Tile adhesive can dry relatively quickly, and applying it to a large area at once might result in it becoming tacky or dry before you have a chance to place all your gems. A section of about 1-2 square feet is usually manageable. Use the notched side of the trowel to create uniform ridges in the adhesive; these ridges help ensure proper coverage and strong bonding for each gem.
Once the adhesive is applied to a small section, immediately begin pressing your dried gems into it. Place each gem firmly but gently into the adhesive, ensuring good contact with the wall. You can arrange them creatively, forming patterns, or simply placing them randomly for a mosaic effect – whatever suits your personal aesthetic. Don’t be afraid to experiment with different arrangements before the adhesive sets. As you work, continue to apply adhesive to small sections and place gems until your entire marked area is covered. After all gems are in place, allow the adhesive to set according to the manufacturer’s instructions, typically for at least 24 hours, to ensure a strong, stable bond before moving to the next step.
Step 3: Grouting for a Polished Finish
Once the tile adhesive has fully cured and your gems are securely fixed, it’s time to grout. Grouting is essential for filling the gaps between the gems, providing structural integrity, protecting against moisture, and giving your backsplash a finished, professional look. In a clean bucket, mix one cup of grout powder with approximately half a cup of water. Slowly add water to the grout powder, stirring continuously until you achieve a consistency similar to thick peanut butter or wet sand – it should be spreadable but not too runny. Always refer to the specific grout product’s instructions for precise mixing ratios, as these can vary.
Again, work in small sections. Using a rubber float or even a gloved hand, apply the mixed grout over the gems, pushing it firmly into all the spaces between them. Ensure that every gap is thoroughly filled. Be careful not to push too hard on the gems themselves, as they might dislodge if the adhesive isn’t fully cured or if excessive force is applied. Once a section is completely grouted, allow it to sit for approximately one hour. This allows the grout to begin setting and firming up.
After the hour, or when the grout has set to a firm but not rock-hard consistency, it’s time to clean off the excess. Dampen a sponge with plain water (do not use soap) and gently wipe over the gems and grout lines. Rinse your sponge frequently in a separate bucket of clean water to avoid spreading a hazy film. You may need to make several passes, wiping away the excess grout from the gem surfaces and smoothing out the grout lines. The goal is to leave the gems sparkling clean and the grout lines even and full. If a slight haze remains after drying, you can buff it gently with a dry, clean cloth a few hours later. Allow the grout to cure completely, typically 24-48 hours, before proceeding.
Step 4: Sealing with Caulk for Durability and Protection
The final crucial step in completing your DIY gem backsplash is applying caulk. Caulk creates a flexible, waterproof seal, essential for any area exposed to moisture like a bathroom. It prevents water from seeping behind your beautiful new backsplash, which could lead to damage, mold, or mildew. Focus on the area where your gem backsplash meets the sink or countertop.
Carefully apply a thin, consistent bead of caulk along this seam. A caulk gun will provide the most control, but you can also use squeeze tubes for smaller applications. Aim for a continuous line without breaks. Immediately after applying a section, moisten your finger (or use a caulk tool) and gently run it along the bead of caulk. This smooths out the caulk, pushing it firmly into the gap and creating a clean, professional finish. Wipe away any excess caulk with a damp cloth promptly before it starts to skin over. Allow the caulk to cure fully according to the manufacturer’s instructions, which can range from a few hours to a full day, before exposing the area to significant moisture. This final touch not only enhances the visual appeal but also ensures the longevity and functionality of your dazzling new backsplash.
Maintenance and Care for Your Dazzling Gem Backsplash
Once your DIY Dollar Store gem backsplash is complete, proper maintenance will ensure its sparkle and durability for years to come. Thankfully, caring for this unique feature is relatively simple and requires only basic cleaning practices.
Routine Cleaning
For daily or weekly cleaning, a soft cloth or sponge dampened with warm water and a mild, non-abrasive household cleaner is usually sufficient. Gently wipe down the gems and grout lines to remove any splashes, toothpaste residue, or dust. Avoid using harsh chemicals, abrasive scrubbers, or acidic cleaners, as these can potentially damage the grout or dull the shine of your gems. Always rinse the area with clean water after cleaning to remove any soap residue, and then dry with a soft, clean towel to prevent water spots and keep your gems sparkling.
Addressing Stubborn Stains
If you encounter any stubborn stains on the grout lines, a paste made from baking soda and water can be effective. Apply the paste to the stained area, let it sit for a few minutes, and then gently scrub with a soft brush (like an old toothbrush) before rinsing thoroughly. For more persistent issues, specific grout cleaners are available, but always check for compatibility with your gem material and test in an inconspicuous spot first.
Inspecting and Re-caulking
Periodically inspect the caulk line where your backsplash meets the countertop or sink. Over time, caulk can degrade, crack, or peel, compromising its waterproof seal. If you notice any signs of wear, it’s important to remove the old caulk and apply a fresh bead. This simple preventative measure will protect your wall from water damage and keep your backsplash looking its best.
Protecting Your Investment
While the gems are durable, avoid using them as a cutting surface or placing excessively heavy or sharp objects directly against them, as this could cause chipping or dislodgment. With minimal effort and consistent care, your DIY Dollar Store gem backsplash will remain a vibrant and elegant focal point in your bathroom for a very long time, continuing to reflect your personal style and ingenuity.
DIY Bathroom Backsplash using Dollar Store Gems: Your Ultimate Budget-Friendly Transformation
Embarking on a bathroom renovation doesn’t have to be a daunting or expensive endeavor. This DIY bathroom backsplash project, utilizing humble Dollar Store gems, is a testament to the power of creative thinking and accessible home improvement. You’ve learned how to transform an ordinary vanity area into a dazzling focal point, all while adhering to a strict budget and enjoying the immense satisfaction of a job well done by your own hands.
From carefully selecting your sparkling gems and preparing your surface to expertly applying adhesive, meticulously grouting, and finally sealing with caulk, each step contributes to a durable, beautiful, and utterly unique feature. This project not only saves you money but also allows for unparalleled personalization, ensuring your bathroom truly reflects your individual style.
So, why wait? Gather your materials, follow these detailed instructions, and prepare to be amazed by the stunning results. Give your bathroom the stylish update it deserves with a DIY gem backsplash that looks luxurious without the luxury price tag. Your refreshed vanity area will not only elevate your home’s aesthetic but also serve as a proud testament to your DIY prowess. Enjoy your brilliantly transformed space!