
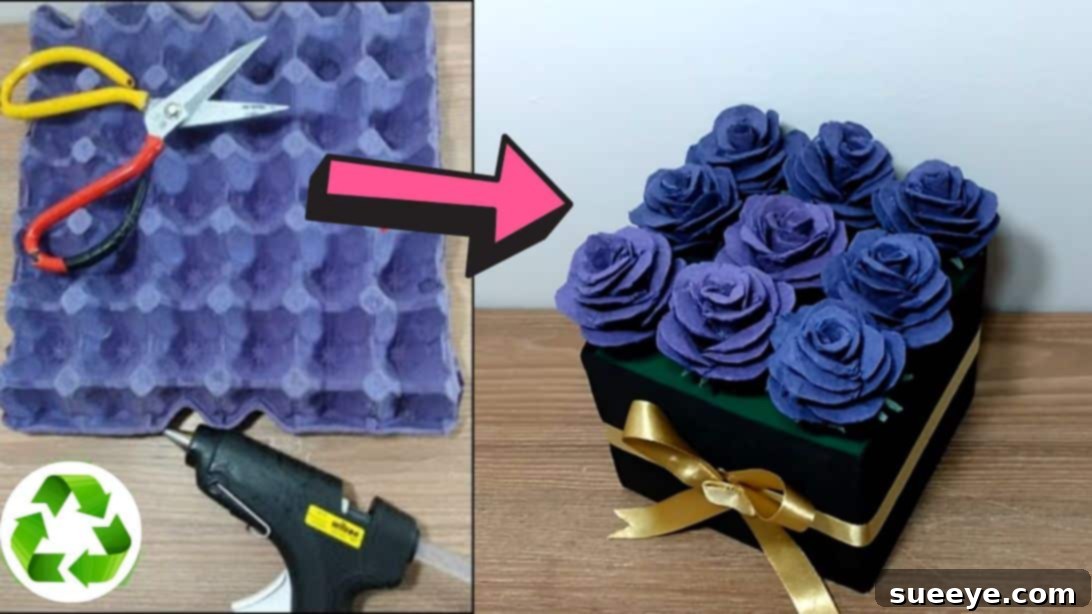
Craft a Beautiful DIY Rose Box from Recycled Egg Cartons: An Eco-Friendly Gift Guide
Are you searching for a unique, heartfelt, and budget-friendly gift idea that truly stands out? Look no further! This incredible DIY rose box, ingeniously crafted from humble egg cartons, offers a delightful solution. It’s a creative and easy project perfect for anyone looking to make a lasting impression without breaking the bank. Inspired by the brilliant ideas from Innovando Ideas on Youtube, this craft transforms everyday recyclables into a stunning display of everlasting roses. Imagine the joy of presenting a loved one with a beautiful box of flowers that you’ve meticulously made with your own hands. Not only is it a thoughtful gesture, but it also champions sustainability by giving new life to discarded materials. Dive into this engaging project and create a gift that speaks volumes about your care and creativity.
This comprehensive guide will walk you through every step, from preparing your egg cartons to assembling your elegant rose box. Whether you’re a seasoned crafter or just starting, our clear instructions and helpful tips will ensure a successful and enjoyable experience. Get ready to unleash your inner artist and craft a gorgeous, eco-conscious gift that will be cherished for years to come.
Why Choose an Egg Carton Rose Box?
In a world often driven by consumerism, the appeal of handmade gifts is stronger than ever. A DIY egg carton rose box embodies several compelling benefits that make it an exceptional choice for any occasion:
- Eco-Friendly Crafting: Repurposing egg cartons significantly reduces waste, turning potential landfill material into something beautiful. This craft is a fantastic way to contribute to a greener planet by embracing the principles of recycling and upcycling.
- Budget-Friendly: One of the most attractive aspects of this project is its minimal cost. The primary material, egg cartons, is often readily available from your household recycling bin, making this a virtually free craft. The few additional supplies needed are inexpensive and widely accessible.
- Personalized and Heartfelt: Unlike store-bought flowers that wilt and fade, these handmade roses are a lasting symbol of your affection. The time and effort invested in creating this gift make it incredibly personal and convey a deep level of thoughtfulness that money simply cannot buy.
- Therapeutic and Rewarding: Crafting can be a wonderfully calming and meditative activity. The process of cutting, shaping, and assembling these roses can be a relaxing escape, offering a sense of accomplishment and pride once completed.
- Versatile Gifting: This rose box is suitable for a wide array of occasions. Be it Valentine’s Day, Mother’s Day, birthdays, anniversaries, or just a spontaneous gesture of appreciation, a handmade rose box is always a welcome and cherished present.
- Unique Home Decor: Beyond gifting, these beautiful rose boxes can serve as charming and unique decorative pieces for your own home, adding a touch of rustic elegance and handmade charm to any room.
Materials You’ll Need:
Gathering your supplies before you begin will ensure a smooth crafting experience. Here’s what you’ll need to create your stunning egg carton rose box:
- Colored Egg Cartons: Opt for sturdy paper-based egg cartons. Using blue and green cartons (as suggested) provides a lovely contrast for roses and leaves, but feel free to experiment with other colors or paint plain cartons for a custom look. You’ll need enough carton sections to create approximately nine roses, plus additional pieces for the sepals (the leaf-like structures under the flower).
- Precision Blade or Craft Knife: Essential for clean, intricate cuts. Always use with extreme caution on a protected surface.
- Scissors: For general cutting, especially for larger sections of the egg carton and felt paper.
- Small Box: This will be the base for your rose display. A sturdy cardboard box of a suitable size will work perfectly. Consider recycling a small gift box or product packaging.
- Green Felt Paper: For lining the bottom of your box, creating a lush, grassy base for your roses.
- Black Felt Paper: For covering the sides of your box, providing a sophisticated contrast. You can choose other colors to match your roses or decor.
- Hot Glue Gun and Glue Sticks: Your best friend for this project! Hot glue provides a strong, quick-drying bond, which is crucial for assembling the roses and securing them into the box.
- Ribbon: A decorative ribbon to wrap around the finished box, adding an elegant final touch. Choose a color that complements your roses and felt paper.
Step-by-Step Guide: Crafting Your Egg Carton Rose Box
Follow these detailed instructions to transform your simple materials into a beautiful, lasting gift.
Step 1: Preparing and Shaping Your Rose Petals
Begin by carefully separating the individual cups from your egg cartons. Using a blade, cut the egg carton into rows, then further cut each cup into individual pieces. Once you have your individual cup sections, use your scissors to trim away all long, sharp corners, smoothing them out. Now, with a keen eye and steady hand, cut each cup section into four distinct quadrants, moving from the outer edge inwards but stopping just before reaching the absolute center. This creates four basic petal shapes. The key here is not to cut through the very core, which will keep the petals attached. Gently curve each of these freshly cut petals outwards and slightly downwards. The goal is to give them a natural, soft appearance, mimicking the delicate curl of real rose petals. Repeat this process for all the egg carton pieces you intend to use for your roses; you’ll need several such pieces for each bloom.
Step 2: Assembling Your Egg Carton Roses
Now, let’s bring those petals to life! Take one of your prepared egg carton flower pieces. Gently press its petals outward to create an open base. Select one petal and carefully roll it tightly inwards to form the central bud of your rose. Apply a small dab of hot glue at its base to secure this rolled petal in place, ensuring it holds its shape. Next, apply a thin line of hot glue along the bottom half of the adjacent petals and carefully wrap them around the central rolled petal, overlapping slightly to build the rose’s core. Take another prepared egg carton piece and attach it to your budding rose by applying glue to its bottom half and wrapping it around the existing structure. Continue this layering process with additional flower pieces, ensuring that each new layer is offset from the previous one. This staggered arrangement is crucial for creating a natural, full, and voluminous rose. You’ll want to repeat this layering process approximately two to three more times per rose, adding more petals until you achieve a bloom of your desired fullness. Remember to vary the “opening” or arrangement of petals with each layer to mimic the organic growth of a real rose. Aim to create at least eight additional roses following this same meticulous process, so you have a total of nine beautiful blooms for your box.
Step 3: Crafting the Rose Sepals (Leaves)
To give your roses a more realistic and finished look, we’ll add sepals – the small, leaf-like structures that cup the base of a real rose. Take one of your green egg carton pieces. Cut this piece into four distinct sections, similar to how you started with the rose petals, but this time, you’ll be creating a different shape. From each of these four sections, cut out three pointy leaves. These leaves should be slender and sharp at the tips, reminiscent of actual rose sepals. You will need one set of these green sepals for each of the roses you’ve created, ensuring a consistent and natural appearance across your entire arrangement.
Step 4: Attaching the Sepals to Your Roses
With your sepals ready, it’s time to attach them to the base of your beautiful egg carton roses. Apply a generous amount of hot glue to the very bottom center of each rose, where all the petal layers converge. Carefully take one of your green sepal pieces and press it firmly onto the glued base. Ensure that the pointy leaves are facing downwards and outwards, naturally cradling the bottom of the rose bloom. Hold it in place for a few seconds until the glue sets. This step not only adds a touch of realism but also provides a neat finish to the base of each rose.
Step 5: Preparing and Covering Your Display Box
Now, let’s get the box ready to house your stunning roses. First, take your green felt paper and cut a piece that precisely matches the dimensions of the bottom of your small box. Securely glue this green felt piece onto the inside bottom of the box. This will create a vibrant, grass-like base for your roses. Next, measure the exact height and perimeter of the sides of your box. Using these measurements, cut a strip of black felt paper. When cutting, remember to add a small allowance (about half an inch) to the length, which will allow for a neat overlap when gluing, and a similar allowance to the height if you want the felt to slightly extend over the top edge for a softer finish. Carefully glue the black felt paper around the inner sides of the box, ensuring it sits flush against the green base and creating a smooth, dark border that elegantly frames your future floral display. The allowance added to the length ensures a seamless wrap around the box, hiding any raw edges.
Step 6: Arranging and Gluing Your Roses into the Box
With your box beautifully lined, it’s time for the grand arrangement! Carefully plan the layout of your roses within the box. A classic and aesthetically pleasing arrangement is a grid of three rows and three columns, totaling nine roses. Begin by placing the roses in their desired positions without glue to ensure even spacing and a balanced look. Once you’re satisfied with the arrangement, start gluing them into place one by one. Apply a generous dollop of hot glue to the bottom of each rose (where the sepals meet) and firmly press it onto the green felt base. Hold each rose in place for a few seconds until the glue sets completely. Take care to align them neatly within your chosen grid, creating a dense and visually appealing floral arrangement that fills the box.
Step 7: The Finishing Touch: Adding the Ribbon
To complete your elegant rose box, add a decorative ribbon. Wrap your chosen ribbon around the perimeter of the box, securing it with a small dab of hot glue at the back or underneath the box to prevent it from slipping. You can tie a simple knot or a beautiful bow on the top or front of the box, depending on your preference and the ribbon style. This final touch adds a sophisticated flair, making your DIY egg carton rose box truly gift-ready and exquisitely presented. And just like that, your unique, handmade, and eco-friendly rose box is done!
Tips for Success and Crafting Excellence
To ensure your egg carton rose box turns out perfect and your crafting experience is enjoyable, consider these helpful tips:
- Safety First: Always use a cutting mat when working with a blade or craft knife. Exercise extreme caution to prevent injury. If children are involved, adult supervision is paramount, and they should primarily handle scissors for safer cutting.
- Patience is Key: Crafting takes time and precision. Don’t rush the process, especially when cutting and shaping the petals. Small adjustments can make a big difference in the final look of your roses.
- Practice Makes Perfect: If you’re new to this type of crafting, consider practicing on a few egg carton pieces before tackling your main roses. This will help you get a feel for the material and the cutting/shaping techniques.
- Vary Your Petal Curls: For a more natural look, vary the degree to which you curve the petals. Some can be slightly open, while others are more tightly curled, mimicking the organic imperfections of real flowers.
- Experiment with Colors: While blue and green are suggested, don’t hesitate to use other colored egg cartons or even paint plain ones. Pastel colors create a softer look, while bolder hues make a dramatic statement. Acrylic paints work well for this purpose.
- Hot Glue Savvy: Use hot glue sparingly but effectively. Too much can create messy strings, while too little won’t provide a secure bond. A steady hand and quick application are beneficial.
- Ventilation: If you choose to paint your egg cartons, work in a well-ventilated area.
- Personalize Your Box: Beyond the ribbon, consider adding other embellishments to your box, such as small beads, glitter on the rose tips, or even a personalized tag.
Variations and Personalization Ideas
While the basic design is enchanting, there are numerous ways to customize your egg carton rose box to suit different tastes, occasions, or decorative themes:
- Different Flower Types: With practice, you might adapt the cutting and shaping techniques to create other simple flower types from egg cartons, such as daisies or poppies, for a mixed floral arrangement.
- Box Size and Shape: Experiment with different sizes and shapes of boxes. A long, rectangular box could house a row of roses, while a heart-shaped box would be perfect for Valentine’s Day.
- Scented Roses: Lightly spray your finished roses with a rose-scented essential oil or perfume to add an aromatic dimension to your gift.
- Glitter and Sparkle: Apply a touch of glitter glue or fine craft glitter to the edges of the rose petals for a whimsical, sparkly effect, especially suitable for celebratory occasions.
- Message in a Box: Tuck a small, handwritten note or a heartfelt message among the roses for an extra personal touch.
- Seasonal Themes: Create rose boxes with colors that match specific seasons or holidays. Reds and whites for Christmas, pastels for Easter, or oranges and browns for autumn.
- Gift Tags and Embellishments: Attach a charming handmade gift tag, or tie on a small charm or pendant with the ribbon for added decorative appeal.
Conclusion: The Enduring Beauty of Handmade Gifts
Crafting this DIY rose box from recycled egg cartons is more than just a simple project; it’s an opportunity to create something truly beautiful, meaningful, and sustainable. By following these detailed steps, you’ve transformed discarded materials into a stunning, everlasting bouquet that perfectly embodies thoughtfulness and creativity. This craft offers an unparalleled way to express your affection, celebrate special moments, or simply add a touch of handmade charm to your home decor. The joy of giving or receiving such a personalized, eco-friendly gift is immense, far surpassing the fleeting pleasure of conventional flowers. So, embrace the spirit of repurposing, unleash your inner artist, and delight in the knowledge that you’ve created a masterpiece that is as kind to the planet as it is to the heart. We hope you enjoyed this journey into creative recycling and are inspired to craft many more beautiful things!