
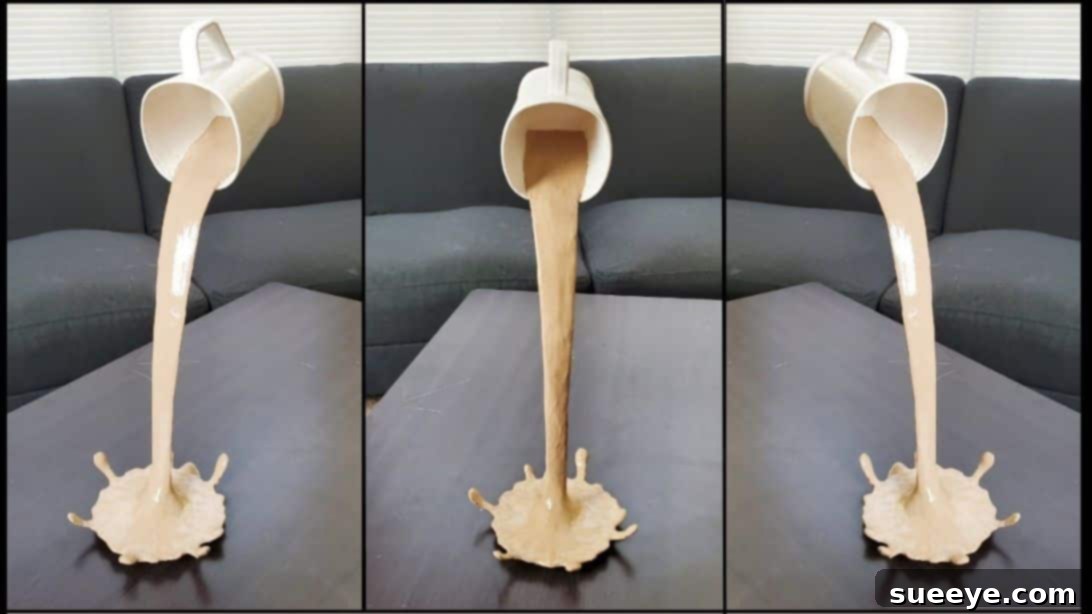
Craft Your Own Enchanting Floating Coffee Cup: A Unique DIY Home Decor Project
For many of us, the day truly begins with that first comforting sip of coffee. It’s more than just a beverage; it’s a ritual, a moment of peace, and an essential part of our morning routine. Imagine capturing that magical moment, forever frozen in time, right on your living room table. This is precisely what a DIY floating coffee cup craft achieves—a stunning illusion of coffee pouring mid-air, creating an artistic and captivating centerpiece that celebrates your love for coffee.
Inspired by the ingenious design from Creative Cat, this project transforms simple materials into a conversation-starting piece of home decor. It’s an eye-catching way to add a touch of whimsy and creativity to any space, be it your kitchen, office, or a cozy reading nook. Whether you’re an experienced crafter or just starting your DIY journey, this comprehensive guide will walk you through every step of creating your very own floating coffee mug masterpiece, ensuring a smooth and enjoyable crafting experience.
Why Create a Floating Coffee Cup? Unveiling the Benefits of This Unique Decor
Beyond its undeniable aesthetic appeal, crafting a DIY floating coffee cup offers a plethora of benefits, making it an ideal project for any home decor enthusiast or aspiring artist. Firstly, it provides an incredible opportunity for personalization. While we provide a standard design, you can easily adapt the colors, mug style, and even the “spill” pattern to perfectly match your home’s interior design or reflect your unique personality. Imagine a rustic-themed cup for a farmhouse kitchen or a sleek, modern design for a minimalist living room.
Secondly, this project is remarkably budget-friendly. Many of the required materials, such as metal wire from an old hanger or tissue paper, are likely items you already have around the house or can source for very little cost. This makes it an excellent alternative to expensive store-bought decorations, allowing you to achieve a high-end look without breaking the bank. Furthermore, the act of creating something with your own hands is incredibly rewarding. There’s a distinct sense of pride and accomplishment that comes with displaying a piece you’ve crafted yourself, making your home feel even more personal and inviting.
Finally, a handmade floating coffee cup serves as an exceptional and thoughtful gift. Birthdays, housewarmings, or holidays—this unique item is sure to delight any coffee lover or anyone who appreciates quirky, artistic decor. It’s a gift that speaks volumes about your creativity and care, making it far more meaningful than a generic store-bought item. Dive into this project and discover not only a beautiful piece of decor but also the joy of creation.
Essential Materials for Your Floating Coffee Cup Masterpiece
Gathering all your materials before you begin is key to a smooth crafting process. Most items are easily found at hardware stores, craft shops, or even repurposed from around your home. Here’s a detailed list:
- Metal Wire: A sturdy yet pliable wire is crucial for forming the structure. An old clothes hanger is an excellent and eco-friendly option, providing sufficient rigidity.
- Masking Tape: Used for covering the wire and sealing edges. Choose a good quality tape that adheres well.
- Plastic Bowl: This will serve as the base for your “coffee spill.” Ensure it’s a size that complements your mug.
- Plastic Mug: The star of the show! Select a mug you like, keeping in mind its weight and design.
- Plaster of Paris: This quick-setting plaster will be used to create the weight in the base and the texture of the spilling coffee. You can find it at most craft or hardware stores.
- Craft Glue (White Glue): Standard PVA glue is perfect for mixing with tissue paper and water.
- Hot Glue and Hot Glue Gun: Essential for strong, instant bonds, especially for attaching the wire to the bowl and mug.
- Beige Acrylic Paint: To give your “coffee” its realistic color. You might also want brown or white for custom shading.
- Varnish: A clear sealant to protect your paintwork and give it a polished finish.
- Tissue Paper: Used to create a textured, durable surface over the wire structure. White or light-colored tissue paper works best.
- Thick Paper (Cardstock): For forming the initial shape of the coffee spill. Cereal boxes or craft cardstock are suitable.
Necessary Tools for Precision and Safety
Having the right tools at hand makes all the difference in a DIY project, ensuring both efficiency and safety.
- Pliers: Indispensable for bending and shaping the metal wire accurately.
- Marker: For drawing your coffee spill design onto the plastic bowl and thick paper.
- Blade or Craft Knife: For carefully cutting the plastic bowl and thick paper. Always use with extreme caution.
- Safety Gloves: Absolutely essential when working with a blade, hot glue, and plaster of Paris to protect your hands.
- Paint Brush: For applying the glue mixture and acrylic paint evenly.
- Mixing Container and Stirring Stick: For preparing plaster of Paris and glue mixtures.
Preparation and Safety First: Setting Up for Success
Before diving into the creative process, take a moment to prepare your workspace and prioritize safety. Lay down newspaper or a protective sheet to prevent spills and messes, especially when working with paint and plaster. Ensure good ventilation, particularly when using varnish. Always wear your safety gloves when handling sharp tools like the blade or when mixing plaster of Paris, as it can be drying to the skin. Keep all tools organized and within reach to maintain focus and efficiency throughout the project.
Step-by-Step Instructions: Crafting Your Floating Coffee Cup
Now, let’s bring this captivating floating coffee cup to life! Follow these detailed instructions carefully to ensure a beautiful and stable finished product.
Step 1: Preparing the Metal Wire Foundation
Begin by taking your chosen metal wire, such as a straightened clothes hanger. Cover the entire length of the wire with masking tape. This step is crucial for two reasons: it provides a better surface for subsequent materials to adhere to, and it adds a slight thickness, making the wire easier to work with. Once covered, use your pliers to carefully bend one end of the wire at a precise 90-degree angle. This bend will form the initial attachment point to the base and determine the angle of your floating cup, so ensure it’s sturdy and well-formed.
Step 2: Designing the Coffee Spill Base
Flip your plastic bowl upside down. Using your marker, carefully draw the shape of spilled coffee onto the bowl’s surface. Think about how coffee would naturally drip and spread. You can replicate the design shown in the accompanying image or get creative and alter the design to make some drips longer or shorter, adding a unique touch to your project. This will be the foundational shape for your cascading coffee, so take your time to achieve a pleasing form.
Step 3: Cutting and Attaching the Base
With your safety gloves securely on, carefully use a blade or craft knife to cut out the coffee spill shape you just drew on the plastic bowl. Exercise extreme caution during this step to avoid injury. Once the shape is cut, flip it over. Apply a generous amount of hot glue to the center of the cut-out shape and firmly press the bent end of your metal wire (from Step 1) into the hot glue. Hold it in place until the glue sets completely, ensuring a strong and stable connection. This forms the initial structure of your floating effect.
Step 4: Strengthening the Coffee Spill Base
Prepare a mixture of white glue and water, diluted to a consistency that is easy to brush but not too watery. Tear tissue paper into small, manageable pieces. Begin covering the entire plastic coffee spill shape with these tissue paper pieces, applying the glue-water mixture over them with your brush. This technique, similar to papier-mâché, will add strength, texture, and a smoother surface for painting later. Work slowly, flattening out any wrinkles or bubbles as you go, creating a uniform and sturdy base.
Step 5: Shaping the Spilling Coffee Effect
Take your thick paper or cardstock. Draw two identical shapes resembling thin, elongated coffee drips, ensuring each piece is approximately the same length as your metal wire. These pieces will form the sides of your spilling coffee. Carefully cut them out. Now, using hot glue, attach one of these thick paper shapes to each side of the metal wire, creating a hollow channel. Once secured, use masking tape to seal the edges of these paper pieces to the wire and to each other, creating a slim, cohesive spill effect. This forms the three-dimensional “stream” of coffee.
Step 6: Creating a Stable Base
In a mixing container, prepare a small batch of plaster of Paris according to the package instructions, ensuring a thick but workable consistency. Apply this mixture to the bent wire section at the bottom, creating a substantial, heavy base. This will be the foundation that allows your entire floating cup structure to stand upright. Shape and smoothen the plaster with your hands (wearing gloves!), ensuring it’s wide and heavy enough to provide excellent stability. Let it dry completely before proceeding.
Step 7: Anchoring the Mug
Carefully insert the other, unbent end of the metal wire into the plastic mug. Position it so that the mug appears to be floating just above the “spill.” Once satisfied with the placement, pour some of your plaster of Paris mixture into the mug, surrounding the wire. Level the plaster with the top edge of your thick paper spill, ensuring the wire is firmly encased. This step is critical for holding the mug securely in its “floating” position. Allow the plaster to fully cure and harden.
Step 8: Texturizing and Strengthening the Spill
Prepare a new mixture of plaster of Paris, this time adding a small amount of craft glue to the water before mixing in the plaster powder. The glue will improve the adhesion and flexibility of the plaster. Apply two even coats of this mixture to the entire spill structure (the plastic bowl piece and the thick paper stream), but carefully avoid applying it to the mug itself. This will further strengthen the structure, create a unified texture, and prepare it for painting. Allow each coat to dry thoroughly.
Step 9: Painting and Finishing Touches
Once all the plaster is completely dry, it’s time to bring your coffee spill to life with color. Use beige acrylic paint to cover the entire spilling part, aiming for a consistent “coffee” shade. You can add a touch of brown for a darker roast or white for a creamier look, depending on your preference. Allow the paint to dry completely. Finally, apply a coat of clear varnish over the painted areas. The varnish will protect the paint, provide a subtle sheen, and give your floating coffee cup a professional, finished appearance. Let the varnish dry according to product instructions.
Customization Ideas: Make It Uniquely Yours
The beauty of DIY lies in customization! Consider these ideas to personalize your floating coffee cup. Experiment with different mug designs—a rustic ceramic mug, a sleek modern one, or even a whimsical novelty cup. Change the “coffee” color; perhaps a frothy cappuccino with a touch of white paint, or a dark espresso with deeper browns. Add small embellishments like miniature coffee beans, tiny cinnamon sticks, or even a small faux pastry attached to the base to enhance the cafe aesthetic. You could also paint the base to mimic a wooden coaster or a patterned tablecloth, making it blend seamlessly with your existing decor.
Display and Maintenance Tips
Once your enchanting floating coffee cup is complete and fully dry, finding the perfect spot to display it is the next step. It makes a fantastic centerpiece for a coffee table, a unique accent on a bookshelf, or a charming addition to your kitchen counter. To maintain its pristine condition, simply dust it regularly with a soft cloth or a feather duster. Avoid using harsh chemical cleaners, as these might damage the paint or varnish. Handle it gently, especially around the “floating” section, to ensure its longevity. This handmade piece is designed to be a durable and delightful addition to your home for years to come.
Conclusion: Celebrate Your Crafty Achievement
Congratulations! You’ve successfully crafted an eye-catching and truly unique DIY floating coffee cup. This project is more than just an assembly of materials; it’s a testament to your creativity, patience, and ability to transform ordinary objects into extraordinary works of art. Each time you glance at this whimsical piece, you’ll be reminded of the joy of creation and the magic of a perfect cup of coffee. It’s a wonderful way to infuse your home with personality and a touch of the unexpected, inviting smiles and sparking conversations. Enjoy your beautiful, handmade floating coffee mug, a delightful symbol of your passion for craft and coffee alike!