
DIY Easter Centerpiece: Effortless Charm on a Budget with Dollar Store Finds
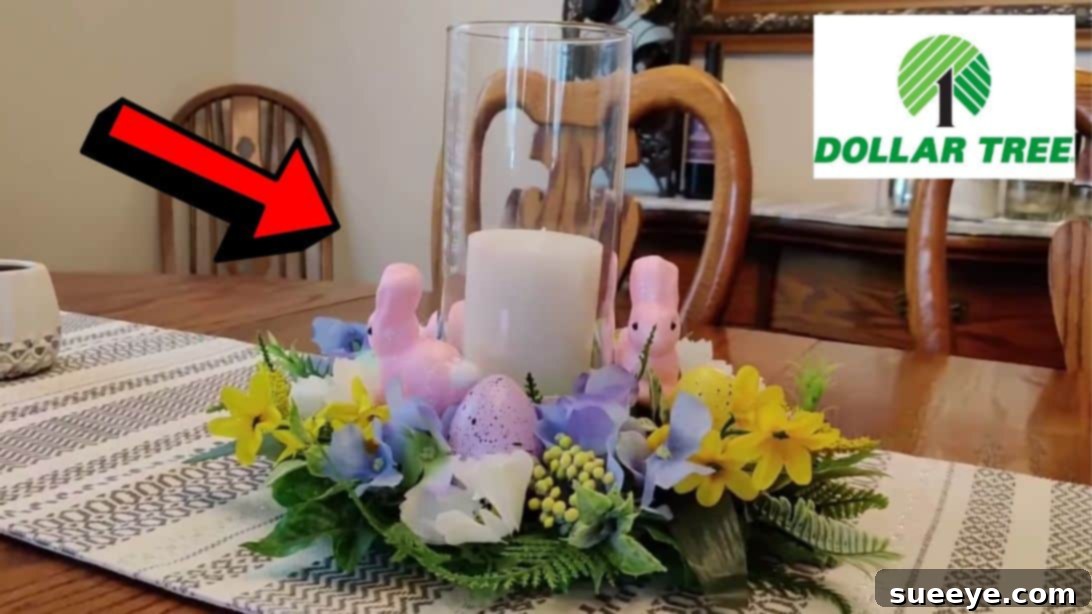
As Easter approaches, many of us start dreaming of vibrant spring decorations and delightful family gatherings. The centerpiece often becomes the focal point of our festive table, setting the mood for the entire celebration. If you’re still searching for that perfect decorative touch, something that’s both beautiful and won’t break the bank, then you’re in for a treat! This incredible DIY Easter centerpiece idea, originally shared by Michelle Smith Creations on YouTube, offers an ideal solution. It’s crafted entirely from affordable items sourced from your local Dollar Store, making it an incredibly budget-friendly project. What’s even better? It’s so simple and quick to assemble that you can have it ready in just a few minutes, transforming your table into a welcoming Easter display.
This charming decor piece radiates fun and festivity, perfectly capturing the spirit of the occasion. It’s a fantastic way to add a personal, handmade touch to your Easter celebrations without the stress of complex crafting. If you happen to have any leftover craft supplies from previous projects, feel free to incorporate them – it’s an excellent opportunity to save even more money and make your centerpiece truly unique. Dive into the detailed tutorial below to learn exactly how to create this enchanting DIY masterpiece. We’re confident you’ll adore this easy Easter centerpiece as much as we do. Get ready to enjoy the creative process and the beautiful outcome!
Why Choose This Dollar Store Easter Centerpiece?
In the world of holiday decorating, finding projects that combine affordability, simplicity, and aesthetic appeal can be a challenge. This DIY Easter centerpiece excels on all fronts. First and foremost, its reliance on Dollar Store materials means you can achieve a high-end look without a hefty price tag. This makes it an accessible craft for everyone, from seasoned crafters to beginners looking for a rewarding project. Secondly, the design is inherently versatile. While designed for Easter, its core elements can be adapted for general spring decor, allowing you to enjoy your creation beyond the holiday weekend. Imagine the satisfaction of telling your guests that your stunning table decoration was made with your own hands and cost very little!
Beyond the cost and ease, this centerpiece offers immense potential for personalization. You’re not just following a guide; you’re creating an item that reflects your personal style. Whether you prefer pastel hues, vibrant colors, or a more rustic aesthetic, the basic structure serves as a canvas for your creativity. It’s also a fantastic activity for families, providing an engaging way to spend time together while making something beautiful. This project isn’t just about decorating; it’s about crafting memories and adding a personal touch to your home that store-bought items simply can’t replicate.
Materials for Your Charming DIY Easter Centerpiece
Gathering your materials is the first exciting step in bringing your vision to life. The beauty of this project lies in its simplicity and the accessibility of its components. Most items can be found at your local Dollar Store, craft store, or even around your home if you’re a keen crafter. Here’s a detailed list of what you’ll need to create your own delightful Easter centerpiece:
- 1 wreath form, approximately 8 inches: This will serve as the foundational ring for your floral and egg arrangements, providing structure and a base for wrapping.
- 1 roll of dark green burlap ribbon: Burlap adds a lovely rustic texture and a natural, earthy feel, perfectly complementing spring themes. Choose a shade of green that evokes fresh foliage.
- 3-4 stems of artificial greenery: Look for realistic-looking leaves or small branches to provide a lush backdrop for your flowers and eggs. Variety in leaf shape can add depth.
- 3-4 stems of artificial florals: Select flowers that resonate with the Easter or spring palette. Think soft pastels like lavender, yellow, pink, or crisp whites. Small blossoms or clusters work best.
- 1 pack of decorative Easter eggs: Lightweight, colorful plastic or foam eggs are perfect. Choose a mix of sizes and colors to add visual interest.
- 1 pack of rabbit picks: These adorable bunny figures on sticks will be the whimsical final touch, making your centerpiece unmistakably Easter-themed.
- 1 glass hurricane vase: This elegant piece will house your candle and serves as the central pillar around which the wreath will be arranged. Its clear design allows light to pass through beautifully.
- 1 candle, real or LED: A real pillar candle offers a traditional warm glow, while an LED candle provides a safe, flameless alternative, ideal for homes with children or pets.
- 1 pack of decorative sand: Sand placed inside the vase not only stabilizes the candle but also adds a clean, minimalist base and can be chosen to complement your color scheme.
- Hot glue gun and glue sticks: An essential tool for securing all your elements firmly in place, ensuring your centerpiece is durable.
- Scissors: For cutting ribbon and any packaging.
- Wire cutters: Handy for trimming the stems of artificial greenery and florals to your desired length.
Remember, the beauty of DIY is flexibility. Don’t hesitate to substitute items if you find something similar or even more inspiring at the Dollar Store! For instance, if you can’t find burlap, a simple green fabric ribbon would work just as well. The goal is to have fun and create something that brings joy to your home.
How to Make Your Easy DIY Easter Centerpiece: Step-by-Step Guide
Step 1: Preparing the Wreath Base with Burlap Ribbon
Begin by taking your 8-inch wreath form. For easier wrapping, it’s often helpful to flip the wreath over so that the side you intend to be the ‘front’ is facing down. This allows you to start securing the ribbon on the less visible side. Take one end of your dark green burlap ribbon and wrap it securely around the two innermost wires of the wreath form. Apply a dab of hot glue to firmly hold the ribbon in place. Allow a moment for the glue to dry completely before proceeding, ensuring a stable starting point.
Once the initial attachment is secure, start wrapping the ribbon around all three wires of the wreath form. As you wrap, overlap the ribbon slightly with each pass. This overlapping technique is crucial for achieving a full, continuous, and aesthetically pleasing coverage, preventing any gaps where the wreath form might show through. Maintain a consistent tension as you wrap to ensure an even appearance. Continue this process methodically until the entire wreath form is completely covered with the burlap ribbon. Finally, trim any excess ribbon and secure the end with another generous application of hot glue, pressing firmly until it sets. This burlap-covered base creates a beautiful, natural foundation for your Easter centerpiece.
Step 2: Setting the Stage – The Vase and Candle Assembly
Next, take your glass hurricane vase. Carefully pour the decorative sand into the vase. Once the sand is in, gently shake the vase from side to side to help the sand settle evenly and create a flat surface at the bottom. This even base is important for stabilizing your candle. Once the sand is leveled, place your chosen candle – whether a traditional pillar candle or a safe LED alternative – securely into the center of the sand. The sand will hold the candle upright and add a clean, minimalist aesthetic to the central element of your centerpiece.
Now, turn your attention to preparing the greenery and flowers. Using your wire cutters, begin by cutting individual stems off the main branches of your artificial greenery and florals. Once detached, trim these pieces into smaller, manageable lengths. The goal here is to create various sizes that will allow for a more dynamic and layered arrangement on your wreath. As demonstrated in the video tutorial by Michelle Smith Creations, having a mix of lengths will help you achieve a natural, organic look, rather than a flat, uniform appearance. This preparatory step ensures all your decorative elements are ready for easy arrangement.
Step 3: The Grand Assembly – Decorating Your Wreath and Final Touches
Now it’s time to bring all the elements together and create your festive display. Take your burlap-wrapped wreath and lay it flat with its right side facing up. This is your canvas for decoration. Begin by hot gluing your prepared leaves and flowers onto the burlap base. There’s no single ‘right’ way to do this – experiment with different arrangements until you achieve a look that you love. Start with the larger greenery pieces to establish the main shape, then fill in with the smaller sprigs and florals, creating depth and visual interest. Consider grouping some elements and spacing others for balance.
Once your greenery and florals are arranged to your satisfaction, start adhering the decorative Easter eggs. Space them evenly around the wreath, or create small clusters for a different effect. The hot glue will secure them firmly in place. After the wreath is adorned, carefully pick up the vase with the candle and sand. Gently place the decorated wreath over the top of the vase, sliding it down until it rests snugly around the base of the candle or the rim of the vase, depending on your preferred height. For the ultimate whimsical finish, take your rabbit picks and hot glue them strategically into the wreath. You can place them peeking out from the greenery, or have them standing upright to complete your charming Easter scene.
Customization and Personalization Tips for Your Easter Centerpiece
One of the most exciting aspects of DIY is the freedom to personalize. While Michelle Smith Creations provides a fantastic blueprint, feel free to let your creativity soar! Consider changing the color palette – instead of traditional pastels, why not try vibrant jewel tones for a bolder statement, or a monochromatic scheme for a sophisticated touch? You could also experiment with different types of flowers, perhaps incorporating unique spring blooms like tulips or daffodils (artificial, of course!) instead of generic florals.
Beyond colors and flowers, think about adding other small decorative elements. Tiny birds, miniature nests with speckled eggs, delicate faux butterflies, or even small ladybugs could enhance the spring theme. Ribbons in coordinating colors can be tied into bows and strategically placed around the wreath. For a more rustic appeal, you might intersperse small pieces of preserved moss or twine. If you’re celebrating with children, let them help pick out the eggs or small trinkets, making it a truly family-friendly project. The Dollar Store often has a treasure trove of seasonal items that can be repurposed, so keep an open mind as you browse!
Safety First: Important Considerations for Your DIY Project
While crafting is fun, safety should always be a priority. When using a hot glue gun, exercise caution to avoid burns. Always unplug the gun when not in use and keep it away from flammable materials. If you opt for a real candle in your hurricane vase, ensure it is always placed on a stable surface and never left unattended, especially around children or pets. Keep the flame away from any fabric or paper elements of your centerpiece. An LED candle is a wonderful alternative that eliminates fire risk entirely, offering peace of mind while still providing a lovely glow. Teach younger crafters about hot glue gun safety if they are participating.
Displaying and Enjoying Your Handmade Easter Decor
Your beautifully crafted Easter centerpiece isn’t just for the dining table! Consider placing it on a coffee table in your living room, on an entryway console to greet guests, or even as a cheerful accent on a kitchen island. The soft glow of the candle, combined with the vibrant spring elements, will bring a warm and inviting atmosphere to any space. To maintain its beauty, simply dust it gently with a soft cloth as needed. Since all components are artificial, there’s no need for watering or special care, allowing you to enjoy your creation for many Easters to come.
Conclusion: Your Perfect Easter Centerpiece Awaits
Crafting a memorable and festive Easter centerpiece doesn’t have to be complicated or expensive. With this brilliant DIY project from Michelle Smith Creations, you can easily create a stunning focal point for your holiday table using budget-friendly Dollar Store finds. It’s an enjoyable activity that yields beautiful results, allowing you to infuse your home with personalized charm and the joyful spirit of spring. So gather your materials, follow these simple steps, and prepare to impress your guests with your handmade masterpiece. Happy Easter and happy crafting!
*All image credit belongs to Michelle Smith Creations via YouTube. Follow and subscribe to her channel for more inspiring DIY projects!