
Recycle & Create: DIY Dandelion Art with Toilet Paper Rolls – An Easy & Fun Craft for All Ages
In a world increasingly focused on sustainability and mindful consumption, finding creative ways to repurpose everyday items has become more than just a hobby; it’s a lifestyle. Among the myriad of household items often discarded without a second thought, the humble toilet paper roll stands out as a surprisingly versatile material for countless craft projects. While toilet paper itself might be a topic of frequent discussion, especially in recent times, the sturdy cardboard core offers an incredible canvas for imagination. This guide will delve into one such captivating project: transforming these overlooked cylinders into enchanting dandelion paintings.
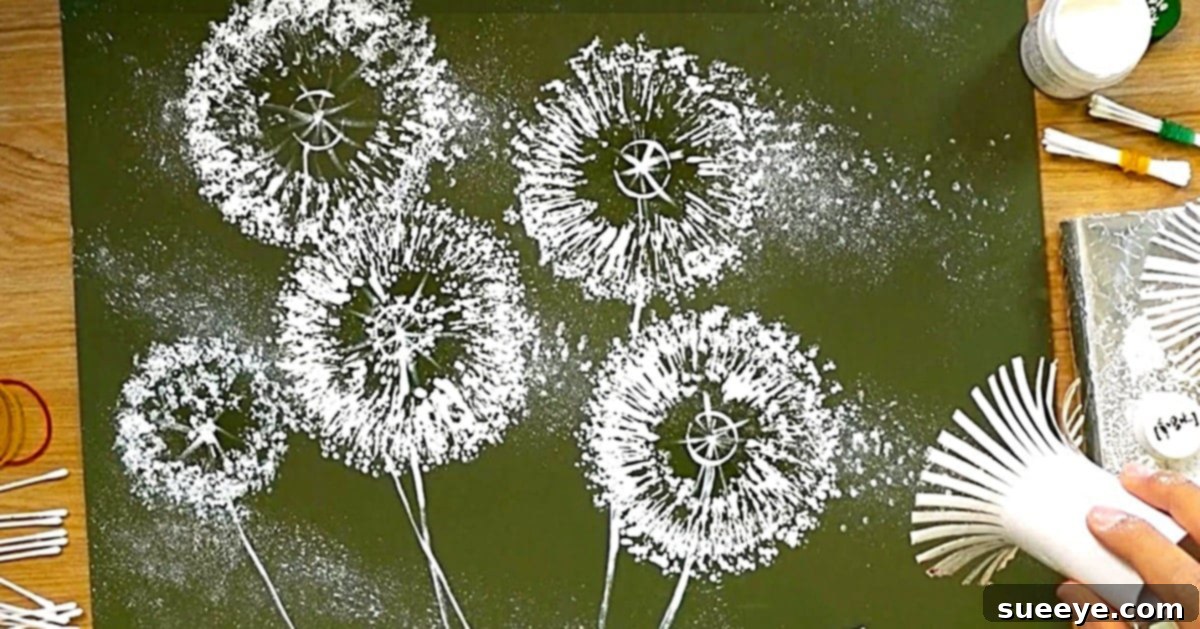
Dandelions, with their cheerful yellow blooms and whimsical seed heads, symbolize hope, resilience, and the beauty of wishes taking flight. Capturing their delicate form on canvas might seem like a task for skilled artists, but thanks to an ingenious stamping technique utilizing toilet paper rolls, anyone can create stunning dandelion art. This particular method, popularized through various craft communities, simplifies the process, making it accessible and enjoyable for crafters of all skill levels, including children. Imagine vibrant white dandelions blooming against a rich red background in your kitchen, or a field of yellow dandelions gracing your living room wall – all crafted with materials that cost next to nothing.
This project isn’t just about creating a beautiful piece of art; it’s an opportunity to engage in a rewarding, eco-friendly activity that promotes creativity and resourcefulness. It’s perfect for a rainy afternoon activity with kids, a relaxing solo craft session, or even a unique gift idea. The simplicity of the technique, combined with the readily available materials, makes it an ideal choice for anyone looking to add a touch of handmade charm to their home without breaking the bank. Let’s gather our supplies and embark on this delightful journey of turning trash into treasure, one dandelion stamp at a time.
Gather Your Creative Arsenal: Materials for Your Dandelion Art
One of the most appealing aspects of this dandelion painting project is how accessible and inexpensive the required materials are. You likely have most, if not all, of these items already in your home, making it a perfect spontaneous craft. Opting for recycled materials like toilet paper rolls further enhances the project’s eco-friendly appeal, turning potential waste into wonderful art. Here’s what you’ll need to get started:
- Empty Toilet Paper Rolls: These are the stars of our show! Collect a few of them, as you might want to experiment with different sizes or create multiple stamps. Their cylindrical shape and cardboard flexibility are key to forming the dandelion petals.
- Scissors: A good pair of sharp scissors is essential for cutting the fringe on your toilet paper rolls. Safety scissors can be used for children, with adult supervision for finer cuts.
- Poster Paint: Acrylic craft paint also works wonderfully. Choose colors that evoke the essence of dandelions. Traditional white for the seed heads against a darker background (like red, blue, or green) creates a striking contrast. For blooming dandelions, a bright yellow is perfect. Experiment with different shades to add depth to your artwork.
- Cotton Wool (or cotton balls/squares): These are ideal for creating the delicate, fluffy “dandelion dust” or seeds that float away from the main flower. Their soft texture allows for a gentle, dispersed paint application.
- Poster Board: This will be your canvas. White poster board is a versatile choice, but you can also use colored boards to create interesting background effects. Other alternatives include thick cardstock, canvas panels, or even repurposed cardboard boxes for a truly upcycled project.
- Q-Tips (Cotton Swabs): Essential for adding intricate details, especially for the “flying seeds” or small stems. Their precise tip allows for controlled application of paint.
- Aluminum Foil (for paint palette, a plastic plate would also work): Any non-absorbent surface can serve as your palette. Aluminum foil is great because it’s disposable and easily moldable, while a plastic plate can be washed and reused. Old ceramic tiles or even waxed paper are also viable options.
- Optional: Paint Stirring Sticks (for framing): If you decide to frame your artwork, free paint stirring sticks from hardware stores are a fantastic, budget-friendly option. They can be painted or left natural for a rustic look.
- Optional: Hot Glue Gun & Glue Sticks: For attaching frames or other embellishments securely. Always use with adult supervision.
- Optional: Paintbrushes: While the core technique relies on stamping, small paintbrushes can be useful for adding green stems, leaves, or touching up details.
- Optional: Old Newspaper or Plastic Sheeting: To protect your work surface from paint splatters, especially when crafting with children.
Step-by-Step Guide: Crafting Your Dandelion Masterpiece
Creating your dandelion painting is a wonderfully therapeutic and enjoyable process. Follow these detailed steps to bring your vision to life, turning simple toilet paper rolls into a charming work of art. Remember, there’s no right or wrong way to be creative, so feel free to adapt these instructions to suit your style.
Step 1: Preparing Your Workspace and Materials
Before you dive into the painting, ensure your creative station is ready. Lay down old newspapers, a plastic tablecloth, or any protective sheeting to shield your table from paint. Gather all your materials within easy reach. If working with children, explain the steps clearly and ensure they have appropriate supervision, especially when using scissors or a hot glue gun.
Step 2: Transforming the Toilet Roll into a Dandelion Stamp
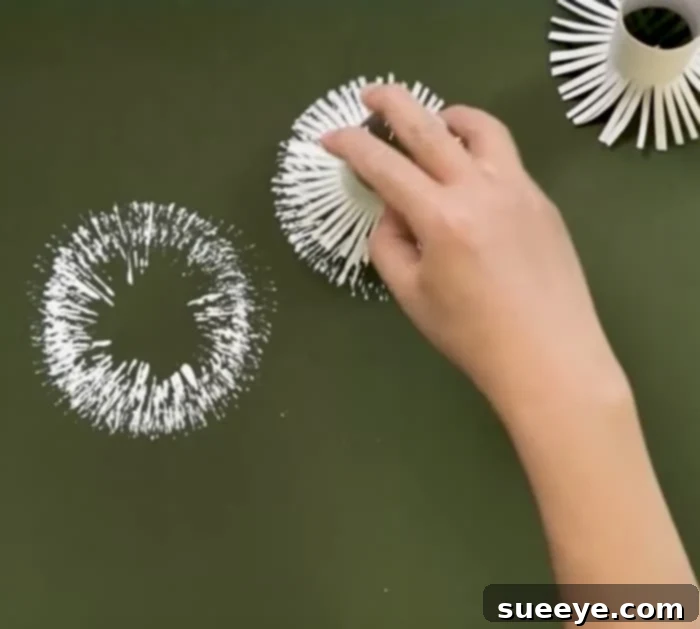
This is where the magic begins! Take one of your empty toilet paper rolls. Using your scissors, carefully cut a fringe at one end of the roll. The cuts should be about 1 to 1.5 inches deep, depending on the desired size and density of your dandelion petals. Make these cuts fairly close together, about 1/4 inch apart. The more cuts you make, the fuller and more intricate your dandelion will appear. Once you’ve cut all around the circumference, gently splay out the fringed strips outwards. This will create a flower-like shape, ready for stamping. You can gently bend some fringes inwards or outwards to create a more organic, less uniform look.
Step 3: Setting Up Your Paint Palette
Prepare your paint palette. If using aluminum foil, tear off a piece and fold up the edges slightly to create a shallow well. If using a plastic plate, you’re all set. Squeeze a small amount of your chosen poster paint (e.g., white for seed heads, yellow for blooms) onto your palette. You don’t need a lot of paint at once; you can always add more. For best stamping results, the paint should be just deep enough to cover the tips of your toilet roll fringes without submerging the entire cut section. If your paint is too thick, you can add a tiny drop of water to thin it slightly, but be careful not to make it too watery, as this can lead to bleeding.
Step 4: Stamping the Main Dandelion Heads
Now, it’s time to create your dandelions! Gently dip the fringed end of your prepared toilet paper roll stamp into the paint on your palette. Ensure an even coating on all the fringe tips. Lightly blot off any excess paint on the edge of your palette if needed. Then, firmly but carefully press the painted end onto your poster board. Apply even pressure and lift straight up. You should see a beautiful, symmetrical dandelion imprint! Repeat this process, re-dipping your stamp in paint for each new dandelion head. Experiment with placing your dandelions at different heights and angles on your poster board to create a dynamic composition. You can layer stamps slightly over each other for a fuller effect or create a cluster of dandelions.
Step 5: Adding the Whimsical Dandelion Seeds (Puffs)
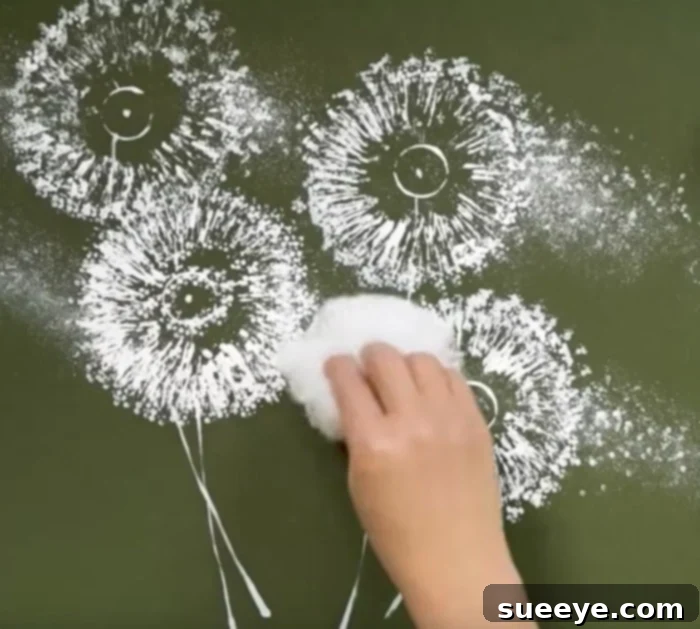
After your main dandelion heads are stamped and slightly dry, it’s time to add the iconic “dandelion dust” or floating seeds. This step adds movement and realism to your artwork. Dip a Q-tip lightly into a small amount of paint (the same color as your dandelions, usually white). Then, around your stamped dandelions, gently dot and dab the Q-tip on the poster board. Create small, irregular clusters and individual dots that appear to be floating away from the main flower. You can vary the pressure to create different sized dots. For a softer, cloud-like effect, you can also lightly dab with a small piece of cotton wool. Focus on creating a sense of upward or outward movement, as if the wind is carrying the seeds.
Step 6: Enhancing Your Art with Stems, Leaves, and Background Details (Optional)
While the stamped dandelions are beautiful on their own, adding a few extra details can elevate your artwork. Use a small paintbrush or another Q-tip dipped in green paint to create thin stems extending downwards from your dandelions. You can also paint simple dandelion leaves at the base of the stems. If you’re feeling adventurous, consider adding a subtle background color wash before you start stamping, or delicate clouds with a sponge for a sky effect. Allow all paint to dry completely before proceeding to any framing or handling.
Step 7: Framing Your Masterpiece (Optional)
Once your painting is completely dry, you might want to give it a finished look with a simple frame. As mentioned, paint stirring sticks are a fantastic, free option. Collect four sticks for a rectangular frame. You can paint them to match your artwork or leave them natural for a rustic charm. Arrange them around the edges of your poster board, overlapping at the corners. Use a hot glue gun to securely attach the sticks to the back or front edges of your poster board. Alternatively, you can use pre-made frames, or simply mount your poster board on a slightly larger, contrasting piece of cardstock for a subtle border.
Tips for Success and Creative Variations:
- Experiment with Colors: Don’t limit yourself to white dandelions. Try yellow dandelions on a blue “sky” background, or even whimsical purple or pink dandelions.
- Different Sized Rolls: Use paper towel rolls for larger dandelions or cut toilet rolls shorter for smaller ones.
- Layering: For more depth, stamp one color of dandelion, let it dry, then stamp a slightly different shade or a lighter touch over it.
- Greeting Cards: This technique is perfect for creating unique handmade greeting cards or gift tags.
- Fabric Stamping: With appropriate fabric paints, you could even stamp dandelions onto canvas bags, t-shirts, or tea towels!
- Add Glitter: For a touch of magic, sprinkle fine glitter onto the wet paint of your dandelion seeds before it dries.
The Joy of Upcycling: Why Toilet Roll Crafts Matter
This dandelion painting project is more than just a fun activity; it embodies the spirit of upcycling, a practice that transforms waste materials into new products of higher quality or environmental value. In an era where environmental consciousness is paramount, embracing crafts that utilize recycled materials offers numerous benefits:
- Environmental Impact: By repurposing toilet paper rolls, we divert waste from landfills, reducing our carbon footprint and conserving natural resources.
- Cost-Effectiveness: Recycled crafts are inherently budget-friendly, often requiring materials that would otherwise be thrown away, saving money on art supplies.
- Fostering Creativity: Working with unconventional materials encourages innovative thinking and problem-solving, pushing the boundaries of traditional art.
- Educational Value: For children, these projects teach valuable lessons about recycling, sustainability, and the endless possibilities of creative expression. It also helps develop fine motor skills, hand-eye coordination, and an understanding of cause and effect.
- Personal Satisfaction: There’s immense satisfaction in creating something beautiful and functional from items that were once considered trash. It instills a sense of accomplishment and pride.
Conclusion: Your Dandelion Journey Awaits!
From a simple empty cardboard tube to a charming piece of art, the transformation offered by this DIY dandelion painting project is truly delightful. It’s a testament to the power of imagination and the beauty of upcycling. Whether you’re a seasoned crafter or just looking for an easy, rewarding activity to do with your family, this project promises fun, creativity, and a beautiful result. So, the next time you finish a roll of toilet paper, think twice before tossing that cardboard core. Instead, gather your paints, unleash your inner artist, and let the whimsical beauty of dandelions bloom on your canvas. Happy crafting!