
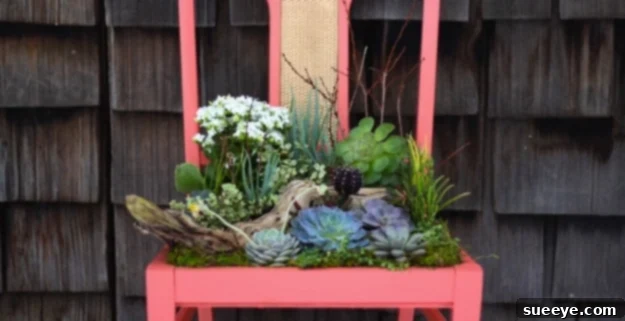
DIY Chair Planter: Transform Old Furniture into a Charming Succulent Garden
Are you looking for a creative, budget-friendly way to add a unique touch to your garden or patio? This comprehensive guide will show you how to give new life to a simple, forgotten chair by transforming it into a stunning planter for succulents or small plants. Embrace the beauty of upcycling and craft your very own bespoke garden feature in 14 easy, yet detailed, steps. It’s a rewarding project that combines sustainability with personal flair, perfect for adding a touch of green to any space.
Why Upcycle an Old Chair into a Planter?
In an age where environmental consciousness is paramount, upcycling offers a fantastic opportunity to reduce waste and contribute to a more sustainable lifestyle. An old chair, often destined for the landfill, possesses incredible potential to be reimagined into a beautiful and functional piece of garden art. This DIY chair planter project is more than just a craft; it’s a statement about creativity and sustainability.
- Eco-Friendly & Sustainable: By reusing an old chair, you divert waste from landfills, actively participating in a circular economy. This small act contributes positively to environmental conservation.
- Cost-Effective Garden Decor: Instead of purchasing expensive new planters, you can repurpose an item you already own, find at a thrift store, or even rescue from a curbside for minimal cost.
- Uniquely Personalized Aesthetic: Each upcycled chair planter is a one-of-a-kind creation, reflecting your personal style and adding an unparalleled charm that mass-produced items cannot replicate.
- Rewarding DIY Experience: There’s immense satisfaction in creating something beautiful and functional with your own hands. It’s a project that builds confidence and showcases your crafty side.
- Versatility for Various Plants: While perfect for succulents, this planter design is also suitable for small herbs, vibrant annuals, cascading trailing plants, or even a miniature fairy garden.
Choosing the Perfect Chair: The Foundation of Your Planter Project
The success and longevity of your chair planter largely depend on the initial selection of your chair. Not all chairs are suitable for outdoor transformation, so a careful choice is crucial. Here’s what to consider when hunting for your ideal foundation:
- Structural Sturdiness: Prioritize chairs that are stable and free from significant structural damage. Minor wobbles can often be fixed, but a chair with heavily rotted wood or severely bent metal might not be worth the effort.
- Material Matters:
- Wood Chairs: Excellent choices due to their ease of modification and rustic appeal. Opt for solid wood over particle board or veneer, as solid wood handles outdoor elements (especially moisture) much better.
- Metal Chairs: Can also be transformed, but require proper rust treatment and weather-resistant paint to prevent corrosion.
- Avoid: Chairs made from particle board, MDF, or cheap veneer are generally unsuitable for outdoor use as they will quickly swell and disintegrate when exposed to moisture.
- Design & Style: Consider the existing aesthetic of your garden or home. A vintage wooden chair can evoke a charming country cottage feel, while a minimalist metal chair might suit a modern outdoor space. The chair’s backrest design can become a beautiful backdrop for your plants.
- Seat Condition: The condition of the original seat is less critical, as it will be removed or significantly altered. Focus instead on the integrity of the chair’s frame that supports the seat.
Pro Tip: Excellent sources for affordable chairs include garage sales, flea markets, thrift stores, online marketplaces, or even forgotten pieces in your own attic or garage!
Gather Your Essential Tools and Materials
Before you embark on your DIY journey, ensuring you have all the necessary tools and materials at hand will streamline the process and prevent interruptions. Being prepared is key to a smooth and enjoyable project.
Materials You’ll Need:
- One Old Chair: (Wood or metal, as chosen above).
- Potting Mix: A well-draining soil, specifically a succulent and cactus mix if you plan to plant succulents. Otherwise, a good quality all-purpose potting soil for other plants.
- Succulents or Small Plants: Select varieties that suit your climate and desired aesthetic. Consider their mature size and sun requirements.
- Drainage Layer: Gravel, small river stones, lava rocks, or broken terracotta pot shards (approx. 1-2 inches deep).
- Landscape Fabric or Weed Barrier Cloth: Crucial for lining the planter and keeping soil contained while allowing water to pass.
- Outdoor-Grade Paint or Sealant: (Optional but highly recommended) Choose a color that complements your space or a clear sealant to preserve the natural wood.
- Sandpaper: Assorted grits (e.g., 80-grit for stripping, 120-grit for smoothing, 220-grit for finishing).
- Wood Filler: For filling any cracks, holes, or imperfections in wooden chairs.
- Wood Glue: For reinforcing wobbly joints on wooden chairs.
- Small Screws or Nails: For reinforcing the chair frame or attaching support elements.
Tools for the Job:
- Jigsaw or Hand Saw: For carefully cutting out the seat opening.
- Drill with Bits: Essential for drilling pilot holes and drainage holes.
- Staple Gun and Staples: For securely attaching the landscape fabric.
- Measuring Tape or Ruler and Pencil/Marker: For accurate measurements and marking cuts.
- Protective Gear: Safety glasses, work gloves, and a dust mask are non-negotiable for safety.
- Paintbrushes or Rollers: If you choose to paint your chair.
- Screwdriver or Wrench Set: For tightening existing fasteners or disassembling parts of the chair.
- Clamps: Useful for securing glued joints while they dry.
14 Easy Steps: Crafting Your Stunning Chair Planter
Follow these detailed instructions to transform your chosen chair into a beautiful, living garden feature. Take your time with each step for the best results.
Step 1: Thoroughly Inspect and Repair the Chair
Begin by meticulously examining your chair for any structural weaknesses. Tighten all loose screws and bolts. For wooden chairs, apply wood glue to wobbly joints and clamp them securely, allowing ample drying time. Fill any visible cracks, chips, or holes with wood filler, sanding smooth once dry. A solid foundation is vital for your planter’s longevity.
Step 2: Clean and Prepare the Surface
Give the entire chair a thorough cleaning. Use warm soapy water and a stiff brush to remove all dirt, grime, cobwebs, and any flaking paint. Rinse well and allow the chair to dry completely. This step ensures proper adhesion for primer and paint.
Step 3: Sand the Chair for a Smooth Finish
Using sandpaper, prepare the chair’s surface. Start with a coarser grit (e.g., 80-120) to smooth rough areas and remove loose paint. Progress to a finer grit (e.g., 220) for a silky-smooth finish. This creates an ideal surface for primer and paint to bond, ensuring a professional look.
Step 4: Prime and Paint (or Seal) for Protection
Apply one or two coats of exterior-grade primer, especially if you’re changing the chair’s color significantly or working with unfinished wood. Once the primer is dry, apply two to three thin coats of outdoor-grade paint in your desired color, lightly sanding between coats if needed. If you prefer the natural wood look, apply a durable, weather-resistant sealant or varnish instead.
Step 5: Carefully Remove the Existing Seat
With the chair prepared, focus on the seat. Depending on its construction, you might need to unscrew it from underneath, pry off upholstery and padding, or cut away woven materials. The goal is to create an open cavity where the seat once was, exposing the interior frame.
Step 6: Define and Cut the Planter Opening
If the chair’s seat frame remains, you’ll need to create an opening. Measure and mark the desired shape (often a rectangle or square) on the frame, ensuring enough structural integrity remains. Use a jigsaw or hand saw to carefully cut along your marks, creating a clean-edged hole for your planting area. This opening should be large enough to accommodate your chosen plants.
Step 7: Reinforce the Planter Base (If Needed)
Depending on the size of your opening and the sturdiness of the remaining frame, you might need to add support. Attach thin wooden strips or a piece of sturdy wire mesh across the bottom of the opening using screws or a staple gun. This creates a more stable platform for your soil and plants.
Step 8: Drill Essential Drainage Holes
If you’ve added a solid wood base or if the chair frame provides a mostly solid bottom, drill several 1/2-inch to 1-inch diameter drainage holes through it. Proper drainage is absolutely crucial to prevent waterlogging and root rot, especially for succulents and other moisture-sensitive plants.
Step 9: Line the Planter with Landscape Fabric
Cut a piece of landscape fabric or weed barrier cloth to fit the entire opening of your chair planter, allowing for an overlap of several inches up the sides. Press the fabric into the opening, forming a deep basin. Secure the edges of the fabric to the chair frame using a staple gun, pulling it taut to create a neat, durable liner.
Step 10: Add a Crucial Drainage Layer
Pour a 1-2 inch layer of your chosen drainage material (gravel, small stones, or broken pottery shards) into the bottom of the fabric-lined planter. This layer further assists water drainage, preventing soil from compacting and roots from sitting in standing water.
Step 11: Fill with Appropriate Potting Mix
Carefully fill the lined planter with your selected potting mix. If you’re planting succulents, ensure it’s a well-draining succulent and cactus mix. Fill it to approximately one to two inches below the rim, leaving enough space for your plants.
Step 12: Arrange and Plant Your Succulents/Plants
Carefully remove your succulents or other plants from their nursery pots. Arrange them within the planter, considering their size, growth habits, and aesthetic appeal. Once satisfied with the layout, gently plant them into the soil, filling any remaining gaps with more potting mix. Lightly pat the soil around the base of each plant.
Step 13: Initial Watering and Placement
After planting, give your new chair garden a thorough watering. Observe to ensure water drains freely from the bottom. For succulents, allow the soil to dry out completely before the next watering. Place your finished chair planter in a location that provides the appropriate amount of sunlight for your specific plants.
Step 14: Enjoy and Provide Ongoing Care
Your unique chair planter is now complete! Regularly monitor your plants for watering needs, signs of pests, or disease. Trim dead leaves and rotate the planter occasionally to ensure even growth. With proper care, your upcycled creation will thrive and bring beauty to your space for many seasons to come.
Elevate Your Design: Creative Variations and Personal Touches
While a simple chair planter is charming, don’t hesitate to infuse more creativity into your design. Here are a few ideas to spark your imagination:
- Multi-Level Displays: If you have access to two or more chairs, consider arranging them at different heights or even carefully stacking smaller, sturdier chairs (ensuring safety) to create a dynamic, multi-tiered succulent display.
- Integrated Side Table: Attach a small wooden board or a repurposed shelf to one side of the chair. This creates a convenient spot for small gardening tools, a cup of coffee, or another decorative item, enhancing functionality.
- Themed Gardens: Go beyond just plants! Create a miniature “zen garden” with carefully placed pebbles and tiny succulents, or a whimsical “fairy garden” complete with tiny figurines and moss.
- Color Contrast: Use vibrant, contrasting colors for the chair frame against the natural greens of your plants. For instance, a bright turquoise chair can make green succulents truly pop.
- Cascading Beauty: Choose trailing succulent varieties like String of Pearls or Donkey’s Tail. As they grow, they will gracefully spill over the sides of the planter, adding lushness and movement to your design.
- Signage and Embellishments: Add a small, hand-painted sign with a whimsical quote, or attach decorative elements like small mirrors, rustic metal accents, or even repurposed ceramic pieces to the chair’s backrest.
Troubleshooting Common Chair Planter Issues
Even the most experienced DIY enthusiasts can encounter minor setbacks. Here are some common problems you might face with your chair planter and how to address them:
- Wobbly Chair: If the chair becomes wobbly over time, re-examine all joints. For wooden chairs, apply more wood glue and re-clamp. For metal chairs, check for loose bolts and tighten them securely. Adding small corner braces on the underside can provide extra stability.
- Poor Drainage Leading to Waterlogging: If water pools in your planter or drains too slowly, it’s a sign of inadequate drainage. Ensure the drainage holes are not blocked. You may need to add more holes or increase the thickness of your gravel layer beneath the soil. Consider elevating the chair slightly to improve airflow underneath.
- Plants Not Thriving: This can be due to several factors. Check if your plants are receiving the correct amount of sunlight. Overwatering is a common killer for succulents, so ensure the soil dries out completely between waterings. Also, consider the nutrient levels in your soil; a little plant food might be necessary.
- Paint Peeling or Fading: If your paint begins to peel, it often indicates insufficient surface preparation (Step 3). Ensure the chair is thoroughly cleaned, sanded, and primed before painting. For fading, the paint may not be truly outdoor-grade, or the chair receives extreme direct sun; consider a protective UV-resistant clear coat.
- Soil Erosion: If soil washes out through the drainage holes, your landscape fabric might have shifted or torn, or the drainage layer is insufficient. Re-secure the fabric or add a finer mesh between the gravel and the soil.
Embrace Sustainable Gardening and Your Unique Creation
Creating a DIY chair planter is far more than just a home decor project; it’s a meaningful step towards a more sustainable and environmentally conscious lifestyle. By taking an item that might otherwise be discarded and transforming it into something beautiful and functional, you’re actively reducing waste and championing the principles of reuse and upcycling. This project allows you to express your creativity while making a positive impact on the planet.
Your unique, handmade chair planter will serve as a conversation starter and a testament to your ingenuity. It’s a living piece of art that brings warmth, character, and a touch of green to any outdoor or indoor space. Enjoy the process, cherish the result, and take pride in your contribution to sustainable living through gardening!