
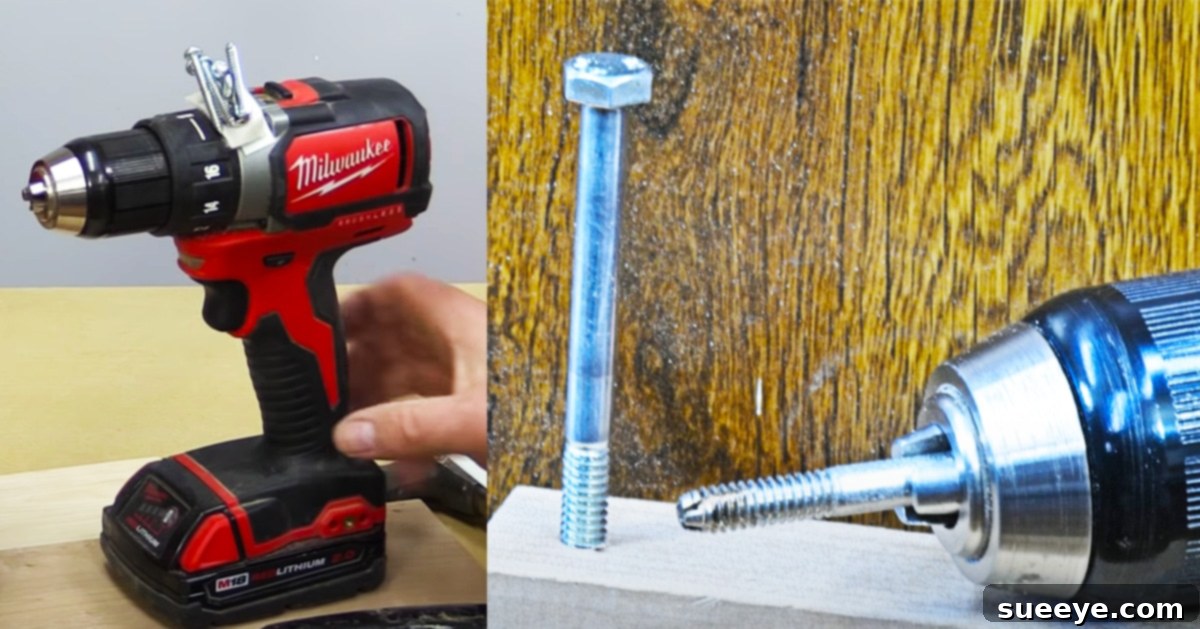
Master Your Cordless Drill: 6 Essential Hacks for DIY Enthusiasts
The cordless drill is arguably one of the most indispensable tools in any DIY enthusiast’s arsenal. From hanging shelves to assembling furniture, its versatility is unmatched. However, even seasoned crafters encounter frustrating challenges that can slow down progress or compromise the quality of their work. What if you could transform common annoyances into opportunities for efficiency and precision? This comprehensive guide, inspired by the brilliant insights from WoodWorkWeb, dives deep into 6 ingenious cordless drill hacks designed to elevate your DIY game, making your projects smoother, faster, and infinitely more enjoyable. Whether you’re a novice looking to build confidence or a veteran seeking smarter solutions, these tips and tricks will undoubtedly make your life a little bit easier in the workshop.
The Magnetic Holder: Keep Fasteners Close at Hand
One of the most common frustrations during any drilling or fastening task is fumbling for screws, bits, or small hardware. They inevitably roll away, get dropped, or simply disappear into thin air, costing valuable time and interrupting your workflow. The magnetic holder hack brilliantly solves this problem, ensuring your essential components are always within arm’s reach.
How to Implement This Hack:
This ingenious solution involves attaching a high-power magnet directly to the housing of your cordless drill. You can choose to permanently affix a strong neodymium magnet to the front housing using a robust adhesive like epoxy. Ensure the magnet is positioned in a spot that doesn’t interfere with the drill’s operation or your grip. For those who prefer a less permanent alteration, an excellent alternative is to glue magnets onto a piece of double-sided Velcro. This allows you to attach and detach the magnetic strip as needed, making it adaptable across different tools or for specific tasks.
Benefits of a Magnetic Drill Holder:
- Enhanced Efficiency: No more interruptions searching for dropped screws or switching between bits. Everything you need is right there.
- Increased Safety: Reduces the risk of small fasteners rolling into dangerous areas or creating tripping hazards.
- Improved Organization: Keeps your workspace tidier and more organized, particularly when working in confined spaces or overhead.
- Versatility: Not just for screws! Use it to hold drill bits, nut driver attachments, or even small washers and nuts.
This simple yet incredibly effective modification can dramatically improve your productivity and make detailed work with small fasteners far less stressful.
Stripped Screw Heads: A Clever Recovery Method
Encountering a stripped screw head is a common bane for DIYers and professionals alike. Whether it’s due to an overtightened screw, a worn driver bit, or a low-quality fastener, a stripped head can bring a project to a grinding halt, potentially damaging the material or making removal seem impossible. Before you reach for drastic measures like drilling out the screw entirely, which can leave a sizable hole, consider this clever recovery hack.
The Dremel Slot Technique:
The solution lies in transforming the damaged screw head into one that can be easily removed with a standard flat-head screwdriver. To do this, you’ll need a Dremel tool or another small rotary tool equipped with a thin, abrasive cutting wheel, typically designed for metal. Carefully cut a clean, straight slot across the diameter of the stripped screw head. This new slot effectively converts your Philips or Torx head into a functional flat-head screw.
Why This Hack Works and Its Advantages:
- Minimal Damage: Unlike drilling out a screw, which often requires filling a larger hole, this method focuses solely on the screw head, minimizing collateral damage to your workpiece.
- Cost-Effective: It leverages tools you might already own, avoiding the need for specialized screw extractor kits, which can be pricey and aren’t always effective.
- Accessibility: A flat-head screwdriver is ubiquitous, making subsequent removal straightforward once the slot is cut.
- Time-Saving: Can be much faster than attempting to use a stubborn screw extractor, especially for deeply embedded or rusted screws.
Important Considerations:
Always wear appropriate eye protection when using a rotary tool, as metal shavings can fly. Take your time to make a clean cut, ensuring the slot is deep enough to provide purchase for the screwdriver blade but not so deep that it severs the screw head. With this trick in your repertoire, stripped screw heads will no longer be a source of dread.
Spade Bit Marking: Achieving Perfect Drilling Depth
Spade bits are excellent for quickly boring large holes in wood, but they come with a common challenge: accurately judging the drilling depth. When you’re not drilling all the way through a workpiece, ensuring consistent and precise depth can be tricky, often leading to uneven holes or unintentional breakthroughs. This simple yet highly effective hack provides an infallible visual guide for perfect depth control every time.
The Visual Depth Marker:
The core of this tip involves creating a clear visual marker on your spade bit. First, measure the desired depth you wish to drill. Then, using a pencil, a piece of masking tape, or even a permanent marker, draw a distinct line around the spade bit at that measured distance from its tip. As you drill, simply observe this line. Once the line becomes flush with the surface of your material, you know you’ve reached your target depth.
Advantages of Marking Your Spade Bit:
- Unrivaled Precision: Eliminates guesswork and ensures every hole is drilled to the exact same depth, critical for joinery, doweling, or creating uniform recesses.
- Prevents Over-Drilling: Protects your workpiece from accidental breakthroughs or drilling deeper than intended, saving material and rework.
- Increased Efficiency: Speeds up repetitive tasks by providing an immediate visual cue, removing the need for constant measurement or depth gauge adjustments.
- Works Anywhere: Effective in various lighting conditions and even when working in awkward positions where it’s hard to get an exact visual of the bit’s tip.
Tips for Best Results:
For highly precise work, consider using a drill press with a depth stop, but for handheld drilling, this marking technique is invaluable. If using masking tape, ensure it’s tightly wrapped to prevent slippage during drilling. For a permanent mark, use a metal scribe or a fine-tipped permanent marker. This hack transforms a common challenge into a straightforward operation, guaranteeing professional-looking results.
Countersinking That Works: The Reverse Spin Secret
Countersinking is a crucial step in woodworking and assembly, allowing screw heads to sit flush with or slightly below the surface of your material for a clean, professional finish. However, many DIYers find countersink bits frustrating, often yielding rough edges, tear-out, or inconsistent results, especially in softer woods or composite materials. This can lead to unsightly finishes and make subsequent filling or painting more difficult. WoodWorkWeb reveals a counter-intuitive secret to achieving consistently clean countersinks.
The Reverse Drilling Technique:
The conventional wisdom is to use a countersink bit in forward (clockwise) rotation. However, this hack suggests a different approach: insert your countersink bit into your drill and run it in reverse (counter-clockwise). Surprisingly, this simple change can dramatically improve the quality of your cut, especially for bits that typically produce a “bad cut” in forward rotation.
Why Reverse Countersinking is Effective:
- Reduced Tear-Out: When a countersink bit spins in reverse, its cutting edges scrape the material rather than aggressively biting into it. This scraping action is much gentler, significantly reducing tear-out around the rim of the countersunk hole, particularly in softwoods or plywood.
- Cleaner Edges: The reverse motion tends to produce a smoother, cleaner edge, eliminating the frayed look often associated with conventional countersinking.
- More Control: The slower, more controlled material removal can give you better control over the depth of the countersink, allowing for precise adjustments.
- Extends Bit Life (Potentially): While not its primary purpose, reducing aggressive cutting can sometimes contribute to less wear and tear on the cutting edges, extending the life of your bit.
When to Use This Hack:
This technique is particularly beneficial for materials prone to splintering, such as MDF, plywood, or softwoods like pine. It’s an excellent trick to keep in your toolkit for when you need a perfectly clean countersink without having to switch to a more expensive, specialized countersinking tool. Experiment with this method on scrap pieces to find the optimal pressure and speed for your specific material and bit.
T-Nut Drilling: Ensuring a Perfectly Flush Fit
T-nuts are fantastic fasteners for creating strong, permanent, threaded inserts in wood, ideal for jigs, fixtures, and furniture construction where frequent assembly and disassembly are required. The challenge, however, often lies in getting them to sit perfectly flush with the wood surface. If not installed correctly, the flange of the T-nut can protrude, creating an uneven surface or a weak connection. This ingenious drilling technique ensures your T-nuts are always seated perfectly flat and secure.
The Two-Stage Spade Bit Method:
Instead of simply drilling a through-hole and hammering the T-nut in, this hack utilizes a two-stage drilling process involving a spade bit. First, select a spade bit that matches the outer diameter of the T-nut’s flange, including the prongs. Use this spade bit to create a shallow recess in the wood, just deep enough for the T-nut’s flange to sit flush. The side tangs of the spade bit are key here, as they define the outer edge of this recess. Once the recess is created, switch to a different, smaller drill bit – one that matches the internal barrel diameter of the T-nut – and drill a through-hole from the center of the recess. This creates a perfect pocket for the T-nut.
Why This Method Guarantees a Perfect Fit:
- Precision Recess: The spade bit creates a precise, flat-bottomed recess that perfectly cradles the T-nut’s flange, preventing it from protruding.
- Prevents Splitting: By pre-drilling the recess, you reduce the stress on the wood when hammering the T-nut in, minimizing the risk of splitting, especially in harder woods.
- Stronger Connection: A flush-seated T-nut distributes pressure more evenly across the wood surface, leading to a stronger and more reliable threaded connection.
- Professional Finish: The resulting installation is clean, aesthetic, and fully functional, essential for high-quality craftsmanship.
Installation Tip:
After drilling, simply align the T-nut with the pre-drilled holes and gently tap it into place with a hammer. The prongs will bite into the wood, securing it firmly within the recess. For an even more secure fit, especially in softer woods, you can apply a small amount of wood glue in the recess before tapping the T-nut in. This method transforms a finicky installation into a simple, precise operation.
Bolt Tapping: Create Custom Wood Threads on the Fly
Imagine needing to create internal threads in wood for a custom jig, a unique furniture piece, or a specific repair, but you don’t have the exact tap size on hand. Specialized wood taps exist, but they can be expensive and aren’t always available in every thread pitch. This incredibly clever hack allows you to transform a standard bolt into a functional wood tap, giving you the flexibility to create custom threads quickly and economically using your cordless drill.
Transforming a Bolt into a Tap:
- Select Your Bolt: Choose a bolt with the desired thread size and pitch. This will determine the size of the internal thread you’ll create in the wood.
- Prepare the Bolt: Cut the head off the bolt. You’ll want to use the threaded shaft.
- Create Cutting Flutes: This is the crucial step. Using a Dremel tool fitted with a thin steel cutting blade (or a grinding wheel), carefully cut 3 or 4 longitudinal slots into the tip of the bolt. These slots act as “flutes” – channels that allow wood shavings to escape as the bolt cuts its thread, mimicking the design of a conventional tap. Ensure the cuts are deep enough to create sharp cutting edges.
- Pilot Hole: Before tapping, drill a pilot hole into your wood. This pilot bit should be 2 or 3 drill bit sizes smaller than the bolt’s diameter. The goal is to create a hole that is small enough for the bolt’s threads to bite into, but large enough to prevent splitting the wood. Experiment on scrap wood to find the ideal pilot hole size for your specific wood type and bolt.
- Tap the Thread: Once the pilot hole is ready, insert your newly modified “bolt tap” into your cordless drill. With the drill set to a slow speed and in forward rotation, carefully drive the bolt into the pilot hole. The cutting flutes will progressively carve a clean thread into the wood.
Benefits of This DIY Tapping Method:
- Cost-Effective: Uses readily available and inexpensive bolts, saving you money on specialized taps.
- Custom Thread Sizes: Allows you to create threads in virtually any size for which you can find a corresponding bolt.
- Stronger Wood Threads: Properly tapped threads are often stronger and more durable than simply screwing a bolt directly into wood.
- Problem-Solving: An invaluable trick for on-the-fly repairs or custom projects where specific hardware might be hard to source.
Safety Note:
Always wear eye protection when cutting or grinding metal. Use gloves to protect your hands. Ensure the bolt is securely held during modification. This hack empowers you to create custom threaded connections with remarkable ease and precision.
Conclusion: Empowering Your DIY Journey with Smart Drill Hacks
The cordless drill is more than just a tool for driving screws or boring holes; it’s a versatile powerhouse capable of remarkable feats when armed with the right knowledge. These 6 hacks from WoodWorkWeb are not just clever shortcuts; they are fundamental techniques that address common challenges, enhance precision, and significantly improve the efficiency of your woodworking and DIY projects. From solving the perennial problem of lost fasteners with a magnetic holder to salvaging stripped screws, achieving perfect drilling depths, mastering clean countersinks, ensuring flush T-nut installations, and even crafting your own custom wood taps, each tip offers a tangible benefit.
By incorporating these simple yet powerful strategies into your workflow, you’ll not only save time and reduce frustration but also elevate the quality and professionalism of your finished projects. Don’t let common snags deter your creative flow. Instead, embrace these ingenious solutions, practice them, and watch as your cordless drill transforms into an even more indispensable companion in your journey of making and building. Share these insights with fellow DIYers, and keep exploring new ways to maximize the potential of your tools. Happy drilling!