
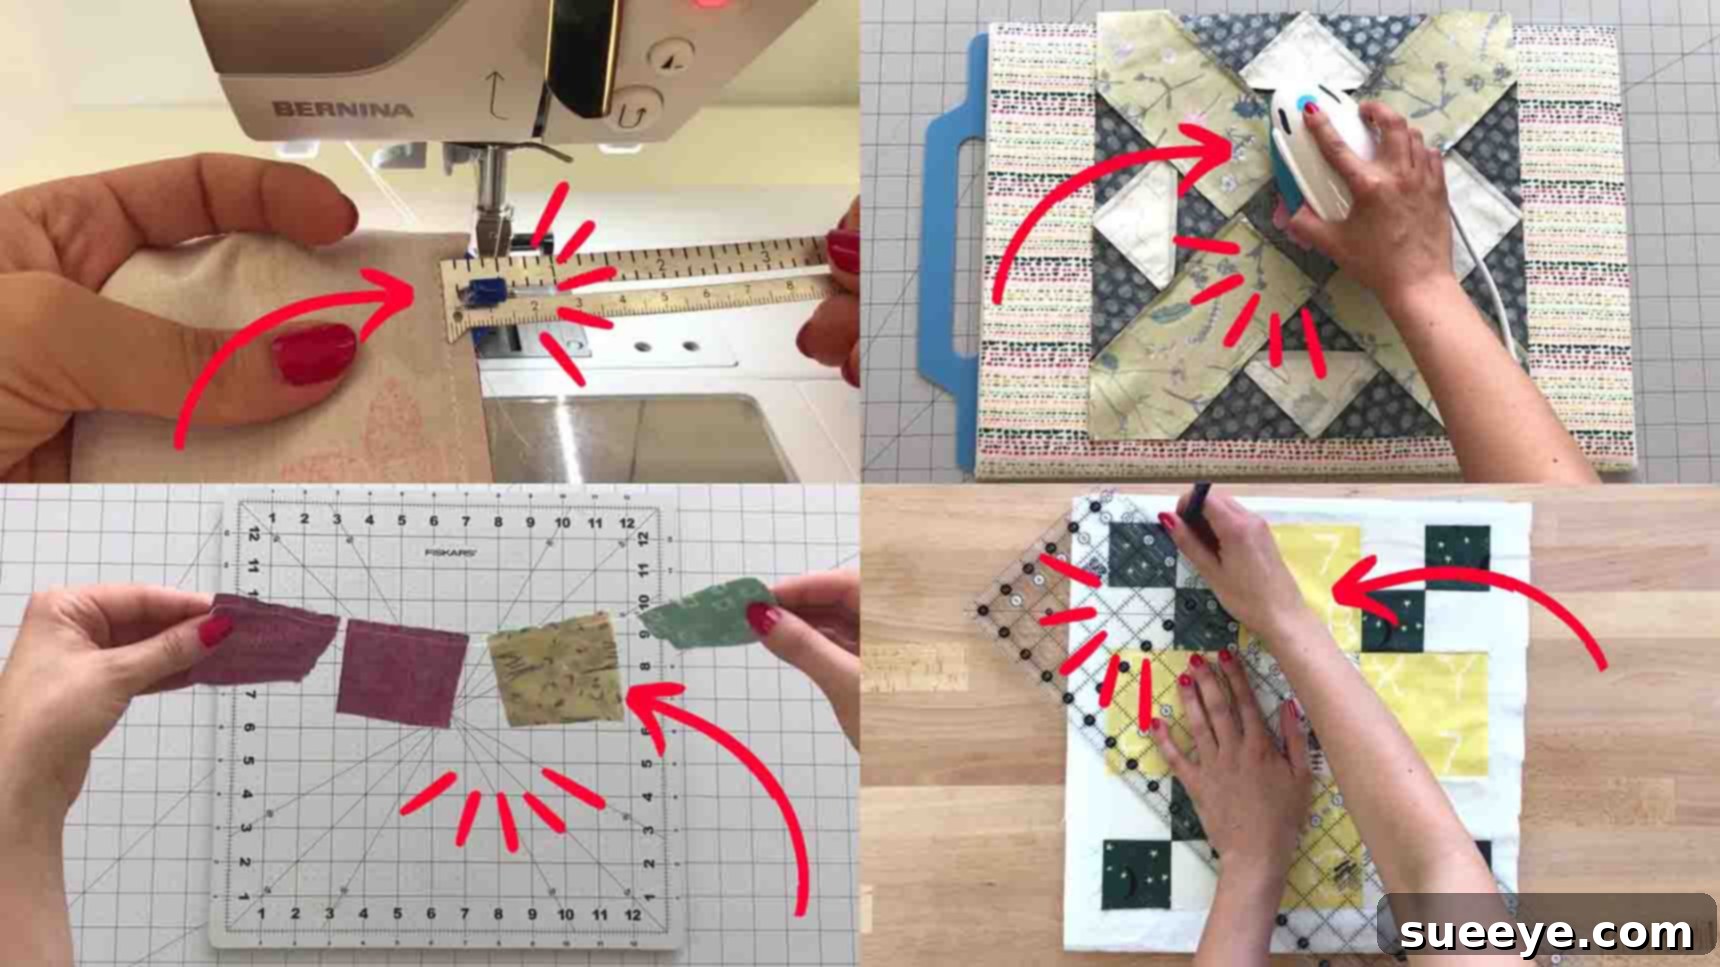
Embarking on the journey of quilting is an incredibly rewarding experience, yet it often comes with a unique set of challenges for beginners. From grappling with the right tools to understanding the subtle nuances of fabric manipulation, new quilters frequently encounter obstacles that can dampen their enthusiasm. Common pitfalls include using unsuitable equipment, neglecting the precision of seam allowances, or overlooking the critical step of proper fabric pressing. If you’re new to the vibrant world of quilting, mastering these fundamental techniques early on will set you up for success and significantly enhance your enjoyment. We’ve compiled essential advice, inspired by expert quilters like Art Gallery Fabrics on YouTube, to guide you through your initial steps. These five cornerstone tips are designed to address common beginner frustrations, ensuring your early quilting projects are not only achievable but also incredibly satisfying.
Quilting is an art form that blends creativity with precision. While the artistic freedom of choosing fabrics and designs is exhilarating, the technical aspects are what truly bring a quilt to life, ensuring it lies flat, aligns perfectly, and endures for generations. By focusing on these core principles, you’ll build a strong foundation, allowing your artistic vision to flourish without being hindered by avoidable technical setbacks. Let’s dive into the indispensable wisdom that every aspiring quilter must embrace.
#1 Master Your Seam Allowance for Perfect Alignment
In quilting, precision is paramount, and nowhere is this more critical than with your seam allowance. The standard seam allowance for most quilting projects is a precise 1/4 inch, often referred to as a “scant 1/4 inch.” This seemingly small detail is incredibly significant; an accurate and consistent seam allowance ensures that your quilt blocks match up perfectly when pieced together, eliminating frustration and preventing distorted designs. Without a consistent seam allowance, your carefully cut fabric pieces won’t align as intended, leading to wonky blocks and a final quilt that doesn’t lay flat.
To achieve this crucial accuracy, investing in a dedicated 1/4-inch presser foot for your sewing machine is highly recommended. Many sewing machines come equipped with one, or they are readily available for purchase. This specialized foot provides a physical guide, helping you maintain that exact 1/4-inch distance from the needle to the edge of your fabric. For those who don’t have a specific presser foot, you can mark your sewing machine bed with a piece of painter’s tape or use a quilter’s seam guide. Practice stitching on scrap fabric, adjusting your needle position if necessary, until you can consistently sew a perfect 1/4-inch seam. Consistency is more important than absolute perfection initially; once you find your method, stick to it. This foundational skill will save you countless hours of unpicking and frustration, making your quilting journey much more enjoyable and your results far more professional.
#2 Cultivate Patience and Press Your Fabric and Seams Diligently
The saying “press as you go” is a golden rule in quilting, and for good reason. Pressing is often underestimated, but it is a fundamental step that significantly impacts the accuracy, flatness, and overall quality of your finished quilt. Unlike ironing, which involves moving the iron back and forth, pressing means lifting and setting the iron down firmly on the fabric. This prevents distortion and stretches, which are common culprits for wavy or skewed blocks.
Begin by pressing your fabric before you even make the first cut. Fabric often arrives with creases, wrinkles, or sometimes even a bit of sizing that can affect how it cuts and sews. A thorough pre-pressing ensures your fabric is flat and smooth, allowing for perfectly accurate cuts. Once you begin piecing, pressing all your seams as you go is equally important. This sets the stitches, removes bulk, and helps your blocks lie flat. You have two primary options for pressing seams: pressing them open or pressing them to one side. Pressing seams open distributes the bulk evenly, resulting in flatter blocks, which can be advantageous for machine quilting. However, it can sometimes leave a tiny gap that might show through lighter fabrics. Pressing seams to one side, typically towards the darker fabric to prevent shadowing, offers a stronger seam and can be quicker, but it creates more bulk. The choice often depends on the specific quilt pattern, the fabric types, and your personal preference. Regardless of the method, consistent, patient pressing throughout your project is essential for achieving crisp points, perfectly matched seams, and a beautifully finished quilt top that you’ll be proud to display.
#3 Trim Your Quilt Blocks with Precision and Care
Achieving perfectly square and accurately sized quilt blocks is vital for a professional-looking quilt. This is where trimming comes in, and having the right tools and technique makes all the difference. Always start with a fresh, sharp rotary blade in your rotary cutter. A dull blade can snag, fray, and distort your fabric, leading to inaccurate cuts and frustration. When cutting or trimming, use a smooth, even motion; avoid “sawing” back and forth, as this can dull your blade and create imprecise edges.
A rotating cutting mat is an invaluable tool for trimming blocks. It allows you to trim two sides of your block, then simply rotate the mat to access the remaining two sides without having to reposition your fabric or yourself. This not only saves time but also maintains the stability of your fabric, preventing shifts that could lead to crooked cuts. When trimming common blocks like half-square triangles (HSTs), align the diagonal line on your quilting ruler precisely with the diagonal seam of your HST. Hold the ruler firmly in place, apply even pressure, and trim the excess fabric from two sides. Then, rotate your mat and align the ruler’s measurements with the newly trimmed edges to square up the block to its desired size, trimming the final two sides. This method ensures that your HSTs are perfectly square and the seam runs precisely through the diagonal, making for crisp and accurate points when pieced into your quilt. Careful, consistent trimming transforms uneven blocks into perfect components, ready for assembly.
#4 Embrace Chain Piecing for Efficiency and Accuracy
Chain piecing is a revolutionary technique that can significantly streamline your quilting process, saving both time and thread while often improving accuracy. This method involves sewing multiple fabric pieces together in a continuous “chain” without stopping to cut the thread between each pair. The process is simple: you feed one set of fabric pieces through your sewing machine, sew your seam, and as soon as you finish, you immediately feed the next set of fabric pieces under the needle, continuing to sew. You don’t lift the presser foot or cut the thread until all the pieces in your chain are sewn.
To prepare for chain piecing, pin or clip together as many identical pairs or sequences of fabric pieces as you need to sew. Once assembled, take them to your sewing machine and begin stitching them one after another. The benefits are numerous: you conserve thread by eliminating those tiny connecting tails between individual pieces, and you save a tremendous amount of time by reducing the constant stopping, starting, and thread cutting. Furthermore, chain piecing helps maintain consistency in your seam allowance because the machine is already in motion, reducing the chance of slight deviations that can occur when starting and stopping for each new piece. This method is particularly effective for projects with many repeating units, such as building numerous identical blocks or piecing together a large number of squares or rectangles. Once you’ve completed your chain, you simply snip the threads connecting the pieces, press your seams, and your units are ready for the next step. Chain piecing truly will change your life as a quilter, making the process faster, more efficient, and incredibly satisfying.
#5 Arm Yourself with the Correct Quilting Tools
Having the right tools for any craft is crucial, and quilting is no exception. Investing in a few essential, high-quality tools from the outset will prevent major headaches, improve the accuracy of your work, and make the entire quilting process much more enjoyable. Think of these tools as extensions of your skill, designed to make precision easier to achieve.
Fabric Marking Pens: These are absolute game-changers. Frixion pens, for example, draw smoothly on fabric and the marks can be easily erased with heat from an iron, making them perfect for marking sewing lines, quilting lines, or specific alignment points on your project without leaving permanent residue. Other options include water-soluble pens, air-erasable pens, or even tailor’s chalk, each suited for different fabric types and marking needs. Experiment to find what works best for your projects.
Small, Sharp Scissors (or Thread Snips): While your rotary cutter handles the heavy lifting of cutting fabric, a pair of small, super-sharp scissors or dedicated thread snips are indispensable at your sewing machine. They are perfect for quickly clipping threads as you sew, trimming fabric corners, or snipping jump stitches. Their compact size makes them easy to handle and keeps your larger fabric shears reserved for their primary task, preserving their sharpness.
Rotary Cutter, Mat, and Rulers: While mentioned previously for trimming, these are fundamental tools for all cutting. A good quality self-healing cutting mat protects your work surface and prolongs the life of your rotary blade. Clear acrylic quilting rulers, in various sizes, are essential for precise measuring and cutting. Look for rulers with clear markings that are easy to read. A 6×24 inch ruler is excellent for cutting long strips, while a smaller square ruler (like 6.5×6.5 inches) is perfect for squaring up blocks.
Beyond these, consider a good quality sewing machine with various stitch options, a reliable iron and ironing board, high-quality cotton thread, and a thimble if you dabble in hand sewing. Having the correct tools not only makes the job easier but also contributes significantly to the professional finish of your quilts, transforming potential frustration into creative flow.
Elevate Your Quilting: Essential Strategies for Every Crafter
Mastering the art of quilting is a journey of continuous learning and refinement. For new quilters, the initial steps can feel overwhelming, but by focusing on these five foundational principles, you’ll establish habits that lead to consistent success and immense satisfaction. From achieving that perfect 1/4-inch seam allowance that brings your blocks into harmonious alignment, to the diligent pressing that creates a flat, professional finish, each tip builds upon the last to enhance your craft.
Embracing techniques like precise block trimming ensures your components fit together flawlessly, while chain piecing will revolutionize your efficiency, saving precious time and resources. Furthermore, equipping yourself with the right tools – from sharp rotary blades to versatile marking pens – empowers you to execute your vision with greater accuracy and less frustration. These aren’t just tips; they are cornerstones of good quilting practice, applicable whether you’re crafting your first potholder or an intricate heirloom quilt. Practice these techniques patiently, allow yourself grace for mistakes, and watch as your skills and confidence grow. Happy quilting!