
Transform Your Old T-shirts: 5 Creative DIY Refashion Ideas for Sustainable Style
Do you have a closet overflowing with old T-shirts that you just can’t bring yourself to part with? Perhaps they’re worn, faded, or simply out of style, yet they hold sentimental value or feel too wasteful to discard. You’re in luck! Instead of relegating them to the rag pile, imagine giving them a brand-new lease on life. With a dash of creativity and a few simple tools, you can transform those forgotten tees into exciting, unique fashion statements that reflect your personal style while promoting sustainability.
This comprehensive guide will walk you through five incredibly fun and surprisingly easy ways to refashion your old T-shirts. From a simple yet chic crop top to an intricate boho braided back design, each project offers a chance to unleash your inner designer and add a personalized touch to your wardrobe. Get ready to revitalize your collection and discover the amazing potential hidden within your old garments!
Why Upcycle Your T-shirts? Embrace Sustainable Fashion
Beyond the joy of crafting something new, upcycling your T-shirts comes with a host of benefits that extend far beyond just refreshing your style. It’s a powerful act of conscious consumption in an increasingly fast-fashion world.
- Environmental Impact: Textile waste is a significant global issue. By repurposing existing clothing, you reduce the demand for new production, conserving resources like water and energy, and diverting textiles from landfills.
- Unique Style: Mass-produced clothing often lacks individuality. DIY refashions guarantee a one-of-a-kind piece that perfectly expresses your unique aesthetic, setting you apart from the crowd.
- Cost-Effective: Why buy new when you can create something fabulous for free (or nearly free)? Upcycling saves money that you would otherwise spend on new clothes.
- Skill Development: These projects are perfect for beginners and offer a wonderful opportunity to learn basic sewing or no-sew craft techniques, boosting your confidence in creative endeavors.
- Creative Outlet: T-shirt refashioning is a fantastic way to engage your creativity, experiment with different designs, and turn your vision into a tangible item you can wear proudly.
Essential Tools for Your T-shirt Transformation Journey
Before you dive into these exciting projects, gather a few basic tools. Most of these you might already have around the house, making T-shirt upcycling even more accessible:
- Sharp Fabric Scissors: A good pair of scissors makes clean cuts and prevents fabric fraying.
- Fabric Chalk or Marker: Essential for marking cut lines and design points on your T-shirt.
- Ruler or Measuring Tape: For accurate measurements and straight lines.
- Needle and Thread (optional for no-sew projects): For hemming, attaching pockets, or securing braids. A sewing machine can speed things up, but hand-stitching works perfectly.
- Safety Pins or Fabric Clips: To hold fabric in place before cutting or stitching.
- Iron and Ironing Board: To press seams and ensure a neat finish (especially for pockets or hems).
- Seam Ripper: Handy for fixing mistakes or carefully dismantling parts of a T-shirt.
With your tools ready and a stack of old T-shirts at hand, let’s explore these five fantastic refashioning ideas!
Dive into the DIYs: 5 Exciting T-shirt Makeovers
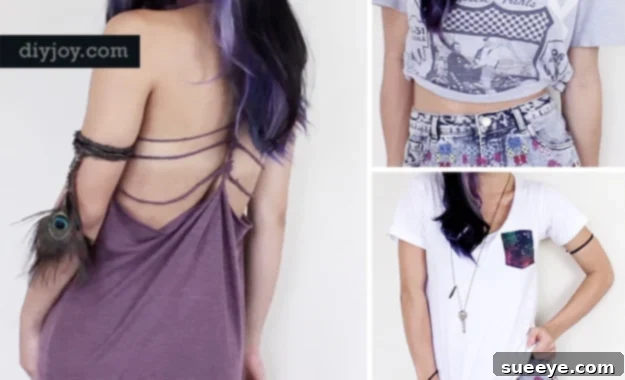
1. The Effortlessly Chic Crop Top: A Modern Staple
Crop tops have been a prevailing trend for years, offering a stylish way to pair with high-waisted skirts, jeans, or shorts. Transforming an old T-shirt into a custom crop top is perhaps one of the easiest and most impactful refashions you can undertake, perfect for beginners looking for instant gratification.
How to Create Your Crop Top:
- Choose Your T-shirt: Select a T-shirt with a good fit in the shoulders and chest. Thicker cotton jerseys work well as they tend to hold their shape.
- Determine Length: Try on the T-shirt. Stand in front of a mirror and mark with fabric chalk or a pin where you want the bottom hem of your crop top to fall. Consider your natural waistline or slightly above for a more daring look.
- Mark the Cut Line: Take off the T-shirt and lay it flat on a clean surface. Using a ruler and fabric chalk, draw a straight line (or slightly curved for a softer look) across the T-shirt, about 1-2 inches below your initial mark. This extra allowance is for the hem.
- Cut Carefully: Using sharp fabric scissors, cut along the marked line. For a no-sew option, simply leave the raw edge. Knit fabrics often curl up naturally, creating a rolled hem effect without any stitching.
- Optional Hemming: If you prefer a neater finish and want to prevent stretching, fold the raw edge up by about 1 inch, press with an iron, and then stitch it in place using a sewing machine or hand-sewing.
Tips for Your Crop Top:
- Experiment with different necklines. A V-neck or scoop neck T-shirt can offer a different vibe.
- For a trendy distressed look, gently stretch the fabric along the cut edge until it curls.
- Pair your new crop top with high-waisted pants or a skirt for a balanced and flattering silhouette.
2. Braided Strap Tank Top: A Touch of Boho Chic
Elevate a plain tank top or transform a regular T-shirt into a unique, eye-catching piece perfect for warm weather. The braided strap detail adds a handmade, bohemian flair that’s both stylish and fun to create.
How to Create Your Braided Strap Tank:
- Prepare the T-shirt: Lay your T-shirt flat. Carefully cut off both sleeves along the seam, and then cut out the neckline to create a wider, more open tank top shape. Don’t make the armholes too deep initially; you can always adjust later.
- Create Strap Sections: Determine where you want your new braided straps to be. For a standard tank, you’ll work with the existing shoulder seams. Cut these shoulder sections into three equal vertical strips on each side. These will be your braiding strands.
- Braid the Straps: Take the three strips on one shoulder and braid them together tightly. Repeat for the other shoulder. You can braid them all the way down or leave a small section unbraided at the ends.
- Secure the Braids: Once braided, you can either tie the ends securely with a small piece of thread (matching the T-shirt color) or sew them down neatly to the back of the tank top where the original strap would have ended. If you’re creating new straps from scratch by cutting down the back of the T-shirt, you’ll need to secure the braided ends to the back fabric.
- Refine Edges: Hem any raw edges around the armholes and neckline if desired, or allow the knit fabric to naturally curl for a casual look.
Tips for Your Braided Tank:
- For extra flair, use a T-shirt in a contrasting color or pattern to create the braided straps and attach them to a different colored tank.
- Experiment with different braiding techniques, such as a fishtail braid, for a more intricate design.
- Ensure your strips for braiding are of even thickness for a uniform look.
3. The Playful Fringe Hem Tee: Add Movement to Your Look
Fringe is a timeless detail that adds movement, texture, and a playful vibe to any garment. Transforming the hem of an old T-shirt into a stylish fringe tee is a super simple, no-sew project that yields fantastic results.
How to Create Your Fringe Hem Tee:
- Prepare Your T-shirt: Lay your T-shirt flat and smooth out any wrinkles. Decide on the desired length of your fringe. Typically, fringe works best starting about 4-6 inches up from the original hem, but you can go shorter or longer depending on your preference.
- Mark the Cut Line: Using a ruler and fabric chalk, draw a straight horizontal line across the T-shirt at the top of where you want your fringe to begin. This is your “stop” line for cutting.
- Cut the Fringe Strips: From the bottom hem of the T-shirt, start cutting vertical strips upwards, stopping at your marked line. Aim for strips that are about 0.5 to 1 inch wide. Try to keep them as even as possible.
- Create the Curl (Optional): Once all your strips are cut, gently pull and stretch each individual strip. This action will cause the knit fabric to curl inwards, creating a neat, finished-looking fringe without any sewing.
Tips for Your Fringe Tee:
- Vary the length of your fringe for an asymmetrical or layered effect.
- For a more bohemian look, tie small knots at the end of each fringe strip, or tie pairs of strips together.
- Add beads or small charms to the ends of some fringe pieces for extra customization.
4. Custom Pocket T-shirt: Personalize with Panache
Adding a custom pocket to a plain T-shirt is an excellent way to introduce a pop of color, pattern, or texture, instantly transforming a basic garment into something unique and personalized. It’s also a fantastic way to use up fabric scraps from other projects!
How to Create Your Custom Pocket T-shirt:
- Choose Your Fabric: Select a piece of fabric for your pocket. This can be a contrasting pattern, a vibrant color, or even a piece of denim or canvas for a different texture. Ensure it’s large enough for your desired pocket size.
- Design and Cut the Pocket: Decide on the shape and size of your pocket. A classic square or rectangle is popular, but you could try a rounded bottom, a triangular flap, or even a heart shape. Cut out your pocket shape, adding about 0.5 inch extra allowance on all sides for seams.
- Prepare the Pocket Edges: Fold the top edge of your pocket fabric down by 0.5 inch, press it with an iron, and stitch it in place. Then, fold the remaining three sides inwards by 0.5 inch and press, creating neat, finished edges.
- Position the Pocket: Try on your T-shirt and decide where you want the pocket to be. The classic placement is on the left chest, but you can experiment with lower placements or even on the sleeve. Mark the position with fabric chalk.
- Attach the Pocket: Pin the prepared pocket onto the T-shirt, aligning it carefully with your marks. Stitch the pocket in place along the three folded edges (leaving the top open) using a sewing machine or hand-sewing. Use a strong thread and backstitch at the corners for durability.
Tips for Your Custom Pocket:
- Before stitching, you can add embroidery, patches, or fabric paint to your pocket for an extra layer of personalization.
- Consider using a fabric that compliments or subtly contrasts with the T-shirt color.
- For a unique touch, use a patch from an old pair of jeans or a patterned scarf as your pocket fabric.
5. The Boho Braided Back T-shirt: Your Statement Piece
This project is perhaps the most ambitious of the five, but the result is a stunning, sophisticated, and undeniably unique T-shirt that will turn heads. The boho braided back T-shirt transforms a simple tee into an elegant, open-back statement piece, perfect for summer festivals or stylish casual wear.
How to Create Your Boho Braided Back T-shirt:
- Prepare the Back Panel: Lay your T-shirt flat, face down. Decide how much of the back you want to expose. Using fabric chalk and a ruler, draw a large rectangular or oval shape on the back, avoiding the side seams and the top shoulder/neckline area. Ensure you leave enough fabric on the sides and top to act as an anchor for your braids.
- Cut Out the Shape: Carefully cut out the marked shape from the back of the T-shirt. You should now have a large opening in the back.
- Create Braiding Strips: Now, from the remaining fabric *around* the cut-out (the fabric that forms the border of your opening), cut vertical or horizontal strips. These will be the strands you use to create your braided design. The number and width of strips will depend on your desired pattern. For example, for a ladder braid, you’ll need parallel strips.
- Braid or Weave the Design: This is where your creativity shines. You can create a simple ladder braid by cutting horizontal strips and then weaving them through each other. Or, cut vertical strips and braid them into a criss-cross or more intricate lattice pattern across the open back. Secure the ends of your braids by tying them off or stitching them neatly to the surrounding fabric.
- Secure and Finish: Ensure all braided ends are securely fastened. You may want to add a thin fabric strip or ribbon along the edges of the cut-out for a cleaner finish, especially if the original fabric is prone to fraying.
Tips for Your Boho Braided Back:
- Use a contrasting color of fabric underneath the braided section for a layered effect that makes the design pop.
- Practice braiding techniques on scrap fabric first if you’re attempting a complex design.
- Consider adding beads or small metal rings into your braided pattern for extra detail.
- Ensure you leave enough ‘anchor’ fabric around the cut-out area so that the braids are securely held and don’t tear the T-shirt.
General Tips for Successful T-shirt Upcycling Projects
To ensure your T-shirt refashioning journey is as smooth and enjoyable as possible, keep these general tips in mind:
- Wash Before You Start: Always wash and dry your T-shirts before beginning any project. This helps pre-shrink the fabric and removes any sizing or finishes that might affect your cuts or stitches.
- Choose Wisely: Opt for T-shirts made of 100% cotton or a cotton blend. These fabrics are generally easier to work with, hold their shape well, and respond nicely to various cutting and stitching techniques.
- Measure Twice, Cut Once: This age-old adage holds true for crafting. Double-check all your measurements and markings before making any cuts to avoid irreversible mistakes.
- Don’t Be Afraid to Experiment: If you’re using a T-shirt you truly don’t mind sacrificing, feel free to try new techniques or tweak instructions. Sometimes the best designs come from happy accidents!
- Utilize Online Resources: While this guide provides detailed steps, a quick search for video tutorials on YouTube can offer visual guidance for specific techniques, especially for complex braids or stitching.
Unleash Your Creativity and Embrace Sustainable Fashion
You no longer have to mourn the loss of your favorite old T-shirts or contribute to textile waste. With these five creative DIY refashion ideas – from the simple elegance of a crop top to the intricate charm of a boho braided back – you have the power to transform and personalize your wardrobe. Each project offers an exciting opportunity to express your unique style, save money, and make a positive impact on the environment.
So, raid your closet, grab your scissors, and let your imagination run wild. You’ll be amazed at what you can create with a little effort and a lot of passion. We encourage you to try out these cool ways to revamp your T-shirts and share your unique creations with the world. Happy crafting!