
10 Creative & Budget-Friendly DIY Planters You’ve Never Thought Of
Gardening is often celebrated as a therapeutic and rewarding hobby, bringing a touch of nature’s tranquility into our homes and outdoor spaces. While the joy of nurturing plants is immense, the cost of charming planters can quickly add up, often diverting funds from acquiring rare succulents or exquisite flower seeds. Fortunately, unleashing your creativity can lead to incredibly stylish and unique plant containers without breaking the bank. This comprehensive guide, inspired by the ingenious ideas from HGTV Handmade on YouTube, will show you how to craft or refresh planters that look so professionally made, no one will ever guess they’re DIY. Get ready to transform ordinary items into extraordinary homes for your beloved greenery!
Why Embrace DIY Planters?
Beyond the simple act of saving money, crafting your own planters offers a multitude of benefits:
- Cost-Effectiveness: Reuse materials you already have or purchase inexpensive supplies, significantly reducing your gardening expenses.
- Personalization: Design planters that perfectly match your decor, reflect your personality, and complement your plant collection.
- Sustainability: Upcycling old items reduces waste and gives them a new purpose, contributing to a more eco-friendly lifestyle.
- Unique Aesthetic: Stand out from mass-produced options with one-of-a-kind planters that become conversation starters.
- Therapeutic Crafting: Engage in a mindful activity that sparks creativity and provides a sense of accomplishment.
Essential Materials for Your Planter Projects
Many of these projects utilize common household items or easily accessible craft supplies. Here’s a consolidated list of materials you might need, categorized for convenience, though specific requirements will vary by project:
- Paints & Finishes: Acrylic paint (various colors), ceramic paint markers, spray paint (primer, clear acrylic spray, textured stone paint).
- Adhesives & Tools: Super glue, sandpaper, paintbrushes, cutting tools (saw, utility knife), drill.
- Repurposed Items: Egg cups, mannequin heads, old rain boots, disco balls, toy animals, plastic planters, terra-cotta pots, white ceramic pots.
- Decorative Elements: Nail polish, marble toothpick, seashells, jute rope, instant paper mache, rocks, soil, plant plates, hanging plant boxes.
- Other: Warm water, plant hangers.
Detailed DIY Planter Ideas & Step-by-Step Instructions
Let’s dive into each incredible planter idea, offering clear instructions and tips to ensure your crafting success.
1. The Marbled Masterpiece Planter
Elevate a plain planter with a sophisticated marbled finish, making it look incredibly expensive and chic.
Materials for this project:
- A plain planter (ceramic or plastic)
- Warm water
- Nail polish (1-3 complementary colors)
- Marble toothpick or wooden skewer
- Clear acrylic spray sealant
Directions:
- Fill a disposable bowl with warm water.
- Carefully pour small drops of nail polish onto the surface of the water. Work quickly as nail polish dries fast.
- Using a marble toothpick or wooden skewer, gently swirl and drag the nail polish to create a marbled pattern.
- Dip your planter into the water, ensuring the desired areas are coated with the marbled design.
- Remove the planter and let any excess water drip off.
- Once dry to the touch, apply a clear acrylic spray to seal the design and protect it from water and wear.
- Allow it to dry completely overnight before adding your plant. This technique works wonderfully for small to medium-sized pots.
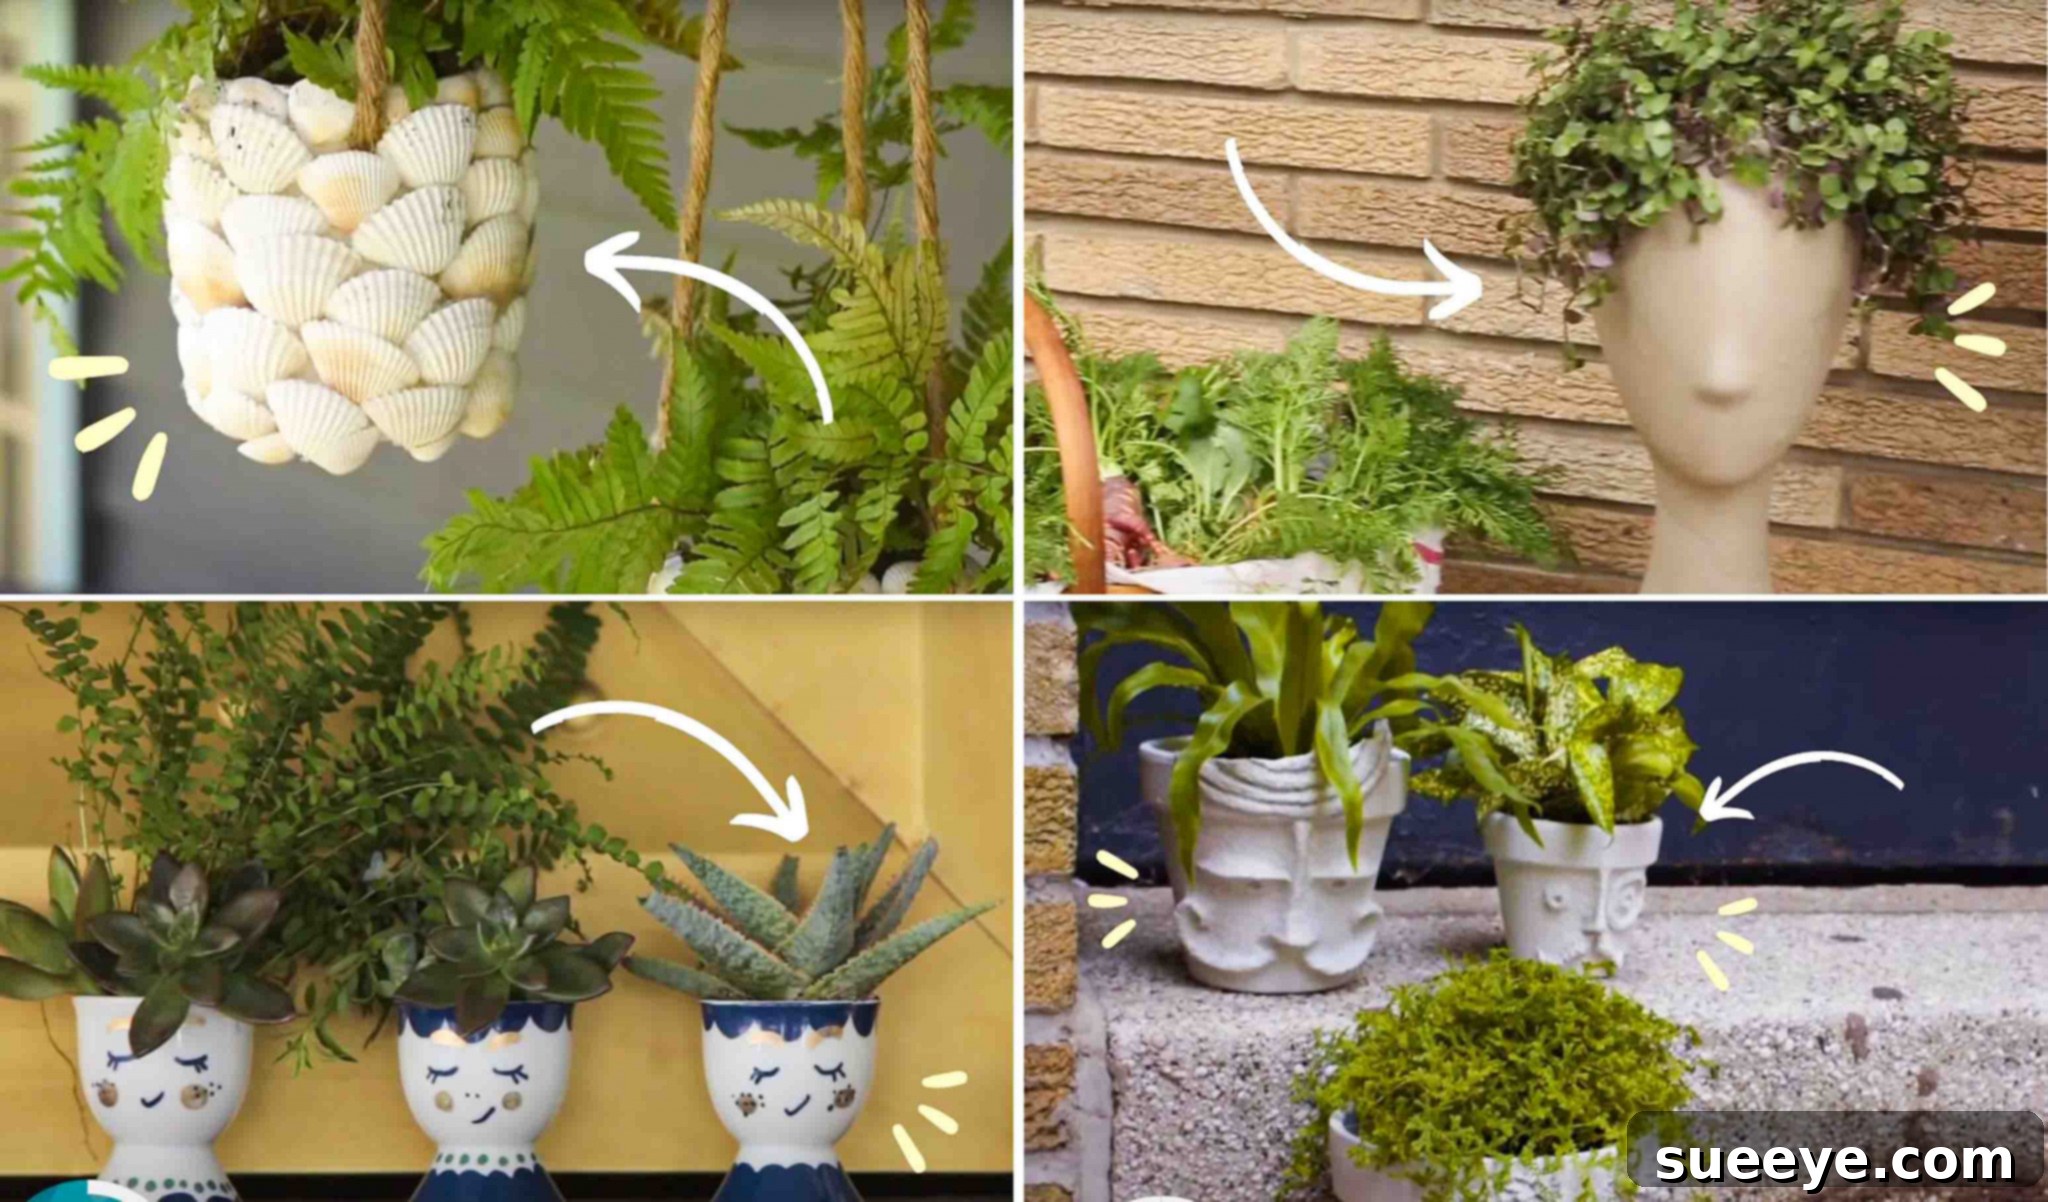
2. Whimsical Egg Cup Miniatures
Transform simple egg cups into adorable, character-filled homes for tiny succulents or air plants, perfect for a quirky desk accessory.
Materials for this project:
- Egg cups (ceramic or porcelain work best)
- Ceramic paint markers (fine-tip for details)
- Small succulents or air plants
Directions:
- Clean the egg cup thoroughly and ensure it’s dry.
- Using ceramic paint markers, draw a face on one side of the egg cup. You can make it expressive or minimalist.
- Add details like “scalloped hair” or a simple “outfit” pattern around the body of the egg cup to enhance its character.
- Allow the paint to dry completely according to the marker instructions (some may require baking for permanence).
- Carefully place a small succulent or air plant into the finished egg cup. Ensure the plant’s needs for drainage are met, or use plants that require minimal water.
3. The Avant-Garde Mannequin Head Planter
For a truly artistic and bold statement, repurpose a mannequin head into a striking plant holder where foliage becomes “hair.”
Materials for this project:
- Mannequin head (plastic or styrofoam)
- Utility knife or saw
- Spray paint (primer and desired color)
- Rocks (for drainage)
- Potting soil
- Plant with trailing or voluminous foliage
Directions:
- Carefully cut the top section of the mannequin head using a utility knife or saw to create an opening for your plant. Be mindful of safety during this step.
- In a well-ventilated area, spray the entire mannequin head with a primer suitable for the material.
- Once the primer is dry, apply your chosen color of spray paint. Let it dry completely.
- Place a layer of rocks at the bottom of the head for drainage.
- Fill the head with potting soil and carefully plant your chosen greenery. Plants like fern, pothos, or spider plant work well to create a “hair” effect.
4. Rustic Rain Boot Planters
Give old rain boots a charming new life as whimsical outdoor planters, perfect for adding a touch of rustic appeal to your porch or garden.
Materials for this project:
- Old rain boots (any size or color)
- Drill (optional, for drainage)
- Rocks (for drainage)
- Potting soil
- Plants (flowers, herbs, or small shrubs)
Directions:
- Clean the rain boots thoroughly, inside and out.
- (Optional but recommended) Drill a few small drainage holes in the bottom of each boot to prevent waterlogging.
- Add a layer of rocks at the bottom of each boot for additional drainage.
- Fill the boots with good quality potting soil.
- Plant your desired flowers, herbs, or small shrubs. Rain boots are particularly effective for vibrant annuals or trailing plants.
- Arrange them in your garden, on your porch, or by your entryway for a delightful and unexpected display.
5. Dazzling Disco Ball Hanging Planter
Bring glitz and glam to your plant collection with an unforgettable disco ball planter that catches the light beautifully.
Materials for this project:
- Disco ball (size appropriate for your plant)
- Small hanging plant box (or a plastic pot to suspend inside)
- Hanger from the plant box or chain for hanging
- Small pot and plant plate (for the base)
- Saw or rotary tool (for cutting the disco ball)
- Drill with a small bit
- Super glue or strong adhesive
- Rocks, soil, and your chosen plant
Directions:
- Carefully saw off the top portion of the disco ball to create an opening. Exercise extreme caution and wear appropriate safety gear.
- Remove the existing hanger from your chosen hanging plant box.
- Fill the plant box with rocks for drainage, then soil, and plant your chosen plant.
- Drill three evenly spaced small holes near the rim of the disco ball for the hanging mechanism.
- Super glue a small pot upside down to the very bottom center of the disco ball to act as a stable base for the plant box.
- Glue a plant plate on top of this upside-down pot. This provides a flat surface for the plant box to rest on and collects excess water.
- Carefully place the potted plant (in its plant box) inside the disco ball, resting it on the plate.
- Attach your desired hanger (chains or rope) through the drilled holes, ensuring it’s secure. Hang and enjoy the sparkling display!
6. Fruity Fun Planters
Inject a dose of playful charm into your space with pots painted to resemble your favorite fruits, like pineapples and strawberries.
Materials for this project:
- White pots (terra-cotta or ceramic)
- Red acrylic paint
- Yellow acrylic paint
- Green and black acrylic paint (for details)
- Paintbrushes (fine-tip for details)
Directions:
- Ensure your white pots are clean and dry.
- Paint one pot entirely with yellow acrylic paint and another with red acrylic paint. Apply multiple coats if needed for opaque coverage. Let them dry completely.
- On the yellow pot, use green paint to draw a “crown” of pineapple leaves at the rim and use black paint or a fine brush to create the crosshatch pattern of a pineapple skin.
- On the red pot, use green paint for small leaf details near the rim and black paint to dot “seeds” all over the pot, mimicking a strawberry.
- Allow all painted details to dry thoroughly. For added durability, you can apply a clear sealant.
7. Coastal Chic Seashell Planter
Bring the calming essence of the beach indoors with a planter adorned with beautiful seashells and rustic jute rope.
Materials for this project:
- Plastic planter (any color, but a neutral base works well)
- Spray paint (a neutral color like cream or light blue, optional)
- Seashells (various sizes)
- Strong adhesive or super glue
- Jute rope
- Drill (for hanging holes, if making it a hanging planter)
- Tape (to secure jute rope ends)
Directions:
- If desired, spray paint your plastic planter a base color that complements your seashells. Let it dry.
- Drill three evenly spaced holes near the rim of the planter if you intend to hang it.
- Carefully glue seashells all over the exterior of the plastic planter. Arrange them in a visually appealing pattern, ensuring they are securely attached.
- For the hanger, cut three equal lengths of jute rope. Tape the ends of each rope length to prevent fraying.
- Thread one end of each jute rope through a drilled hole from the outside in, and tie a secure knot to hold it in place.
- Gather the three ropes at the top and tie them together in a strong knot to form a hanging loop.
- Add your plant, ensuring proper drainage, and hang your new coastal planter.
8. Playful Toy Animal Planters
Delight both children and adults by transforming old toy animals into whimsical, miniature planters perfect for succulents or air plants.
Materials for this project:
- Large toy animal (plastic or rubber works best)
- Utility knife or small saw
- Primer spray paint
- Acrylic paint (various colors, optional)
- Rocks (for drainage)
- Potting soil
- Small succulents or air plants
Directions:
- Choose a toy animal with a sturdy base and a suitable area for a plant.
- Carefully cut a hole into the back or top of the toy animal, large enough to accommodate your plant. Use caution when cutting.
- In a well-ventilated area, spray the entire toy animal with primer. This helps paint adhere better.
- Once the primer is dry, you can paint the toy animal in any color or pattern you desire, or leave it its original color if it suits your aesthetic. Let it dry completely.
- Place a small layer of rocks at the bottom of the cavity for drainage.
- Fill the rest of the cavity with potting soil and plant your chosen succulent or air plant. These make fantastic gifts or desk companions.
9. Weathered Charm Terra-Cotta Pot
Give a new terra-cotta pot the aged, rustic look of a cherished antique with a simple layering and sanding technique.
Materials for this project:
- Terra-cotta pot
- Gray acrylic paint
- White chalk paint
- Sandpaper (fine-grit)
- Paintbrushes
- Rubber stamps and ink (optional, for herb names)
Directions:
- Ensure your terra-cotta pot is clean and dry.
- Apply a coat of gray acrylic paint evenly over the entire pot. Let it dry completely.
- Once the gray paint is dry, apply a coat of white chalk paint. Don’t worry about perfection; a slightly messy or uneven second coat actually enhances the weathered effect. Allow it to dry.
- Using fine-grit sandpaper, gently sand areas of the pot, especially edges and raised parts, to reveal bits of the gray paint and the original terra-cotta underneath. This creates a beautifully distressed, aged look.
- (Optional) Once satisfied with the weathered finish, use rubber stamps and waterproof ink to add herb names or decorative motifs to the pot.
- Seal with a clear matte sealant if desired, especially for outdoor use.
10. Sculptural Paper Mache Face Planter
Unleash your inner artist by molding instant paper mache into unique, textured faces on a plain planter, creating a piece of art that holds life.
Materials for this project:
- Plain plastic or ceramic planter
- Instant paper mache powder
- Water
- Primer spray paint
- Textured stone paint spray
Directions:
- Follow the instructions on your instant paper mache package to mix it with water until it reaches a clay-like consistency.
- Once pliable, begin applying the paper mache to the exterior of your planter.
- Start sculpting a face, adding features like eyes, a nose, lips, and ears. You can create abstract or realistic designs.
- Add any other desired textural details or patterns to the paper mache.
- Allow the paper mache to dry completely, which may take 24-48 hours depending on thickness and humidity.
- Once hardened, spray the entire planter with a coat of primer. Let it dry.
- Finally, apply textured stone paint spray to give your sculpted planter a realistic, stone-like finish. This adds depth and character.
- After the paint dries, your unique, artistic planter is ready for your favorite plant.
Tips for Successful DIY Planter Projects
- Drainage is Key: Almost all plants require proper drainage. If your repurposed item doesn’t have holes, consider adding them or using a smaller pot with drainage inside your DIY planter.
- Choose the Right Plants: Match your plant to the size and type of planter. Succulents and air plants are forgiving in smaller or less traditional containers.
- Seal for Durability: For painted or decorated planters, especially those used outdoors, a clear sealant (acrylic spray or brush-on) will protect your hard work from water, sun, and wear.
- Safety First: When cutting, drilling, or using spray paints, always work in a well-ventilated area and wear appropriate safety gear (gloves, eye protection).
- Clean Your Materials: Ensure all repurposed items are clean and dry before you begin decorating or planting.
- Experiment: Don’t be afraid to mix and match techniques or adapt these ideas to items you already have. Creativity is the essence of DIY!
Conclusion
As you can see, the possibilities for creating stunning and unique plant pots are endless, extending far beyond the typical store-bought options. These 10 inventive DIY planter ideas, inspired by the creativity of HGTV Handmade, offer fantastic ways to express your personal style, save money, and contribute to a more sustainable lifestyle. From elegant marbled designs to whimsical animal shapes and sparkling disco balls, each project transforms everyday objects into captivating homes for your plants. So, gather your materials, unleash your imagination, and start crafting your way to a greener, more personalized living space. Your plants – and your wallet – will thank you!