
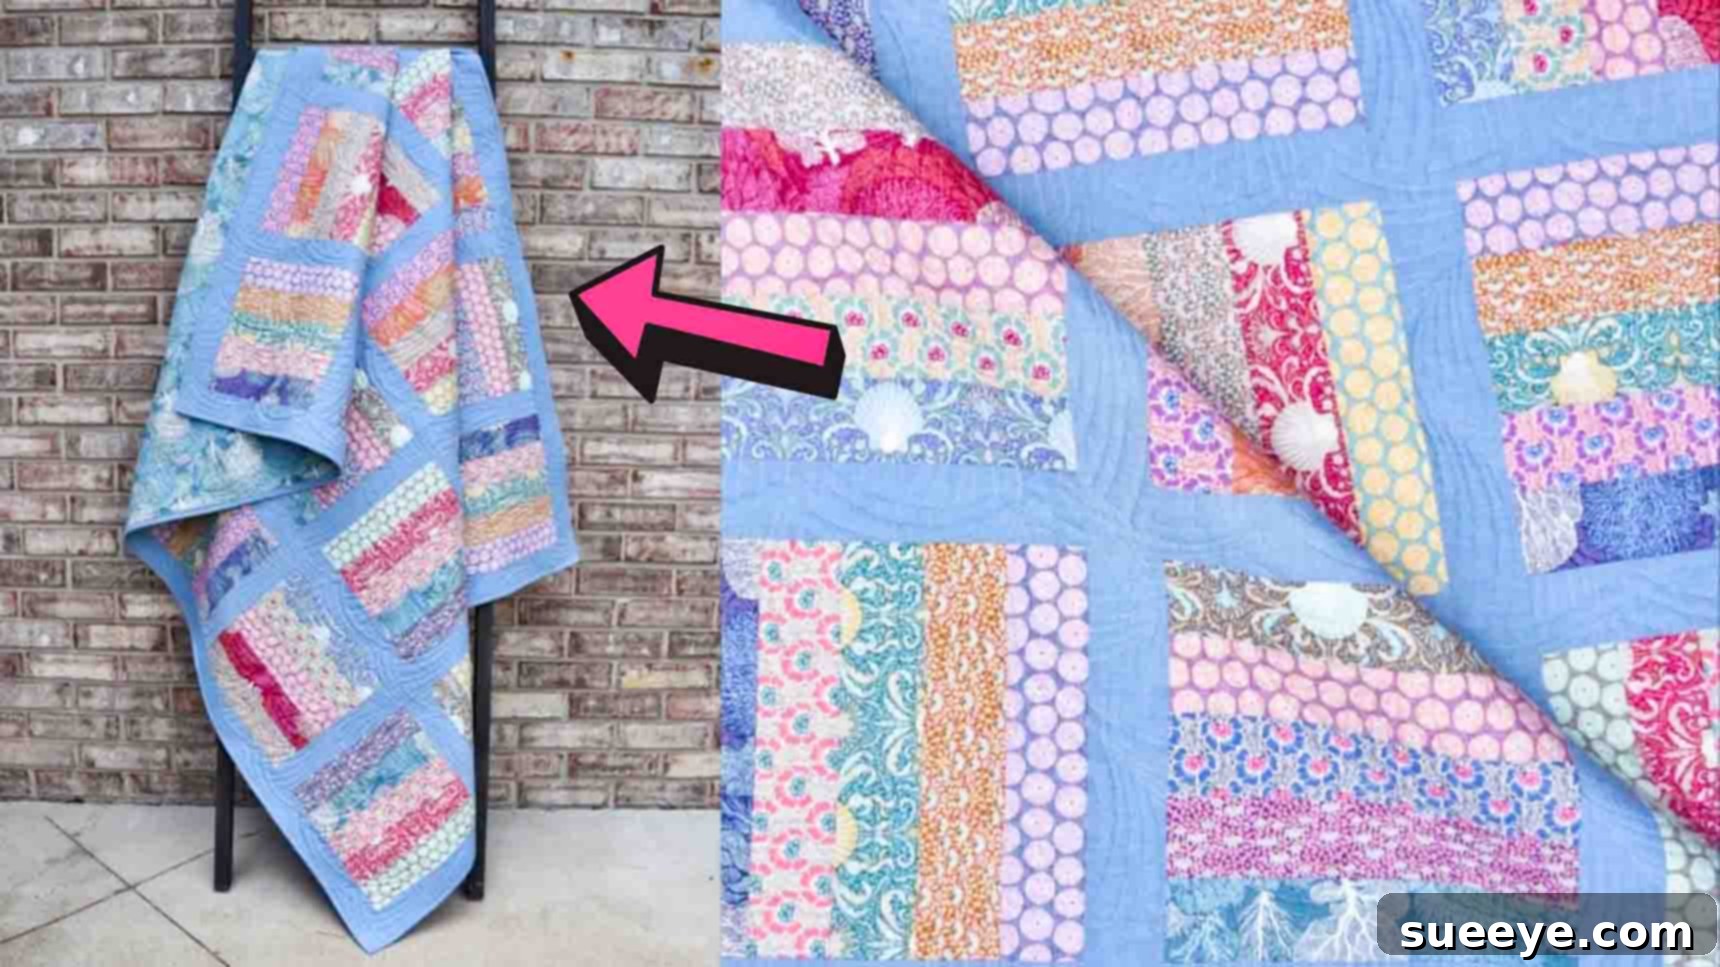
Embark on a delightful quilting journey with the popular jelly-filled quilt pattern, a design that promises a fast finish and stunning results. Whether you’re taking your very first stitches or you’re a seasoned quilter looking for a quick and satisfying project, this tutorial is designed for you. The beauty of the jelly-filled quilt lies in its simplicity and the vibrant impact achieved with pre-cut fabric strips. It’s an ideal project if you need a heartfelt handmade gift in a pinch or simply wish to hone your quilting accuracy and speed. Get ready to transform a simple jelly roll into a beautiful, cozy masterpiece. For a visual guide to complement these instructions, be sure to watch the comprehensive video tutorial by Material Girl Quilts on Youtube.
Mastering the Jelly-Filled Quilt: A Comprehensive Guide for Beginners
Quilting doesn’t have to be an intimidating endeavor. With the right pattern and guidance, anyone can create a beautiful quilt. The jelly-filled quilt is a fantastic starting point, leveraging the convenience of jelly rolls to simplify the fabric preparation process. This guide will walk you through every step, ensuring you gain confidence with your rotary cutter, sewing machine, and pressing iron. Prepare to create a cherished item that’s both functional and a testament to your growing skills.
Essential Materials for Your Jelly-Filled Quilt
Before you begin, gathering all your materials is key to a smooth and enjoyable quilting experience. The beauty of this pattern is its efficiency, largely thanks to the use of a jelly roll.
- 1 Jelly Roll: A standard jelly roll consists of 40 pre-cut fabric strips, each measuring 2 & 1/2 inches wide by the width of the fabric (WOF), typically 42-44 inches. The coordinated fabrics in a jelly roll eliminate the need for extensive fabric selection, making it perfect for beginners. If you don’t have a jelly roll, you can cut 40 individual 2 & 1/2″ x WOF strips from your fabric stash.
- 2 & 1/2 yards of Sashing/Border Fabric: This fabric will create the strips that separate your main quilt blocks (sashing) and frame your quilt top (borders). Choose a color that complements or contrasts with your jelly roll fabrics to make your design pop.
- 4 yards of Backing Fabric: The backing fabric provides the underside of your quilt. It’s an opportunity to use a fun print or a solid that ties into your front design. Ensure it’s wide enough to accommodate the finished quilt size plus a few inches on each side for quilting.
- 1/2 yard Binding Fabric: Binding is the final touch that encases the raw edges of your quilt, providing a clean, durable finish. Select a fabric that either matches your sashing/border fabric or offers a final contrasting frame.
Tools You’ll Need:
Beyond the fabrics, a few essential quilting tools will make your process much more efficient and precise:
- Sewing Machine: A reliable machine with a quarter-inch foot is highly recommended for accurate seams.
- Rotary Cutter: A sharp rotary cutter (45mm or 60mm) is crucial for precise, quick cuts.
- Self-Healing Cutting Mat: Protect your work surface and your rotary cutter blade.
- Quilting Rulers: A large rectangular ruler (e.g., 6″ x 24″) and a square ruler (e.g., 12.5″ x 12.5″) will be invaluable for cutting and squaring up blocks.
- Fabric Scissors: For snipping threads and other small tasks.
- Iron and Ironing Board: Proper pressing is just as important as accurate sewing.
- Pins or Fabric Clips: To hold fabric pieces together before sewing.
- Matching Thread: High-quality 100% cotton thread is usually best for quilting.
Step-by-Step Directions to Create Your Jelly-Filled Quilt
Step 1: Preparing and Sewing Your Strip Sets
The initial phase involves transforming your jelly roll strips into larger, composite fabric units. Begin by carefully separating the 40 strips from your jelly roll. Organize them into eight distinct sets, with each set comprising five strips. This preparation helps you manage your fabrics and visualize potential color combinations.
Once your sets are arranged, you’ll sew these five strips together along their long edges. For consistent and professional-looking results, always use a precise 1/4-inch seam allowance. Chain piecing can significantly speed up this process: sew the first two strips of a set, then without cutting the thread, feed the next two strips of the next set, and so on. Once all pairs are sewn, go back and add the third, fourth, and fifth strips to complete each set of five. After sewing each seam, press it carefully. For this project, pressing seams open is often recommended to reduce bulk, but pressing to one side (usually the darker fabric) is also acceptable, as long as you’re consistent. Flat seams are critical for accurate subsequent cuts. You will now have eight strip sets, each approximately 10 & 1/2″ wide.
Next, these sewn strip sets will be cut into 10 & 1/2″ square blocks. Precision is paramount here. If you own a square ruler that is at least 10 & 1/2″ square, it will be your best friend. Align the ruler with one edge of your strip set, ensuring it’s perfectly straight, and make your cut.
However, if you don’t have a ruler of that size, your cutting mat can serve as an excellent guide. Lay your strip set on the cutting mat, aligning one long edge perfectly straight along one of the grid lines. Ensure that the selvage edge of your fabric (the finished edge from the manufacturer) extends beyond the zero line on the left side of your cutting mat. This allows you to make a clean, straight initial cut, trimming off any unevenness or excess selvage. This “squaring up” cut establishes a true starting point.
Step 2: Cutting Your 10 & 1/2″ Quilt Blocks
With your strip set now squared on one end, you’ll proceed to cut your individual quilt blocks. If you are using your cutting mat as a guide, simply move your rotary cutter to the 10 & 1/2″ mark along the top or bottom edge of your cutting mat, ensuring your strip set remains perfectly aligned. Make your cut to yield your first 10 & 1/2″ square. Repeat this process, moving 10 & 1/2 inches down the strip set for each subsequent cut.
If you’re using a square ruler, position its 10 & 1/2″ mark directly over the newly squared left edge of your strip set, then make your cut. Each of your eight sewn strip sets should yield exactly four 10 & 1/2″ x 10 & 1/2″ blocks. This means you will have a total of 32 blocks (8 sets x 4 blocks/set) ready for assembly. Always handle your newly cut blocks with care to avoid stretching the fabric.
Step 3: Designing Your Quilt Layout with Sashing
This is where your quilt truly begins to take shape! Arrange your 32 blocks into a grid of 6 rows with 5 blocks per row. You’ll notice this leaves two blocks extra; these can be used for a bonus project, or you might choose to create a slightly larger quilt. For our standard 6×5 layout, the goal is to alternate the direction of the strips within your blocks. This creates a dynamic visual texture across the quilt top, adding interest and movement. Experiment with the placement of your blocks on a design wall or a clean floor until you are pleased with the overall balance of colors and patterns.
Between each block within the rows, you will introduce your sashing strips. Cut 24 pieces of your sashing/border fabric to measure 2 & 1/2″ x 10 & 1/2″. These strips will act as separators, providing a clean visual break between your busy jelly roll blocks and enhancing the overall design. Pin and sew these sashing strips to the right side of each block in a row, ensuring accurate 1/4-inch seams. Press these seams open or towards the sashing strips for a neat finish.
Step 4: Assembling Rows and Adding Sashing Rows
Once all blocks within a row have their sashing strips attached, you will sew the blocks together to form complete rows. Again, use a consistent 1/4-inch seam allowance and press your seams. After completing all six rows, you will then join these rows together.
To connect your rows, you’ll need longer sashing rows. These will be pieced from your sashing/border fabric. You’ll need five sashing rows that each measure 2 & 1/2″ x 58 & 1/2″. To achieve this length, you will likely need to piece together several 2 & 1/2″ x WOF strips. Sew these strips end-to-end using a diagonal seam for a less noticeable join, then trim and press to the required length.
Sew one of these long sashing rows to the bottom edge of your first quilt row. Then, sew your second quilt row to the bottom of that sashing row. Continue this pattern, alternating quilt rows with sashing rows, until all six quilt rows and five sashing rows are joined. Press all seams meticulously. This careful pressing helps ensure your quilt top lies flat and square.
Step 5: Adding the Borders to Frame Your Quilt
The final step in constructing your quilt top is to add the borders. Borders not only frame your beautiful work but also help to stabilize the quilt and can correct minor imperfections in squareness. Using your remaining 2 & 1/2″ strips from the sashing/border fabric, piece them together to create strips long enough for each side of your quilt.
For the side borders, measure the length of your quilt top through the center. Cut two border strips to this exact measurement and sew them to the left and right sides of your quilt top. Press the seams towards the borders.
Next, measure the width of your quilt top, including the newly added side borders, through the center. Cut two border strips to this new measurement and sew them to the top and bottom edges of your quilt. Press these seams towards the borders as well.
Upon completion of the borders, your jelly-filled quilt top will proudly measure approximately 62″ x 74″ – a perfect size for a lap quilt or a generous throw!
Step 6: Finishing Your Quilt – Batting, Backing, and Binding
With your quilt top complete, the next steps are to prepare it for quilting.
Layering the Quilt Sandwich: You’ll need a layer of batting (the fluffy middle layer that gives your quilt warmth and dimension) and your backing fabric. Lay your backing fabric face down on a clean, flat surface, smoothing out any wrinkles. Tape it down if necessary. Next, center your batting over the backing. Finally, place your completed quilt top, right side up, on top of the batting. Ensure all three layers are smooth and free of wrinkles.
Basting: Secure these layers together using your preferred basting method. This could be safety pins (pin basting), spray adhesive (spray basting), or hand basting with large stitches. The goal is to prevent the layers from shifting during the quilting process.
Quilting: Now comes the quilting itself – stitching through all three layers to hold them together permanently. For a beginner, simple straight lines (stitch-in-the-ditch along your sashing or straight lines across the blocks) are highly effective and achievable on a home sewing machine. You can also explore simple meandering or stippling if you’re feeling adventurous. The key is to distribute the quilting evenly.
Trimming and Squaring Up: Once quilted, trim the excess batting and backing fabric, squaring up the edges of your quilt so it’s perfectly rectangular.
Binding: The final step is to bind your quilt. Cut your binding fabric into 2 & 1/2″ wide strips. Piece them together to create one continuous strip long enough to go around the entire perimeter of your quilt, plus about 10-12 inches extra. Fold this strip in half lengthwise and press. Attach the binding to the front of your quilt, then flip it to the back and hand-stitch or machine-stitch it down for a clean, finished edge.
Why the Jelly-Filled Quilt is a Must-Try for Quilters
The jelly-filled quilt stands out for several compelling reasons, making it a beloved choice among quilters of all levels:
- Speed and Efficiency: Utilizing pre-cut jelly roll strips drastically cuts down on initial cutting time, allowing you to get to the sewing machine faster. This means you can complete a beautiful quilt in a fraction of the time compared to patterns requiring extensive fabric cutting.
- Beginner-Friendly: The straightforward block construction and simple layout make it an excellent learning project. It reinforces fundamental quilting skills like accurate seam allowances, pressing, and basic assembly without overwhelming complexity.
- Stunning Visual Impact: Despite its simplicity, the alternating direction of the strips within the blocks creates a captivating dynamic pattern. Paired with a complementary sashing fabric, the jelly-filled quilt achieves a sophisticated look with minimal effort.
- Perfect for Gifts: Because of its relatively quick completion time, this quilt is ideal for last-minute gifts for birthdays, holidays, or new babies. A handmade quilt is always a treasured item.
- Versatility: Depending on the jelly roll you choose, the quilt can range from vibrant and playful to elegant and subdued. It’s adaptable to any home decor or recipient’s taste.
Embark on Your Quilting Journey Today!
Completing a jelly-filled quilt is an incredibly rewarding experience. From selecting your beautiful jelly roll to making the final stitch on the binding, each step is a creative act that culminates in a functional work of art. This project not only yields a gorgeous quilt but also builds confidence and refines your quilting skills, paving the way for more intricate projects in the future. We encourage you to dive into this fun and accessible pattern. Remember, every quilter, no matter their experience level, can create something wonderful. Don’t hesitate to refer back to the Material Girl Quilts YouTube tutorial for visual guidance throughout your process. Happy quilting!