
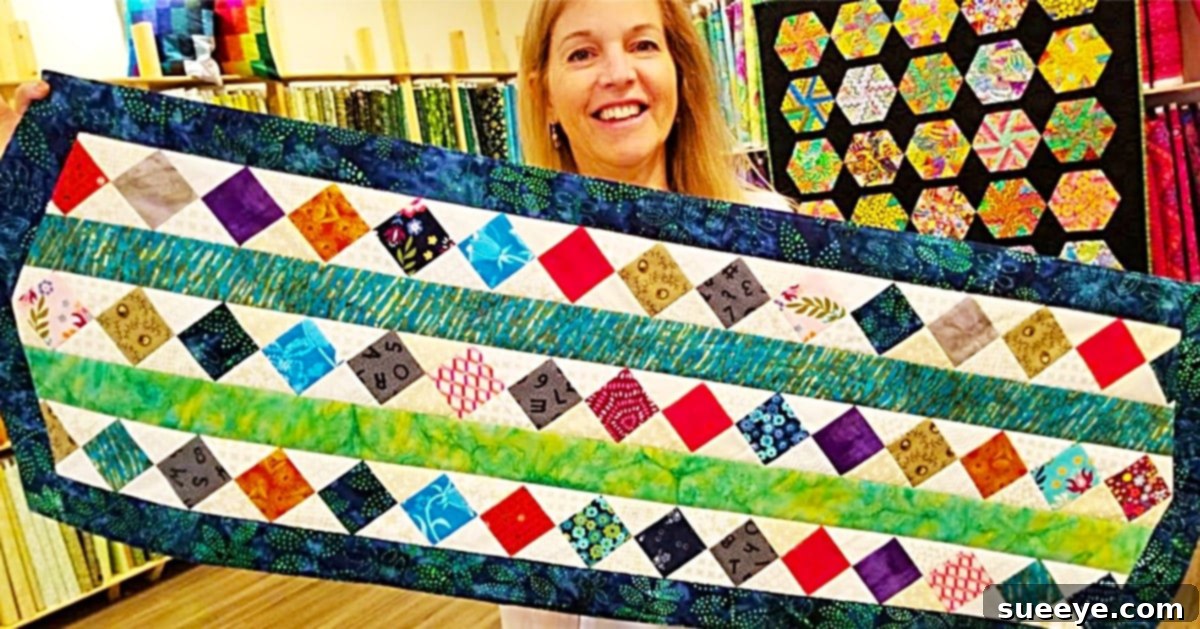
Create a Stunning DIY Scrappy Table Runner: Your Ultimate Guide to Quilting with Fabric Scraps
There’s nothing quite like the joy of crafting, especially when you can transform forgotten fabric remnants into something beautiful and functional. As the seasons change or holidays approach, adding a touch of handmade charm to your home decor creates an inviting atmosphere. A DIY scrappy table runner is the perfect project to infuse your space with vibrant color and personality. Using a collection of fabric scraps, often referred to as “jelly roll” strips, you can create a truly unique and cheerful seasonal flair that’s sure to impress your guests.
My inspiration for this delightful quilting adventure struck when I stumbled upon a fantastic scrappy table runner video tutorial by the celebrated Quilting Afficiando Donna Jordan. Her clear instructions and ingenious design immediately captured my attention. I had a substantial collection of fabric jelly roll scraps and various remnants, treasures I had acquired during sales at local fabric stores for next to nothing, but hadn’t quite decided on their ultimate purpose. After a diligent search on YouTube for a fresh and exciting table runner quilting idea, Donna’s tutorial felt like striking gold! Her method promised an approachable yet visually stunning result, perfect for showcasing those beautiful fabric bits. This guide will walk you through the process, ensuring you can craft your own basic scrappy table runner pattern with ease. All you need are some pre-cut fabric strips (like jelly rolls), a quilt backing fabric, and a desire to create. So, let’s get quilting!
Essential Materials for Your Scrappy Table Runner Project:
Embarking on any quilting project requires the right tools and materials. For this charming scrappy table runner, you’ll find that a few key items will make the process smooth and enjoyable. Gathering these before you start will ensure an uninterrupted creative flow.
- Jelly Roll Scraps or Pre-Cut Fabric Strips: These are ideal for this project, typically 2.5 inches wide, making them incredibly easy to work with. They come in a variety of coordinating colors and patterns, perfect for a vibrant “scrappy” look. If you don’t have jelly rolls, you can cut your own strips from larger fabric remnants.
- Coordinating Thread: Choose a high-quality cotton or polyester thread that matches or subtly complements your fabric choices. A neutral color like white or light grey often works well when piecing together a variety of fabric colors.
- Cutting Mat: An essential tool for protecting your work surface and ensuring precise cuts with your rotary cutter. Look for one with clear grid lines to help with accurate measurements.
- Rotary Cutter: This sharp tool makes quick and accurate cuts through multiple layers of fabric, significantly speeding up the cutting process compared to scissors. Always use it with a cutting mat and ruler for safety and precision.
- Quilter’s Ruler: A transparent acrylic ruler, usually marked with inches and various angles, is crucial for squaring up fabric and making precise straight or diagonal cuts. A longer ruler (e.g., 6×24 inches) is very helpful for cutting strips.
- Fabric Scissors: While a rotary cutter is excellent for strips, a good pair of sharp fabric scissors will still be useful for snipping threads, trimming corners, and other small adjustments. Dedicate them only to fabric to keep them sharp.
- Sewing Machine: A reliable sewing machine is the heart of this project. Ensure it’s in good working order, with a fresh needle and properly wound bobbins.
- Iron and Ironing Board: Pressing seams as you go is vital for achieving flat, accurate blocks and a professional finish.
- Quilt Batting: This is the middle layer of your table runner, providing loft, warmth, and texture. Choose a batting type (cotton, polyester, blend) based on your desired drape and washability.
- Backing Fabric: A piece of fabric for the back of your table runner. It should be slightly larger than your finished top to allow for quilting. This is an opportunity to use a complementary print or a solid color.
- Binding Fabric: Strips of fabric used to finish the raw edges of your quilted table runner, giving it a neat and durable border.
Step-by-Step Directions for Crafting Your Scrappy Table Runner:
This beautiful table runner video tutorial by Donna Jordan on YouTube is an excellent visual guide. Here, we’ll break down the process into easy-to-follow steps, expanding on the core techniques Donna demonstrates. Remember, quilting is an art of precision and patience, and each step contributes to the final masterpiece.
Step 1: Preparing Your Fabric Strips and Creating Strip Sets
The journey begins with your vibrant jelly roll strips. The key to a truly “scrappy” look is to mix and match various patterns and colors. Start by pressing all your fabric strips to ensure they are flat and wrinkle-free. This simple step is critical for accurate piecing. Once pressed, you’ll begin by sewing several jelly roll strips together lengthwise. Donna Jordan’s method often involves creating sets of three or four strips sewn side-by-side. Use a consistent ¼-inch seam allowance for all your piecing – this precision is paramount in quilting. After sewing each set of strips, press the seams open or to one side, whichever creates a flatter, less bulky result. This initial piecing forms the foundation of your unique scrappy blocks.
Step 2: Sub-Cutting Your Strip Sets into Unique Sections
With your strip sets sewn and pressed, the magic of the “scrappy” design truly begins. According to Donna’s technique, you will now take these wider, multi-strip pieces and cut them into smaller, uniform sections. The crucial element here is making your cuts on a diagonal. This isn’t just a straight cut; using your quilter’s ruler, you’ll carefully position it at an angle across your sewn strips and use your rotary cutter to slice through. The angle of your cut will determine the dynamic, geometric pattern of your table runner. Repeat this process until you have several identical-sized, diagonally cut segments from your strip sets. These small sections, with their array of colors and patterns, will form the individual blocks of your table runner, creating visual interest and movement.
Step 3: Assembling the Middle Scrappy Portion and Adding Solid Strips
Now comes the exciting part of bringing your design to life. You will begin to assemble the middle, most vibrant portion of your table runner by sewing these diagonally cut sections together. Pay attention to how the angles align to create a continuous, flowing pattern. Often, quilters will lay out their pieces on a design wall or floor first to visualize the final look and ensure a pleasing arrangement of colors and patterns. Once you are satisfied with the layout of your scrappy blocks, stitch them together, maintaining that precise ¼-inch seam allowance. As per Donna’s expert instructions, the next step involves adding solid strips. These solid strips, often in a complementary or contrasting color, act as “sashing” or borders between your scrappy blocks or along the edges of the central panel. They provide a visual break, define the patchwork elements, and can help to square up your design. These additions contribute to the overall structure and aesthetic balance of your table runner.
Step 4: Finishing the Quilt Top and Preparing for Quilting
Once all your scrappy blocks are sewn together and the solid strips are attached, you will have your finished quilt top. Take time to give it a final press, ensuring all seams are flat. Now, it’s time to prepare for the actual quilting process – creating the “quilt sandwich.” Lay your backing fabric right side down on a clean, flat surface, smoothing out any wrinkles. Next, place your batting on top of the backing, also smoothing it carefully. Finally, center your finished scrappy table runner top right side up on top of the batting. Secure these three layers together using basting pins, spray basting, or hand basting stitches. This step prevents the layers from shifting during quilting, which is crucial for a smooth and even finish.
Step 5: Quilting and Binding Your Table Runner
With your quilt sandwich basted, you’re ready to quilt! This is where you stitch through all three layers (top, batting, and backing) to secure them together and add texture. You can choose to machine quilt using straight lines, free-motion quilting designs, or even hand quilt for a more traditional look. Keep your quilting lines evenly spaced and consistent. Once the quilting is complete, trim any excess batting and backing fabric, squaring up your table runner. The final step is binding. Cut strips of fabric (typically 2.5 inches wide) for your binding. Sew these strips together to create one long strip, then attach it around the perimeter of your table runner. You can machine stitch one side and hand stitch the other for a neat finish, or machine stitch both sides for durability and speed. This binding not only encloses all the raw edges but also adds a beautiful frame to your finished piece.
Why a Scrappy Table Runner is the Perfect Project:
This is truly one of the cutest scrappy table runners I have ever seen, and Donna Jordan is an undeniable expert! But beyond the aesthetics, there are several compelling reasons to embark on this quilting journey:
- Economical and Sustainable: It’s a fantastic “scrap buster” project, allowing you to use up those smaller pieces of fabric you’ve collected, reducing waste and giving new life to forgotten textiles.
- Highly Customizable: The beauty of a scrappy design is that every piece is unique. You choose the colors, patterns, and arrangement, making it truly yours. No two scrappy table runners will ever be exactly alike!
- Skill Development: For beginners, it’s an excellent way to practice fundamental quilting skills such as accurate cutting, consistent seam allowances, pressing techniques, and basic assembly. For experienced quilters, it’s a quick and satisfying project.
- Versatile Home Decor: A table runner instantly elevates any dining table, coffee table, or console. Change them with the seasons or holidays to refresh your home decor effortlessly.
- Thoughtful Gift Idea: A handmade table runner makes a heartfelt and personalized gift for weddings, housewarmings, birthdays, or any special occasion.
Donna Jordan’s Influence on Scrap Buster Projects:
Donna Jordan of Jordan Fabrics has become a beloved figure in the quilting community for her accessible, clear, and often innovative tutorials. Her “scrap buster” projects, like this table runner, are particularly popular because they provide quilters with creative solutions for using up fabric stashes. She simplifies complex techniques, making quilting approachable for all skill levels, while her designs always result in beautiful, high-quality finished pieces. This scrappy table runner is a testament to her ability to inspire and guide quilters in transforming simple fabric scraps into cherished household items.
Embarking on this scrappy table runner project is more than just sewing fabric; it’s about embracing creativity, honing your quilting skills, and producing a unique piece of functional art for your home. So gather your beautiful scraps, follow Donna Jordan’s excellent guidance, and enjoy the rewarding process of bringing a vibrant, personalized touch to your living space!