
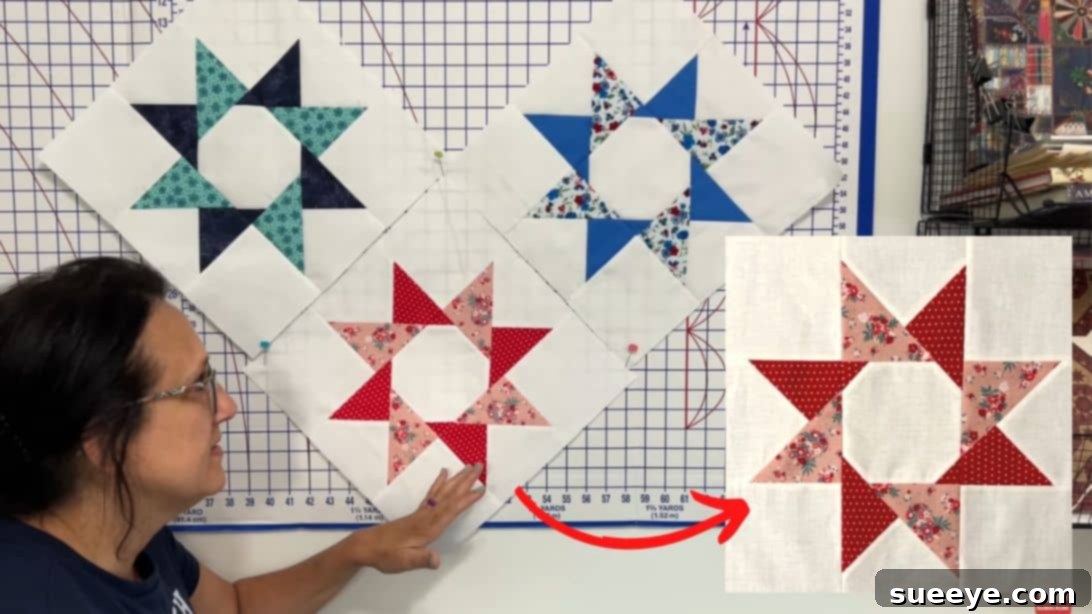
Master the Star of the Orient Quilt Block: A Comprehensive Sewing Tutorial
Welcome to a journey into the heart of quilting, where artistry meets precision. The Star of the Orient Quilt Block, as beautifully demonstrated by The Sewing Channel, is a design that captivates with its intricate appearance yet surprises with its approachable construction. This guide is crafted to transform your fabric pieces into a breathtaking star pattern, offering clear, step-by-step instructions that emphasize the importance of accuracy in every cut, fold, and stitch. Whether you’re a seasoned quilter looking for a rewarding project or a beginner eager to expand your skills, this tutorial will empower you to create a truly gorgeous quilt block. Prepare your sewing machine, gather your fabrics, and get ready to experience the joy of quilting!
The Star of the Orient Quilt Block is renowned for its mesmerizing visual depth, created by carefully placed contrasting fabrics. Its design evokes images of distant lands and ancient constellations, making it a focal point in any quilt. While the finished product appears complex, the individual steps are straightforward, relying on fundamental quilting techniques. The secret to its success lies in meticulous preparation and a steady hand, ensuring that each component aligns perfectly to form the radiant star. We’ll walk you through everything, from selecting your materials to the final pressing, ensuring your Star of the Orient block shines brightly.
Essential Tools & Materials for Your Star of the Orient Quilt Block
Before diving into the creative process, gathering your materials and ensuring you have the right tools is paramount. Quality tools not only make the quilting process more enjoyable but also significantly contribute to the precision and professional finish of your block. Investing in good quality fabric is also recommended, as it will hold its shape better and be more forgiving during the sewing process.
Materials You’ll Need:
- First Colored Fabric: This will be one of your primary design elements, often a vibrant or strong color to create contrast.
- 4 pieces of 1 1/2″ squares
- 4 pieces of 4″ squares
- Second Colored Fabric: Choose a complementary or contrasting color to your first fabric, adding another layer of visual interest to your star.
- 4 pieces of 4″ squares
- Background Fabric: Typically a lighter, neutral tone, this fabric allows the star design to truly pop and gives the eye a place to rest.
- 9 pieces of 5″ squares
- Thread: A good quality 100% cotton thread that matches or blends with your fabrics.
- Fabric Marker: A disappearing ink pen or a chalk pencil for marking your fabric.
Essential Quilting Tools:
- Rotary Cutter, Mat, and Quilting Ruler: These are indispensable for achieving precise, straight cuts. A 12.5-inch square ruler is highly recommended for squaring up blocks.
- Iron and Ironing Board: Crucial for pressing seams and achieving crisp folds, which is vital for accuracy.
- Sewing Machine: Equipped with a fresh needle (universal or quilting needle, size 80/12 or 90/14) and a 1/4-inch piecing foot, if available, for consistent seam allowances.
- Fabric Shears or Scissors: For any minor trimming or thread snipping.
- Pins or Fabric Clips: To hold fabric pieces securely in place before sewing.
- Seam Ripper: An essential tool for every quilter – don’t worry, even the pros make mistakes!
Choosing your fabrics is an exciting part of the process. Consider how the colors will interact. A strong contrast between the colored fabrics and the background will make your Star of the Orient truly sparkle. Don’t be afraid to experiment with different color palettes to create a unique look that reflects your personal style.
Step-by-Step Instructions: Crafting Your Star of the Orient Quilt Block
This tutorial breaks down the creation of the Star of the Orient Quilt Block into manageable steps. Remember, patience and precision are your best friends here. Take your time, enjoy the process, and watch your star emerge!
Step 1: Preparing Your Fabric Squares
The foundation of any beautiful quilt block is accurate cutting and marking. Begin by taking all your fabric squares. For each square, carefully fold it in half diagonally, ensuring the corners align perfectly. Press firmly with a hot iron to create a sharp, visible crease. This crease will serve as your guide for subsequent steps. Next, using a ruler and a fabric marker (either disappearing ink or chalk), draw a clear line precisely along this crease on the back (wrong side) of each square. This line is critical for maintaining accuracy when sewing, so make sure it’s clear and straight. The precision of this initial step directly impacts the final appearance of your Star of the Orient quilt block.
Step 2: Attaching the First Small Triangles (Snowballing Technique)
Now, let’s start building the core units of your block. Take one of your marked 1 1/2″ colored squares and one 5″ background fabric square. Position the smaller, folded colored square onto one corner of the larger background square, aligning the raw edges. Ensure that the background fabric is completely covered by the colored triangle; no white should peek out from underneath. Carefully open the folded colored square to flatten it, then secure it in place with a pin, making sure the marked diagonal line is visible and correctly positioned. Repeat this process for all four corners of four different 5″ background squares, using the same first colored fabric. Now, using your sewing machine, stitch precisely along the creased line you marked. It’s crucial not to stitch toward the very center of the background block; instead, stitch from the outer edge towards the point where the marked line meets the corner of the background square, creating a “snowball” effect. This technique is fundamental for creating sharp points in your quilt block designs.
Step 3: Pressing for Perfection
Pressing is just as important as sewing in quilting, as it sets your seams and ensures your blocks lie flat. After sewing, gently press over the top of your seams to “set” the stitches. This helps to meld the threads into the fabric, creating a flatter seam. Then, carefully fold the triangular pieces created in Step 2 outwards, away from the center, so that the seam allowance is hidden underneath. Press again, ensuring the edges are crisp and flat. You can choose to press seams open or to one side, but for this step, pressing towards the outside (into the new triangle) helps to minimize bulk in the center.
Step 4: Squaring Up Your Blocks (First Trim)
Consistency in block size is key for a well-assembled quilt. After pressing, take your ruler and measure the newly constructed block. It should ideally still measure 5″ x 5″. If your block is slightly larger or uneven due to fabric stretch or minor sewing variations, carefully trim it down to the precise 5″ square using your rotary cutter and mat. Align your ruler with the existing seams and ensure your cuts are perfectly square. This step is crucial for ensuring all your block units fit together seamlessly later on.
Step 5: Incorporating the First Set of Larger Triangles
Now we’ll add the next layer of detail to your Star of the Orient. Take one of your remaining 5″ background squares (without any small triangles yet). Choose one of the 4″ squares from your *first* colored fabric, which you have already folded and marked diagonally in Step 1. Place this folded 4″ square onto one corner of the background square, aligning the raw edges. Open it and secure it with pins, ensuring the marked line is ready for sewing. Repeat this with the remaining three 4″ squares of the first colored fabric, attaching them to the remaining three corners of three separate 5″ background squares. Sew along the marked diagonal line, just as you did in Step 2, remembering not to stitch towards the very center of the block. After sewing, use your rotary cutter to trim off the excess fabric, leaving a 1/4-inch seam allowance beyond your stitched line. Then, open the seam allowances and press them flat, either towards the darker fabric or open, depending on your preference for minimizing bulk.
Step 6: Second Squaring Up (Ensuring Uniformity)
Just as before, it’s vital to maintain consistent block sizing. After attaching the 4″ triangles and pressing, measure each of your new block units. Again, they should be 5″ squares. If necessary, use your rotary cutter and ruler to carefully trim any excess fabric, squaring up each block to exactly 5″ x 5″. This iterative squaring-up process is fundamental in quilting to ensure that when you assemble your rows and complete quilt, all pieces align perfectly, resulting in a flat and beautiful finished project.
Step 7: Adding the Second Set of Larger Triangles
This step brings more complexity and visual interest to your Star of the Orient. Take one of the 5″ square units you created in Step 5 (the ones with only one large triangle attached). Now, take one of the 4″ squares from your *second* colored fabric, which has also been folded and marked diagonally. Place this folded 4″ square onto the corner of your existing unit *adjacent* to the first large triangle you added, ensuring the raw edges are aligned. This placement is key to building the star’s points. Pin it securely. Sew precisely on your marked diagonal line, trim the excess fabric leaving a 1/4-inch seam allowance, and press the seams open or towards the darker fabric. Repeat this process for the other three units you prepared in Step 5, ensuring each unit receives a second colored triangle in the corresponding adjacent corner. This creates the distinctive two-tone points of the Star of the Orient.
Step 8: Assembling Your Star of the Orient Block (Layout)
Now comes the exciting part where your star truly begins to take shape! Lay out all your individual block units on a flat surface, such as a design wall or a large table, according to the visual reference image provided or based on the video tutorial. You should have:
- One central 5″ background square (the plain one).
- Four units with two different colored large triangles.
- Four units with the small 1 1/2″ triangles at the corners (from Step 4).
Arrange them into a 3×3 grid, carefully rotating each piece until the star pattern emerges and all the points align as desired. Take a moment to admire your layout and ensure everything is oriented correctly before moving on to sewing. This visual planning stage is crucial for avoiding mistakes and ensuring your star’s symmetry.
Step 9: Sewing the Rows Together
Once you’re satisfied with your layout, it’s time to sew the individual units into rows. Working one row at a time (e.g., top row, middle row, bottom row), take the units and place them right sides together. Use pins generously to align the edges and especially to match up any points or seams where two pieces meet. This is where your careful pressing and squaring up will pay off, allowing for precise matching. Sew each seam with a consistent 1/4-inch seam allowance. After sewing each row, take it to your ironing board. Press the seams open or to one side (alternating directions for adjacent rows can help nest seams in the next step, reducing bulk). This ensures your rows lie flat and are ready for the final assembly.
Step 10: Joining the Rows to Complete Your Star of the Orient
With your three rows meticulously sewn and pressed, it’s time to bring your Star of the Orient Quilt Block to completion. Place the top row and the middle row right sides together, carefully aligning all the seams and points. Use plenty of pins to secure them, paying extra attention to where the seams meet – you want those points to match up perfectly! Sew along the entire length with a precise 1/4-inch seam allowance. Repeat this process to attach the bottom row to the combined top and middle rows. Once all rows are sewn, take your complete block back to the ironing board for a final, crucial press. Press all the row seams open or to one side, ensuring the entire block lies perfectly flat and square. This final pressing step really defines the crispness and professional finish of your beautiful Star of the Orient Quilt Block.
Tips for Success and Creative Variations
- Practice Precision: The Star of the Orient relies heavily on accurate cutting and sewing. Don’t rush! Take your time with each step.
- Press, Don’t Iron: When pressing, lift and set your iron down rather than sliding it, which can distort your fabric.
- Chain Piecing: For efficiency, especially if making multiple blocks, you can “chain piece” similar steps without cutting threads between units.
- Color Play: Experiment with different fabric combinations. A monochromatic scheme can create a subtle elegance, while high-contrast colors will make your star pop!
- Beyond the Block: Once you’ve mastered this block, consider incorporating it into larger projects like a throw quilt, a wall hanging, a pillow cover, or even a tote bag. Repeating the block across a quilt creates a stunning mosaic effect.
Congratulations! You have successfully created a magnificent Star of the Orient Quilt Block. This design is not just a collection of fabric pieces; it’s a testament to your dedication, precision, and growing skill as a quilter. Each point and line tells a story of careful craftsmanship. We hope this comprehensive tutorial has been both informative and inspiring, guiding you seamlessly through every stage of this rewarding project. Keep exploring, keep creating, and most importantly, happy quilting!