
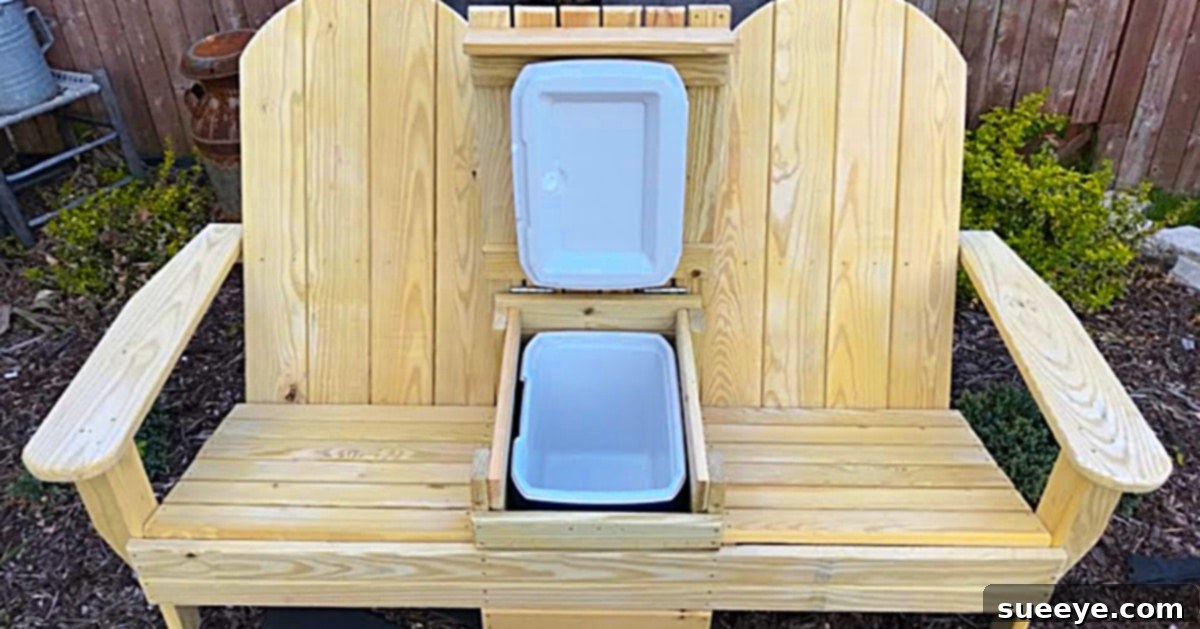
DIY Adirondack Cooler Bench: The Perfect Blend of Style and Convenience
There’s an undeniable charm to Adirondack-style furniture that instantly evokes a sense of relaxation and timeless outdoor living. The classic design, with its wide armrests and sloped back, is ideal for unwinding on a porch or patio. However, finding furniture that perfectly balances this iconic style with modern practicality can sometimes be a challenge. As someone who appreciates the aesthetic appeal of Adirondack pieces, I often found myself wishing for an addition that offered both comfort and an extra touch of convenience for outdoor gatherings.
My husband, on the other hand, prioritizes functionality and always appreciates a practical feature, especially when it comes to outdoor entertaining. While he loves the idea of comfortable seating, he often felt traditional Adirondack chairs, despite their beauty, lacked the kind of direct utility that truly enhanced our outdoor experience. He’s the kind of person who enjoys having a cold drink readily accessible without having to constantly trek back inside. This slight difference in preference often left us searching for a compromise that would satisfy both our desires for classic style and ultimate ease.
That’s why, when I stumbled upon the ingenious concept of an Adirondack-style bench featuring a built-in cooler, I knew I had found the perfect solution. This innovative design promised to marry the beloved aesthetic of Adirondack furniture with the ultimate convenience of a cool, refreshing drink always within reach. It was an idea so compelling that I immediately knew I had to convince him. The best way to present such a brilliant concept, I thought, would be to show him a meticulously crafted case – which, for this particular stroke of genius, simply meant sharing the fantastic video tutorial by Rustic Goose on Youtube. The design truly is brilliantly straightforward, yet the integrated cooler transforms this project into something truly unique and highly desirable. I could barely contain my excitement at the prospect of finally realizing my dream of an Adirondack patio bench, all while ensuring my husband remained perfectly content with his ingenious built-in cooler.
The Allure of the Adirondack Cooler Bench
Imagine a warm summer afternoon, lounging on your patio or deck. The sun is shining, a gentle breeze is blowing, and you’re comfortably seated on a beautiful, handcrafted Adirondack bench. What could make this idyllic scene even better? Not having to get up for another cold beverage! This is precisely the magic of the DIY Adirondack Cooler Bench. It’s more than just a piece of furniture; it’s an enhancement to your entire outdoor living experience.
This project stands out not just for its aesthetic appeal, but for its unparalleled practicality. Traditional Adirondack chairs are known for their comfort and classic lines, but they don’t typically offer integrated storage or chilling capabilities. By incorporating a cooler directly into the bench’s design, this DIY project solves a common outdoor entertaining dilemma. It minimizes trips to the kitchen, keeps your drinks perfectly chilled for hours, and adds a unique focal point to your outdoor space. Whether you’re hosting a barbecue, enjoying a quiet afternoon with a book, or simply soaking up the sun, having your refreshments conveniently at hand elevates the entire experience. It’s truly a game-changer for anyone who loves spending time outdoors.
Essential Materials for Your Adirondack Cooler Bench
Embarking on a woodworking project like the Adirondack Cooler Bench requires careful selection of materials to ensure durability, longevity, and a beautiful finish. The beauty of this design lies in its simplicity, requiring a manageable list of items that are readily available at most hardware stores or lumberyards. Here’s a detailed look at what you’ll need to bring this fantastic project to life:
- Coleman 28-Quart Cooler: This specific size is crucial as the bench’s dimensions are designed around it. The Coleman brand is known for its reliable insulation, ensuring your drinks stay cold for extended periods. Choosing a cooler with a secure, hinged lid is also important, as this will integrate seamlessly into the bench’s top.
- Wood: The primary material for the bench’s structure. For outdoor furniture, selecting the right type of wood is paramount for weather resistance and longevity. Popular choices include:
- Cedar: Naturally resistant to rot, decay, and insect infestation. It’s lightweight, easy to work with, and has a beautiful aromatic scent.
- Treated Pine: A more budget-friendly option, pine that has been pressure-treated offers good resistance to moisture and insects. However, it may require more regular sealing or painting to maintain its appearance.
- Redwood: Similar to cedar in its natural resistance to decay and insects, redwood is also highly durable and aesthetically pleasing, though often more expensive.
- Cypress: Another excellent choice for outdoor use, cypress is durable, naturally resistant to decay, and holds up well against various weather conditions.
Ensure you purchase high-quality, straight lumber to minimize warping and make the assembly process smoother.
- Stainless Steel Utility Hinge: A strong, weather-resistant hinge is vital for the cooler lid mechanism. Stainless steel is preferred over other metals because it won’t rust or corrode when exposed to outdoor elements, ensuring smooth operation for years to come. Choose a size that can adequately support the weight of the wooden lid section that covers the cooler.
- 1 5/8 Coated Deck Screws: These screws are specifically designed for outdoor applications. The coating (often ceramic or polymer) protects them from rust and corrosion, which is essential for furniture exposed to moisture and varying temperatures. Using the correct length ensures a secure hold without penetrating too far through the wood.
Essential Tools for a Successful Build
While the design of the Adirondack Cooler Bench is straightforward, having the right tools makes the building process efficient, accurate, and enjoyable. These are the fundamental power tools you’ll need, along with a brief explanation of their purpose:
- Table Saw: A table saw is indispensable for making long, precise, and consistent cuts in lumber. It will be used for ripping boards to specific widths for the bench slats and framing pieces, ensuring all components fit together snugly and accurately. Safety should always be a priority when operating a table saw; ensure you understand its functions and use appropriate safety guards.
- Jigsaw: A jigsaw is perfect for cutting curves and intricate shapes, or for making plunge cuts for the cooler opening. While the Rustic Goose design is generally linear, a jigsaw provides flexibility for any custom shaping or for cleanly cutting out the cooler’s precise perimeter. It’s also useful for trimming any pieces that require non-straight cuts.
- Cordless Drill/Driver: Essential for pre-drilling pilot holes (to prevent wood splitting) and driving screws quickly and efficiently. A good quality drill/driver with adjustable torque settings will be your best friend for assembly.
- Measuring Tape and Pencil: Accuracy is key in woodworking. A reliable measuring tape and a clear marking pencil will ensure all your cuts and placements are exact.
- Safety Glasses and Hearing Protection: Always prioritize safety when working with power tools. Eye protection is non-negotiable, and hearing protection is highly recommended, especially when using a table saw for extended periods.
- Sander or Sandpaper: To achieve a smooth, splinter-free finish that is comfortable to sit on and ready for staining or painting.
Step-by-Step Overview: Bringing Your Bench to Life
The beauty of the Rustic Goose tutorial lies in its clear, simple instructions, guiding you through each phase of construction. While a detailed step-by-step written guide cannot fully replace the visual clarity of a video, we can outline the general progression of this exciting DIY project:
Step 1: Preparation and Cutting the Wood. The initial phase involves accurately measuring and cutting all the wooden components. This includes the frame pieces for the bench’s base, legs, backrest, and most importantly, the specific pieces that will form the cooler compartment. The table saw will be your primary tool here, ensuring all cuts are straight and precise according to the plan provided in the video. Attention to detail at this stage is crucial for a well-fitting and sturdy final product. Labeling your cut pieces can also be very helpful to avoid confusion during assembly.
Step 2: Assembling the Bench Frame. Once all pieces are cut, you’ll begin assembling the main structural components of the Adirondack bench. This typically starts with the side frames, including the iconic wide armrests and the angled legs. Using your coated deck screws and pre-drilling pilot holes will ensure strong, lasting joints. The video will guide you on the specific angles and dimensions required to achieve the comfortable recline characteristic of Adirondack furniture. Remember to use a square to ensure all connections are at proper right angles where necessary, contributing to the bench’s stability.
Step 3: Constructing the Cooler Compartment. This is where the project truly differentiates itself. You’ll build a specific wooden casing designed to perfectly house the Coleman 28-quart cooler. This compartment will be integrated into the central section of the bench, creating a seamless and functional unit. The jigsaw might be used to refine the opening or make specific cuts for the cooler’s snug fit. The objective is to create a secure, insulated enclosure that keeps the cooler firmly in place and easily accessible. Precision here ensures the cooler functions optimally and looks professionally integrated.
Step 4: Installing the Cooler and Hinged Lid. With the cooler compartment built, the next crucial step is to install the Coleman cooler itself. It should fit snugly into its custom-built wooden home. Then, you will attach a wooden flap or lid directly above the cooler opening, using the stainless steel utility hinge. This flap will mimic the original cooler lid, allowing you to lift it up effortlessly to access your drinks. The placement of the hinge is vital to ensure smooth operation and a secure closure. This ingenious design means you don’t even have to get up from your comfortable Adirondack position to grab another refreshing beverage. Just lift the flap, grab a drink, and continue relaxing!
Step 5: Finishing Touches. Once the bench is fully assembled and the cooler is integrated, the final steps involve sanding and applying a protective finish. Sanding ensures a smooth surface, eliminating splinters and preparing the wood for staining, painting, or sealing. For outdoor furniture, applying a weather-resistant stain, paint, or clear sealant is highly recommended. This not only enhances the appearance of your DIY Adirondack Cooler Bench but also protects the wood from moisture, UV rays, and general wear and tear, significantly extending its lifespan. Choose a finish that complements your existing outdoor decor.
The Benefits of Building Your Own Cooler Bench
Beyond the undeniable satisfaction of creating something with your own hands, constructing a DIY Adirondack Cooler Bench offers a multitude of practical and personal benefits:
- Unmatched Convenience: No more interruptions to fetch drinks from inside the house or a separate, unsightly cooler. Everything you need for refreshment is right at your fingertips.
- Customization Potential: You get to choose the wood, the stain, the paint color, and any additional details, ensuring the bench perfectly matches your personal style and outdoor aesthetic.
- Cost-Effectiveness: Building your own outdoor furniture can often be significantly cheaper than purchasing pre-made, high-quality pieces, especially those with unique features like a built-in cooler.
- Skill Development: It’s an excellent opportunity to hone your woodworking skills, learn new techniques, and gain confidence in tackling future DIY projects.
- Unique Outdoor Feature: This isn’t just another patio bench; it’s a conversation starter and a truly unique piece that will impress guests and elevate your outdoor living space.
- Durability and Longevity: By selecting high-quality, weather-resistant materials and applying proper finishes, your handmade bench can easily outlast many store-bought alternatives.
- Enhanced Entertaining: Perfect for barbecues, poolside lounging, garden parties, or simply enjoying a quiet evening, this bench makes hosting and relaxing outdoors infinitely easier and more enjoyable.
Tips for a Successful DIY Project
To ensure your DIY Adirondack Cooler Bench project goes smoothly and results in a stunning, durable piece of outdoor furniture, consider these helpful tips:
- Measure Twice, Cut Once: This age-old woodworking adage is crucial. Double-check all your measurements before making any cuts to avoid costly mistakes and wasted materials.
- Prioritize Safety: Always wear appropriate safety gear, including safety glasses and hearing protection, especially when operating power tools. Understand the proper use of each tool before you begin.
- Choose the Right Wood for Your Climate: If you live in a particularly humid or rainy area, investing in naturally weather-resistant wood like cedar or cypress will save you maintenance in the long run. If opting for treated pine, ensure it’s rated for ground contact if any part of the bench will touch the earth, and apply a good sealant.
- Pre-Drill Pilot Holes: Always pre-drill pilot holes for your screws. This prevents the wood from splitting, especially near edges or when working with harder woods, ensuring a stronger, cleaner joint.
- Invest in Quality Fasteners: As mentioned, coated deck screws or stainless steel screws are vital for outdoor projects to prevent rust and ensure structural integrity over time.
- Don’t Skip the Finish: A proper finish isn’t just about aesthetics; it’s about protection. Apply a good quality outdoor stain, paint, or sealant to protect the wood from moisture, UV damage, and mildew. Reapply as needed, typically every 1-3 years depending on the product and exposure.
- Take Your Time: Rushing through a DIY project can lead to mistakes and frustration. Enjoy the process, take breaks when needed, and focus on accuracy rather than speed.
- Level Ground: Ensure you assemble your bench on a flat, level surface to avoid creating a wobbly or uneven final product.
Ready to Build Your Dream Outdoor Oasis?
The journey from a simple idea to a tangible, functional piece of furniture is incredibly rewarding. My husband is already more enthusiastic about this DIY Adirondack Cooler Bench than I am, and his excitement is infectious! He’s already made a trip to Home Depot and purchased all the necessary materials, eager to kickstart this project this upcoming weekend. The prospect of having a stylish, comfortable bench that also serves as a convenient cooler for our outdoor space has truly captured our imaginations.
If you’re looking for a project that combines classic outdoor aesthetics with ingenious modern functionality, the DIY Adirondack Cooler Bench is an absolute winner. It’s a fantastic way to enhance your patio, porch, or garden, making outdoor relaxation and entertaining more enjoyable than ever before. So why wait? Gather your materials, fire up that Rustic Goose tutorial, and start building the ultimate outdoor seating solution that will keep you (and your drinks) cool all season long!