
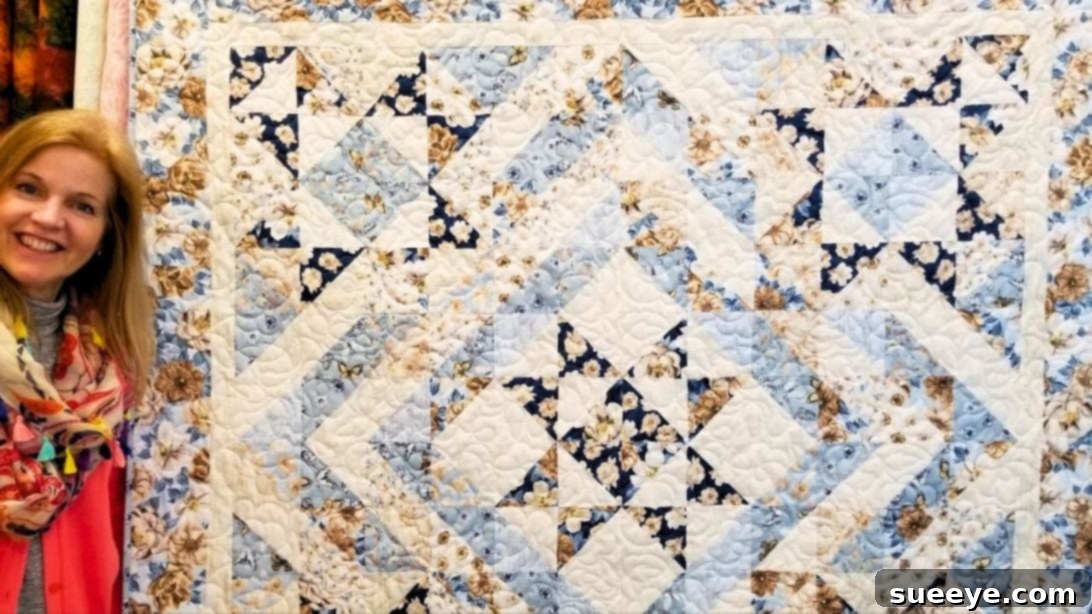
Donna’s Five-Star Quilt: A Stunningly Simple HST Pattern for Every Quilter
Are you looking for a captivating quilt pattern that looks complex but is surprisingly easy to create? Look no further than Donna’s Five-Star Quilt, a brilliant design brought to you by the experts at Jordan Fabrics. This remarkable quilt, despite its intricate appearance, is meticulously crafted using just one fundamental quilting unit: the half-square triangle (HST). Even if you’re a beginner quilter, you can confidently tackle this project and achieve a professional-looking result.
The beauty of Donna’s Five-Star Quilt lies in the clever arrangement of these simple HSTs into dynamic star and striking chevron blocks. When these two distinct block types are combined, they form a mesmerizing pattern that gives the quilt its signature “five-star” appeal. This comprehensive guide will walk you through each step, from preparing your fabric to the final binding, ensuring a smooth and enjoyable quilting journey. Get ready to transform basic fabric squares into a masterpiece you’ll cherish for years to come!
Essential Materials for Your Five-Star Quilt Project
Before you dive into the exciting world of cutting and sewing, gather all your necessary materials. Having everything ready beforehand ensures a seamless and efficient quilting experience. The charm pack friendly design makes fabric selection a breeze, offering pre-cut convenience.
- 3 packs of 5″ charm squares: These will form the “dark” or patterned fabric in your HSTs, bringing vibrant color and design to your quilt.
- 1 pack of bone 5″ squares: This pack will serve as your “light” or background fabric, providing contrast and making your star and chevron motifs pop.
- 1 yard for inside border and binding: Choose a coordinating solid or subtle print that complements your charm squares to frame your quilt top beautifully and finish the edges.
- 1 yard for the outside border: Select a fabric that either harmonizes or contrasts dramatically with your quilt top, adding a final touch of elegance and size.
- 3 3/4 yards for backing: This will be the fabric for the back of your quilt. Consider a soft, durable cotton that will feel comfortable and last long.
- Basic quilting supplies: You will also need a sewing machine, rotary cutter, cutting mat, quilting ruler, iron, ironing board, scissors, thread, and straight pins.
Step-by-Step Instructions: Crafting Your Donna’s Five-Star Quilt
Step 1: Mastering the Half-Square Triangle (HST) Units
The half-square triangle is the foundational element of this quilt pattern. Precision here is key to a perfectly aligned finished quilt. You will need a total of 144 HST units for this project.
- Prepare your squares: Begin by selecting 72 light 5″ squares (from your bone pack) and 72 dark 5″ squares (from your charm packs). Ensure your fabrics are pressed flat and free of wrinkles.
- Marking for accuracy: Take one light 5″ square and, using a fabric-friendly pen or pencil, draw a diagonal line from one corner to the opposite corner on the wrong side of the fabric. This line will be your cutting guide.
- Layering and sewing: Place the marked light fabric square on top of a dark fabric square, with right sides together. Make sure all edges are aligned perfectly. Pin to secure. Now, sew a seam 1/4″ away from each side of the drawn diagonal line. You will have two parallel stitch lines.
- Cutting and pressing: Carefully cut along the drawn diagonal line between your two stitch lines. This will yield two raw half-square triangles. Open these units and press the seam allowances towards the darker fabric. Pressing towards the darker fabric helps to prevent the lighter fabric’s seam allowance from showing through.
- Trimming for perfection: At this stage, your HSTs might have small “dog ears” (tiny fabric triangles extending beyond the corner) and might not be perfectly square. Using your rotary cutter and ruler, trim these “dog ears” and square up each HST unit to precisely 4 5/8″. This step is crucial for ensuring all your blocks fit together perfectly later on. Repeat this process until you have a total of 144 perfectly trimmed HST units.
Step 2: Constructing the Elegant Star Blocks
The star blocks are the primary focal point of Donna’s Five-Star Quilt, bringing a classic yet dynamic element to the design. You will create five of these stunning blocks.
- Arrangement is key: For each star block, you will need 16 of your newly made 4 5/8″ half-square triangles. Refer to the pattern’s visual guide (or the image below) to arrange these 16 HSTs into a 4×4 grid, forming the distinct star shape. Pay close attention to the orientation of each HST to ensure the points of your star are crisp and well-defined.
- Sewing into rows: Once you are satisfied with your arrangement, carefully sew the HSTs together in rows. Use a consistent 1/4″ seam allowance. After sewing each row, press the seam allowances in alternating directions from one row to the next. For example, press the seams of the first row to the right, the second row to the left, the third row to the right, and so on. This technique helps reduce bulk when you join the rows.
- Joining the rows: With your rows sewn and pressed, it’s time to join them to form the complete star block. Carefully align the seams of adjacent rows, nesting them together where the pressing directions alternate. Pin generously at the seam intersections to ensure accurate points. Sew the rows together, again using a 1/4″ seam allowance. Press the final seams open or to one side, whichever creates the flattest block.
- Repeat the process: Continue these steps to create a total of five magnificent star blocks.
Step 3: Creating the Dynamic Chevron Blocks
The chevron blocks add a sense of movement and modern flair to Donna’s Five-Star Quilt, perfectly complementing the traditional star blocks. You will need to make four of these eye-catching blocks.
- Arranging the chevron pattern: Similar to the star blocks, each chevron block requires 16 half-square triangles. Consult the pattern’s visual guide (or the image below) for the specific arrangement of these HSTs to form the distinct “V” shape of the chevron. The direction and angle of each HST are crucial for achieving the desired effect.
- Sewing rows with precision: Once your HSTs are arranged correctly for a single block, sew them together into rows using a consistent 1/4″ seam allowance. As with the star blocks, remember to press the seam allowances in alternating directions for adjacent rows. This technique ensures that your seams will nest together perfectly when you join the rows, resulting in flat, bulk-free blocks.
- Assembling the block: Carefully join the sewn rows, aligning all seams and pinning securely. Sew with a 1/4″ seam allowance. Give the finished block a good press, ensuring all seams lie flat.
- Repeat for all blocks: Follow these steps to complete a total of four chevron blocks.
Step 4: Assembling the Quilt Top — Bringing It All Together
Now that you have all your star and chevron blocks ready, it’s time for the exciting stage of assembling your quilt top! This is where the magic truly happens as the individual blocks come together to reveal the full beauty of Donna’s Five-Star Quilt pattern.
- Layout your design: Carefully arrange your five star blocks and four chevron blocks on a design wall or a large flat surface (like a clean floor). Refer to the picture of the finished quilt for the exact placement. Typically, these quilts alternate between star and chevron blocks to create the overall flowing pattern. Take your time to get the arrangement just right, stepping back frequently to view it from a distance.
- Sewing into rows: Once you are happy with the layout, begin sewing the blocks together into horizontal rows. Maintain a consistent 1/4″ seam allowance. As you sew, pay close attention to the alignment of your block seams to ensure that your points and lines meet up accurately. Press the seams in alternating directions between blocks within each row to facilitate nesting when joining the rows.
- Joining the rows to form the quilt top: With all your rows completed and pressed, carefully join them together to form the full quilt top. Pin extensively at all seam intersections, nesting the seams where possible, to ensure precision. Sew slowly and carefully, maintaining your 1/4″ seam allowance.
- Final pressing: After the entire quilt top is assembled, give it a thorough steam press. Lay it flat and use a hot iron with steam, gently pressing across the entire surface. This step helps to set the seams, flatten any puckers, and gives your quilt top a crisp, professional finish.
Step 5: Adding Borders and the Finishing Touches
Borders frame your quilt, enhancing its design and adding an extra layer of visual appeal. Once the borders are on, you’ll move to the quilting and binding stages to complete your masterpiece.
- Preparing the inside border: From your chosen inside border fabric, cut 6 strips, each 2″ wide, across the width of the fabric (WOF). These strips will be sewn together to create continuous lengths long enough for your quilt’s perimeter. Attach these strips to all four sides of your quilt top, starting with the opposing sides (e.g., top and bottom), pressing seams, then attaching the remaining two sides. This method helps keep the quilt square.
- Adding the outside border: Next, from your outside border fabric, cut 7 strips, each 4 1/2″ wide, across the width of the fabric (WOF). Join these strips end-to-end to create the necessary lengths. Attach these wider border strips to all four sides of your quilt, again starting with opposing sides. Press all seams flat. Your quilt top is now complete and beautifully framed.
- Quilting your project: This step involves layering your quilt top, batting (the fluffy middle layer), and backing fabric, then stitching through all three layers to hold them together and add texture. You can choose to machine quilt (using a walking foot or free-motion quilting), hand quilt, or even tie your quilt. Select a quilting design that complements your piecing, whether it’s simple stitch-in-the-ditch, an all-over meander, or more intricate custom designs.
- Binding the quilt: The final step is to bind the edges of your quilt, providing a clean, durable finish. Use the remaining inside border fabric (or cut additional strips if needed) to create binding strips. Typically, these are cut 2 1/2″ wide. Sew these strips together end-to-end to form one continuous length. Attach the binding to the front edge of your quilt, then wrap it around to the back and hand-stitch or machine-stitch it in place.
Tips for Success and Customization
To ensure your Donna’s Five-Star Quilt project is a resounding success and truly reflects your personal style, consider these additional tips:
- Fabric Selection: While charm packs simplify fabric choice, don’t hesitate to curate your own 5″ squares from your stash. Consider the contrast between your “light” and “dark” fabrics; a strong contrast will make your star and chevron designs pop, while a subtle contrast will create a softer, more blended look. Pre-washing your fabrics can prevent future shrinkage and dye bleeding, especially important for darker, saturated colors.
- Precision is Paramount: Quilting is an art that benefits greatly from precision. Use a sharp rotary cutter, accurate rulers, and a consistent 1/4″ seam allowance throughout the entire process. Regularly check your measurements and trim your HSTs diligently to 4 5/8″ to ensure all blocks fit together perfectly.
- Pressing Matters: Proper pressing is just as important as accurate sewing. Always press your seams as you go. Pressing seams in alternating directions when joining rows and blocks helps them to “nest,” reducing bulk at intersections and allowing your quilt top to lie flatter. Use a good quality iron and consider a spritz of starch for extra crispness.
- Chain Piecing: To speed up the HST creation process, consider chain piecing. This involves feeding one unit after another through your sewing machine without lifting the presser foot or clipping threads in between. Once all units are sewn, you can snip them apart. This technique is a significant time-saver for repetitive tasks.
- Design Wall: A design wall (a flannel-covered board or wall space) is invaluable for arranging your blocks. It allows you to step back and view your layout from a distance, making it easier to spot any arrangement errors before you start sewing.
- Customizing Your Quilt: Don’t be afraid to make this pattern your own!
- Size: Adjust the number of blocks to make a larger bed quilt or a smaller throw.
- Color Palette: Experiment with different color combinations. A monochrome palette can be strikingly modern, while bright, varied colors can create a cheerful, eclectic feel.
- Quilting Design: The quilting itself adds another layer of design. From simple straight lines to complex free-motion motifs, your quilting choices can dramatically alter the final look and feel of your quilt.
- Take Breaks: Quilting should be an enjoyable process. If you find yourself getting frustrated, step away for a bit. A fresh perspective can often help you solve a problem more easily.
Your Completed Donna’s Five-Star Quilt
Congratulations! You’ve successfully navigated the steps to create a stunning Donna’s Five-Star Quilt. This project, which initially might have seemed daunting, has showcased the power of the humble half-square triangle and the beauty of thoughtful design.
Whether this is your first quilt or your fiftieth, the satisfaction of creating something beautiful and functional with your own hands is truly rewarding. This versatile pattern from Jordan Fabrics is a testament to how simple techniques, when combined creatively, can yield truly spectacular results. Enjoy your new quilt, a testament to your skill and patience, and perhaps share your creation with fellow quilters or on social media to inspire others!
Keep an eye out for more inspiring patterns and tutorials to continue your quilting journey. Happy quilting!