
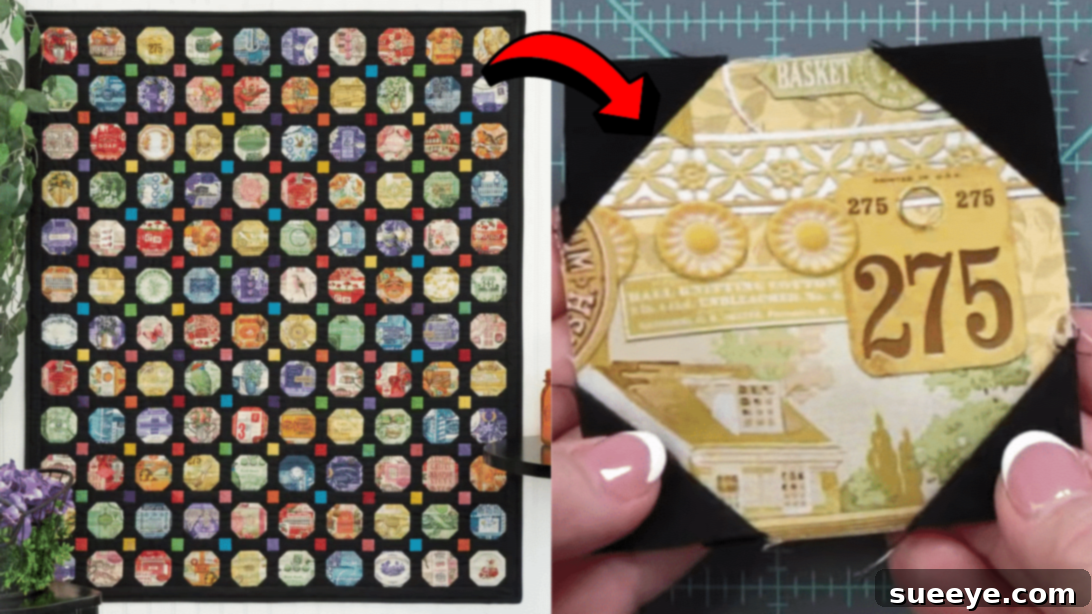
Master the Easy I Spy Quilt: A Beginner-Friendly Snowball Block Tutorial
Are you searching for a delightful and straightforward quilting project that yields stunning results? Look no further! This “I Spy” quilt pattern, beautifully presented by Shabby Fabrics on YouTube, is an absolute gem for quilters of all skill levels, especially beginners. Its inherent simplicity in piecing, combined with endless creative possibilities, makes it an instant favorite. Imagine a quilt where vibrant, whimsical prints truly pop against a sophisticated black background – that’s the magic of this design. It’s more than just a quilt; it’s a journey of discovery for little eyes, making it a perfect gift or a cherished family heirloom. The construction relies on the incredibly accessible “snowball block” technique, which simplifies complex-looking designs into manageable, repetitive steps, building confidence with every stitch.
The true charm of the I Spy quilt lies in its remarkable versatility and the unique opportunity it offers to personalize your creation. You’re not just limited to a few specific fabric choices; this project actively encourages you to dive into your fabric stash and utilize those fun, novelty prints you’ve been saving for the perfect occasion. Fabrics adorned with large, interesting shapes, playful texts, charming illustrations, or even miniature scenes find their perfect home here. The strategic use of a black background isn’t merely a backdrop; it’s a powerful design element that makes every single colorful print stand out with remarkable clarity and contrast. This stark contrast transforms individual, often disparate, fabric pieces into a cohesive, eye-catching masterpiece that invites interaction and play.
RELATED PROJECT: If you love accessible quilting projects that build essential skills, be sure to explore this guide for an Easy Snowball & Stars Quilt Using 5″ Squares. Both patterns cleverly leverage the fantastic “snowball block” technique, making them ideal companions for skill-building and expanding your quilting repertoire. Learning one technique well opens up a world of possibilities!
We’re confident that you’ll thoroughly enjoy every step of crafting this charming and engaging quilt. From selecting your whimsical fabrics to seeing the final design come to life, the process is incredibly rewarding. To guide you through each stage, we’ve outlined detailed steps below. For a comprehensive visual walkthrough and invaluable extra tips that bring these instructions to life, we highly recommend watching the accompanying video tutorial from Shabby Fabrics. Gather your materials, prepare your workspace, and let’s embark on this exciting and satisfying quilting adventure together!
Essential Materials for Your I Spy Quilt Project
Before you begin your creative quilting journey, gathering all your materials is a crucial first step for a smooth, efficient, and enjoyable process. Having everything at hand will prevent interruptions and keep your momentum going. Here’s a comprehensive list of what you’ll need, along with some insights into why each item is important for achieving the best results:
- Print Fabric (Assorted Novelty Prints): This is where the “I Spy” fun truly comes alive! Collect a vibrant variety of cotton fabrics featuring interesting motifs, characters, animals, objects, or text. Aim for clear, distinct designs that will be easily identifiable and engaging for a viewer to “spy.” These fabrics will form the core, playful elements of your quilt blocks. Don’t be afraid to mix and match different scales and themes for an eclectic feel.
- Black Fabric (Background, Sashing, and Border): The unsung hero of this quilt’s design! A high-quality solid black cotton fabric provides the perfect, dramatic contrast to make your colorful prints truly pop and stand out. Choose a deep, consistent black or a very subtle tone-on-tone black print (like a black-on-black stripe or dot) for the most effective background. You’ll need this versatile fabric for the small corner squares of your snowball blocks, the strips that beautifully separate your blocks (known as sashing), and the elegant outer frame of your quilt (the border).
- Assorted Print Fabric (for Cornerstones): While optional, small contrasting print squares, strategically used as cornerstones, add an extra touch of design sophistication where your sashing strips intersect. These can be charming scraps from your “I Spy” prints, or entirely new coordinating prints that complement your overall color scheme. They provide little bursts of color and break up the continuous black lines.
- Marking Pen, Pencil, or Chalk: Precision is key in quilting! An essential tool for accurately marking diagonal lines on your fabric squares. A fine-tipped fabric marker that disappears with heat (like an iron) or water, or tailor’s chalk that brushes away easily, is ideal. Test your marker on a scrap piece first to ensure it disappears completely.
- Ruler (Quilting Ruler Recommended): An absolute must for accuracy. Clear acrylic quilting rulers with precise measurements (1/8″, 1/4″, 1/2″ increments) are invaluable for accurate cutting and marking. A square ruler (e.g., 6.5-inch or 12.5-inch) for squaring up blocks, along with a longer straight ruler (e.g., 24-inch) for cutting strips, will be incredibly helpful.
- Needle and Thread: For piecing your quilt top, a good quality all-purpose polyester or 100% cotton thread is recommended. Choose a color that matches your dominant fabric (often the background, so black or dark gray is a safe bet) or a neutral tone that blends well with all your fabrics.
- Scissors or Rotary Cutter and a Cutting Mat: For maximum efficiency and unparalleled accuracy, a sharp rotary cutter and a self-healing cutting mat are highly recommended over traditional scissors for cutting fabric squares and strips. Ensure your rotary blade is sharp for clean, crisp cuts and always use a ruler as a guide.
- Fabric Pins or Wonder Clips: To hold fabric pieces securely in place before stitching. Fine, sharp fabric pins are excellent for precise alignment, especially when matching critical seams. Wonder Clips are also a great alternative for holding thicker layers or binding.
- Iron and Ironing Board: Crucial for achieving a professional, flat finish. Pressing seams open or to one side is a vital step that helps your quilt blocks lie flat, match up accurately, and ensures the entire quilt top looks polished. Do not skip this step!
- Sewing Machine: A reliable sewing machine is the heart of modern quilting. Ensure it’s in good working order. A quarter-inch presser foot (if available for your machine) is a fantastic accessory that helps maintain consistent 1/4-inch seam allowances, which is standard in quilting.
- Batting (Quilt Wadding): (An essential quilting component, not explicitly listed in the original, but required for a finished quilt.) This is the “fluffy” middle layer of your quilt, providing warmth, loft, and texture. Choose from various materials like cotton, polyester, or blends, depending on your desired feel and warmth.
- Backing Fabric: (Another essential quilting component.) A large piece of fabric for the reverse side of your quilt. This can be a single fabric or pieced together from several coordinating fabrics.
- Binding Fabric: (The final touch for a complete quilt.) Strips of fabric cut to finish and protect the raw edges of your quilt, providing a neat and durable frame.
Step-by-Step Guide: How to Craft Your Easy I Spy Quilt
Creating this charming I Spy quilt is an enjoyable process that involves a series of simple, repetitive steps, making it perfect for honing your quilting skills. The core technique is the “snowball block,” which is incredibly beginner-friendly and creates a sophisticated look with minimal effort. Follow these detailed instructions, and remember to consult the Shabby Fabrics video tutorial for clear visual guidance on each step, especially the cutting dimensions.
Step 1: Fabric Preparation and Precise Cutting
The foundation of any beautiful and successful quilt is accurate cutting. Even small discrepancies can lead to blocks that don’t fit together perfectly. Refer diligently to the Shabby Fabrics video tutorial for the exact dimensions required for your chosen quilt size (e.g., baby quilt, lap quilt). Typically, you will carefully cut:
- Larger Print Squares: These will be your main “I Spy” focus squares, showcasing your novelty prints. Ensure these are perfectly square for consistent block sizes.
- Smaller Black Squares: These will form the distinctive “snowball” corners of your main blocks. Accuracy here is crucial for perfect points and a neat finish.
- Sashing Strips: Long, uniform strips of black fabric that will beautifully separate and frame your quilt blocks within rows and columns.
- Cornerstone Squares: Small, often contrasting print squares that will be inserted at the intersections of your sashing strips, adding a decorative touch.
- Border Strips: Longer strips of black fabric to create a polished frame around the entire finished quilt top.
Take your time with this critical first step. Use your sharp rotary cutter and a reliable quilting ruler carefully on your self-healing cutting mat. For best results and to prevent any future shrinkage or color bleeding, it’s also a good practice to pre-wash and press all your fabrics before you begin cutting.
Step 2: Crafting the Snowball Block – The Heart of Your Quilt
This is where the magic of the I Spy quilt truly begins! The snowball block is surprisingly simple to create and quickly becomes intuitive:
- Select Your Pieces: Take one of your larger print squares (your main “I Spy” square) and two of your smaller black squares.
- Position the Black Squares: Place one small black square onto one corner of the larger print square, with their right sides facing each other. Align the edges precisely. Then, repeat this for the corner directly opposite the first one (e.g., if you started with the top-left, place the second on the bottom-right).
- Mark the Diagonal Line: Using your marking tool and ruler, draw a diagonal line from one corner of the small black square to the opposite corner. This line should pass precisely through the points where the small square meets the larger square. This marked line will be your guide for stitching.
- Pin and Stitch: Secure the small black squares in place with a few pins to prevent any shifting during sewing. Stitch directly along the marked diagonal line. It’s essential to maintain a consistent ¼-inch seam allowance for all your piecing seams throughout the entire project for accurate block construction.
- Trim the Excess: Carefully cut away the fabric ¼ inch *away* from your stitched line, towards the outside edge of the small black square. This creates your necessary seam allowance and removes the excess bulk, ensuring your block lays flat.
- Press Open: Remove your pins. Head to your ironing board and carefully press the black corner triangles open, away from the central print square. Pressing ensures flat, crisp seams and a professional finish, preventing bulk at intersections.
- Repeat for Remaining Corners: Now, repeat steps 2-6 for the remaining two corners of your print square, using two more small black squares. When you’re done, you’ll have a beautifully completed “snowball” block with four black corners surrounding your central “I Spy” print.
Continue making more snowball blocks using all your “I Spy” print squares until you have enough to form your desired quilt size. The exact number of blocks will depend on your chosen layout plan and the finished dimensions you’re aiming for.
Step 3: Assembling Quilt Rows with Sashing and Cornerstones
Once your individual snowball blocks are complete, it’s time to arrange them and connect them into structured rows that will form your quilt top:
- Layout Your Blocks: On a design wall, a large table, or a clean floor, arrange your completed snowball blocks into rows and columns according to your desired pattern. This allows you to visualize the final look, ensure a balanced distribution of your “I Spy” prints, and catch any unintentional repetitions.
- Add Sashing to Rows: Take your black sashing strips and place one between each snowball block within a row. These strips not only create visual separation and definition between your blocks but also contribute to the overall stability and flat lie of the quilt.
- Incorporate Cornerstones: At the intersections where vertical and horizontal sashing strips will meet later, place your small assorted print cornerstone squares. These little squares add a delightful design detail, provide a pop of contrasting color or pattern, and break up the continuous lines of the sashing.
- Stitch Row Segments Together: Beginning with your first row, stitch a sashing strip to the right side of your first snowball block. Then, stitch the next snowball block to the other side of that sashing strip. Continue this process until your entire first row is complete. Press your seams consistently, typically towards the sashing strips, to reduce bulk. Repeat for all your planned quilt rows.
Step 4: Joining Rows and Adding the Border
With your individual rows assembled, it’s time to bring the entire quilt top together, adding the sashing rows and the final framing border:
- Create Sashing/Cornerstone Connector Rows: For the strips that will go *between* your completed quilt rows, you will stitch sashing strips together with cornerstone squares interspersed. For example, stitch a sashing strip, then a cornerstone, then another sashing strip, and so on. This creates a complete sashing/cornerstone row that will connect your main quilt rows.
- Join Quilt Rows: Take your first completed quilt row (from Step 3) and stitch a sashing/cornerstone connector row to its bottom edge. Then, stitch your second completed quilt row to the bottom edge of that sashing/cornerstone connector row. Continue this process until all your quilt rows are joined, creating a cohesive and complete quilt top. Carefully press all seams, ensuring they lay flat and nest nicely where they meet.
- Attach the Borders: Once your central quilt top is fully assembled and pressed, accurately measure its length and width. Cut your black border strips to these precise measurements. First, stitch the side borders to the quilt top, ensuring they are evenly attached along the entire length. Press these seams. Then, attach the top and bottom borders, again pressing seams neatly. This final border beautifully frames your quilt, gives it a finished appearance, and helps to square up the entire project.
Step 5: Quilting, Batting, Backing, and Binding – The Finishing Touches
Your quilt top is complete! Now comes the exciting and often creative process of quilting and finishing, which brings all three layers (the quilt top, the batting, and the backing) together and secures the raw edges:
- Layering (Creating the Quilt Sandwich): On a large, clean, flat surface (like a floor or large table), carefully create your “quilt sandwich.” Lay your backing fabric right side down, ensuring it is smooth and wrinkle-free, and tape it down securely at the edges. Next, lay your batting (the fluffy middle layer) on top of the backing, smoothing out any creases. Finally, place your finished quilt top right side up on top of the batting, centered and perfectly flat.
- Basting: Secure these three layers together by basting. This prevents them from shifting during the quilting process. You can use safety pins specifically designed for quilting (known as curved basting pins), a temporary basting spray, or long hand stitches (thread basting). Ensure the layers are securely held, with pins spaced about a fist’s width apart across the entire quilt.
- Quilting: This is where you stitch through all three layers of your quilt sandwich. For a beginner-friendly approach, you can “stitch in the ditch” (stitch directly along the seam lines) around your snowball blocks or sashing. Alternatively, simple straight lines, wavy lines, or even tie quilting (tying knots through all layers at regular intervals) are excellent options that add texture and stability. The Shabby Fabrics video may offer specific quilting suggestions, or you can choose a style that suits your skill level and aesthetic preference.
- Trimming and Squaring: Once your quilting is complete, carefully trim away the excess batting and backing fabric, using your ruler and rotary cutter. Square up your quilt edges to ensure they are perfectly straight and even, creating a crisp foundation for your binding.
- Binding: The final step is to bind the quilt. This involves attaching fabric strips (your binding fabric, often cut from the black background or a coordinating print) around the entire perimeter of the quilt. This not only protects the raw edges but also provides a beautiful, durable frame. There are many methods for binding – machine binding, hand binding, or a combination – so choose one that is comfortable and enjoyable for you.
And just like that, with patience and creativity, you will have completed your very own I Spy quilt! A beautiful, handmade creation filled with discovery, charm, and the warmth of your own stitches.
Why the I Spy Quilt is Perfect for Beginners and Beyond
The I Spy quilt isn’t just another project; it’s an opportunity to create something truly special, functional, and deeply engaging. Its inherent “spy” element makes it wonderfully interactive, especially for children who delight in searching for specific objects, animals, or characters within the diverse blocks. It’s a fantastic way to engage young minds, stimulate storytelling, and create a cherished item they can grow with, perhaps even passing it down through generations.
For beginners, this pattern offers an ideal starting point, building confidence without overwhelming. The repetitive nature of creating the snowball block allows you to hone essential piecing skills, such as precise cutting, consistent seam allowances, and effective pressing techniques. The forgiving design means that minor imperfections often blend seamlessly into the overall charm and busy nature of the “I Spy” prints, reducing stress and encouraging continuation. It’s also an excellent stash-buster, perfect for utilizing those smaller, novelty fabric scraps that are often too precious to discard but don’t quite fit into other projects.
Imagine the profound joy of gifting this unique quilt to a loved one, knowing you poured your creativity, effort, and affection into every single stitch. Whether it’s destined for a baby shower, a child’s birthday, a comforting lap quilt, or simply to add a touch of whimsy and warmth to your home decor, the I Spy quilt promises to bring smiles, spark curiosity, and create lasting, warm memories for years to come.
*A heartfelt thank you and full credit to Shabby Fabrics via YouTube for their inspiring tutorial and for all the wonderful images used here. Their clear, step-by-step instructions and visual demonstrations make complex quilting projects accessible and enjoyable for everyone. If you enjoyed crafting this I Spy quilt project, we highly recommend exploring their extensive collection of other quilting videos. Visit their channel, subscribe, and discover a treasure trove of creative quilting ideas, tips, and techniques! Happy quilting, and may your needle always be sharp!