
Are you tired of constantly battling dust bunnies, tangled hair, and stubborn pet fur that seems impossible to fully remove from your floors? Do you wish there was a simpler, more effective way to sweep your home clean without the frustration of debris clinging to your broom bristles? If so, you’re in for a treat! We recently stumbled upon an ingenious cleaning hack shared by the brilliant Mr Smart on YouTube, and it’s quickly become a game-changer in our daily routine. This incredibly simple yet highly effective trick, involving just a broom and a roll of plastic wrap, promises to transform your sweeping experience and leave your floors sparkling clean with minimal effort. It’s one of those “why didn’t I think of that?” moments that will make you wonder how you ever cleaned without it.
RELATED: Unlock More Clever Cleaning Strategies: Learn This Must-Try Taped Broom Hack!
We’ve all been there: after a diligent sweeping session, you look at your broom only to find its bristles laden with a disgusting mixture of hair, dust, and tiny debris. This isn’t just unsightly; it’s also highly inefficient. Not only does it make the broom itself a chore to clean, but it also increases the likelihood of redepositing dirt back onto your freshly swept floors. Traditional brooms, while effective at gathering larger particles, often struggle with finer dust and electrostatic hair, scattering rather than truly collecting them. This persistent problem leads to wasted time, incomplete cleaning, and a lingering sense of frustration. Thankfully, this isn’t a battle you have to keep fighting. The brilliant solution we’re about to share tackles these common sweeping woes head-on, promising a cleaner home and a much easier cleaning process.
The Ultimate Dust & Pet Hair Solution: Genius Plastic Wrap Broom Hack
This hack is astonishingly simple and incredibly effective, leveraging the power of static electricity to effortlessly lift and capture even the most elusive dust and pet hair. Here’s a detailed, step-by-step guide to executing this genius plastic wrap broom hack:
- Gather Your Supplies: You’ll only need two items: your standard household broom and a roll of clear plastic wrap (the kind you use for food storage).
- Prepare Your Broom: Ensure your broom is relatively clean before applying the plastic wrap. While the hack is designed to keep it clean, starting with a clean broom ensures optimal performance.
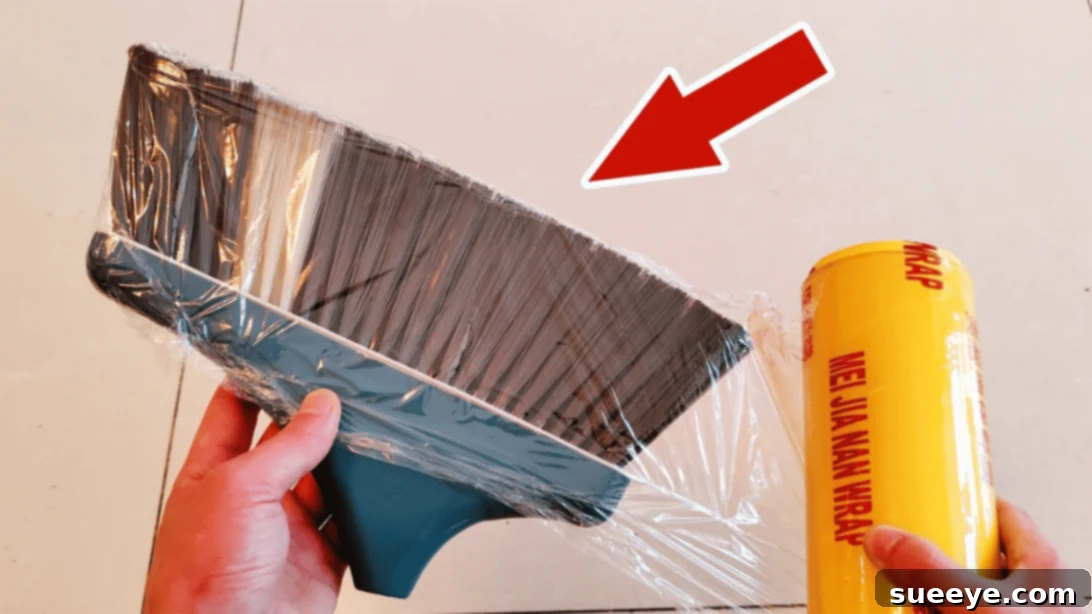
- Wrap the Broom Head: Take the end of your plastic wrap and begin to tightly wrap it around the base of your broom’s handle, just above where the bristles begin. Continue wrapping downwards, covering the entire broom head and its bristles completely. Make sure each layer slightly overlaps the previous one, creating a secure and smooth surface. The goal is to encase the bristles entirely, forming a tight, protective, and static-charged layer over the broom head. This might take several rotations to achieve full coverage and a good seal.
- Ready to Sweep: Once your broom head is thoroughly covered, it’s ready for action. The plastic wrap creates a smooth surface that hair and dust cling to due to static electricity, preventing them from getting entangled in the bristles.
- Sweep as Usual: Proceed to sweep your floors as you normally would. You’ll immediately notice a remarkable difference. Hair, lint, pet fur, and fine dust will cling to the plastic wrap with an almost magnetic attraction, forming neat clumps that are easy to gather. Unlike a traditional broom where dirt often gets pushed around or tangled, the plastic-wrapped broom effectively collects everything in its path.
- Effortless Disposal: After you’ve finished sweeping, the real magic happens. Instead of painstakingly picking strands of hair and dirt out of your broom bristles, simply peel off the plastic wrap. The collected dirt will be securely encapsulated within the wrap.
- Tidy Cleanup: Once removed, carefully fold the plastic wrap in on itself, encasing all the accumulated debris. This creates a neat, contained package of dirt that can be effortlessly tossed into the trash. No mess, no fuss, and a perfectly clean broom ready for its next use.
This hack isn’t just about making sweeping easier; it’s about making it significantly more effective. By creating a static charge and a smooth, non-porous surface, the plastic wrap ensures that every strand of hair and every speck of dust is picked up, leaving your floors truly clean. It’s particularly invaluable for homes with pets, where fur can be a constant battle. Say goodbye to clogged broom bristles and hello to efficient, hygienic cleaning!
Bonus Hack #1: Ingenious Fix for a Broken Mop or Broom Handle
A loose or broken handle on your favorite mop or broom can be incredibly frustrating, often leading to the premature disposal of an otherwise perfectly good cleaning tool. Before you rush out to buy a replacement, consider this clever DIY repair hack that uses an everyday item to restore your cleaning tool’s functionality. This trick is not only a money-saver but also a sustainable way to extend the life of your household items.
- Identify the Problem Area: This hack is most effective for handles that have come loose from the broom or mop head, or where the connection point is simply unstable.
- Grab a Small Balloon: Find a small, sturdy balloon. The thicker the rubber, the better, as it will provide more grip and durability.
- Prepare the Handle: Gently push the balloon’s opening onto the end of the broom or mop handle. Work it down until the balloon’s entire body is bunched up around the tip of the handle, creating a thick rubber cushion.
- Insert and Twist: Now, carefully insert the balloon-covered handle back into the broom or mop head’s socket. As you push it in, twist the handle firmly. The compressed rubber of the balloon will expand and conform to the shape of the socket, creating a tight, non-slip grip that locks the handle securely in place.
- Reinforce for Durability (Optional but Recommended): For an even more secure and long-lasting fix, consider these additional steps:
- Tape Reinforcement: Wrap several layers of strong adhesive tape (like electrical tape or duct tape) around the joint where the handle meets the head. This adds an external layer of stability.
- Adhesive Security: For a permanent solution, you can apply a strong adhesive or hot glue inside the broom/mop head socket before inserting the balloon-covered handle. This will create an incredibly robust bond once dry.
This simple balloon hack provides excellent friction and fills gaps, making your broken cleaning tool feel brand new. It’s an eco-friendly and economical solution that prevents perfectly usable items from ending up in the landfill, proving that sometimes the best solutions are the most unexpected ones.
Bonus Hack #2: DIY Clothes Cover for Travel and Storage
Protecting your garments from dust, wrinkles, and spills, especially during travel or seasonal storage, doesn’t always require expensive garment bags. This incredibly resourceful hack uses a common household item – a Ziploc bag – to create effective, lightweight, and transparent clothes covers. It’s perfect for keeping delicate items pristine, organizing your wardrobe, or ensuring your outfits remain fresh when packed in a suitcase.
- Select Your Ziploc Bag: Choose a Ziploc bag that is large enough to comfortably accommodate your folded garment. Gallon-sized bags work well for shirts and blouses.
- Prepare the Bag: Lay the Ziploc bag flat and fold it in half horizontally.
- Make the Hanger Opening: Carefully cut off the bottom folded corner of the bag. This will create a small opening when the bag is unfolded, through which the hook of your hanger will pass.
- Unfold and Prepare Garment: Unfold the Ziploc bag. Now, take the shirt or garment you wish to protect and place it on a hanger.
- Fold the Garment (Optional but Recommended for Compactness): To make the garment fit neatly within the bag and minimize wrinkles, fold both sleeves inward towards the center of the shirt. Then, fold the entire bottom portion of the shirt upward until it reaches the base of the hanger. This creates a compact, rectangular shape.
- Insert the Garment into the Bag: Carefully slide the Ziploc bag over the folded shirt, ensuring the cut hole aligns with the hanger’s hook. Push the hanger hook through the newly created hole in the bag.
- Seal for Protection: Once the shirt is inside and the hanger hook is through, seal the opening of the Ziploc bag at the bottom. This fully encloses the garment, protecting it from dust, moisture, and potential creases.
This DIY clothes cover is incredibly versatile. It’s fantastic for protecting seasonal clothing stored in attics or closets, safeguarding delicate fabrics from dust, or keeping outfits clean and organized in your luggage when traveling. The transparent nature of the Ziploc bag also allows you to easily see what’s inside, making wardrobe management a breeze. It’s a testament to how simple, everyday items can be repurposed into highly functional and valuable home organization solutions.
These brilliant, budget-friendly hacks offer practical solutions to common household challenges, proving that you don’t need fancy gadgets or expensive products to make your life easier and your home cleaner. From conquering stubborn pet hair with the Mr Smart plastic wrap broom hack to extending the life of your cleaning tools and protecting your wardrobe, these tips are designed to simplify your routine and enhance your home environment.
We extend our sincere thanks to Mr Smart via YouTube for sharing these amazing and innovative ideas. His channel is a treasure trove of clever life hacks and DIY solutions that can truly make a difference in your daily life. We highly encourage you to visit his channel to discover more inspiring videos like these!
Give these hacks a try and experience the difference yourself. Happy cleaning and organizing!