
The Enchanting Forest Flutter Charm Pack Quilt Pattern: A Delightful DIY Project
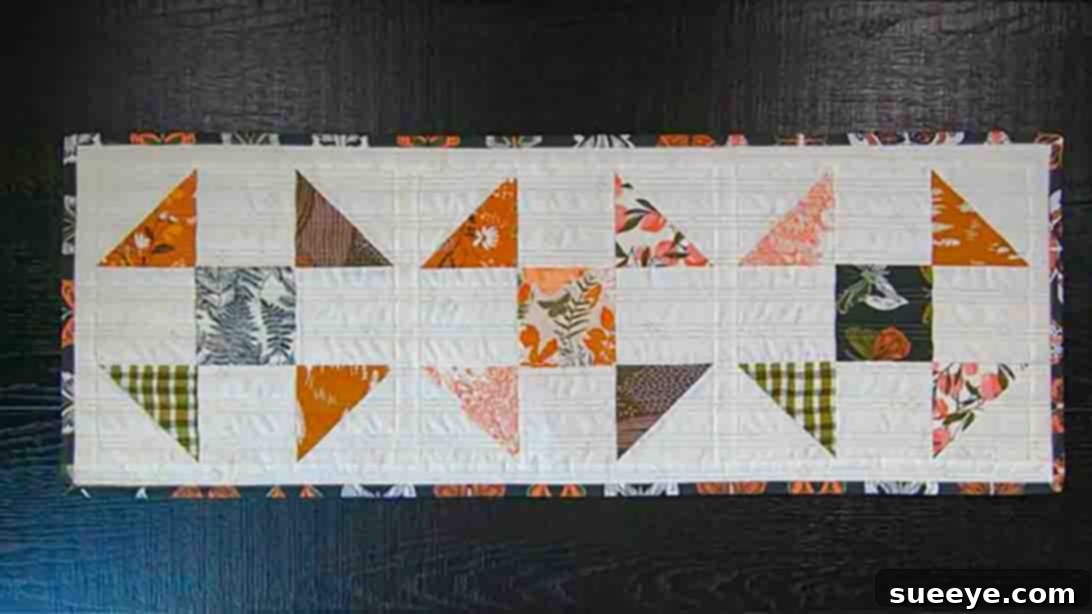
Embark on a rewarding quilting journey with the captivating Forest Flutter Quilt pattern, a truly delightful creation from Moonkin Stitchery on YouTube. Whether you’re taking your very first stitches in the world of quilting or are a seasoned artisan with many projects under your belt, this pattern promises an enjoyable and fulfilling experience. It has quickly become a favorite among quilters for its remarkable simplicity, elegant aesthetics, and incredible speed of completion. Imagine crafting a beautiful, handmade quilt that looks intricate and professional, yet can be finished within a single day! This makes the Forest Flutter Quilt an absolute gem for last-minute gift-giving, adding a touch of personalized warmth to any occasion, or simply creating a charming new addition to your home decor.
This comprehensive, step-by-step guide will walk you through the entire process, leveraging the convenience and charm of a pre-cut fabric assortment known as a “charm pack.” Charm packs, typically consisting of 5-inch fabric squares, offer a curated selection of coordinating prints, eliminating the guesswork from fabric selection and allowing you to dive straight into the creative process. With Moonkin Stitchery’s expert guidance, transformed into an accessible written tutorial, you’ll learn how to transform these humble squares into a stunning quilted masterpiece. Gather your essential sewing and quilting materials, prepare your workspace, and get ready to bring the Forest Flutter Quilt to life!
RELATED: If you love working with charm packs, don’t miss exploring the Hidden Trails Charm Pack Quilt Pattern for more inspiration and creative adventures!
Essential Materials for Your Forest Flutter Quilt
To embark on this delightful quilting project, you’ll need a few key materials. The beauty of this pattern lies in its minimalist requirements, making it incredibly accessible even for those just starting their fabric stash.
- 9 – 5-inch Print Fabric Squares: These are often found in pre-packaged “charm packs,” which contain 42 squares from a specific fabric line, ensuring a coordinated look. However, you can also select nine coordinating 5-inch squares from your personal fabric stash for a truly unique and personalized touch. Choose prints that evoke the “forest flutter” theme, perhaps with delicate florals, leaves, or subtle patterns.
- 1/2 Yard Background Fabric: This fabric will provide the crucial contrast and cohesion for your quilt design. A solid or tone-on-tone fabric in a neutral color like cream, white, light grey, or a soft pastel often works best to let your print squares shine. Ensure it complements your chosen charm pack prints.
Recommended Tools:
While the list above covers the fabric, having the right tools will make your quilting experience smooth, accurate, and enjoyable:
- Sewing Machine: A reliable machine with a 1/4-inch presser foot is ideal for maintaining consistent seam allowances, which is critical in quilting.
- Rotary Cutter: A sharp rotary cutter (45mm or 60mm) is essential for precise and efficient fabric cutting.
- Self-Healing Cutting Mat: Protect your work surface and prolong the life of your rotary blade with a good quality cutting mat.
- Quilting Rulers: A few acrylic rulers, especially a 6″ x 12″ or 6″ x 24″ for cutting strips and a square ruler (like 6.5″ or 8.5″) for trimming blocks, will be incredibly useful.
- Fabric Scissors: Keep a sharp pair dedicated solely to fabric to ensure clean cuts.
- Iron and Ironing Board/Pressing Mat: Proper pressing at each stage is vital for flat, accurate blocks and a smooth quilt top.
- Fabric Marking Tool: A heat-erasable pen, chalk pencil, or fine-line permanent marker (for the wrong side of fabric) will be needed for drawing diagonal lines.
- Pins or Fabric Clips: To hold fabric layers securely in place while sewing.
- Coordinating Thread: High-quality 100% cotton thread is generally recommended for quilting. Choose a color that blends well with your fabrics, typically a neutral like white, cream, or light grey.
Step-by-Step Guide to Crafting Your Forest Flutter Quilt
Follow these detailed instructions to construct your beautiful Forest Flutter Charm Pack Quilt. Precision in cutting and sewing is key to a professional-looking finish, so take your time with each step.
Step 1: Preparing Fabrics and Creating Half-Square Triangles (HSTs)
The foundation of this quilt lies in accurately cut fabric pieces and perfectly formed Half-Square Triangles (HSTs). These versatile units are a staple in quilting and will form the core elements of your shoofly blocks.
- Subcut Background Fabric: Take your 1/2 yard of background fabric. Using your rotary cutter and ruler, carefully cut it into six 5-inch squares. These will be used to create your HSTs. Additionally, cut twelve 4 1/2-inch squares from the remaining background fabric. These smaller squares will form part of your shoofly blocks later. Accuracy here is paramount, so double-check your measurements before cutting.
- Trim Print Squares: Select three of your 5-inch print squares. Trim each of these down to 4 1/2-inch squares. These will serve as the center squares for your shoofly blocks. The remaining six 5-inch print squares will be used in conjunction with your background 5-inch squares to create HSTs.
- Mark Diagonal Lines: On the wrong side of each of your six 5-inch background fabric squares, use your fabric marking tool to draw a single 45-degree diagonal line from one corner to the opposite corner. This line will serve as your sewing guide.
- Pair and Sew for HSTs: Take one 5-inch background square (with the drawn line) and one 5-inch print square. Align them right sides together, ensuring all edges are perfectly matched. Pin them securely to prevent shifting.
- Stitch and Trim: Using your sewing machine, sew a 1/4-inch seam allowance on both sides of the drawn diagonal line. Do NOT sew on the line itself; the line is your guide for splitting the squares. After sewing both seams, carefully cut along the drawn line. This will yield two raw HST units.
- Press and Square Up: Open each HST unit and press the seam allowance. You can press the seam open for a flatter finish, or press it towards the darker fabric to reduce bulk (this is often called “pressing to the dark side”). The goal is a flat, crisp unit.
- Trim HSTs to Size: Now, and this is a crucial step for accuracy, trim each HST unit to a precise 4 1/2-inch square. Place your square ruler over the HST, ensuring the 45-degree line on your ruler aligns perfectly with the diagonal seam of your HST. Trim two adjacent sides, rotate the HST 180 degrees, and trim the remaining two sides. This squaring-up process ensures all your HSTs are uniform, leading to perfectly matched seams later.
- Repeat for All: Repeat steps 4 through 7 for all six of your 5-inch background squares paired with your remaining six 5-inch print squares. By the end of this process, you will have created a total of twelve perfectly squared 4 1/2-inch Half-Square Triangles. These will be a mix of print and background fabrics.
- Gather Block Components: For each Shoofly block, you will need the following 4 1/2-inch squares:
- Four Half-Square Triangles (HSTs) from your mixed print and background pile.
- One print square (from the three 4 1/2-inch print squares you trimmed in Step 1). This will be your center square.
- Four background squares (from the twelve 4 1/2-inch background squares you cut in Step 1). These will form the corners.
- Lay Out the Block: Arrange these nine squares into a 3×3 grid, mimicking the traditional Shoofly block design. Typically, the layout is as follows:
- Row 1: Background square, HST, Background square
- Row 2: HST, Print square (center), HST
- Row 3: Background square, HST, Background square
Visualize this layout carefully before sewing. The diagonal seams of the HSTs should point inward towards the center print square, creating a delightful windmill-like effect.
- Sew Rows Together: Working one row at a time, sew the three squares in each row together with a 1/4-inch seam allowance. Press the seams for Row 1 and Row 3 in one direction, and the seams for Row 2 in the opposite direction. This “nesting” of seams will help you achieve perfectly matched points when joining the rows.
- Join Rows to Complete Block: Now, sew the three rows together, again using a 1/4-inch seam allowance. Carefully align the seams between rows, using pins to hold them in place. Press the final block, ensuring it lies flat and measures approximately 12 1/2 inches square (if your components were 4 1/2 inches and seam allowances 1/4 inch, (4.5 * 3) + (0.25 * 4) = 13.5 + 1 = 13.5). Wait, no, after 1/4″ seams, a 4.5″ square * 3 squares will result in a 12.5″ block. Let’s re-calculate: 3 x (4.5″ finished block unit) + 2 x (0.5″ seam allowance overlap) = 13.5″ but since the units are 4.5″ *before* sewing, and we lose 1/2″ (1/4″ on each side) from each piece when sewn, let’s reconfirm. A 4.5″ square is the *finished* size after the seam. So 3 squares sewn together will be 4.5″ * 3 = 13.5″ wide. Yes, it will be 13.5″ unfinnished if they are 4.5″ finished pieces. If they are 4.5″ cut pieces, then they will be (4.5 – 0.5) * 3 + 0.5 = 4*3+0.5 = 12.5″ – let’s simplify to “ensure it lies flat and square.”
- Repeat for All Blocks: Repeat steps 1 through 4 until you have successfully created a total of three complete Shoofly Quilt Blocks.
- Prepare Sashing Strips: From your background fabric (or a coordinating solid), cut 1 1/2-inch wide strips. The length will depend on your desired arrangement, but typically you will need strips the length of your blocks (which are approximately 12.5 inches each) to place between them, and longer strips for the rows themselves. For a simple row arrangement, you’ll need two sashing strips to go between your three blocks in a single row.
- Assemble Quilt Row(s): Arrange your three Shoofly blocks in a single row. Place a 1 1/2-inch sashing strip between the first and second block, and another 1 1/2-inch sashing strip between the second and third block. Sew these pieces together with a 1/4-inch seam allowance. Press the seams towards the sashing strips. This creates your complete quilt center.
- Cut Border Strips: Measure the exact length and width of your assembled quilt center. Cut 1 1/2-inch wide border strips from your background fabric. For accuracy, it’s always best to measure your quilt top directly rather than relying on theoretical dimensions. Cut two strips for the side borders (length equal to the quilt’s height) and two strips for the top and bottom borders (length equal to the quilt’s width plus the two side borders’ width).
- Attach Side Borders: Sew the two side border strips to the left and right edges of your quilt center. Press seams towards the borders.
- Attach Top and Bottom Borders: Sew the two remaining border strips to the top and bottom edges of your quilt. Press seams towards the borders. This completes your quilt top! Take a moment to admire your work.
- Prepare Backing Fabric: Choose a backing fabric that is at least 4-6 inches larger on all sides than your quilt top. Press it thoroughly to remove any wrinkles.
- Prepare Batting: Select a quilt batting (cotton, polyester, wool, or blend) that is also 4-6 inches larger on all sides than your quilt top.
- Create the Quilt Sandwich: Lay your backing fabric right side down on a clean, flat surface (like a large table or the floor). Smooth it out completely, taping the edges down if needed. Next, carefully lay the batting on top of the backing, smoothing it out so there are no wrinkles or puckers. Finally, center your quilt top (right side up) on top of the batting, smoothing it out meticulously.
- Basting: Secure these three layers together. Common basting methods include:
- Safety Pin Basting: Use curved safety pins placed every 4-6 inches across the quilt, starting from the center and working outwards.
- Spray Basting: Use a temporary fabric adhesive spray to bond the layers together. This offers a smooth, pin-free surface but requires good ventilation.
- Thread Basting: Hand-stitch long, loose basting stitches through all layers in a grid pattern.
The goal of basting is to prevent shifting and puckering during the quilting process.
- Choose Your Method: You can quilt by machine or by hand. For a quick project like the Forest Flutter Quilt, machine quilting is generally faster.
- Simple Machine Quilting Ideas:
- Stitch-in-the-Ditch: Quilt along the seam lines of your pieced blocks and sashing. This is a very common and effective method for beginners, as it hides your stitches within the seams.
- Straight Line Quilting: Quilt parallel lines across the entire quilt, either diagonally or horizontally/vertically. A walking foot on your machine is highly recommended for even feeding of layers.
- Simple Free-Motion Quilting: If you’re feeling adventurous, try a simple meander or loop-de-loop pattern. This requires lowering your feed dogs and using a darning foot.
- Quilting Process: Start quilting from the center of your quilt and work your way outwards. This helps to prevent pushing fabric and batting to the edges, which can cause puckering. Remove basting pins as you approach them, but only once the area is secured by quilting stitches.
- Trim and Square Up: After quilting, trim all four edges of your quilt so they are even and square. Use a large quilting ruler and rotary cutter for precision.
- Prepare Binding Strips: Cut 2 1/2-inch wide strips of fabric (often from your background fabric or a coordinating print) that are long enough to go around the entire perimeter of your quilt, plus about 10-12 inches extra for joining. Join these strips end-to-end at a 45-degree angle to create one continuous, long binding strip. Press the entire strip in half lengthwise, wrong sides together.
- Attach Binding: Starting along one side, align the raw edges of your folded binding strip with the raw edge of your quilt. Sew with a 1/4-inch seam allowance, stopping 1/4 inch from each corner to miter the corners. Finish by joining the ends of your binding strip with a diagonal seam.
- Finish Binding: Once sewn to the front, flip the folded binding over to the back of the quilt. You can hand-stitch the binding down to the backing fabric for a traditional, invisible finish, or machine-stitch it for a quicker, more visible finish.
- Accuracy is Key: In quilting, even a slight deviation in your 1/4-inch seam allowance or cutting can compound over many pieces. Use a consistent 1/4-inch foot and always double-check your measurements.
- Press, Don’t Iron: When pressing seams, use an up-and-down motion rather than sliding the iron. This prevents stretching and distorting your fabric pieces.
- Choose Contrasting Fabrics: While charm packs offer coordinated prints, ensure there’s enough contrast between your print fabrics and your background fabric for the design to truly stand out.
- Test Your Stitches: Before you start sewing your actual quilt pieces, do a few test seams on scraps of fabric to ensure your tension is correct and your stitches are even.
- Patience and Enjoyment: Quilting is a journey, not a race. Take your time, enjoy the process, and don’t be afraid to unpick and redo if something isn’t quite right. The joy of creating is part of the charm!
- Coordinated Fabrics: Each charm pack contains a selection of fabrics from a specific designer’s line, ensuring all the prints and colors complement each other perfectly. This eliminates the daunting task of choosing individual fabrics and guarantees a cohesive look.
- Convenience: The fabrics are pre-cut into perfect 5-inch squares, saving you significant time on cutting and allowing you to jump straight into piecing.
- Variety: A typical charm pack has 42 squares, offering a wide array of prints and patterns within a single theme, which adds visual interest to your quilt without needing to buy large quantities of many different fabrics.
- Cost-Effective: They are an economical way to get a taste of an entire fabric collection without purchasing yardage of each print, making them great for smaller projects or for building a diverse fabric stash.
- Color Palette: Experiment with different color combinations. A fall-themed quilt could use warm oranges, browns, and deep greens, while a spring version might feature pastels and bright floral prints.
- Quilt Size: To make a larger quilt, simply create more Shoofly blocks and arrange them in multiple rows, adding sashing between all blocks and rows. Adjust border widths for a different frame.
- Border Variations: Instead of a single 1 1/2-inch border, you could add multiple borders of varying widths or colors to create a more elaborate frame for your quilt center.
- Embellishments: Consider adding embroidered details, appliqué elements, or decorative stitches to specific blocks for an extra touch of flair.
Step 2: Constructing the Shoofly Quilt Blocks
With your HSTs prepared, it’s time to assemble the classic Shoofly block. This traditional block is a timeless favorite and relatively simple to piece together, especially with accurately sized components.
Step 3: Assembling the Quilt Top with Sashing and Borders
Sashing and borders are design elements that frame your blocks, add visual separation, and contribute to the overall size and aesthetic of your quilt. They are relatively straightforward to add once your blocks are complete.
Beyond the Quilt Top: Quilting, Batting, and Binding
Completing the quilt top is a significant milestone, but the journey continues with layering, quilting, and finishing to transform it into a functional and beautiful textile art piece.
Layering and Basting Your Quilt
Once your quilt top is assembled, you need to prepare it for quilting. This involves creating a “quilt sandwich.”
Quilting Your Layers
Quilting is the process of stitching through all three layers (quilt top, batting, backing) to hold them together and add texture and dimension to your project.
Binding Your Quilt
The binding is the final edge finish that encloses the raw edges of your quilt and gives it a polished, durable border.
Tips for Quilting Success
To ensure your Forest Flutter Quilt comes out beautifully, keep these valuable tips in mind:
Why Choose a Charm Pack for This Project?
Charm packs are a fantastic resource for quilters, especially for projects like the Forest Flutter Quilt. Here’s why they are so beloved:
Customize Your Forest Flutter Quilt
While this tutorial provides a clear path to a beautiful quilt, feel free to personalize it!
Conclusion: Your Beautiful Forest Flutter Quilt Awaits!
Congratulations on embarking on and completing your Forest Flutter Charm Pack Quilt! This project, inspired by the talented Moonkin Stitchery, is a testament to how simple fabric squares can be transformed into a piece of art with just a few basic techniques. Whether this is your first quilt or your fiftieth, the satisfaction of creating something beautiful and functional with your own hands is truly unparalleled. The charming design of the Shoofly block, combined with the ease of working with pre-cut charm pack fabrics, makes this quilt a rewarding endeavor for quilters of all skill levels.
We encourage you to share your finished Forest Flutter Quilt with the quilting community. Your unique fabric choices and personal touches will undoubtedly inspire others. Enjoy the comfort and beauty this handmade quilt brings to your home or the joy it sparks in the heart of a loved one who receives it as a thoughtful gift. Happy quilting, and may your creative journey always be filled with fluttery delight!