
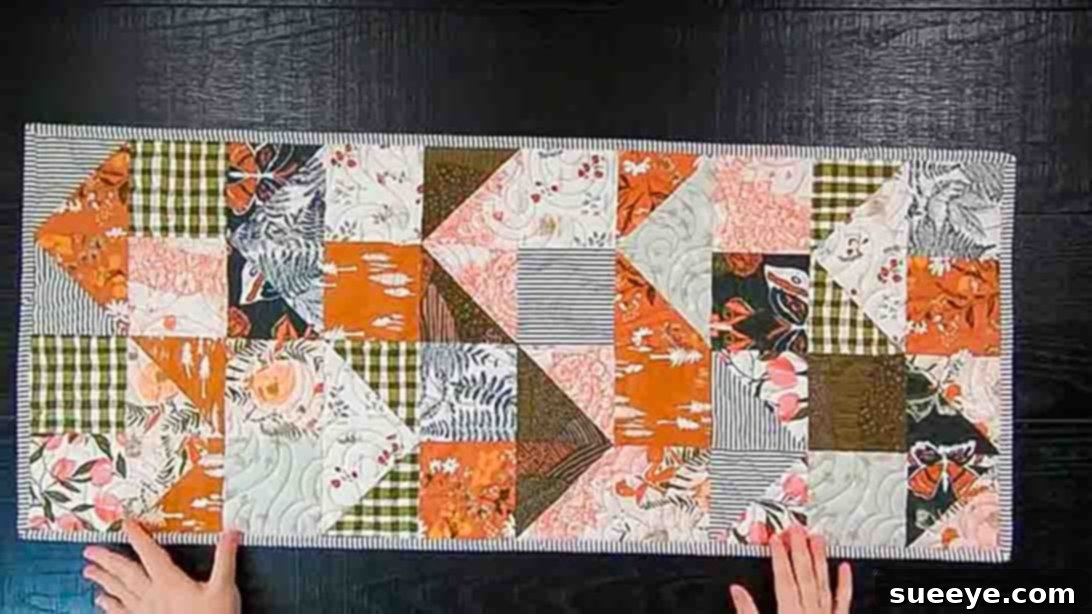
Are you searching for your next inspiring quilting adventure? Look no further than this captivating Hidden Trails Quilt pattern, a fantastic creation from Moonkin Stitchery, available as a detailed video tutorial on YouTube. This delightful quilt project offers a unique blend of simplicity and visual intrigue, making it an ideal choice for quilters of all experience levels. What makes it even more appealing? You can craft the entire quilt top using just a single charm pack!
This beginner-friendly quilting project is designed for speed and ease, making it perfect for those moments when you crave a fulfilling creative outlet without committing to a lengthy, complex endeavor. If you have a collection of charm packs patiently waiting in your fabric stash for the perfect opportunity to shine, the Hidden Trails Quilt is precisely that project. It’s a wonderful way to transform those pre-cut squares into a beautiful, functional piece of art.
RELATED: If you love working with charm packs, explore another exciting design with our Two Charm Pack Herringbone Quilt tutorial!
In this comprehensive, step-by-step guide, inspired by Moonkin Stitchery’s expert instructions, we will walk you through the process of constructing this gorgeously patterned quilt with remarkable ease. While its straightforward approach makes it an excellent starting point for new quilters, the engaging design and satisfying assembly process ensure that even seasoned quilters will find immense enjoyment in bringing the Hidden Trails Quilt to life. Prepare to be amazed at how quickly your charm pack transforms into a stunning, unique quilt top!
Essential Materials for Your Hidden Trails Quilt
Gathering your materials before you begin is the first step toward a smooth and enjoyable quilting experience. For this Hidden Trails Quilt, you’ll need a few essential tools and, of course, your chosen fabric. Here’s a detailed list of what you’ll need:
- Charm Pack (or equivalent 5-inch squares): The star of this project! A charm pack typically contains 42 pre-cut 5×5 inch fabric squares. These coordinated fabric collections eliminate the need for extensive fabric selection, allowing you to dive straight into cutting and sewing. If you don’t have a charm pack, you can easily cut your own 5-inch squares from yardage or a layer cake (a layer cake contains 10×10 inch squares, from which you can yield four 5×5 inch squares per square).
- Rotary Cutter: An indispensable tool for precise fabric cutting. A sharp blade is crucial for clean, accurate cuts, which are fundamental to successful quilting.
- Self-Healing Cutting Mat: Protects your work surface and extends the life of your rotary cutter blade. Ensure you have one large enough to comfortably accommodate your fabric squares.
- Quilting Ruler (at least 6″ x 12″ or larger): Essential for accurate measuring and straight cuts. A clear acrylic ruler with visible markings will be your best friend for trimming and squaring up your blocks.
- Sewing Machine: Any basic sewing machine capable of a straight stitch will work perfectly. Ensure it’s in good working order and you have fresh needles appropriate for quilting (e.g., universal or microtex needles).
- Iron and Ironing Board: Crucial for pressing seams. Pressing, not ironing, is key in quilting – you want to gently set the seams without stretching the fabric. A good, hot iron can make a significant difference in the flatness and overall quality of your finished quilt blocks.
- Thread: Choose a good quality 100% cotton thread that matches or complements your fabrics. A neutral color like white, grey, or cream is often a safe choice.
- Fabric Scissors (optional but recommended): For snipping threads and occasional intricate cuts.
- Fabric Marking Tool (optional): A fabric pencil, chalk, or air-erasable pen for drawing lines on fabric, especially for your half-square triangles.
- Pins or Fabric Clips: To hold fabric pieces together before sewing, ensuring accuracy.
Having these items ready before you start will help you maintain a steady workflow and ensure the success of your Hidden Trails Quilt.
Step-by-Step Guide to Crafting Your Hidden Trails Quilt
Now that your materials are ready, let’s dive into the exciting process of assembling your Hidden Trails Quilt! Precision is important in quilting, so take your time with each step.
Step 1: Preparing Your Fabric and Creating Half-Square Triangles (HSTs)
The foundation of many beautiful quilt patterns, including this one, lies in accurately cut fabric and well-constructed half-square triangles (HSTs). Follow these detailed instructions to get started:
- Sort and Select: Begin by sorting through your charm pack squares. For this pattern, you’ll primarily be working with 5-inch squares. If you started with a layer cake or yardage, ensure all your squares are accurately cut to 5 inches by 5 inches.
- Initial Trimming: From your collection of 5-inch squares, select twenty squares that you will trim down. Using your rotary cutter, cutting mat, and ruler, carefully trim these twenty 5-inch squares down to 4 1/2-inch squares. Set these aside; they will form part of your quilt blocks later.
- Prepare for HSTs: From your remaining 5-inch squares, select ten pairs of squares (a total of twenty squares). You’ll be making half-square triangles from these. For each pair, choose two contrasting or complementary fabrics that you’d like to see together in an HST.
- Marking the Diagonal: On the wrong side of one square from each pair, use your fabric marking tool to draw a precise 45-degree diagonal line from one corner to the opposite corner. This line will serve as a guide for your sewing.
-
Sewing the HSTs: Take one marked 5-inch square and place it on top of its partner 5-inch square, right sides together. Align all edges perfectly. Pin them securely to prevent shifting.
Now, using your sewing machine, sew a 1/4-inch seam allowance on both sides of the drawn diagonal line. Be consistent with your 1/4-inch seam for accurate results. -
Cutting and Pressing: Once you’ve sewn both seam lines, cut the square diagonally along your original drawn line. You will now have two separate units.
Carefully press these units open. A common practice in quilting is to press seams toward the darker fabric to prevent seam allowances from showing through lighter fabrics. Alternatively, you can press them open for a flatter block, especially if working with thick fabrics. After pressing, you will have two perfect 4 1/2-inch half-square triangles (HSTs) from each original 5-inch square pair. - Trim for Accuracy: Even with careful sewing, HSTs often benefit from a final trim. Using your quilting ruler and rotary cutter, square up each HST to exactly 4 1/2 inches. This step is critical for ensuring your quilt blocks will fit together perfectly later on. Repeat steps 3-7 for all ten pairs of 5-inch squares, resulting in twenty 4 1/2-inch HSTs.
Step 2: Assembling Quilt Blocks and Constructing the Quilt Top
With your 4 1/2-inch squares and HSTs ready, it’s time to bring the “Hidden Trails” design to life by assembling your individual quilt blocks and then the entire quilt top.
-
Constructing the Core Block: From the 4 1/2-inch squares you trimmed in Step 1, select two in mixed prints. These will form the base of your block. Now, take two of your newly made 4 1/2-inch HSTs. The goal is to create a block that has a directional, “flying geese” effect.
Arrange your pieces: Place one 4 1/2-inch square in the top left, an HST in the top right (oriented so its diagonal line points up-left or up-right, depending on your desired “flight” direction), another 4 1/2-inch square in the bottom left, and another HST in the bottom right, again oriented to create the directional flow. This arrangement of two squares and two HSTs creates a larger block unit. The precise arrangement will determine the “hidden trail” effect.
Sew these four 4 1/2-inch units together. First, sew the top two units together (a square and an HST) with a 1/4-inch seam. Then, sew the bottom two units together (a square and an HST). Press your seams. Finally, sew these two rows together to form one complete 8 1/2-inch quilt block. The pattern’s beauty emerges from the careful placement of the HSTs to create a sense of movement, reminiscent of flying geese or arrows. - Repeat for Ten Blocks: Continue creating these 8 1/2-inch quilt blocks until you have a total of ten completed units. This ensures you have enough blocks for the final quilt top arrangement. As you make each block, be mindful of the orientation of your HSTs to ensure consistency or intentional variation.
-
Laying Out the Quilt Top (The Hidden Trails Effect): This is where the magic of the “Hidden Trails” pattern becomes evident. Lay out your ten quilt blocks on a design wall or a clean floor to visualize the full pattern before sewing.
For the first row: Arrange five of your 8 1/2-inch quilt blocks so that the “flying geese” or directional pattern within each block is pointed consistently to the left.
For the second row: Take the remaining five 8 1/2-inch quilt blocks. Rotate each of these blocks 180 degrees so that their “flying geese” or directional pattern is now pointed to the right.
Lay these two rows parallel to each other, ensuring the alternating directions of the blocks create the distinctive zig-zag or “hidden trails” appearance. This opposing orientation creates a dynamic visual flow across the quilt top. - Assembling the Rows: Once you are satisfied with your layout, carefully sew the five blocks in the first row together, using a consistent 1/4-inch seam allowance. Press your seams, alternating the direction of the seam allowance for each joint to reduce bulk where the rows will meet. Repeat this process for the second row.
- Completing the Quilt Top: Finally, with both rows assembled, align the two rows, right sides together, matching all seams as perfectly as possible. Pin generously along the length of the seam. Sew these two rows together with a 1/4-inch seam allowance. Press the final seam to complete your beautiful Hidden Trails Quilt top.
Finishing Your Hidden Trails Quilt: Beyond the Top
Creating the quilt top is a major accomplishment, but the journey isn’t over yet! To transform your quilt top into a complete, cozy masterpiece, you’ll need to add batting, backing, and binding. These steps ensure durability, warmth, and a professional finish.
- Batting: This is the middle layer of your quilt, providing warmth and dimension. Choose a batting material that suits your preference – cotton, polyester, or a blend are common.
- Backing Fabric: Select a fabric for the back of your quilt. This can be a single piece of wide-back fabric or pieced together from standard width fabrics. Ensure it’s larger than your quilt top (typically 4-6 inches larger on all sides) to allow for shifting during quilting.
- Basting: This process secures the three layers (quilt top, batting, and backing) together so they don’t shift while you’re quilting. Common basting methods include safety pins, basting spray, or hand-basting. Lay your backing fabric right side down, smooth the batting on top, then place your quilt top right side up on the batting. Baste thoroughly.
- Quilting: This is where you stitch through all three layers to hold them together and add texture. You can choose a simple stitch-in-the-ditch design (stitching along the seam lines), straight-line quilting, or more intricate free-motion quilting. The quilting pattern will enhance the “hidden trails” effect.
- Trimming and Squaring: Once quilted, trim the excess batting and backing so all three layers are perfectly square and flush with the edges of your quilt top.
- Binding: The final touch that gives your quilt a clean, finished edge and protects the raw seams. Create binding strips by cutting fabric into 2.5-inch wide strips, sewing them end-to-end to create a long continuous strip, and pressing it in half lengthwise. Attach the binding to the front of the quilt by machine, then wrap it around to the back and hand-stitch or machine-stitch it in place.
- Labeling (Optional but Recommended): Don’t forget to add a label to your quilt with your name, the date, and perhaps the quilt’s name or recipient. This adds a personal touch and a historical record to your handmade treasure.
Tips for Quilting Success
To ensure your Hidden Trails Quilt project is as enjoyable and successful as possible, keep these pro tips in mind:
- Accuracy is Paramount: In quilting, small discrepancies in cutting or seam allowances can compound. Always strive for accurate 1/4-inch seams and precise cuts. Consider a scant 1/4-inch seam if your machine tends to sew slightly larger.
- Pressing vs. Ironing: Remember to “press” your fabric rather than “ironing” it. Pressing involves lifting and placing the iron down, which sets seams and keeps fabric from stretching or distorting. Ironing involves sliding the iron, which can pull and warp your precisely sewn pieces.
- Chain Piecing: To speed up the sewing process, especially when making multiple identical units like HSTs, use chain piecing. Sew one unit, then feed the next unit directly under the needle without lifting the presser foot or cutting the thread. Continue until all units are sewn, then clip them apart.
- Test Your Seam Allowance: Before starting your project, sew a test seam on scrap fabric. Measure it to ensure it’s a true 1/4 inch. Adjust your needle position or presser foot if necessary.
- Take Breaks: Quilting should be enjoyable! If you get frustrated or tired, step away for a bit. A fresh perspective often helps resolve challenges.
- Embrace Imperfection: While precision is good, remember that handmade items have character. Don’t let minor imperfections deter you from finishing your beautiful quilt.
Your Finished Hidden Trails Charm Pack Quilt!
Congratulations on completing your Hidden Trails Charm Pack Quilt! This pattern offers a fantastic blend of simple techniques and a visually engaging design, making it a truly rewarding project. Whether this was your first quilt or your hundredth, the satisfaction of transforming a simple charm pack into such a beautiful and functional piece of art is immense.
The “hidden trails” design, created by the clever arrangement of directional blocks, adds a dynamic and modern touch to any space. It’s a testament to how creative fabric placement can elevate a basic block into something truly special. This quilt is perfect for snuggling on the couch, decorating a child’s room, or gifting to a loved one. Each stitch tells a story, and now you’ve added a wonderful new chapter to your quilting journey.
We hope this detailed tutorial, inspired by Moonkin Stitchery’s excellent video, has empowered you to create a quilt you’ll cherish for years to come. Don’t hesitate to experiment with different charm pack selections to explore endless color and pattern combinations. Happy quilting!