
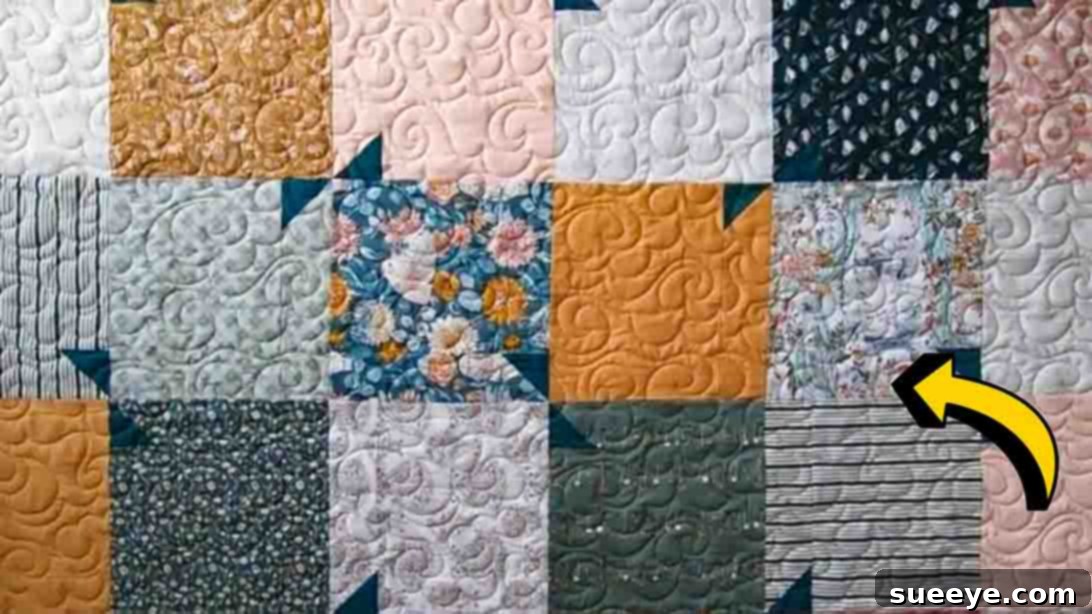
Are you searching for an engaging and rewarding quilting project that won’t take weeks to complete? Look no further! The beautiful Whispering Winds Layer Cake Quilt offers the perfect blend of simplicity and stunning design, making it an ideal choice for quilters of all skill levels. Whether you’re a seasoned crafter seeking a relaxing weekend project or a beginner taking your first steps into the wonderful world of quilting, this pattern is designed to inspire and delight.
We’re thrilled to share this fantastic tutorial, originally brought to life by Moonkin Stitchery on YouTube. Their clear, step-by-step instructions ensure a smooth and enjoyable crafting experience, guiding you from your first cut to your final stitch. This particular quilt stands out because it cleverly utilizes pre-cut fabrics – layer cakes and fat quarters – eliminating the need for extensive initial cutting and letting you dive straight into the fun part: sewing!
Say goodbye to tedious yardage calculations and intricate pattern pieces. With the Whispering Winds Layer Cake Quilt, you’ll discover how quickly a collection of coordinated fabrics can transform into a charming and cozy quilt. It’s a project that promises not only a gorgeous finished product but also immense satisfaction from creating something beautiful with your own hands. Get ready to embark on your next favorite quilting adventure!
RELATED: Quick and Easy Layer Cake Jolly Bar Quilt
Embrace Simplicity: The Magic of Layer Cakes and Fat Quarters
One of the most appealing aspects of the Whispering Winds Quilt pattern is its ingenious use of pre-cut fabrics. For many quilters, especially those new to the craft, the initial cutting stage can feel daunting and time-consuming. This pattern bypasses that hurdle, making it incredibly accessible and enjoyable.
What are Layer Cakes?
Layer cakes are collections of 10-inch squares of fabric, typically featuring an entire fabric line from a specific designer. This means all the fabrics are pre-selected to coordinate beautifully, taking the guesswork out of fabric choices and ensuring your quilt has a cohesive and professional look. They save you precious time and allow you to jump straight into piecing, making them a favorite among busy quilters.
What are Fat Quarters?
A fat quarter is a quarter-yard of fabric, cut in a way that creates a piece approximately 18 x 22 inches (or half the width of the fabric by half the length of a yard). This larger, more versatile shape, compared to a standard quarter-yard strip, is perfect for cutting various shapes without being limited by narrow strips. In this particular quilt, fat quarters are primarily used for accent pieces, providing a lovely contrast and defining the pattern’s unique “whispering winds” effect.
By leveraging these pre-cuts, you’re not just saving time; you’re also often getting a curated selection of high-quality fabrics that would be challenging to assemble individually. This project truly showcases how these convenient bundles can be transformed into stunning quilts with minimal effort.
Materials You’ll Need for Your Whispering Winds Quilt
Gathering your materials is the first exciting step in any quilting journey. For this Whispering Winds Layer Cake Quilt, you’ll find the list concise and straightforward, focusing on essential tools for precision and efficiency. Having everything ready before you begin will ensure a smooth and enjoyable crafting process.
- Layer Cake: Choose a layer cake with colors and patterns that speak to you! This will form the main body of your quilt and its unique design. One standard layer cake (42 pieces) is usually sufficient for a lap-sized quilt, but consider a second if you desire a larger finished product.
- Fat Quarter (for accent): Select a fat quarter in a contrasting or complementary color to your layer cake. This accent fabric will create the striking directional elements within your blocks, giving the quilt its signature “whispering winds” appearance.
- Rotary Cutter: A sharp rotary cutter is indispensable for accurate and quick fabric cutting. Ensure your blade is fresh for clean cuts.
- Quilting Ruler: A clear acrylic quilting ruler with precise measurements is crucial for straight and accurate cuts. A 6″ x 24″ or a smaller 6″ x 12″ ruler will be highly useful for this project.
- Cutting Mat: Protect your work surface and your rotary blade with a self-healing cutting mat. A large mat is recommended for easier fabric manipulation.
- Sewing Machine: Any standard sewing machine in good working order will suffice. Ensure it’s threaded correctly and that you have fresh needles appropriate for quilting (e.g., universal or quilting needles).
- Basic Sewing Supplies: Don’t forget thread (a good quality cotton thread that blends or contrasts as desired), pins or fabric clips, an iron and ironing board, and a seam ripper (just in case!).
Step-by-Step Directions to Craft Your Whispering Winds Quilt
Now that you have all your beautiful materials and essential tools ready, it’s time to dive into the exciting part: constructing your quilt blocks! Follow these detailed instructions, inspired by the excellent tutorial from Moonkin Stitchery, to bring your Whispering Winds Quilt to life.
Step 1: Preparing Your Fabrics and Crafting the Half-Square Triangle Units
Precision in cutting is key for beautiful quilting, so take your time with this initial stage. This step focuses on preparing your fabric pieces and constructing the unique corner units that give the quilt its dynamic movement.
- Prepare Your Accent Squares: Begin by taking your chosen fat quarter accent fabric. Using your rotary cutter and quilting ruler, carefully cut forty-two 2½-inch squares. These small squares will be crucial for creating the “wind” effect in your blocks.
- Prepare Your Layer Cake Rectangles: From each of your layer cake squares, you will cut two distinct rectangles. First, cut one 2½-inch by 9½-inch rectangle. Next, cut one 7½-inch by 9½-inch rectangle. You will repeat this for each of your 42 layer cake squares, resulting in 42 sets of these two rectangles.
- Create the Corner Unit (Half-Square Triangle Method):
- Take one of your 2½-inch by 9½-inch rectangles from a layer cake.
- Now, take one of the 2½-inch accent squares you just cut from the fat quarter.
- On the wrong side of the accent square, use a fabric marker or pencil to draw a diagonal line from one corner to the opposite corner. This line will serve as your sewing guide.
- Place the accent square right sides together on the right end of the 2½-inch by 9½-inch layer cake rectangle. Ensure the edges are aligned perfectly. Pin in place if desired.
- Carefully sew directly on the drawn line. Maintain a consistent stitch length.
- Once sewn, trim the excess fabric. Measure ¼-inch away from your sewn line, towards the outer corner, and cut along this new line. Discard the trimmed triangle (or save it for a future crumb quilt!).
- Finally, press the seam open. This helps to reduce bulk and ensures your block lies flat, contributing to a smoother finished quilt top. Pressing towards the darker fabric is a common practice, but pressing open is often preferred for intricate piecing to further minimize bulk.
- Repeat this process for all 42 of your 2½-inch by 9½-inch layer cake rectangles, each paired with an accent square. You will now have 42 distinct corner units.
Step 2: Assembling Your Quilt Blocks and the Quilt Top
With your corner units complete, the next step is to combine them with the larger layer cake rectangles to form your final quilt blocks. This stage is where the individual components begin to truly take shape as part of the overall design.
- Complete Each Quilt Block:
- Take one of the corner units you just created (the 2½-inch x 9½-inch rectangle with the accent square sewn onto it).
- Retrieve the corresponding 7½-inch by 9½-inch rectangle from the same layer cake square.
- Align the corner unit to the bottom of the 7½-inch by 9½-inch rectangle, ensuring right sides are together and raw edges are perfectly matched. Pin carefully.
- Sew these two pieces together with a precise ¼-inch seam allowance. Consistency in your seam allowance is crucial for blocks that fit together perfectly.
- Press the seam open or towards the darker fabric, whichever you prefer for minimizing bulk. You have now completed one full Whispering Winds quilt block!
- Repeat this entire block assembly process until you have all 42 of your quilt blocks finished. Take a moment to admire your growing stack of completed blocks – it’s a rewarding sight!
- Layout Your Quilt Top:
- Find a large, flat surface – a design wall, the floor, or a large table – where you can lay out your finished blocks.
- Arrange your 42 blocks in a 6-block by 7-block layout. This means you will have 6 blocks across each row and 7 rows total.
- As you lay out each block, rotate it 90 degrees. This rotation is essential to achieve the characteristic “whispering winds” movement and pattern within the quilt. Experiment with the rotation to create the exact flow and directionality you desire. Step back and look at your layout from a distance to ensure the pattern flows as intended and that you are happy with the visual balance of colors and accents.
- Sew Blocks into Rows:
- Once you are satisfied with your layout, begin sewing the blocks together, one row at a time. Take the first two blocks of a row, place them right sides together, and sew with a ¼-inch seam allowance.
- Continue adding blocks to that row until the entire row is complete.
- Press the seams of each row. For flatter results, consider pressing alternate rows in opposite directions. For example, press seams in Row 1 to the right, Row 2 to the left, and so on. This technique helps seams to nest when joining rows, reducing bulk.
- Repeat this process for all 7 rows.
- Join Rows to Complete the Quilt Top:
- With all your rows sewn and pressed, it’s time to join them together. Take the first two rows, place them right sides together, carefully aligning all seam intersections. Pins are your best friend here!
- Sew the rows together with a ¼-inch seam allowance.
- Continue adding the remaining rows in the same manner until your entire quilt top is complete.
- Give your finished quilt top a final press to ensure all seams are flat and the fabric is smooth.
Finishing Your Whispering Winds Masterpiece
Congratulations! You’ve successfully pieced together the beautiful top for your Whispering Winds Layer Cake Quilt. But the quilting journey doesn’t end there. To transform your quilt top into a cherished, functional item, you’ll need to complete a few more essential steps: layering, quilting, and binding.
Layering Your Quilt
This involves creating the “quilt sandwich.” You’ll need three layers: your finished quilt top, a layer of batting (the warm inner filling), and a backing fabric. Lay your backing fabric right side down, smooth out any wrinkles, then center your batting on top. Finally, place your quilt top right side up on the batting. Secure all three layers together using basting pins, spray basting, or hand basting stitches. This step is critical to prevent shifting and puckering during the quilting process.
Quilting Your Quilt
Quilting is the process of stitching through all three layers to hold them together and add texture and durability. You have several options:
- Machine Quilting: You can quilt simple straight lines, a grid pattern, or more intricate free-motion designs on your home sewing machine. Start with simple “stitch-in-the-ditch” (sewing along existing seam lines) for a classic look, or try wavy lines for added movement.
- Hand Quilting: For a more traditional and tactile finish, you can hand quilt your project. This involves using a needle and thread to create small, even stitches through all layers.
- Professional Longarm Quilting: Many quilters choose to send their quilt tops to a professional longarm quilter, especially for larger quilts or when seeking complex, artistic quilting designs.
Binding Your Quilt
The final touch that gives your quilt a neat, durable edge is binding. This involves cutting strips of fabric (usually 2½ inches wide), sewing them together to form a long strip, and then attaching this strip around the perimeter of your quilt. The binding is typically sewn to the front of the quilt by machine, then folded over to the back and hand-stitched or machine-stitched in place. A well-executed binding provides a beautiful frame for your quilt and protects the raw edges.
Once your Whispering Winds Quilt is quilted and bound, it’s ready to be loved, displayed, and cherished for years to come. Whether it’s a cozy throw for your sofa, a decorative wall hanging, or a thoughtful gift, this project is sure to bring warmth and joy.
Your Quilting Journey Continues
Embarking on the Whispering Winds Layer Cake Quilt project is more than just making a quilt; it’s an opportunity to hone your skills, explore color palettes, and create something truly unique. The satisfaction of seeing your fabric pieces transform into a beautiful, functional work of art is unparalleled. We hope this expanded guide, inspired by Moonkin Stitchery’s excellent tutorial, has provided you with all the confidence and detail needed to start your own Whispering Winds adventure.
Don’t hesitate to personalize your quilt with different fabric choices, experiment with the rotation of your blocks, or even add a unique border if you’re feeling adventurous. The beauty of quilting lies in its endless possibilities for creative expression. Share your finished Whispering Winds Quilt with fellow enthusiasts, and inspire others with your handmade masterpiece. Happy quilting!