
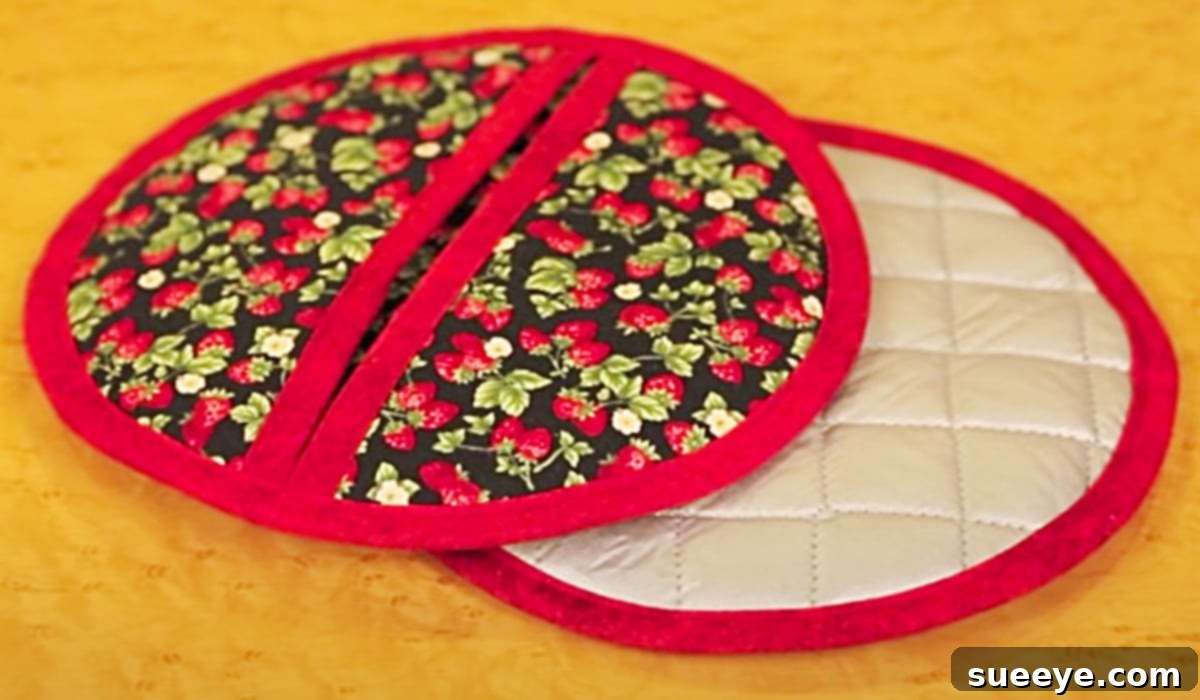
DIY 60-Minute Potholder: Craft a Quick & Insulated Kitchen Essential with Hand Pockets
There’s a unique charm that homemade potholders bring to any kitchen, transforming it into a warm, inviting space. They are not merely functional items; they are expressions of creativity and care. If you’ve been searching for an easy, rewarding sewing project, look no further than the ingenious 60-minute potholder. This design stands out not only for its simplicity and speed but also for its clever functionality, making it a favorite among crafters of all skill levels.
Inspired by the fantastic tutorial from Nancy’s Notions on YouTube, this project redefines the standard potholder. What makes this particular design truly exceptional is its innovative built-in pockets, offering superior grip and protection for your hands. It’s a brilliant fusion of a traditional oven mitt and a classic potholder, delivering an unmatched level of safety and convenience. Moreover, this project is a wonderful “scrap buster,” allowing you to utilize leftover fabrics and breathe new life into forgotten textiles, all while creating a beautiful, farmhouse-style accessory that adds a touch of rustic cuteness to your kitchen.
Why Sew Your Own Potholders? The Benefits of DIY Kitchen Essentials
Embarking on a DIY potholder project, especially one as straightforward as the 60-minute design, offers a multitude of advantages beyond just saving money:
- Personalization and Style: Store-bought potholders often lack character. By sewing your own, you can choose fabrics that perfectly match your kitchen decor, reflect your personal style, or create themed sets for holidays and special occasions. The possibilities for customization are endless.
- Superior Insulation and Protection: Many commercial potholders offer inadequate heat protection. When you make your own, you control the quality and type of insulating materials used, ensuring maximum safety when handling hot pots, pans, and baking dishes. The layered construction of this 60-minute potholder, with specific insulating fabrics, provides excellent heat resistance.
- Cost-Effectiveness and Sustainability: This project is an ideal way to use up fabric scraps that might otherwise go to waste. Instead of purchasing new materials, you can repurpose remnants from previous sewing endeavors, making it an environmentally friendly and budget-conscious craft.
- Skill Development for Beginners: Sewing a potholder is an excellent entry-level project for those new to sewing. It involves basic cutting, layering, and straight-line stitching, providing a confidence boost and a tangible, useful item upon completion. It’s a great way to practice fundamental sewing machine skills.
- Thoughtful Handmade Gifts: Handmade items carry a special sentiment. A set of custom-sewn potholders makes a fantastic gift for housewarmings, weddings, holidays, or for anyone who appreciates unique, handcrafted kitchenware. They are practical, beautiful, and made with love.
- Unique Hand Pockets for Enhanced Safety: The distinctive feature of this particular potholder is its built-in pockets. These pockets allow you to comfortably slide your hands in, providing a secure grip on hot items and distributing heat evenly, significantly reducing the risk of burns. This ingenious design truly elevates its functionality beyond traditional flat potholders.
Materials For The 60-Minute Pot Holder: Crafting a Heat-Resistant Design
To create your own sturdy and effective 60-minute potholder with hand pockets, you’ll need a few key materials. The choice of fabrics is crucial for both aesthetics and, more importantly, for providing adequate heat protection.
- 1/4 of a yard of main cotton fabric: This will be your primary decorative fabric, visible on the front and back of your potholder. Opt for high-quality quilting cotton that can withstand heat and frequent washing. A quarter yard is typically enough for a standard size potholder, allowing for a bit of flexibility.
- 1/4 of a yard of Insul-Bright: This specialized needle-punched insulated lining is the secret weapon for effective potholders. It contains metalized polyester fibers that reflect heat, ensuring your hands stay protected. It’s a vital component for any heat-resistant sewing project, designed specifically for oven mitts and potholders.
- 1/4 of a yard of quilted ironing board silver fabric: This material provides an additional layer of heat reflection and protection. It’s typically a cotton fabric coated with a metallic, heat-reflective layer, often found in ironing board covers. Using this alongside Insul-Bright creates a formidable barrier against high temperatures.
- Coordinating Thread: Choose a durable, all-purpose polyester or cotton thread that matches or complements your main fabric.
- Basic Sewing Supplies: This includes sharp fabric scissors or a rotary cutter and mat, sewing pins or clips, an iron and ironing board, and a sewing machine equipped with a universal needle.
Directions: Step-by-Step Guide to Sewing Your Round Potholder
This 60-minute potholder project, as demonstrated by Nancy’s Notions on YouTube, simplifies the process into a few manageable steps. Follow these instructions carefully to create your durable and practical round potholder with integrated hand pockets.
Step 1: Prepare and Cut Your Fabric Circles
Precision in cutting is key for a beautifully finished round potholder. Begin by selecting a circular template. A dinner plate, a large bowl, or a pre-made quilting template approximately 9-10 inches in diameter works perfectly. This size generally creates a functional and comfortable potholder. Ensure your fabrics are pressed flat before cutting to eliminate any wrinkles that could affect accuracy.
- Cut 2 circles from your main cotton fabric: These will form the outer layers of your potholder and the pocket fronts.
- Cut 2 circles from the quilted ironing board silver fabric: These will serve as crucial heat-insulating layers.
- Cut 1 circle from the Insul-Bright: This will be the core insulating layer, reflecting heat away from your hands.
Once all your circles are cut, you should have a total of five fabric circles ready for assembly.
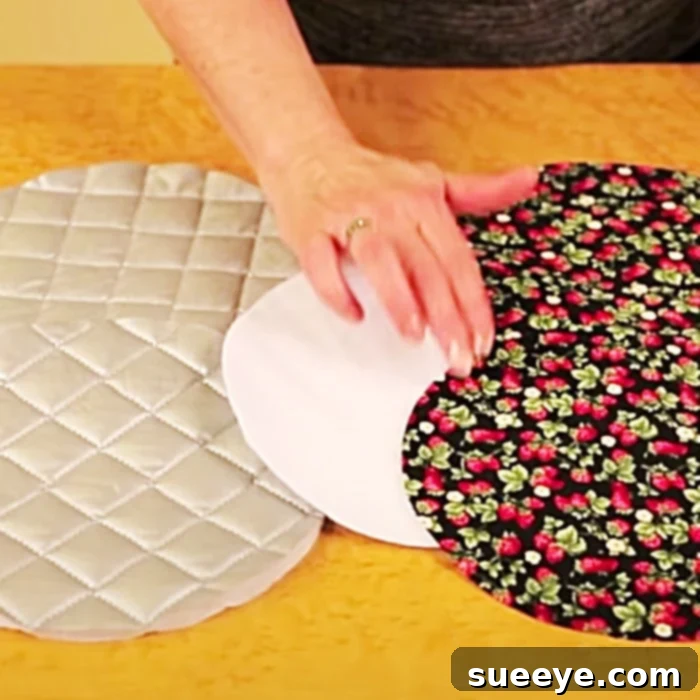
Step 2: Assemble the Potholder Layers (The Sandwich Method)
This step involves carefully stacking your fabric circles to create the insulated core and the ingenious hand pockets. The precise order of layers ensures both maximum heat protection and the correct formation of the pockets.
- Create the base layer: Lay one of your main cotton fabric circles right side down on your work surface. This will be the back of your potholder.
- Add insulating layers: Place one circle of the quilted ironing board silver fabric directly on top of the cotton back. Then, layer the Insul-Bright circle on top of the silver fabric. Follow this with the second circle of quilted ironing board silver fabric. You now have a robust insulating core.
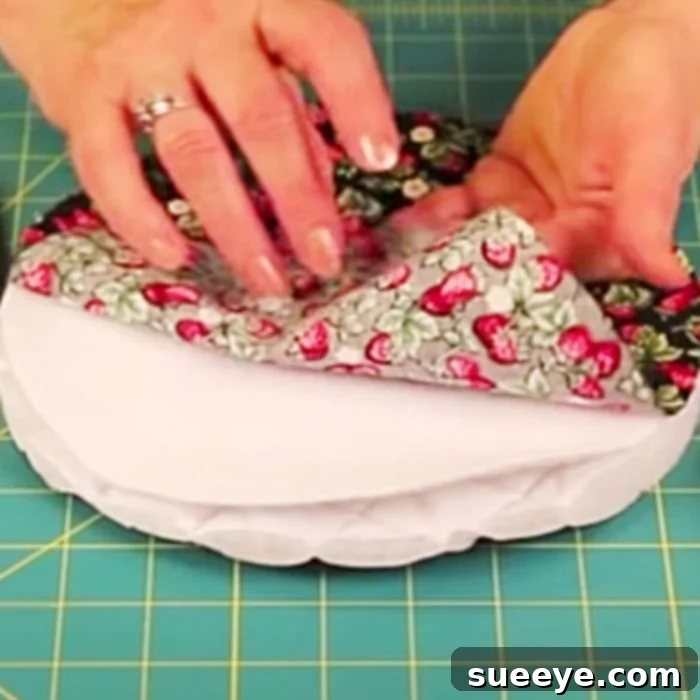
- Prepare the pocket pieces: Take your remaining two main cotton fabric circles. Fold each of these circles in half, creating two semi-circles. Press them gently with an iron to define the fold.
- Position the pockets: Place one folded cotton semi-circle on top of your stacked insulating layers, aligning its raw, curved edge with the raw edge of the main stack. The folded edge should point towards the center of the stack. Repeat with the second folded cotton semi-circle, placing it directly opposite the first one, creating two distinct openings for your hands.
- Secure the layers: Carefully pin all the layers together around the entire perimeter, ensuring everything stays aligned. You now have a complete “sandwich” of fabric and insulation, ready for stitching.
Step 3: Stitch the Layers Together
With all your layers securely pinned, it’s time to stitch them together to form the basic potholder structure. Using your sewing machine, sew a seam around the entire outer edge of the assembled circles. A 1/4-inch seam allowance is typically sufficient. This initial stitch will hold all the layers, including the pocket pieces, firmly in place. Ensure your stitches are even and consistent to create a neat, durable edge. You may also want to add a few lines of decorative quilting stitches across the surface of the potholder at this stage to further secure the layers and prevent shifting, enhancing both its durability and aesthetic appeal. This is especially useful for keeping the insulating layers from bunching after washing.
Step 4: Finish with Binding for a Professional Touch
The final step in constructing your 60-minute potholder is to finish the raw edge with a fabric binding. This not only gives your potholder a professional, polished look but also reinforces the edges, making it more durable and resistant to wear and tear. You can use pre-made bias tape or create your own binding strips from a coordinating or contrasting fabric.
- Prepare the binding: If using store-bought bias tape, you’re ready to go. If making your own, cut fabric strips on the bias (diagonally across the grain) that are approximately 2 inches wide and long enough to go around the entire circumference of your potholder, plus an extra few inches for overlap. Sew these strips together end-to-end if necessary to achieve the required length. Press the strip in half lengthwise.
- Attach the binding: Starting at an inconspicuous spot (like one of the pocket openings), align the raw edges of your folded binding strip with the raw edge of your potholder. Pin the binding all the way around, easing it gently around the curves.
- Sew the binding: Stitch the binding to the potholder with a 1/4-inch seam allowance. When you reach your starting point, overlap the binding ends by about an inch, trim any excess, and secure the overlap.
- Fold and finish: Fold the binding over to the other side of the potholder, encasing the raw edge. Hand-stitch or machine-stitch the binding down, making sure to catch both sides for a clean finish. Alternatively, you can use a double-fold bias tape for a quicker machine-stitched finish, by stitching it to the front, then wrapping it around and stitching from the back, catching the edge.
Once your binding is complete, give your new potholder a final press, and it’s ready to protect your hands in the kitchen!
Tips for Success and Longevity of Your Homemade Potholder
To ensure your 60-minute potholder is both beautiful and long-lasting, consider these additional tips:
- Pre-wash Your Fabrics: Always wash and dry your cotton fabrics before cutting to pre-shrink them. This prevents warping or shrinking after your potholder is made and washed. Insul-Bright and the ironing board fabric typically don’t require pre-washing.
- Use a Walking Foot: When sewing through multiple layers of fabric and insulation, a walking foot attachment on your sewing machine can be incredibly helpful. It helps feed all layers evenly, preventing puckering and shifting.
- Reinforce Key Areas: If you plan to add a hanging loop, securely attach it during the binding process or sew it onto the finished potholder with strong stitches.
- Quilting for Stability: While not explicitly mentioned in the simple steps, adding a few lines of decorative quilting or stitch-in-the-ditch lines across the main body of the potholder (before binding) can help stabilize the inner layers of Insul-Bright and silver fabric. This prevents them from shifting or bunching up over time, especially after washing.
- Washing Instructions: Most homemade potholders can be machine-washed on a gentle cycle with cold water and tumble-dried on low. Avoid high heat as it can damage the Insul-Bright’s reflective properties over time.
- Safety Note on Insul-Bright: While Insul-Bright is fantastic for heat resistance, it contains metallic fibers. Therefore, do not use potholders made with Insul-Bright in the microwave, as it can cause sparks and damage.
Variations and Customization Ideas for Your DIY Potholder
The beauty of DIY projects lies in the ability to personalize them. Here are some ideas to make your 60-minute potholder truly unique:
- Different Sizes: Adjust the size of your circle template to create smaller trivets or larger, extra-protective potholders for bigger baking dishes.
- Patchwork Design: Instead of using a single piece of main fabric, piece together smaller scraps to create a patchwork front for a true “scrap buster” masterpiece. This adds a charming, rustic quilt-like aesthetic.
- Embellishments: Add decorative embroidery, appliqué, or decorative stitching to the main fabric before assembling the layers.
- Contrasting Fabrics: Play with contrasting colors and patterns for your main fabric and binding to create a visually striking potholder.
- Hanging Loop: Incorporate a small fabric loop into the binding at the top of the potholder so it can be conveniently hung on a hook in your kitchen.
- Gift Sets: Create matching sets of potholders with coordinating oven mitts, tea towels, or aprons for a thoughtful and cohesive handmade gift.
This 60-minute potholder is more than just a quick sewing project; it’s an opportunity to infuse your kitchen with personality and practicality. The clever design with built-in hand pockets, combined with the superior insulation of Insul-Bright and quilted ironing board fabric, makes it an indispensable tool for any home cook. Whether you’re a seasoned sewer or just starting, you’ll find immense satisfaction in creating this charming and functional kitchen essential. So, gather your materials, fire up your sewing machine, and get ready to enjoy the warmth and safety of your very own handmade potholder!