
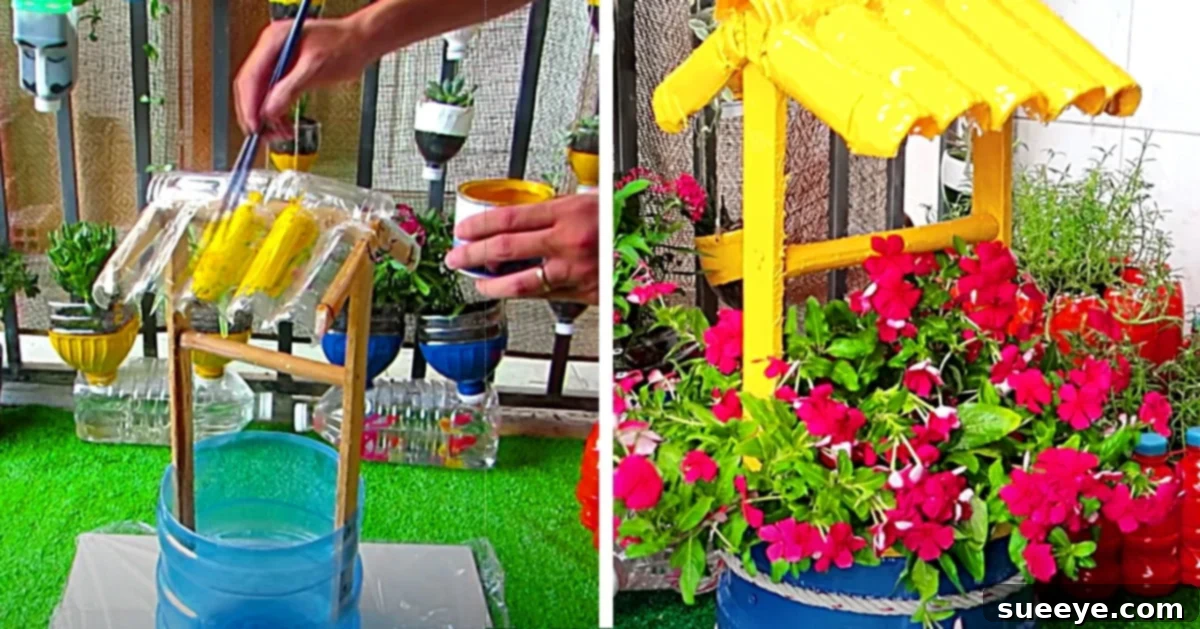
Turn A 5 Gallon Water Bottle Into A Charming Wishing Well Planter
Are you looking to infuse your outdoor space with a touch of magic and whimsy this season? Transforming your patio or garden into a personalized sanctuary doesn’t have to be expensive or complicated. This year, my vision is to create a captivating “Secret Garden,” a serene retreat filled with unique and enchanting elements. As I embarked on this creative journey, I stumbled upon an absolute gem: a video tutorial by J.o.h.n. Ideas, demonstrating how to craft a beautiful wishing well planter from a humble recycled 5-gallon water bottle. My excitement was instantaneous! This project perfectly aligns with my theme and offers an incredibly simple, budget-friendly, and eco-conscious way to add a distinctive focal point to my outdoor decor.
The beauty of this DIY wishing well lies in its accessibility. The tutorial is remarkably straightforward, requiring only a handful of materials that you likely already have stashed away in your home or garage. Imagine the satisfaction of repurposing an everyday item into a charming piece of garden art! For my “Secret Garden,” I plan to incorporate various quaint items, including miniature fairy gardens and a whimsical faux mountain to display my treasured collection of garden gnomes. This delightful water bottle wishing well is destined to be a magnificent addition, perfectly complementing the gnome arrangement and adding an extra layer of enchantment. As I wander through my newly created mystical environment, perhaps with some Led Zeppelin playing softly in the background, I can already feel the magic coming to life!
Why Choose a DIY Wishing Well Planter?
Embracing DIY projects for your garden offers a plethora of benefits, especially when it involves upcycling materials. A wishing well planter made from a 5-gallon water bottle is more than just a decorative item; it’s a statement of creativity, sustainability, and personal flair. Here’s why this project is a must-try for any garden enthusiast:
- Cost-Effective Charm: Traditional garden decor can be pricey. By using a recycled water bottle and other common household items, you dramatically cut down on expenses, proving that stunning garden features don’t require a hefty budget.
- Eco-Friendly Upcycling: Giving a second life to a plastic water bottle reduces waste and lessens your environmental footprint. It’s a fantastic example of sustainable gardening and smart repurposing.
- Unleash Your Creativity: This project offers immense scope for personalization. From the paint colors and finishes to the decorative embellishments, you can tailor your wishing well to perfectly match your garden’s aesthetic and your personal style.
- Unique Garden Feature: Stand out from the crowd with a unique piece of garden art. A handmade wishing well instantly becomes a conversation starter and a charming focal point in any outdoor setting.
- Sense of Accomplishment: There’s immense satisfaction in creating something beautiful and functional with your own hands. This project is accessible enough for beginners but rewarding for all skill levels.
Materials You’ll Need for Your Wishing Well Planter
Gathering your materials is the first exciting step towards bringing your wishing well to life. Most items are readily available, making this a truly convenient DIY endeavor. Here’s a detailed list with some helpful tips:
- A 5-Gallon Water Bottle: This is the cornerstone of your project. Ensure it’s thoroughly cleaned and dry before you begin. Both polycarbonate (PC) and PET plastic bottles work well.
- A Sharpie or Permanent Marker: Essential for precise marking of cutting lines and details on your bottle.
- A Small Saw: A utility knife or a sharp craft knife can work for careful, controlled cuts on plastic. For a smoother, easier cut, consider a small hand saw designed for plastic or even a Dremel tool with a cutting wheel. Always prioritize safety.
- Wood Strips: These will form the structural elements of your wishing well, particularly the roof supports. Thin craft wood strips, balsa wood, or even sturdy popsicle sticks can be adapted. Aim for strips that are easy to cut and glue, roughly 1/4 to 1/2 inch in width. You’ll need about 6-8 strips, depending on your design.
- Nails and a Hammer (Optional): While nails can add structural integrity, often wood glue or a strong hot glue will suffice for the light wood strips. Small brads or tacks might be useful for securing wood pieces.
- A Piece of Doweling: This will serve as the central support for your wishing well’s roof. A wooden dowel approximately 1/4 to 3/8 inch in diameter and about 12-18 inches long should be suitable. A sturdy chopstick or a thick wire could also work as an alternative.
- 6 Small Plastic Water Bottles (or equivalent): These will be cut and shaped to create the shingles for your wishing well roof, giving it that classic look. Alternatively, you could use cardboard, thin plastic sheets, or even small pieces of real bark for a rustic effect.
- A Glue Gun and Glue Sticks: Your best friend for this project! A hot glue gun provides quick, strong bonds for attaching wood, plastic, and decorative elements. Ensure you have plenty of glue sticks on hand.
- Craft Paint (or Spray Paint): To transform the plastic bottle and wood strips into a realistic or whimsical wishing well. Acrylic paints are versatile and adhere well to plastic, especially if you use a primer. Spray paint specifically formulated for plastic offers excellent coverage and a smooth finish. Don’t forget brushes if using craft paint, and consider a primer for optimal paint adhesion and durability outdoors.
- Decorative Rope: Jute, sisal, or any decorative cord can be used to add a rustic or polished finish around the base or edges of your well.
- Optional Embellishments: Consider moss, small pebbles, beads, miniature figurines, or even solar-powered fairy lights to further personalize your creation.
Detailed Directions: Crafting Your Wishing Well Planter
This project is incredibly rewarding, and by following these detailed steps, you’ll have a charming wishing well planter ready for your garden in no time. Remember to work safely and enjoy the creative process!
Step 1: Preparing Your 5-Gallon Water Bottle
First, ensure your 5-gallon water bottle is immaculately clean and completely dry. Any residual water or grime can affect paint adhesion and the overall durability of your project. Decide on the height of your well. Typically, you’ll want to cut the top off, leaving a cylindrical base that’s roughly 10-14 inches tall, depending on the size of the plants you intend to place inside. Use your Sharpie to draw a clear, even line around the circumference of the bottle where you plan to make your cut. Measure carefully to ensure a straight and level planter.
Step 2: Cutting the Bottle Base
Now it’s time to cut your bottle. Using a small saw, utility knife, or a sharp craft knife, carefully follow the line you’ve drawn. Plastic can be tricky to cut, so proceed slowly and deliberately. If using a knife, score the line multiple times before attempting a full cut. For safety, wear protective gloves and eye protection. Once cut, gently sand down any rough edges with fine-grit sandpaper to ensure a smooth, safe rim for your planter.
Step 3: Constructing the Well’s Base Frame (Optional but Recommended)
While the video tutorial focuses on the roof, adding a faux wood base can enhance the wishing well’s appearance. You can achieve this by gluing thin wood strips around the base of your cut bottle, creating the look of a traditional wooden well. Alternatively, you can simply paint vertical “wood planks” directly onto the plastic, using different shades of brown and a fine brush to mimic wood grain. This step really helps sell the illusion of a rustic wishing well.
Step 4: Building the Roof Frame and Support
This is where your wood strips and dowel come into play. Take two longer wood strips and form an “A” frame for one side of your roof. Glue them together at the top, ensuring they are symmetrical. Repeat this for the other side of the roof. These “A” frames will be the main supports. Next, attach your dowel horizontally between the peaks of the two “A” frames. This dowel will act as the central ridge pole for your roof. Secure it firmly with hot glue. You’ll then attach the bottom ends of your “A” frames to the rim of your plastic bottle base, spaced evenly, forming the classic wishing well structure.
Step 5: Creating the Roof Shingles
Take your small plastic water bottles. Cut them into small, flat, semi-circular or rectangular pieces that will serve as your roof shingles. The size can vary, but aim for pieces that will overlap nicely. You can give them a slightly rounded edge to mimic traditional shingles. Starting from the bottom edge of your roof frame, begin gluing these plastic “shingles” onto the wooden frame and the dowel, overlapping each row slightly to create a layered effect. Work your way up to the peak of the roof, ensuring good coverage. You can also use cardboard or thin plastic sheets cut into shingle shapes if you prefer.
Step 6: Painting Your Wishing Well
This step allows for immense creativity. If using craft paint, consider applying a primer first, especially if painting directly onto the plastic bottle, to ensure better adhesion and a longer-lasting finish. For the well’s base, paint it to resemble stone or weathered wood, using various shades of gray, brown, or even mossy green. The roof shingles can be painted in a contrasting color, perhaps a dark brown, forest green, or even a whimsical red to resemble a cottage roof. Use lighter shades to highlight edges and darker shades for shadows to add depth. If using spray paint, do so in a well-ventilated area and apply multiple light coats for an even, smooth finish. Let all paint dry completely.
Step 7: Adding Decorative Touches
Now for the fun part – decorating! Wrap your decorative rope around the base of the well for a rustic, finished look. Secure it with hot glue. This is also the stage to add any additional embellishments. Consider gluing on small pebbles or moss to create an aged, natural look. Jewels, beads, or miniature figures can add a whimsical touch. You could even drape tiny LED fairy lights around the structure for an enchanting glow in the evening.
Step 8: Planting Your Greenery
Once your wishing well is fully assembled and decorated, it’s ready to become a planter. Ensure there are drainage holes at the bottom of the 5-gallon bottle base to prevent waterlogging. You can easily create these using a drill or a hot nail. Fill the planter with suitable potting soil and choose plants that complement your garden theme. Small annuals, succulents, herbs, or even miniature climbing plants would look fantastic cascading over the edge. For a “Secret Garden,” consider miniature roses, ferns, or tiny flowering plants.
Customization and Personalization Ideas
Your wishing well planter is a blank canvas! Don’t limit yourself to the basic design. Here are some ideas to make it uniquely yours:
- Thematic Painting: Instead of traditional wood/stone, paint your well in vibrant colors to match a specific theme, like a candy land garden or a whimsical forest.
- Roof Variations: Experiment with different roof materials. Instead of plastic bottles, try cutting felt or fabric for a softer look, or use real bark pieces for an ultra-rustic vibe.
- Miniature Scenes: Create a small scene around the base of the well with miniature figures – fairies, gnomes, or tiny animals. Add tiny benches, pathways made of small pebbles, or even a miniature pond feature.
- Lighting: Integrate solar-powered mini lights or string lights into the well’s structure or around the roof to create a magical nighttime glow.
- Wishing Elements: Add a small, decorative bucket or pail hanging from the dowel to truly evoke the spirit of a wishing well.
Integrating Your Wishing Well into Your Garden Theme
For my “Secret Garden,” this wishing well is more than just a planter; it’s a storytelling element. Placed strategically near my faux mountain and gnome collection, it will become a central piece of a larger narrative. Consider pairing your wishing well with:
- Fairy Gardens: Nestled amongst miniature plants and tiny houses, the wishing well becomes the centerpiece of a magical fairy village.
- Gnome Sanctuaries: Surround your well with your favorite garden gnomes, perhaps one peeking out from behind it or another fishing in a tiny ‘pond’ nearby.
- Herb Gardens: Use the well to house a collection of culinary herbs, making it both beautiful and functional.
- Welcome Feature: Place it near your patio entrance or garden gate to greet visitors with its charming presence.
Conclusion: Embrace the Magic of DIY Gardening
Creating this wishing well planter from a 5-gallon water bottle is a testament to the power of imagination and the joy of DIY. It’s an affordable, sustainable, and incredibly fun project that yields a stunning piece of garden decor. Beyond the aesthetic appeal, there’s deep satisfaction in transforming discarded items into cherished treasures for your outdoor space. This charming addition will not only bring life to your plants but also infuse your garden with a delightful sense of whimsy and enchantment, perfectly complementing any “Secret Garden” theme or simply adding a unique touch to your patio. So, gather your materials, let your creativity flow, and prepare to enjoy the magical atmosphere your new wishing well planter brings. Happy gardening, and may all your garden wishes come true!