
Delightful Homemade Rainbow Peppermint Patties: An Easy Chocolate-Coated Recipe
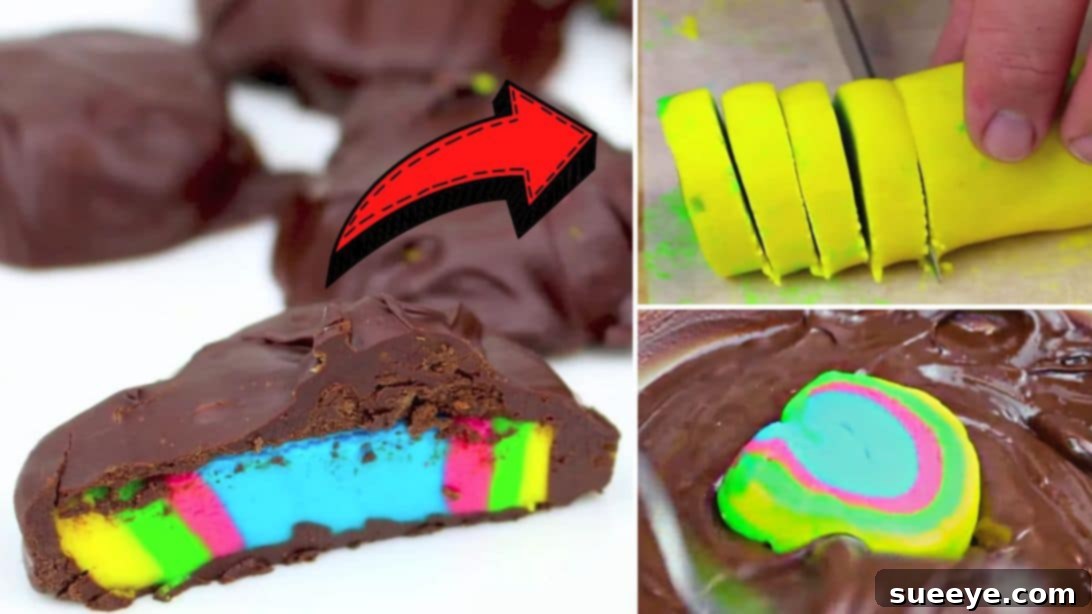
Experience a burst of fresh mint and rich chocolate with these absolutely delightful homemade rainbow peppermint patties. More than just a treat for your taste buds, these vibrant confections are a feast for the eyes, making them perfect for any celebration, holiday gathering, or simply as a special indulgence on a normal day. You’ll be amazed at how surprisingly simple they are to prepare, requiring only a handful of common ingredients and minimal effort. They truly disappear in minutes once served, thanks to their irresistible flavor and charming appearance. This incredible recipe, which brings restaurant-quality confections right to your home, is inspired by the culinary creativity of Todd’s Kitchen on YouTube.
Forget store-bought when you can craft these beautiful, melt-in-your-mouth mint chocolate candies right in your own kitchen. This guide will walk you through every step, ensuring your rainbow peppermint patties turn out perfectly every time – soft, chewy, minty, and enveloped in a crisp chocolate shell. Get ready to impress your friends and family with this sweet and colorful creation!
Essential Ingredients for Your Colorful Peppermint Patties
Crafting these vibrant peppermint patties requires a select group of ingredients, each playing a crucial role in achieving the perfect texture, flavor, and visual appeal. Make sure to have them all measured and ready before you begin.
- 5 cups of powdered or icing sugar: This forms the very foundation of our peppermint dough, ensuring a smooth, fine texture that melts delightfully in your mouth. Sifting it beforehand can help prevent lumps.
- 3 tbsp of corn or glucose syrup: A key ingredient for achieving that classic chewy yet soft bite. It helps prevent the sugar from crystallizing, keeping your patties wonderfully pliable and fresh.
- 3 tbsp of water: Essential for binding all the ingredients together and adjusting the overall consistency of your peppermint dough.
- 3 tbsp of butter: Softened butter adds richness, a creamy mouthfeel, and a subtle depth of flavor to the minty base, enhancing its luxuriousness.
- 1 tsp of peppermint essence or extract: The star flavor! This provides the refreshing, cool burst of mint that defines a peppermint patty. Feel free to adjust the amount to your personal preference for a milder or stronger minty kick.
- Food coloring, any color you prefer: This is where the “rainbow” magic happens! Gel food coloring is highly recommended as it provides vibrant hues without adding excess liquid that could alter the dough’s consistency. Choose a spectrum of colors for a truly stunning effect.
- Chocolate, melted, to coat the peppermint patties: Your choice of chocolate will create the irresistible outer shell. Dark chocolate offers a sophisticated contrast, milk chocolate provides a sweeter balance, and semi-sweet is a popular middle ground. Ensure you have enough for a generous coating.
Step-by-Step Guide to Crafting Rainbow Peppermint Patties
Follow these detailed steps carefully to create your beautiful and delicious chocolate-covered rainbow peppermint patties. Precision and a bit of patience will lead to fantastic results.
Step 1: Preparing the Peppermint Base and Adding Color
The first step involves creating the core peppermint dough and infusing it with vibrant colors, which is both fun and crucial for the final aesthetic.
Begin by combining the powdered sugar, softened butter, corn syrup, water, and peppermint essence in the bowl of a stand mixer fitted with a paddle attachment. Alternatively, you can use a large mixing bowl with an electric hand mixer. Start mixing on a low speed initially to gently incorporate all the ingredients, preventing a powdery cloud. Once the ingredients are somewhat combined, increase the speed to medium and mix for several minutes until the mixture comes together, becoming wonderfully smooth and lump-free.
The key here is achieving the perfect consistency. The dough should be pliable and easy to handle, much like play-dough, but it should not stick excessively to your hands. If the mixture feels too sticky or wet, gradually add a little more powdered sugar, a tablespoon at a time, mixing thoroughly after each addition until it reaches a non-sticky, workable dough. Conversely, if it appears too stiff or crumbly, add a tiny bit more water or corn syrup, just half a teaspoon at a time, until it becomes smooth and malleable. Once it no longer adheres to your hands but remains soft and not overly stiff, it’s ready for the next stage.
Carefully divide the perfectly mixed peppermint dough into four equal portions. Place each portion into a separate bowl. Now comes the exciting part: adding the color! Introduce a drop or two of your chosen food coloring to each bowl. For the most vivid and intense hues, gel food coloring is highly recommended. Using clean hands (you might want to wear gloves to avoid staining your fingers!) or a sturdy spoon, gently knead each portion of dough. Mix until the color is uniformly distributed throughout the dough and appears vibrant and consistent. If you desire deeper or more saturated hues, add another drop of coloring, mixing thoroughly each time, until you achieve your desired shade. Remember to mix each color completely before moving to the next to prevent accidental blending.
Step 2: Shaping, Chilling, and Assembling Your Rainbow Layers
This step is where your rainbow truly begins to take shape, requiring careful handling and chilling for optimal results.
Take each colored portion of dough and gently roll it out into a long, even log, approximately 1 inch thick. The exact length isn’t critical at this stage, as we will be trimming later. Next, place each log between two sheets of parchment paper. Using a rolling pin, flatten each log into a rectangular shape, aiming for an even thickness of about 1/8 to 1/4 inch. The more uniform your thickness, the better your final layered effect will be. Ensure the edges are relatively straight as you roll.
Once flattened, carefully transfer these sheets of colored peppermint dough (still nestled between their parchment paper layers) to a baking tray. Place the tray in the refrigerator and allow them to chill and firm up for at least 30 minutes, or until they are solid enough to handle without deforming. This crucial chilling step ensures that the layers will hold their shape beautifully when you assemble and roll them, preventing them from squishing or blending undesirably.
When sufficiently chilled, remove the peppermint sheets from the refrigerator. Gently peel off the top layer of parchment paper from each. Now, meticulously stack the colored sheets precisely on top of one another, pressing lightly but firmly to adhere them together. Aim for perfect alignment to create a neat block of layered colors. Using a sharp knife, carefully trim off the ragged edges of the stacked layers to create straight, clean lines on all four sides. This will form a neat rectangular block of your layered peppermint dough, ready for the next transformation.
With the remaining bottom layer of parchment paper still underneath, gently begin to roll the stacked layers lengthwise, starting from one of the longer sides. Roll tightly and evenly, applying consistent pressure to create a beautiful spiral effect as the layers coil around each other. The parchment paper will be your ally here, assisting in maintaining the log’s shape and preventing the dough from sticking to your work surface. Continue rolling until you have a firm, cylindrical log with visible colorful spirals.
Once rolled into a tight log, use a very sharp knife to slice the log into round, bite-sized patties. Aim for a thickness of approximately 1/4 to 1/2 inch. For a professional and consistent look, try to make each slice uniform. Placing the log back in the fridge for another 10-15 minutes before slicing can also help achieve cleaner cuts.
Step 3: The Chocolate Coating and Final Set
The final touches involve coating your beautiful patties in chocolate and allowing them to set, bringing the entire confection to perfection.
Prepare your melted chocolate. There are several effective methods: a double boiler offers gentle, even heating; the microwave allows for quick melting (heat in short bursts of 30 seconds, stirring frequently to prevent burning); or you can use a dedicated chocolate melting pot. Whichever method you choose, ensure the chocolate is smooth, fluid, and free of lumps for easy and even coating. If the chocolate is too thick, you can add a small amount of coconut oil or vegetable shortening (half a teaspoon at a time) to thin it slightly, being careful not to over-dilute.
Using a fork or a candy dipping tool, carefully dip each individual peppermint patty into the melted chocolate. Ensure it is fully submerged and evenly coated on all sides. Gently lift the patty, allowing any excess chocolate to drip back into the bowl. A light tap against the side of the bowl can help remove extra chocolate, ensuring a neat and not-too-thick coating.
Place the freshly chocolate-coated patties onto a tray lined with parchment paper or a silicone baking mat, arranging them in a single layer. This prevents them from sticking and makes for easy removal later. Allow them to harden completely. This can be done at room temperature, which will take longer but often results in a glossier finish, or by refrigerating for a quicker set. Once firm to the touch, your delightful rainbow peppermint patties are ready to be served and enjoyed!
Tips for Perfect Homemade Peppermint Patties
Achieving perfection with your homemade candies is all about a few key details. Here are some expert tips to ensure your rainbow peppermint patties are truly exceptional:
Achieving the Ideal Dough Consistency
The success of your patties hinges on the dough’s consistency. It should be soft and pliable, akin to modeling clay, but crucially, it must not be sticky. If your dough is too crumbly and doesn’t hold together, add a tiny bit more water or corn syrup, half a teaspoon at a time, mixing thoroughly. If, however, it’s too sticky and difficult to handle, gradually incorporate more powdered sugar, one tablespoon at a time, until it reaches that perfect, non-tacky stage. This balance is key for easy handling and a smooth final texture.
Vibrant Color Tips
For the most eye-catching and vibrant colors in your rainbow layers, always opt for gel food coloring instead of liquid varieties. Gel colors are highly concentrated, meaning you’ll need only a tiny amount to achieve rich hues. This is important because liquid food coloring can thin out your dough, making it sticky and harder to work with. Remember to mix each color thoroughly to prevent streaks and ensure an even shade.
Working with Chocolate
The chocolate coating is the crown jewel of your peppermint patties. For a truly professional finish with a beautiful sheen and a satisfying snap, consider tempering your chocolate. While not strictly necessary for deliciousness, tempering prevents “blooming” (those unsightly white streaks that can appear on untempered chocolate) and results in a perfectly crisp shell. If tempering seems too daunting, using high-quality melting chocolate or candy melts will still yield excellent results and are easier to work with. Always ensure your melted chocolate is not too hot when dipping, as excessive heat can cause your chilled peppermint centers to soften or even melt slightly.
Storage Solutions
Once your delectable peppermint patties have fully set, proper storage is essential to maintain their freshness and flavor. Store them in an airtight container at room temperature for up to one week, especially if your kitchen is cool. For extended freshness, particularly in warmer climates, storing them in the refrigerator can keep them perfect for up to 2-3 weeks. Furthermore, these candies freeze beautifully for several months. Simply layer them with parchment paper in an airtight freezer-safe container, and thaw them in the refrigerator or at room temperature before serving.
Variations to Explore and Enhance Your Peppermint Patties
While the classic rainbow peppermint patty is a true delight, don’t hesitate to experiment with variations to suit your taste or occasion. The possibilities are endless!
Flavor Twists
The minty core is wonderful, but why stop there? Instead of peppermint extract, try incorporating other essences for a completely different flavor profile. Almond extract offers a sweet, nutty note; lemon extract provides a bright, zesty kick; and orange extract pairs wonderfully with chocolate for a sophisticated citrus burst. You could even combine flavors, such as a hint of coconut with almond.
Chocolate Choices
The type of chocolate you use for coating can dramatically change the overall experience. Experiment with a rich, intense dark chocolate for a less sweet, more complex flavor contrast. Milk chocolate will give you a sweeter, creamier bite that’s often a crowd-pleaser. For a lighter, sweeter, or even more colorful coating (if you tint it with food coloring), white chocolate is an excellent option. You could even use a combination, perhaps drizzling white chocolate over dark chocolate-coated patties for an elegant finish.
Decorative Touches
Elevate the visual appeal of your peppermint patties with simple decorative touches. Before the chocolate coating fully sets, sprinkle them with festive sprinkles for holidays or birthdays, crushed candy canes for a wintery mint explosion, or finely chopped nuts for added texture. A delicate drizzle of contrasting melted chocolate (e.g., white chocolate over dark chocolate patties) can also add an elegant and artistic flair.
Why Make Your Own Peppermint Patties?
Beyond the sheer joy of creating something delicious, making your own peppermint patties offers numerous benefits that elevate them above their store-bought counterparts.
- Unmatched Customization: When you make them yourself, you are the master of flavor and appearance. You control the intensity of the mint, the sweetness of the dough, and the vibrancy of the colors. Make them exactly how you like them, a personalized treat truly tailored to your preferences.
- Exceptional Freshness: Homemade treats always taste better. You’re using fresh ingredients, without any artificial preservatives or stabilizers often found in commercial candies. This means a cleaner, purer flavor and a more pleasant texture.
- Cost-Effective Delight: You’ll be surprised at how economically you can produce a large batch of these gourmet-level candies. Making them at home often costs significantly less than purchasing a small box from a specialty store, giving you more bang for your buck and plenty to share.
- A Fun and Rewarding Activity: This recipe is a fantastic activity for families, especially with kids. Children will love the process of mixing colors and watching the beautiful rainbow layers emerge. It’s a hands-on, creative experience that results in a delicious reward.
- Impressive Homemade Gifts: These beautiful and delicious candies make excellent homemade gifts. Pack them in a decorative box or cellophane bags with a pretty ribbon for friends, family, teachers, or neighbors during holidays, birthdays, or any special occasion. A handmade gift always carries extra thoughtfulness and appreciation.
- Quality Control: You know exactly what goes into your patties, allowing you to choose high-quality butter, chocolate, and natural food colorings if desired, ensuring a treat you can feel good about enjoying.
These delightful rainbow peppermint patties are a testament to how simple ingredients, combined with a little creativity and care, can create truly extraordinary confections. With their refreshing mint flavor, rich chocolate coating, and eye-catching vibrant layers, they are sure to be a crowd-pleaser at any event or a cherished treat for yourself. Whether you’re hosting a party, looking for a unique homemade gift, or simply craving a sweet, minty indulgence, this recipe, inspired by the fantastic work of Todd’s Kitchen, is a perfect choice. Gather your ingredients, unleash your inner candy maker, and prepare to impress everyone with these irresistibly delicious and beautiful candies!
These amazing images and the inspiration for this recipe are all credited to Todd’s Kitchen via YouTube. We highly recommend checking out his channel for more innovative and delicious recipes and culinary inspiration!