
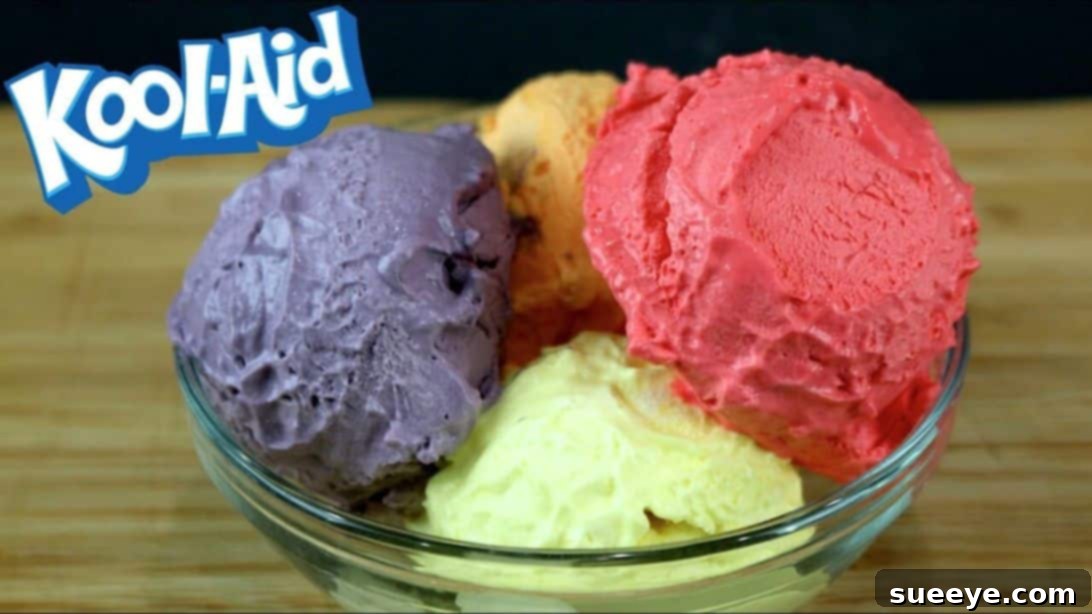
Are you yearning for a delightful, frosty treat that promises to transport you back to carefree summer days? Look no further than this incredibly simple, yet utterly delicious, homemade Kool-Aid ice cream recipe. Crafted for ease and maximum flavor, this no-churn method allows you to whip up vibrant, creamy ice cream without the need for any specialized equipment. It’s the perfect way to satisfy your sweet tooth, cool down on a hot day, or simply indulge in a burst of nostalgic flavor.
Kool-Aid, a name synonymous with childhood summers, punch bowls, and vibrant colors, has long been a staple in many households. This powdered drink mix, available in a rainbow of enticing flavors, is usually enjoyed as a refreshing beverage. However, its versatility extends far beyond just a drink. In this fantastic recipe, courtesy of FunFoods, Kool-Aid transforms into the secret ingredient that infuses your homemade ice cream with its characteristic fruity zest and eye-catching hues. Get ready to create a dessert that’s as fun to make as it is to eat!
RELATED: Strawberry Kool-Aid Pie Recipe
The Ultimate Guide to Easy No-Churn Kool-Aid Ice Cream
Embrace the joy of homemade desserts with this ultimate guide to crafting a delectable no-churn Kool-Aid ice cream. This recipe stands out for its simplicity and the sheer delight it brings. Forget about bulky ice cream makers or complex techniques; all you need is a reliable hand mixer or stand mixer to achieve that perfect, airy consistency. This delightful dessert requires just three core ingredients: rich heavy whipping cream, sweet condensed milk, and your choice of vibrant Kool-Aid packets. The result? A perfectly sweet, incredibly refreshing, and beautifully colored ice cream that will be a hit with both kids and adults alike. It’s an ideal project for a weekend afternoon, a creative activity with the family, or a quick solution for a sudden dessert craving.
Here’s another recipe for you to try: Kool-Aid Pickles Recipe
Why Choose No-Churn Kool-Aid Ice Cream?
Making ice cream at home might sound daunting, but the no-churn method simplifies the entire process, making it accessible to even the most novice bakers and dessert enthusiasts. This particular Kool-Aid rendition brings several compelling advantages:
- Unmatched Simplicity: Without an ice cream machine, the process is streamlined, reducing both equipment needs and cleanup. It’s truly a beginner-friendly recipe.
- Vibrant Customization: Kool-Aid comes in an array of flavors, each offering a distinct color and taste profile. This allows for endless experimentation – mix and match, create multi-flavored batches, or stick to your all-time favorite.
- Nostalgic Appeal: For many, Kool-Aid evokes fond memories. Turning it into ice cream adds a playful, nostalgic twist to a classic childhood drink, perfect for sharing with new generations.
- Budget-Friendly: With just three primary ingredients, this recipe is incredibly economical compared to store-bought gourmet ice creams or even other homemade varieties.
- Kid-Friendly Fun: The process is simple enough for children to participate, fostering a love for cooking and baking from an early age. They’ll love seeing their chosen Kool-Aid flavors transform into a creamy dessert.
This recipe isn’t just about making ice cream; it’s about creating memories, exploring flavors, and enjoying a truly homemade treat that reflects your personal touch.
The Magic Behind No-Churn: Key Ingredients Explained
Understanding the role of each ingredient is key to appreciating the brilliance of no-churn ice cream. The magic lies in how these simple components interact to create a rich, creamy, and scoopable texture without churning.
Heavy Whipping Cream: The Foundation of Creaminess
Heavy whipping cream is the backbone of any excellent no-churn ice cream. When whipped, it incorporates air, creating a light, fluffy base that mimics the aeration achieved by traditional ice cream machines. The high-fat content of heavy cream (typically 36% or more) is crucial here. As it’s whipped to stiff peaks, it forms a stable emulsion that traps air bubbles. This trapped air is what prevents the mixture from turning into a solid block of ice, instead yielding that delightful, airy texture we associate with premium ice cream. The colder the cream and the bowl it’s whipped in, the faster and more efficiently it will achieve those perfect stiff peaks, ensuring a superior final product.
Sweetened Condensed Milk: Sweetness, Smoothness, and Anti-Crystal Power
Sweetened condensed milk is the unsung hero that delivers both sweetness and an incredibly smooth, velvety texture. Unlike granulated sugar, which can lead to grainy ice cream if not fully dissolved, condensed milk is already a thick, syrupy mixture of milk and sugar. Its high sugar concentration plays a vital role in inhibiting ice crystal formation. Sugar lowers the freezing point of water, making it harder for large, crunchy ice crystals to form. This results in a much smoother, softer, and more scoopable ice cream straight from the freezer. It also adds a delightful depth of flavor and richness that complements the tartness of the Kool-Aid beautifully.
Kool-Aid Packets: Unleashing Vibrant Flavor and Color
The Kool-Aid packets are where the fun truly begins, transforming your creamy base into an explosion of color and flavor. Each packet contains a concentrated mix of fruit flavors and food coloring. When incorporated into the ice cream base, it evenly distributes both the desired hue and the iconic fruity taste. From classic cherry and grape to exotic tropical punch, the options are virtually limitless. This allows for immense creativity; you can make a single-flavor batch or create a stunning multi-colored dessert by dividing the base and flavoring each portion differently. The slight tartness often found in Kool-Aid flavors also provides a wonderful counterpoint to the sweetness of the condensed milk, creating a balanced and incredibly palatable frozen treat.
Easy Kool-Aid Ice Cream Ingredients
Gathering your ingredients is the first step towards creating this delightful dessert. The beauty of this recipe lies in its simplicity and the minimal list of items you’ll need.
- 2 cups of heavy whipping cream: Ensure it’s very cold for optimal whipping results. This will create the light and airy base for your ice cream.
- 1 can (14 oz) sweetened condensed milk: This provides the sweetness and creamy texture, preventing the formation of ice crystals.
- 4 Kool-Aid packets in different flavors: Choose your favorite flavors to create a colorful and varied batch. Popular choices include cherry, grape, lemon-lime, and tropical punch, but feel free to experiment!
Note: For best results when whipping cream, always use a large, cold metal bowl. Chilling your bowl and whisk attachments in the freezer for about 15-20 minutes beforehand can significantly improve the whipping process, helping the cream reach stiff peaks faster and more effectively.
How to Make Kool-Aid Ice Cream: A Step-by-Step Guide
Follow these detailed steps to create your own irresistible no-churn Kool-Aid ice cream. Precision and care, especially in the mixing stages, will ensure a perfectly creamy and delicious result.
Step 1: Whip the Heavy Cream to Perfection
Begin by pouring the 2 cups of very cold heavy whipping cream into your large, chilled metal bowl. Using either a handheld electric mixer or a stand mixer fitted with the whisk attachment, start whipping the cream on a medium-high speed. Continue to whisk until the cream forms stiff peaks. This means that when you lift the whisk, the peaks of cream stand firm and hold their shape without drooping. Be careful not to over-whip, as this can turn the cream grainy. The goal is a light, airy, and stable whipped cream that will give your ice cream its characteristic texture.
Step 2: Gently Fold in the Sweetened Condensed Milk
Once your heavy cream has reached stiff peaks, it’s time to incorporate the sweetened condensed milk. Carefully pour the entire can of condensed milk into the whipped cream. Using a rubber spatula, gently fold the condensed milk into the whipped cream. The key word here is “gently.” Avoid vigorous stirring or beating, as this can deflate all the air you’ve painstakingly whipped into the cream. Fold until the two ingredients are just combined and no streaks of condensed milk remain, ensuring the mixture remains light and airy.
Step 3: Divide and Flavor with Kool-Aid
Now for the fun part – introducing the vibrant Kool-Aid flavors! Divide the combined cream and condensed milk mixture evenly into four separate bowls. Into each bowl, sprinkle one packet of your chosen Kool-Aid flavor. Using a clean spatula for each bowl, gently mix the Kool-Aid powder into the base until it is completely dissolved and the color is uniform throughout the mixture. Again, be gentle to maintain the airy texture. You’ll notice the mixture instantly transforming with bright, appealing colors and a delightful fruity aroma.
Step 4: Prepare for Freezing
Once your flavored mixtures are ready, transfer each one into individual freezer-safe containers. If you prefer to make a single large batch with distinct flavors, you can use one big container and create partitions using parchment paper or simply layer the different colors artfully. This step is crucial for preventing freezer burn: take a sheet of plastic cling wrap and press it directly onto the surface of the ice cream mixture in each container, ensuring it touches the entire surface. This barrier prevents ice crystals from forming on the surface, keeping your ice cream wonderfully smooth and creamy. Securely place the lids on the containers to seal them tightly.
Step 5: Freeze for Optimal Setting
Place your sealed containers of Kool-Aid ice cream mixture into the freezer. For the best results and a perfectly firm, scoopable consistency, allow the ice cream to freeze for at least four hours. For an even firmer texture, especially if you prefer a harder scoop, or for making it ahead of time, leaving it in the freezer overnight is ideal. Ensure your freezer is set to a sufficiently cold temperature to facilitate proper freezing.
Step 6: Serve and Savor Your Homemade Creation
Once the freezing time is complete, remove the containers from the freezer. Gently peel back the cling wrap from the surface of the ice cream. If the ice cream is too hard to scoop immediately, let it sit at room temperature for a few minutes to soften slightly. Then, using an ice cream scoop, create beautiful scoops of your homemade Kool-Aid ice cream. Serve it in cones, bowls, or as a vibrant addition to other desserts. Enjoy the refreshing, sweet, and wonderfully nostalgic flavors you’ve created!
Tips for Success and Creative Variations
To ensure your no-churn Kool-Aid ice cream is nothing short of spectacular every time, consider these helpful tips and exciting variations:
Achieving the Perfect Creaminess:
- Keep Everything Cold: This cannot be stressed enough. Cold cream, a cold bowl, and cold whisk attachments are essential for whipping cream to its fullest potential and achieving stiff peaks quickly.
- Don’t Overmix: While whipping the cream, stop as soon as stiff peaks form. Over-whipping can lead to a grainy texture and cause the cream to separate.
- Gentle Folding is Key: When incorporating the condensed milk and Kool-Aid, always use a gentle folding motion with a spatula. This preserves the air in the whipped cream, which is vital for the light, airy texture of no-churn ice cream.
Flavor and Texture Enhancements:
- Experiment with Kool-Aid Ratios: If you prefer a stronger, more intense Kool-Aid flavor, you can try adding a little more powder, being mindful that it also increases sweetness and tartness. Taste as you go when mixing small batches.
- Add-Ins for Extra Fun: Once the Kool-Aid is mixed in, consider stirring in various add-ins before freezing. Mini chocolate chips, colorful sprinkles, chopped fresh fruit (like berries for a strawberry Kool-Aid batch), or even crushed cookies can elevate your ice cream.
- Swirls and Layers: For a visually stunning dessert, try layering different Kool-Aid flavors in your freezer-safe container, gently swirling them with a knife for a marbled effect.
- A Touch of Vanilla: A teaspoon of vanilla extract added to the whipping cream can subtly enhance the overall flavor profile, adding a hint of warmth and depth.
Serving Suggestions:
- Classic Cones or Bowls: Serve your vibrant ice cream in traditional cones or bowls for a simple yet satisfying treat.
- Build a Sundae Bar: Create an exciting sundae experience by offering various toppings such as whipped cream, chocolate syrup, caramel sauce, sprinkles, chopped nuts, and fresh fruit.
- Pair with Other Desserts: A scoop of homemade Kool-Aid ice cream makes an excellent accompaniment to warm brownies, fruit pies, or a slice of cake. The cool, creamy texture contrasts beautifully with baked goods.
- Ice Cream Floats: Combine a scoop or two of your favorite Kool-Aid ice cream with a clear, fizzy soda like lemon-lime or ginger ale for a refreshing and colorful float.
Unleash Your Inner Ice Cream Chef with Homemade Kool-Aid Ice Cream
There’s an undeniable charm and satisfaction in creating something delicious from scratch, and this homemade Kool-Aid ice cream recipe truly delivers on that promise. It’s a testament to how simple ingredients, combined with a little creativity, can produce an extraordinary dessert. From the moment you whip the cream to the first delightful scoop, this recipe is designed to bring joy. The vibrant colors and playful flavors of Kool-Aid make it a fantastic option for parties, family gatherings, or just a treat to brighten an ordinary day.
Whether you’re revisiting cherished childhood memories or creating new ones with your loved ones, this no-churn Kool-Aid ice cream is an experience in itself. Its ease of preparation, customizable nature, and incredibly appealing taste make it a staple for anyone looking for a quick, impressive, and utterly delicious frozen dessert. So, go ahead, gather your ingredients, choose your favorite Kool-Aid flavors, and prepare to embark on a sweet adventure. You’re just a few steps away from enjoying the creamiest, most flavorful homemade ice cream you’ve ever made. Don’t hesitate to share your colorful creations and favorite flavor combinations!