
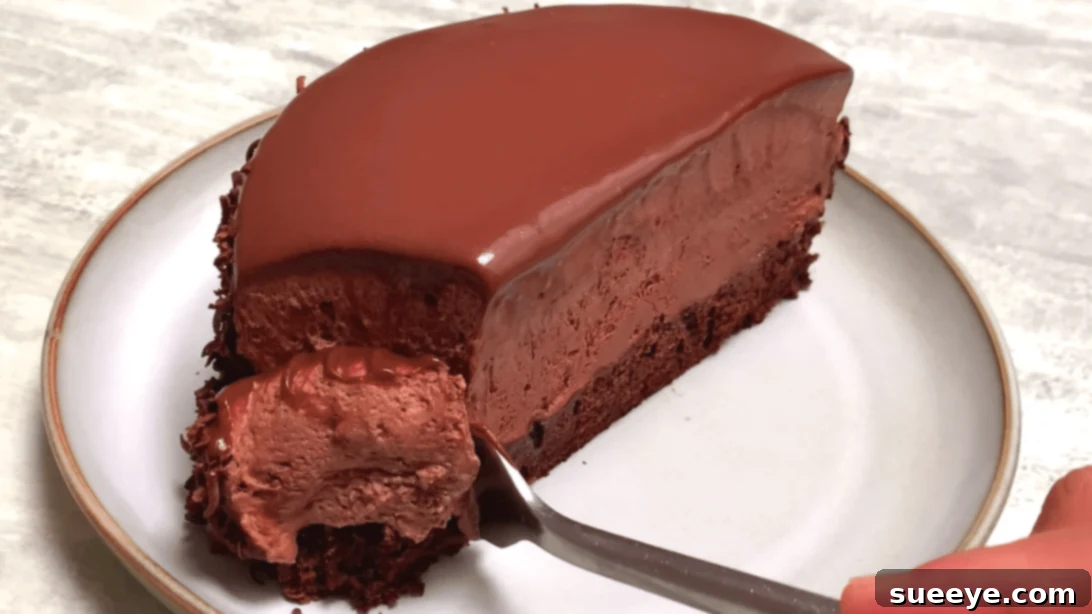
Decadent No-Bake Triple Chocolate Mousse Cake: Your Ultimate Easy Dessert Guide
Are you a devoted fan of rich, creamy chocolate desserts? Do you dream of a show-stopping cake that’s surprisingly simple to create, even without turning on your oven? If so, prepare to be captivated by this spectacular No-Bake Triple Chocolate Mousse Cake! Inspired by the culinary experts at Spice Bites, this recipe brings together not one, but three incredible layers of chocolate, each offering a distinct texture and depth of flavor. From a moist, tender cake base to a light, airy chocolate mousse, all crowned with a glossy, rich ganache, every single bite is an unforgettable journey into chocolate bliss. Get ready to impress your loved ones with this effortlessly elegant and utterly decadent dessert!
Why Opt for This No-Bake Chocolate Mousse Cake?
No-bake desserts have revolutionized home baking, offering a fantastic solution for those who love homemade treats but prefer convenience and ease. This particular triple chocolate mousse cake stands out as an exceptional choice for several compelling reasons:
- Effortless Preparation: Say goodbye to complex baking techniques and oven-watching. This recipe simplifies the process, making it incredibly accessible for cooks of all skill levels, from beginners to seasoned dessert enthusiasts.
- Perfect for Any Season: Whether you’re avoiding the heat of your oven in summer or simply want a quick yet impressive dessert any time of year, this no-bake wonder is ideal.
- Stunning Presentation: Despite its straightforward creation, the distinct layers and smooth finish of this cake give it a sophisticated, professional appearance, as if it came from a high-end patisserie.
- Unrivaled Decadence: With three harmonizing chocolate elements – a tender cake base, a creamy, airy mousse, and a luxurious ganache – this cake delivers an unparalleled chocolate experience that will satisfy even the most intense cravings.
- Customizable: While delicious in its original form, this cake serves as a wonderful canvas for your personal culinary creativity, allowing for easy variations and additions to suit any palate.
Essential Ingredients for Your Triple Chocolate Masterpiece
Crafting this exquisite no-bake chocolate mousse cake requires a selection of readily available ingredients. The secret to an extraordinary dessert often lies in the quality of your ingredients, so choosing good products will elevate the taste and texture significantly. We’ve meticulously categorized the components for each of the cake’s three glorious layers, plus a delightful garnish.
For the Moist Chocolate Cake Base:
- 3/4 cup of All-Purpose Flour: This provides the essential structure for our cake base. Sifting it ensures a light texture and prevents lumps in the batter.
- 2 tablespoons of Unsweetened Cocoa Powder: The primary flavor component for the base. For a deep, rich chocolate taste, opt for a high-quality cocoa powder.
- 1/2 teaspoon of Baking Powder: A crucial leavening agent that helps the cake base achieve a tender, slightly risen crumb.
- 1/4 teaspoon of Baking Soda: Another leavening agent, which works in conjunction with cocoa powder (which can be acidic) to create a soft, airy texture.
- 1/4 cup of Granulated Sugar: Sweetens the cake base and contributes to its delightful moisture.
- 1/2 teaspoon of Vanilla Extract: A flavor enhancer that beautifully complements and deepens the chocolate notes. Pure vanilla extract is always recommended for superior taste.
- 1/4 cup of Cooking Oil: Any neutral-flavored oil, such as vegetable or canola oil, will keep the cake base wonderfully moist and tender without imparting additional flavor.
- 1/2 cup of Water: Used to achieve the perfect batter consistency. For a slightly richer base, you could substitute this with milk.
For the Velvety Chocolate Mousse Layer:
- 1 cup of Heavy Whipping Cream (very cold): The star ingredient for our light and airy mousse. It’s imperative that the cream is thoroughly chilled for optimal whipping and volume.
- 1/4 cup of Powdered Sugar (Confectioners’ Sugar): Adds sweetness and helps to stabilize the whipped cream, ensuring a firm, yet silky mousse. Sifting prevents any unwanted lumps.
- 2 tablespoons of Unsweetened Cocoa Powder: Transforms the whipped cream into a decadent chocolate mousse, imparting a lovely color and deep flavor.
For the Decadent Chocolate Ganache Topping:
- 1/2 cup of Heavy Whipping Cream: Forms the smooth, luscious base of our pourable ganache.
- 1/2 cup of Good Quality Dark Chocolate: The foundation of your glossy ganache. Use high-quality dark chocolate chips or finely chopped bar chocolate (50-70% cocoa solids) for the best flavor and texture.
For Garnish (Optional but Highly Recommended):
- Grated Dark Chocolate: Provides an elegant finishing touch, adding visual appeal and an extra dimension of chocolate flavor and texture to your masterpiece. Chocolate shavings or curls are also excellent alternatives.
Step-by-Step Instructions: Crafting Your No-Bake Triple Chocolate Mousse Cake
Follow these comprehensive, detailed steps to create a flawless and utterly delicious triple chocolate mousse cake. Remember, patience, especially during the crucial chilling times, is the key to achieving perfectly distinct and stable layers.
Step 1: Preparing the Moist Chocolate Cake Base Batter
Begin your chocolate journey by preparing the batter for the cake base. In a spacious mixing bowl, meticulously sift together the all-purpose flour, unsweetened cocoa powder, baking powder, and baking soda. Sifting is an essential step as it aerates the dry ingredients, eliminates any lumps, and ensures a wonderfully smooth and uniform cake texture. Once your dry ingredients are perfectly combined, add the granulated sugar, pure vanilla extract, cooking oil, and water to the mixture. Using a whisk, gently incorporate all the ingredients until they are just combined and you no longer see any dry streaks of flour. Be cautious not to overmix the batter, as this can develop the gluten too much and result in a tougher cake base. The final batter should possess a smooth, pourable consistency.
Step 2: Cooking the Chocolate Cake Base
This recipe offers a fantastic flexibility for cooking your cake base, catering to both true “no-bake” purists and those who prefer a quick oven bake. For the stovetop method (our preferred no-bake approach), select a non-stick pan approximately 8-9 inches in diameter that comes with a tight-fitting lid. Lightly brush the bottom and sides of the pan with a small amount of cooking oil, then line the bottom with parchment paper or dust lightly with flour to prevent any sticking. Carefully pour the prepared chocolate batter evenly into the pan. Securely place the lid on the pan and cook over very low heat for 8-10 minutes. To test for doneness, gently insert a toothpick into the center; if it emerges clean, your cake base is ready. Alternatively, if you opt for an oven-baked base, preheat your oven to 356 degrees F (180 degrees C). Pour the batter into an oiled and parchment-lined baking pan and bake for 8-10 minutes, or until a toothpick inserted into the center comes out clean.
Step 3: Cooling and Shaping the Cake Base
Once your chocolate cake base is cooked (or baked), carefully remove it from the pan and transfer it onto a wire rack to cool completely. This cooling step is absolutely critical; attempting to work with a warm cake will compromise its structure and potentially melt the subsequent layers. Once the cake base has fully cooled to room temperature, it’s time to shape it. Using a 4.5-inch cake ring (or a similarly sized round cookie cutter), meticulously trim the edges of your cake base to create a perfectly round, smaller disk. This precisely cut disk will serve as the firm foundation for your magnificent layered cake. Place this trimmed cake disk back into the cake ring. For a truly professional and clean finish, line the inside of the cake ring with a transparent edge wrapping, such as an acetate strip, before positioning the cake inside. This ensures beautifully smooth and defined sides for your upcoming mousse and ganache layers.
Step 4: Crafting the Silky Chocolate Mousse Layer
Next, we’ll create the incredibly light and luscious chocolate mousse layer. In a large, preferably chilled, mixing bowl, pour in the very cold heavy whipping cream. Begin beating the cream with an electric mixer on medium-high speed. As it starts to thicken, gradually add the powdered sugar and cocoa powder to the whipping cream. Continue beating until stiff peaks form. This means that when you lift the beaters, the peaks of cream should stand firm and hold their shape without drooping. Be vigilant and avoid overbeating, as this can cause the cream to become grainy or even turn into butter. Once your chocolate mousse is perfectly prepared, gently spoon it evenly on top of the chocolate cake base within the confines of the cake ring. Use a spatula or the back of a spoon to spread it uniformly, ensuring it fills the ring with an even layer. For a beautifully flat top surface, use a knife or an offset spatula to carefully smooth it out. Place the entire cake ring, with the cake base and mousse layer, into the refrigerator for a minimum of 1 hour. This critical chilling period allows the mousse to set firmly, which is essential for creating clean, distinct layers.
Step 5: Preparing the Glossy Chocolate Ganache and Assembling the Cake
After the mousse layer has had sufficient time to chill and set, it’s time to prepare the crowning glory: the luscious chocolate ganache. In a microwave-safe bowl, combine the heavy whipping cream and your good quality dark chocolate (whether in chip form or finely chopped). Microwave the mixture on high for approximately 40 seconds. Immediately remove the bowl from the microwave and allow it to sit undisturbed for a minute or two; this allows the residual heat from the cream to melt the chocolate thoroughly. Then, whisk the mixture vigorously until it is completely smooth, beautifully glossy, and uniform in consistency. If you notice any stubborn unmelted chocolate pieces, microwave for an additional 10-15 seconds and whisk again until perfectly smooth. The ganache should be pourable but not overly thin.
Once your ganache is ready, retrieve the cake from the refrigerator. Very carefully remove the transparent edge wrapping (acetate strip) and gently lift off the cake ring. At this point, the mousse layer should be firm and hold its shape perfectly. Delicately pour the warm (but not hot) chocolate ganache over the top of the set mousse layer. Gently tilt the cake slightly to encourage the ganache to spread evenly to all edges, creating a seamless, shiny top. If needed, use an offset spatula to lightly guide the ganache. For a truly elegant and professional finish, take some grated dark chocolate and gently press it onto the sides of the cake. This not only enhances its visual appeal but also adds an extra burst of chocolate flavor and a pleasing textural contrast.
Step 6: The Final Chill and Serving
For the absolute best results and a perfectly set dessert, return your beautifully assembled triple chocolate mousse cake to the refrigerator for at least another 30 minutes. Ideally, a chilling period of 2-3 hours is recommended. This final, crucial chilling time allows the ganache to set completely and ensures that all three layers are firm, cohesive, and easy to slice cleanly. When you’re ready to serve your masterpiece, carefully transfer the cake to a serving platter. For pristine slices, use a sharp knife that has been heated under hot water and thoroughly wiped dry between each cut. Serve your decadent creation chilled and be prepared for delighted gasps and compliments from your guests as they savor this show-stopping, homemade wonder!
Pro Tips for a Perfect No-Bake Chocolate Mousse Cake
- Invest in Quality Ingredients: Especially for the chocolate and cocoa powder, choosing high-quality brands will dramatically enhance the depth of flavor in your final dessert. It makes a noticeable difference.
- Chill Your Whipping Equipment: For best results when whipping cream, place your mixing bowl and electric mixer beaters in the freezer for 10-15 minutes before you begin. This significantly aids in achieving faster, stiffer peaks.
- Never Rush the Chilling Process: The chilling steps are paramount for a well-structured cake with clean layers. Always allow ample time for each layer to set properly; patience will be rewarded.
- Utilize an Offset Spatula for Spreading: For effortlessly smooth and even layers of mousse and ganache, an offset spatula provides superior control and a more professional finish.
- Achieve Clean Slices: To get those picture-perfect slices, use a sharp, thin-bladed knife. Heat it under hot water, wipe it dry, and then make each cut. Repeat this process for every slice.
- Parchment Paper is Your Best Friend: Always remember to line your cake pan for the base. This simple step guarantees easy removal and prevents any frustrating sticking.
Variations and Customizations: Make This Cake Uniquely Yours!
While this recipe for a no-bake triple chocolate mousse cake is undeniably divine as is, feel absolutely free to unleash your creativity and personalize it to your taste preferences:
- Elevate with Coffee: Introduce 1 teaspoon of instant espresso powder to either the chocolate cake base batter or the mousse layer. Coffee beautifully enhances and deepens the chocolate flavor.
- A Hint of Mint: For a refreshing twist, incorporate a few drops of pure peppermint extract into the chocolate mousse layer. This creates a delightful mint chocolate experience.
- Bright Citrus Notes: Grate some fresh orange zest directly into the ganache mixture or elegantly sprinkle it over the top of the finished cake. The vibrant citrus beautifully complements rich dark chocolate.
- Crunchy Nut Layer: For an interesting textural contrast, add a thin layer of finely chopped and toasted nuts (such as pecans, hazelnuts, or almonds) between the cake base and the mousse layer.
- Fresh Berry Delight: Garnish generously with fresh raspberries, strawberries, or cherries just before serving. The natural tartness of the berries provides a wonderful counterpoint to the sweetness and richness of the chocolate.
- Artistic White Chocolate Swirl: After pouring the dark chocolate ganache, drizzle some melted white chocolate over the top and use a toothpick to create beautiful, contrasting swirls.
- Alternative Cookie Base: Instead of the cooked cake base, you can opt for a crushed cookie base. Mix 1 ½ cups of crushed chocolate cookies (like Oreos, filling removed) with ¼ cup of melted butter, press into the cake ring, and chill before adding the mousse.
Serving and Storage Suggestions
This magnificent triple chocolate mousse cake is undoubtedly best served chilled. For an extra touch of elegance and visual appeal, consider dusting the top with a fine layer of cocoa powder just before presenting, or arrange a few fresh berries artfully around the slices. This cake pairs wonderfully with a freshly brewed cup of coffee, a cold glass of milk, or even a sophisticated dessert wine.
Should you be fortunate enough to have any leftovers, ensure the cake is covered loosely with plastic wrap or stored in an airtight container. It will maintain its deliciousness and structural integrity beautifully in the refrigerator for up to 3-4 days. While it can technically be frozen, please be aware that the delicate texture of the mousse might alter slightly upon thawing, so it’s generally best enjoyed fresh within a few days of preparation.
Frequently Asked Questions (FAQ) About This No-Bake Chocolate Mousse Cake
- Can I make this cake ahead of time for an event?
- Absolutely! This no-bake cake is an ideal make-ahead dessert. You can comfortably prepare it a full day in advance. In fact, allowing ample time for all the layers to thoroughly set often enhances the overall flavors and makes for cleaner slices. Just keep it refrigerated until you’re ready to serve.
- What type of chocolate is best for the ganache layer?
- For the most superior results and a truly decadent ganache, we highly recommend using good quality dark chocolate with a cocoa percentage ranging from 50-70%. While chocolate chips are convenient, finely chopped baking chocolate bars often melt more smoothly and yield a shinier, richer ganache. Avoid using milk chocolate unless you specifically prefer a much sweeter ganache, and be prepared that it might also require a slight adjustment to the cream ratio due to its higher sugar and milk solids content.
- My whipped cream isn’t forming stiff peaks. What could be the issue?
- Several factors can prevent whipped cream from reaching stiff peaks. The most common reason is insufficient chilling; ensure your heavy whipping cream is extremely cold, straight from the refrigerator. Chilling your mixing bowl and beaters for 10-15 minutes beforehand can also make a significant difference. Furthermore, always use heavy whipping cream or full-fat cream, as lighter creams or half-and-half lack the necessary fat content to whip properly. Lastly, be careful not to overbeat, as this can cause the cream to separate and become grainy.
- Is it possible to make this cake without a specific cake ring?
- While a cake ring (and ideally an acetate strip) helps achieve perfectly smooth, straight, and professional-looking sides, you can certainly improvise. A springform pan is an excellent alternative. After the cake has thoroughly chilled and set, carefully run a very thin, warm knife around the inner edge of the pan before releasing the sides. While the layers might not be quite as perfectly defined, the incredible taste will remain unaffected!
- How can I adapt this recipe to be gluten-free?
- To effortlessly make the chocolate cake base gluten-free, simply substitute the all-purpose flour with a high-quality 1:1 gluten-free baking flour blend that already contains xanthan gum. Always double-check that all other ingredients you use are naturally gluten-free to ensure the entire dessert is suitable for a gluten-free diet.
This No-Bake Triple Chocolate Mousse Cake is far more than just a dessert; it’s an experience waiting to be savored. Its combination of effortless preparation, luxurious taste, and stunning visual appeal makes it an impeccable choice for any celebration, gathering, or simply as a well-deserved treat for yourself. So, gather your ingredients, embark on this delightful culinary journey following our detailed steps, and prepare to be utterly amazed by your own homemade masterpiece. Happy dessert making!