
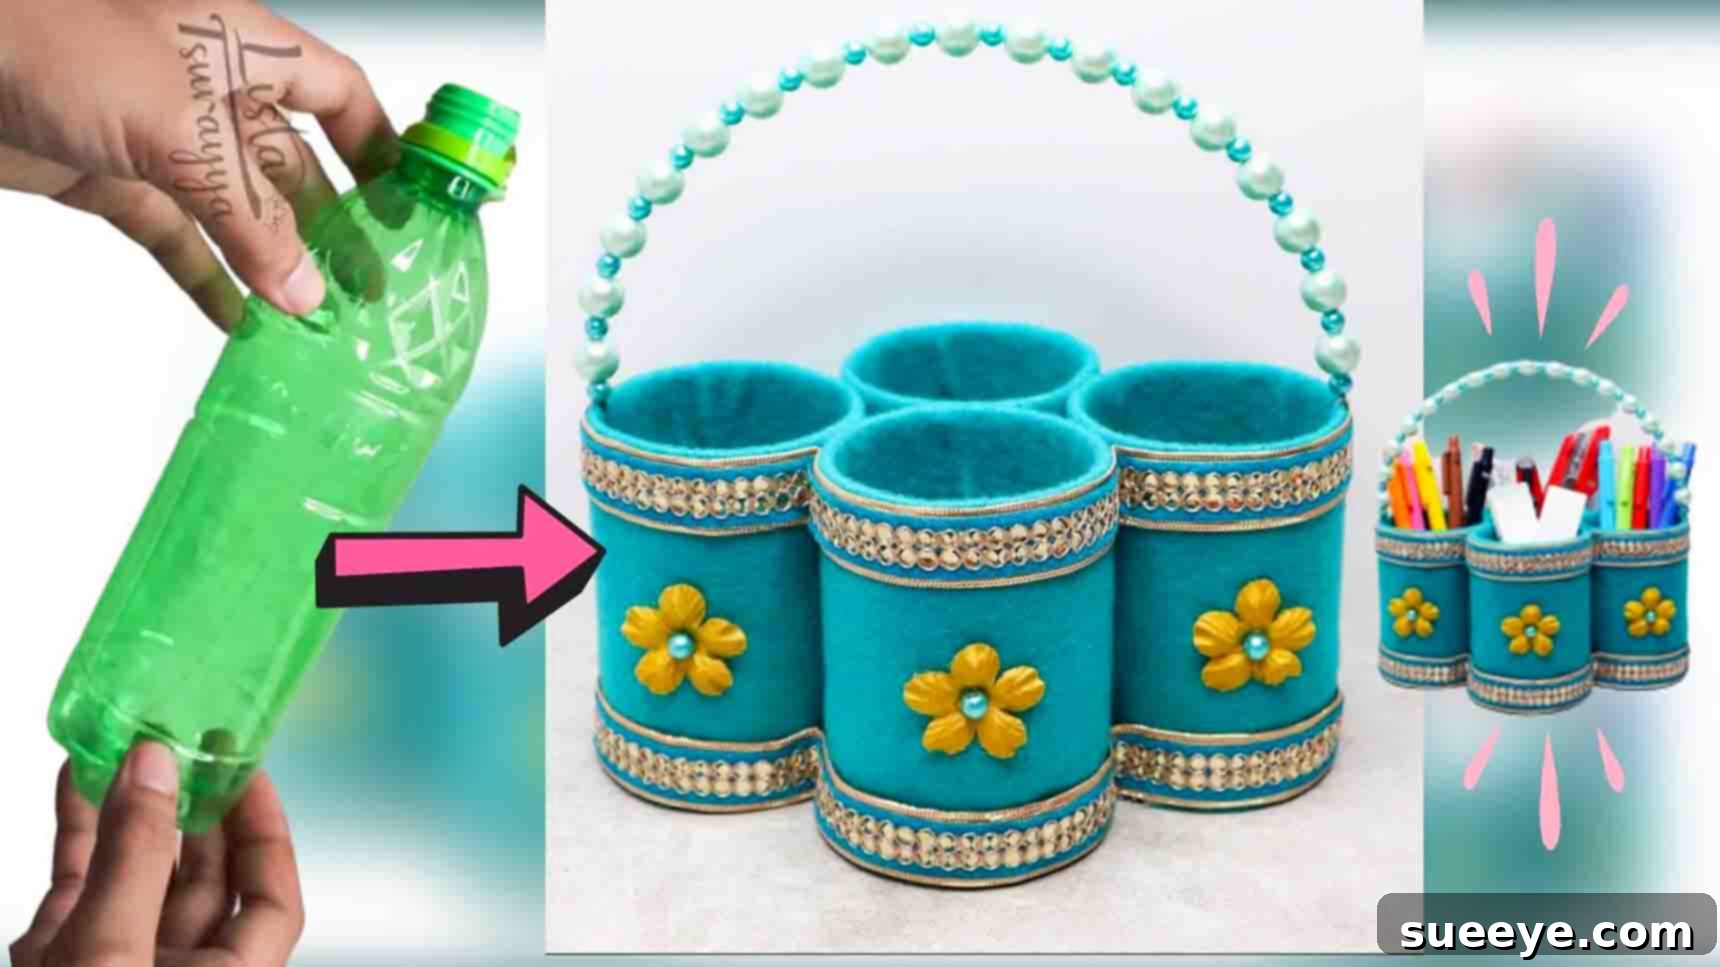
Transform Waste into Wonder: Create Your Own Eco-Friendly DIY Pen Holder from Recycled Plastic Bottles
Are you looking for an innovative and eco-conscious way to give those empty plastic bottles a second life? Instead of letting them accumulate in your recycling bin or, worse, end up in a landfill, why not transform them into something truly useful and beautiful for your home or office? This engaging DIY pen holder project, inspired by the creative minds at Lista Tsurayya on YouTube, offers a fantastic opportunity to upcycle everyday waste into a charming and functional desk organizer. Perfect for a weekend craft session, this project is not only a fantastic way to bond with friends or family but also an excellent step towards sustainable living. Say goodbye to messy desks and hello to organized elegance with a personalized touch!
A cluttered workspace can often lead to a cluttered mind. Keeping your pens, pencils, markers, and other stationery items neatly organized is crucial for productivity and a calm environment. While many commercial pen holders are available, creating your own from recycled materials adds a unique sense of accomplishment and contributes positively to the planet. This guide will walk you through crafting a sturdy and stylish pen holder using simple, affordable materials, ensuring your study table or office desk remains neat, tidy, and aesthetically pleasing. Get ready to unleash your creativity and make a significant impact, one recycled bottle at a time!
Why Choose This Eco-Friendly DIY Project?
In an age where environmental awareness is more critical than ever, opting for DIY projects that utilize recycled materials is a powerful statement. This plastic bottle pen holder project stands out for several compelling reasons:
- Sustainable Living: It actively reduces plastic waste by repurposing bottles that would otherwise contribute to pollution.
- Cost-Effective: Most of the materials needed are either free (plastic bottles) or very inexpensive, making it a budget-friendly craft.
- Personalized Design: You have complete creative freedom to decorate your pen holder, ensuring it perfectly matches your style and decor.
- Skill Development: It’s a great way to hone your crafting skills, from cutting and gluing to decorative embellishments.
- Fun for All Ages: This project is simple enough for older children (with adult supervision for cutting) and enjoyable for adults, making it an ideal family activity.
- Functional Beauty: The end product is not just a decorative item but a practical solution to desk clutter, keeping your essentials within easy reach.
Gather Your Crafting Essentials: Materials for Your Pen Holder
Before diving into the creative process, ensure you have all the necessary tools and materials ready. Most of these items can be found around your house or purchased cheaply from any craft or stationery store. Remember, creativity often blossoms when you adapt and substitute materials based on what’s available!
Materials:
- Plastic Bottles (4 or more): Opt for bottles of similar size and shape (e.g., water bottles, soda bottles). Clean them thoroughly and remove any labels.
- Cutter or Craft Knife: A sharp cutter is essential for clean cuts. Always use with caution and on a protected surface.
- Felt Paper/Sheet: Choose colors that complement your room or desk decor. Felt is easy to work with and provides a soft, finished look.
- Glue Gun and Glue Sticks: A hot glue gun provides quick, strong bonds, perfect for crafting projects.
- Cardboard: A sturdy piece of cardboard will form the base of your organizer. Recycled packaging cardboard works perfectly.
- Lace (of your choice): Decorative lace adds an elegant touch. Feel free to experiment with ribbons, jute twine, or fabric strips.
- Piece of Wire: A flexible yet sturdy wire (e.g., floral wire, craft wire) will create the handle.
- Pliers: Essential for bending and securing the wire handle.
- Faux Pearls (or other embellishments): These add a touch of sophistication. Beads, buttons, small artificial flowers, or glitter can also be used.
Step-by-Step Guide: Crafting Your Eco-Friendly Pen Holder
Follow these detailed instructions to transform your plastic bottles into a beautiful and functional desk organizer. Remember to take your time and enjoy each step of the creation process!
Step 1: Preparing the Bottle Sections and Building the Base
Begin by preparing the main components of your pen holder. This involves carefully cutting the plastic bottles and covering them to create the individual compartments.
- Cut the Plastic Bottles: Carefully use your cutter or craft knife to cut each plastic bottle in half. For this project, you will primarily use the bottom half of the bottles, as they are more stable. Aim for an even cut on all bottles to ensure a uniform height for your compartments. If the edges are sharp, you can gently sand them or trim them with scissors for a smoother finish.
- Wrap with Felt Paper: Take a piece of felt paper. Apply a line of hot glue along one edge of the felt and carefully wrap it around the exterior of a cut plastic bottle half. Ensure the felt is taut and smooth. Overlap the felt slightly to create a clean seam, securing it with more hot glue.
- Finish the Top Edge: For a neat finish, glue the excess felt paper that extends above the plastic bottle’s edge towards the inside of the bottle. This covers the raw plastic edge, giving it a polished look and protecting your stationery from any sharp edges. Repeat this process for all four (or more, depending on your desired capacity) plastic bottle halves.
- Create the Cardboard Base: Get a piece of cardboard. Arrange your four felt-covered plastic bottle halves in your desired configuration (e.g., a square, a cluster, or a line). Trace this arrangement onto the cardboard to create the base template. Cut out the cardboard shape.
- Cover the Cardboard Base: Apply hot glue around the edges of the cardboard base and attach it firmly to a larger piece of felt paper. Once secured, cut around the cardboard, leaving a small margin. To ensure a completely finished look, apply felt paper to both sides of the cardboard base, trimming any excess neatly. This provides a durable and attractive foundation for your organizer.
- Assemble the Organizer: Now, it’s time to bring the pieces together. Apply a generous amount of hot glue to the bottom of each felt-covered plastic bottle half and firmly attach them to the felt-covered cardboard base, matching your pre-planned arrangement. Crucially, also apply glue to the sides of the bottles where they touch each other, pressing them together to create a strong, unified structure. This ensures stability and prevents the compartments from wobbling.
- Add Decorative Lace to the Base: For an elegant finish and to conceal the cardboard edge, apply a strip of lace around the bottom perimeter where the cardboard base meets the table. Secure it with hot glue, ensuring it’s evenly placed.
Step 2: Adding the Handle and Final Embellishments
With the main structure complete, it’s time to add functional and decorative elements that elevate your pen holder from a simple organizer to a personalized piece of art.
- Attach the Wire Handle: Take your piece of craft wire and use pliers to create a small loop or bend at one end. This loop will help secure the wire to the organizer. Carefully attach this looped end to one side of the assembled organizer, perhaps by puncturing the felt and cardboard slightly and twisting the wire, or by securely gluing it down if your wire is light enough. Ensure it is firmly fixed, as this will be the handle.
- String the Faux Pearls: Before attaching the other side of the wire, thread your faux pearls (or other beads) onto the wire. Arrange them to your liking, ensuring they span the desired length of the handle. This step adds a touch of elegance and visual interest to your design.
- Secure the Other End of the Handle: Once the pearls are in place, create another loop or bend at the remaining end of the wire and securely attach it to the opposite side of the organizer, mirroring the first attachment point. Use pliers to ensure both ends are tightly fastened, creating a sturdy handle for easy portability.
- Apply Top Edge Lace: To further enhance the aesthetic, glue a strip of lace along the top edges of the plastic bottle compartments. This adds a soft, finished look and covers any remaining raw edges of the felt or plastic.
- Personalize with Additional Decorations: This is where your creativity can truly shine! Beyond lace and pearls, consider attaching small faux flowers, decorative buttons, glitter, ribbons, or even small charms. You can tailor the design to match your room’s theme, a specific season, or your personal style. For example, a rustic look might use jute twine and dried flowers, while a glamorous style could incorporate sequins and metallic paint.
After carefully attaching all your chosen designs and ensuring all glue has dried, your customized, eco-friendly plastic bottle pen holder is now complete! Step back and admire your handiwork – a functional, beautiful, and sustainable solution to desk organization.
Unleash Your Creativity: Customization Ideas for Your Pen Holder
While the instructions provide a solid foundation, the true beauty of DIY lies in personalization. Here are some ideas to make your recycled plastic bottle pen holder uniquely yours:
- Theme It Up: Design your holder around a specific theme – a seasonal theme (e.g., autumn leaves, festive colors), a hobby (e.g., musical notes for a music lover, tiny tools for a crafter), or a color palette that matches your room.
- Fabric Alternatives: Instead of felt, consider using patterned fabric, denim scraps, burlap, or even old sweaters for covering the bottles.
- Paint and Decoupage: For a different look, prime and paint the plastic bottles before covering them, or use decoupage techniques with tissue paper or magazine cutouts for unique patterns.
- Different Embellishments: Explore buttons, sequins, glitter glue, fabric flowers, pom-poms, miniature toys, or even small shells for a beachy vibe.
- Multipurpose Use: While designed as a pen holder, these compartments can also store makeup brushes, craft supplies, small tools, or even serve as a small desk planter.
- Varying Heights: Cut some bottles shorter or taller to create compartments of different heights for various items, adding visual interest and functionality.
- No Handle Option: If you prefer a stationary organizer, simply omit the wire handle.
Frequently Asked Questions (FAQ) About DIY Pen Holders
Q: What type of plastic bottles work best for this project?
A: Clear plastic water or soda bottles (PET plastic) are ideal because they are easy to cut and readily available. Bottles with smooth sides are generally easier to cover with felt or fabric. Ensure they are thoroughly cleaned and dry before use.
Q: Can I use different types of glue instead of a hot glue gun?
A: A hot glue gun is recommended for its quick drying time and strong hold on plastic and fabric. However, you could use strong craft glue like E6000 or super glue for a more permanent bond, though drying times will be significantly longer. If working with children, white school glue might be safer, but it will require clamping or extended drying periods.
Q: How can I ensure the plastic bottle edges are smooth after cutting?
A: After cutting with a craft knife or cutter, you can gently sand the edges with fine-grit sandpaper (around 220-400 grit) to smooth them out. Alternatively, trimming with sharp scissors can help. Covering the edges with felt, as described, is also an effective way to conceal and soften them.
Q: Is this project suitable for children?
A: Yes, with adult supervision, this project can be a great activity for children. Adults should handle all cutting with the craft knife and potentially the hot glue gun. Children can then take charge of wrapping the bottles with felt, decorating, and assembling the pieces, fostering their creativity and fine motor skills.
Q: How can I make my pen holder more durable?
A: To enhance durability, ensure all glue points are strong and secure. Using quality felt or fabric will also contribute to longevity. For the base, consider using a thicker piece of cardboard or even two layers glued together. If you choose to paint, a clear sealant or varnish can protect the finish.
Conclusion: Your Sustainable, Stylish Desk Solution
Crafting your own DIY pen holder from recycled plastic bottles is more than just a craft project; it’s a step towards mindful living, creative expression, and a beautifully organized space. By following these detailed steps, you’ve not only created a functional and aesthetically pleasing organizer but also contributed to reducing waste and promoting sustainability. Every time you reach for a pen, you’ll be reminded of your ingenuity and commitment to a greener planet.
So, gather your materials, unleash your imagination, and transform those forgotten plastic bottles into a stylish centerpiece for your desk. Share your creations, inspire others, and enjoy the satisfaction of a project well done. Happy crafting!