
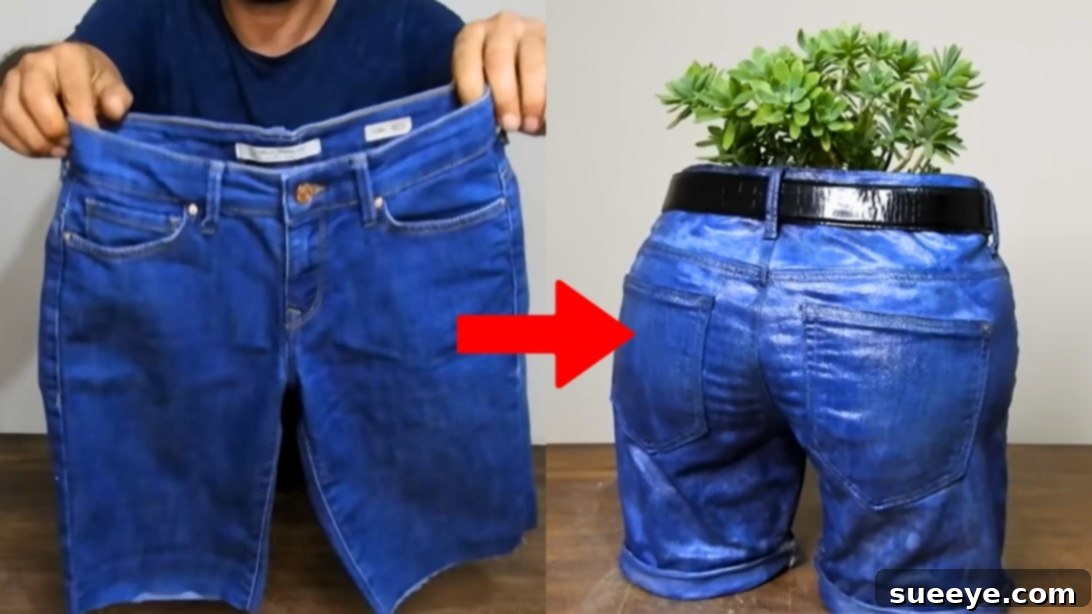
Craft Your Own Unique DIY Jeans Flower Pot: The Ultimate Guide to Upcycled Garden Decor
Transforming old denim into captivating garden art has never been easier or more rewarding. This DIY jeans flower pot project, inspired by the innovative vision of Hüseyin Güler, is guaranteed to be a centerpiece and a lively conversation starter in any outdoor space. Imagine the delight of your guests as they encounter this whimsical and truly unique planter in your garden – it’s an immediate smile-generator! The first time this creative concept crossed my path, I knew it was an absolute must-try. The positive reactions and compliments it garners are testament to its charm and ingenuity. Dive into this comprehensive guide, and let’s bring this extraordinary piece of garden decor to life, step by step, ensuring you achieve a stunning and durable result.
Why Choose a DIY Jeans Planter for Your Garden?
Beyond its undeniable visual appeal, creating a jeans flower pot offers numerous benefits. It’s a fantastic way to upcycle old clothing, contributing to a more sustainable lifestyle by giving new purpose to items that might otherwise end up in landfills. This project allows for immense personalization, letting you choose the style of jeans, the paint colors, and the plants to create a piece that perfectly reflects your aesthetic. It’s not just a planter; it’s a statement piece, an artistic endeavor, and a testament to creative recycling. Plus, the process itself is an engaging DIY experience that results in a robust, weather-resistant planter suitable for various climates and plants.
Materials You’ll Need for Your Denim Masterpiece
Gathering all your supplies before you begin ensures a smooth and uninterrupted crafting process. Most of these items are readily available, making this a highly accessible project for any DIY enthusiast. For safety, remember to wear gloves and a dust mask when working with cement.
- Cement: The primary structural component, providing durability and shape. Opt for a standard Portland cement suitable for general construction.
- Water: Essential for mixing cement into a workable consistency.
- A Pair of Old Jeans: The star of the show! Choose a sturdy pair that you’re willing to repurpose. The fit and style will influence the final look of your pot.
- Container: For mixing cement. A large plastic bucket or tub works perfectly.
- Spray Bottle: To dampen the jeans, aiding in cement adhesion and flexibility.
- Paintbrush: For applying cement mixture and later, paint and varnish. A durable brush is recommended.
- Balloons: Two balloons of similar size, which will serve as internal molds to give the jeans their standing shape. Ensure they are robust enough to withstand being inflated inside the jeans.
- Blankets: Old blankets or towels, which will be rolled and covered to create the leg supports.
- Plastic Bags: To wrap the rolled blankets, protecting them from cement and making them easy to remove.
- Wood Glue: Used in a mixture to reinforce the denim and help the cement adhere better.
- Sand: A key aggregate in the mortar mixture for the base, providing strength and weight.
- Straw: A simple tool for creating drainage holes at the bottom of your planter.
- Blue Paint: Or any color of your choice, to add a finishing touch and cover any grey cement areas, enhancing the denim aesthetic.
- Parquet Varnish: A durable clear coat to protect the finished planter from weather elements, ensuring longevity and a polished look.
- Gloves and Dust Mask: (Highly recommended for safety when working with cement)
Step-by-Step Guide to Crafting Your Jeans Flower Pot
Follow these detailed instructions carefully to ensure a successful and satisfying outcome for your unique denim planter.
Step 1: Preparing Your Denim
Begin by taking your chosen pair of old jeans. Carefully cut one leg just above the knee, creating a pant-short style. This length provides the ideal structure for your planter. Once cut, flip the jeans right side out. Using your spray bottle, thoroughly dampen the fabric with water. This crucial step helps the cement adhere better to the denim and makes the fabric more pliable for shaping.
Step 2: Applying the First Layer of Cement
In your designated mixing container, combine a suitable amount of cement with a small quantity of water. Mix until you achieve a thick, paste-like consistency – it should be spreadable but not too runny. Lay the damp jeans flat. Pour some of the cement mixture onto the back of the jeans, carefully spreading it evenly with your paintbrush. Ensure you cover the fabric thoroughly, but stop approximately 3 inches from the very bottom edge of the cut leg. Repeat this process on the front side of the jeans. Immediately after application, clean your work surface of any spilled cement to prevent it from drying. Once the cement is applied to both sides, gently flip the jeans right side out, if they were inside out for application, to prepare for shaping.
Step 3: Shaping with Balloons
Inflate two balloons to approximately the same size, ensuring they are not over-inflated but firm enough to hold their shape. Crucially, they must be able to fit snugly inside the jeans. Carefully insert one balloon into each leg of the jeans, pushing them up until they fill out the upper portion. Once the balloons are in place, close the zipper and button of the jeans. This action helps to secure the balloons and gives the waistline its final form. Use a damp cloth to gently wipe away any excess cement that might have gotten onto the visible outer surfaces of the jeans, ensuring a clean finish.
Step 4: Folding and Securing the Base
With the balloons providing internal structure, it’s time to define the base of your planter. Brush the very bottom part of the jeans (the un-cemented 3 inches you left earlier) with a fresh layer of cement mixture on both the front and back. Once coated, carefully fold the bottom edge of the legs upwards three times. This creates a sturdy, rolled hem that will form the stable base of your planter and give it a finished look. Press firmly to ensure the cement helps the folds hold their position.
Step 5: Establishing Upright Support
To give your jeans planter its characteristic upright posture, prepare the leg supports. Take your old blankets or towels, fold them several times, and then roll them tightly into cylindrical shapes. Cover these rolled blankets completely with plastic bags; this prevents them from sticking to the cement and makes them easy to remove later. Carefully place one plastic-covered rolled blanket into each pant leg, positioned so they create the desired “standing” stance. Once the supports are in place, gently position the entire jeans structure upright on your work table. Allow the cement applied so far to partially cure and hold its shape before proceeding.
Step 6: Reinforcing with Wood Glue
In a separate container, mix wood glue with a small amount of water. The ratio should be sufficient to create a brushable, thin solution. Carefully brush this wood glue mixture over the entire exterior surface of the jeans where cement has been applied. This step serves a dual purpose: it further reinforces the denim, adding strength, and it creates a better bonding surface for subsequent layers of cement and finishes. Allow the jeans to dry completely after applying the glue mixture. This drying period is crucial for the structural integrity of your planter.
Step 7: Interior Cementing and Curing
Once the exterior glue layer is fully dry, it’s time to work on the interior. Carefully poke and deflate the balloons inside the jeans. In a container, mix a new batch of cement and water. Brush this mixture liberally onto the entire inside surface of the jeans, ensuring full coverage to create a solid inner shell. Allow this interior cement layer to dry completely. Once dry, carefully remove the rolled blankets from the pant legs. Brush these interior leg areas with cement as well, creating a seamless, sturdy structure. After coating the inside of the legs, flip the entire jeans planter upside down and allow it to dry once more. This ensures all surfaces cure properly and the structure is uniformly strong.
Step 8: Creating a Solid Base with Drainage
For the final structural integrity of the base, prepare a mortar mixture. In a container, combine three parts sand with 1.5 parts cement. Gradually add a little bit of water, mixing thoroughly until you achieve a consistent, workable mortar. Place a layer of plastic sheeting inside the legs of the jeans, covering the interior surface of the bottom portion. This acts as a barrier and helps shape the base. Begin filling the legs with your freshly mixed mortar, packing it firmly to create a dense, stable foundation. Next, prepare a thinner mixture of cement and water (more liquid than the previous cement pastes) and pour it over the mortar inside the legs. Before this final layer completely dries and hardens, use a straw to carefully poke several drainage holes through the bottom of the cemented legs. These holes are essential for preventing waterlogging and ensuring the health of your future plants.
Step 9: Finishing Touches and Protection
Once the entire structure is completely dry and cured (which may take up to 24-48 hours depending on humidity), it’s time for the aesthetic finish. Using your blue paint (or any color you prefer), carefully paint over any gray cement areas that are still visible, especially those meant to resemble denim. This enhances the illusion of a pair of standing jeans. Allow the paint to dry thoroughly. As a final, crucial step, brush a generous layer of parquet varnish over all sides of your newly crafted jeans flower pot. This varnish will provide a durable, weather-resistant seal, protecting your creation from moisture, UV rays, and general wear and tear, ensuring it remains a charming garden feature for years to come.
Tips for a Perfect Denim Planter
- Cement Consistency: The key to success is getting the cement mixture right. It should be like a thick pancake batter – spreadable but not watery. Too thin, and it won’t adhere; too thick, and it will be difficult to apply evenly.
- Drying Time is Critical: Do not rush the drying process between steps. Allowing each layer to fully cure ensures maximum strength and durability. Curing can take 24-48 hours, depending on temperature and humidity.
- Safety First: Always wear gloves and a dust mask when handling cement. Cement dust can irritate the respiratory system and skin.
- Even Coating: Ensure uniform application of cement and glue to avoid weak spots in the final structure.
- Creative Embellishments: Consider adding details like faux pockets, patches, or even real buttons (secured with strong adhesive) to enhance the denim look.
- Plant Selection: Choose plants that complement the unique aesthetic of the planter. Succulents, trailing plants, or vibrant flowers all look fantastic. Remember to add a good drainage layer (like gravel) before potting soil.
Caring for Your Upcycled Masterpiece
Once your DIY jeans flower pot is complete and planted, it requires minimal care. The varnish provides excellent protection against the elements, but periodically checking for any chips or cracks in the varnish and reapplying if necessary can extend its lifespan even further. In extremely harsh winter conditions, consider moving the planter indoors or covering it to prevent freeze-thaw cycles from damaging the cement structure. With proper care, your unique denim planter will continue to bring joy and character to your garden for many seasons.
Conclusion: Unleash Your Garden Creativity
Embarking on this DIY jeans flower pot project is more than just a craft; it’s an opportunity to infuse your garden with personality, sustainability, and a touch of whimsical charm. From transforming old denim into a robust planter to delighting every visitor with its unique design, this project offers immense satisfaction. By following this detailed guide, you now have all the knowledge and steps to successfully create your own conversation-starting garden feature, much like the inspiring work of Hüseyin Güler. So, gather your materials, roll up your sleeves, and get ready to add an unforgettable piece of upcycled art to your outdoor sanctuary. Don’t forget to share your amazing creations with fellow DIY enthusiasts!