
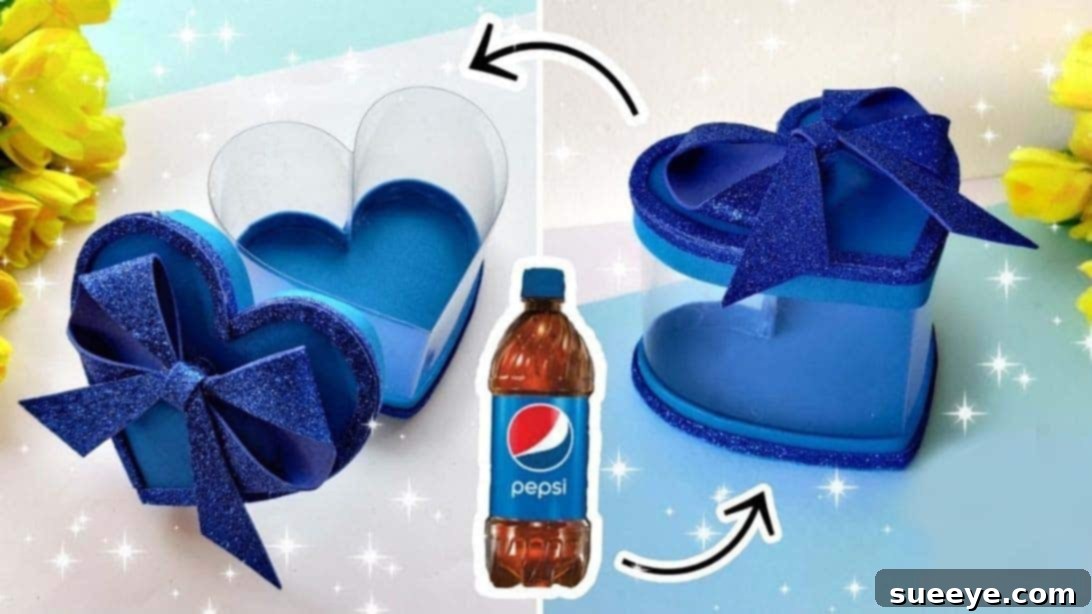
Are you searching for the perfect way to present candy treats or heartfelt gifts without breaking the bank? Look no further! This innovative DIY project offers a creative, sustainable, and incredibly personal alternative to generic, store-bought gift boxes. Imagine transforming a simple plastic bottle, an item often discarded, into a charming heart-shaped gift box. Not only is it significantly cheaper, but it also allows for unparalleled customization, letting your creativity shine through every design choice. The process is surprisingly straightforward, meaning you can craft multiple unique boxes for various occasions. This brilliant concept for a recycled plastic heart gift box comes courtesy of The Craft Gallery India, shared via YouTube, and we’re here to guide you through every step to make your own!
Ultimate Guide: Craft a Beautiful Heart Gift Box from Recycled Plastic Bottles
Embrace the joy of crafting and the principles of upcycling with this comprehensive guide. We’ll walk you through transforming ordinary materials into an extraordinary gift box that speaks volumes about your thoughtfulness and commitment to sustainability. Get ready to impress your loved ones with a handmade treasure that’s both eco-friendly and uniquely yours.
Materials You’ll Need
Gathering your materials is the first exciting step in bringing your heart gift box to life. Most of these items are likely already around your home or readily available at any craft store. Choosing the right materials ensures a smooth crafting process and a beautiful, durable final product.
- Plastic Bottle: A clear, straight-sided plastic bottle (like those used for soda or water) works best. The flatter and more uniform the mid-section, the easier it will be to cut and shape.
- Foam Sheet: Standard craft foam sheets will be used for structural support and decorative elements. Various colors can add to the box’s appeal.
- Glitter Foam Sheet: This will provide a touch of sparkle and elegance, perfect for enhancing the gift box’s aesthetic. Choose a color that complements your regular foam sheet.
- Glue Gun and Glue Sticks: A hot glue gun is essential for quick, strong adhesion, ensuring your box holds together securely. Always exercise caution when using a hot glue gun.
- Scissors: A sharp pair of craft scissors will be needed for precise cutting of plastic, foam, and cardboard.
- Ruler: For accurate measurements and ensuring straight lines, a ruler is indispensable.
- Cardboard: A piece of thin but sturdy cardboard (from an old cereal box or similar packaging) will form the rigid base of your lid, providing stability.
- Pencil: For tracing shapes and marking cutting lines.
With these materials at hand, you’re well-equipped to embark on this rewarding DIY journey. Remember, part of the fun is in selecting colors and textures that truly reflect the recipient’s taste or the occasion.
Step-by-Step Guide: Crafting Your Heart Gift Box
Follow these detailed instructions carefully to construct your stunning heart-shaped gift box. Precision in cutting and careful application of glue will result in a professional-looking finish.
Step 1: Preparing the Plastic Base and Creating the Box Body
The foundation of your heart gift box begins with transforming the plastic bottle into its core shape.
First, take your chosen plastic bottle and carefully cut off both the top (neck) and bottom (base) sections. The goal here is to isolate the straight, flat-textured middle part of the bottle. This cylindrical segment will be the primary material for your box. Once you have this straight section, make a vertical cut to open it up into a flat sheet of plastic. Take your time to even out any raw or uneven edges, ensuring a clean and manageable piece of plastic.
Next, it’s time to give the plastic its characteristic heart shape. Pinch and crease both sides of the plastic sheet to create the foundational curves. Then, carefully turn one side inward and manipulate the plastic to form a distinct heart shape. You might need to gently warm the plastic with a hairdryer (on a low setting, from a distance) to make it more pliable, but always proceed with caution to avoid melting or deforming it permanently. The goal is a clear, symmetrical heart outline.
Now, prepare your foam sheets. You will need strips of varying widths to cover and decorate the plastic heart. Cut strips of regular foam sheet: one set with a width of approximately 1cm (0.4 inches) and another set with a width of 1.5cm (0.6 inches). Additionally, cut strips of glitter foam sheet, each with a width of 0.5cm (0.2 inches). Use a ruler and pencil to mark your lines before cutting to ensure all strips are uniform and straight. These strips will provide both structure and aesthetic appeal to your box.
With your foam strips ready, take one of the 1cm (0.4 inches) foam strips and begin to cover the upper edge of your plastic heart outline. Apply hot glue meticulously along the plastic edge and press the foam strip firmly, working section by section to ensure a clean, seamless bond. This foam strip will provide a soft, finished edge and a surface for further decoration. Once this is in place, take a 0.5cm (0.2 inches) glitter foam strip and line it along the very top of the newly attached foam sheet. This adds an immediate decorative touch and neatly finishes the upper rim of your box.
To create the bottom of the box, flip the plastic heart (with the foam-covered top side facing down) and place it onto a larger piece of regular foam sheet. Secure it firmly with hot glue around the entire perimeter of the plastic heart. Allow the glue to set completely, then carefully cut around the excess foam sheet, following the exact outline of the plastic heart. This creates a soft, flat base for your box.
For the lid’s base, trace the shape of the plastic heart’s other side onto a piece of cardboard. Accuracy is key here, as this will determine how well your lid fits. Cut around the traced shape, creating a sturdy cardboard heart template. To give this cardboard piece a finished look and add some softness, cover both sides of the cardboard heart template with a foam sheet, securing it with hot glue. Trim any excess foam precisely, leaving you with a durable, foam-covered heart-shaped lid base.
Step 2: Constructing the Lid and Decorative Bow
The lid and its embellishments will complete your gift box, adding a touch of elegance and charm.
To create the decorative edge of your lid, take another 0.5cm (0.2 inches) glitter foam strip and attach it neatly on top of a 1cm (0.4 inches) regular foam strip. Use hot glue for a secure bond, ensuring the glitter strip is perfectly centered or aligned to your preference. Now, take this combined strip and use it to cover the sides of your foam-covered cardboard heart (the lid base you prepared earlier). Apply hot glue along the edge of the cardboard and carefully wrap the foam strip around, making sure it sits flush. Don’t worry if the foam sheet overlaps slightly at the bottom; this can be trimmed or hidden later. This creates a clean, finished edge for your lid that will sit snugly over the base of your box.
To further refine the lid, take another glittered strip and carefully place it on top of the cardboard heart, specifically on the side without the overlap (if any). Use this strip to neatly cover any visible seams where the side strips meet, creating a smooth and professional finish. Once these decorative and functional strips are in place, your lid is essentially ready, but we’ll add a beautiful bow to truly elevate its appearance.
Now for the centerpiece decoration: the bow. Begin by cutting a 12 x 12 cm (4.7 x 4.7 inches) square from a glitter foam sheet. This square will be the foundation for your intricate bow. Using a ruler and pencil, draw diagonal lines across the square, forming a clear “X” shape. Carefully cut along these lines, but make sure to leave the very center of the “X” intact – this is crucial for the structural integrity of your bow. Once the cuts are made, gently draw a subtle curve on each seam edge of the cut triangles and carefully cut these curves out. This softens the edges and gives the bow a more organic, petal-like appearance.
Next, focus on shaping the bow. Take the pointed tip of the left and right triangles created by your cuts and fold them inward towards the center. Secure these folds firmly in place with a small dab of hot glue. For the lower triangle, cut out a small triangle from its center. For the upper triangle, carefully cut out the sides, shaping it into a strip that is approximately 1 inch thick. These precise cuts are essential for the bow’s layered look. Now, take the two slanted strips at the bottom and flip them upwards. Then, fold the thick strip you created from the upper triangle over these and wrap it downward. Secure all layers with hot glue, ensuring the bow holds its elegant, multi-layered shape. With these steps, your stunning glitter foam bow is ready to adorn your gift box.
Finally, simply attach your beautifully crafted bow to the top of your finished lid. Position it centrally or slightly off-center for an artistic touch. Use a generous amount of hot glue to ensure it’s securely fastened. Allow all glue to dry completely before handling or filling your gift box. Congratulations, your personalized, heart-shaped gift box is now complete!
Embrace Sustainability: The Power of Upcycling Plastic Bottles
Beyond the aesthetic appeal and personal satisfaction, crafting a gift box from a recycled plastic bottle embodies a powerful message of sustainability. Plastic pollution is a global crisis, with billions of plastic bottles ending up in landfills and oceans each year, taking hundreds of years to decompose. By choosing to upcycle, you are actively diverting waste from these detrimental paths. This project transforms an item destined for trash into something beautiful and useful, promoting a circular economy where materials are reused rather than discarded. It’s a small but significant step towards reducing your environmental footprint and encouraging a more conscious approach to consumption. Imagine the ripple effect if everyone found creative ways to repurpose items instead of buying new ones. This heart gift box is not just a present; it’s a statement for a greener planet.
Beyond the Box: The Enduring Charm of Handmade Gifts
In a world saturated with mass-produced items, a handmade gift box carries a special weight. It signifies effort, thought, and a personal touch that no store-bought item can replicate. When you craft something by hand, you infuse it with a piece of your time and creativity, making the gift inside even more meaningful. A DIY heart gift box, specifically designed and decorated by you, tells the recipient they are truly valued. It’s a unique piece of art that reflects your care and consideration, adding an emotional layer to any present. Whether it’s for a birthday, anniversary, Valentine’s Day, or just a token of appreciation, a handmade gift box transforms the act of giving into a more intimate and memorable experience. It’s a testament to the power of personal connection and creativity.
Expert Tips for a Flawless Finish
Achieving a professional and polished look for your DIY heart gift box is easier with a few expert tips. Firstly, precision is paramount, especially when cutting the plastic bottle and foam sheets. Use a sharp pair of scissors or a craft knife (with a cutting mat for safety) and a ruler to ensure clean, straight edges and accurate shapes. Secondly, master your glue gun technique. Apply hot glue in small, controlled beads or thin lines, pressing pieces together firmly and quickly before the glue sets. Too much glue can seep out and look messy, while too little won’t provide a secure bond. Thirdly, don’t rush the drying process. Allow each glued section ample time to set before moving on to the next step, especially when bonding the plastic to foam or cardboard. Lastly, consider the aesthetic balance. When placing decorative elements like the glitter strips or the bow, experiment with placement before applying glue. A well-centered bow or evenly spaced strips can significantly elevate the final appearance of your heart gift box.
Personalize Your Creation: Endless Customization Ideas
While the heart shape and foam sheets provide a beautiful foundation, the true magic of a DIY gift box lies in its potential for personalization. Don’t limit yourself to the colors shown; explore a vibrant spectrum of foam sheets, glitter foam, and even patterned craft papers to match any theme or recipient’s favorite hues. For added embellishment, consider incorporating small beads, rhinestones, or sequins around the edges or on the bow for extra sparkle. Delicate ribbons, lace, or twine can be tied around the box or used to create alternative bows. You can also personalize the box with hand-painted details, stencils, or even a small, handwritten tag attached with a decorative string. Think about the occasion: red and pink for Valentine’s Day, pastels for a baby shower, or metallic colors for a sophisticated touch. The possibilities are truly endless, allowing each heart gift box to become a unique reflection of your creativity and affection.
Frequently Asked Questions About Your DIY Heart Box
Here are some common questions you might have as you embark on this crafting adventure:
- What kind of plastic bottle works best for this project?
Clear, straight-sided plastic bottles from soda, water, or juice are ideal. Look for bottles with a relatively smooth, untextured middle section, as this makes cutting and shaping much easier. Avoid bottles with deep ridges or irregular shapes.
- Can I use an adhesive other than a hot glue gun?
While a hot glue gun offers quick drying and strong adhesion, you could potentially use strong craft glue like E6000 or super glue. However, these often require longer drying times and might not be as forgiving for repositioning. For foam-to-plastic, hot glue is generally the most effective and efficient choice.
- How sturdy are these recycled plastic gift boxes?
When properly constructed with hot glue and reinforced with cardboard for the lid, these boxes are surprisingly sturdy. They are perfect for holding candies, small trinkets, jewelry, or other lightweight gifts. They are designed for presentation and light handling, not heavy-duty storage.
- What kinds of gifts can I put inside this heart box?
Its charming heart shape makes it perfect for romantic gifts like chocolates, small pieces of jewelry, custom keychains, love notes, or small cosmetic items. It’s also great for party favors, wedding favors, or as a unique container for small craft supplies.
- Is this project suitable for children?
With adult supervision, especially for cutting the plastic bottle and using the hot glue gun, older children and teenagers can certainly enjoy making this craft. It’s an excellent way to introduce them to upcycling and creative problem-solving. Younger children can participate in decorating the pre-cut foam pieces.
Conclusion: Your Unique Heart Gift Box Awaits
Creating this beautiful heart-shaped gift box from an old plastic bottle is more than just a craft project; it’s a delightful blend of creativity, economy, and environmental consciousness. You’ve transformed a common disposable item into a personalized treasure, perfect for holding precious gifts and memories. This project highlights the immense potential of upcycling and the profound impact of handmade items. Every time you present a gift in this custom-made box, you’re not just giving a present; you’re sharing a piece of your heart and a commitment to a more sustainable world. We hope this guide has inspired you to explore the endless possibilities of DIY and upcycling. For more innovative and inspiring crafting ideas, be sure to visit and subscribe to The Craft Gallery India via YouTube, the brilliant creators behind this fantastic idea. Happy crafting!