
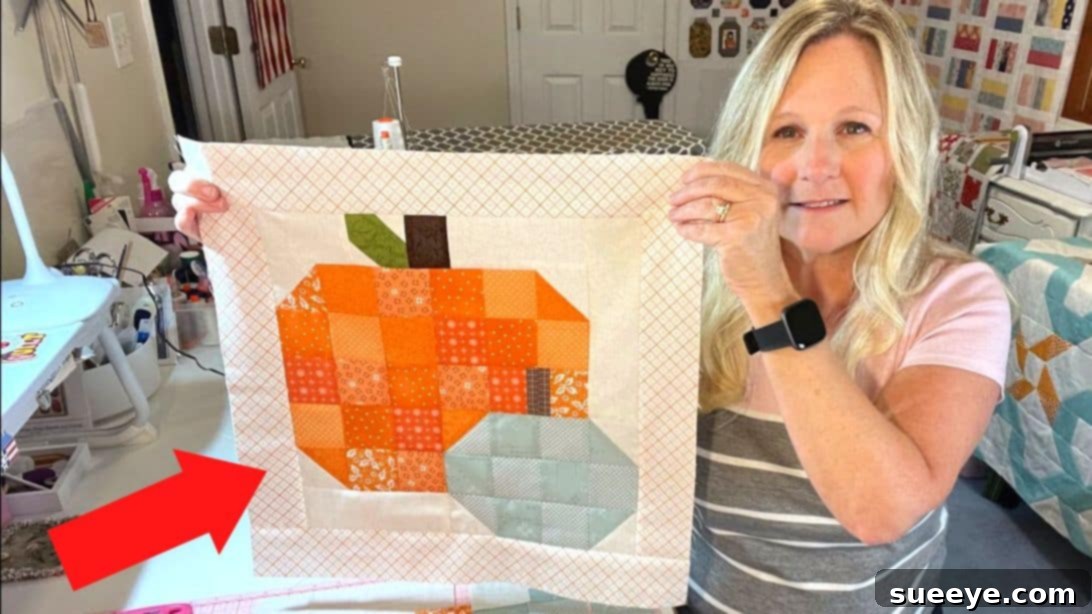
Craft a Charming Pumpkin Quilt Block from Fabric Scraps: A Step-by-Step DIY Tutorial
As the leaves begin to turn and a crispness fills the air, fall brings with it the perfect opportunity for cozy crafting, and what better way to celebrate the season than with an adorable pumpkin quilt block? This enchanting project allows you to transform your leftover fabric scraps into a delightful piece of art, adding a touch of autumn charm to any quilt or decorative item. Imagine the warmth and character a handmade pumpkin block can bring to your home!
We are absolutely captivated by the stunning visual contrast created when a light blue fabric meets vibrant orange, reminiscent of a crisp autumn sky against a bright harvest pumpkin. This tutorial will guide you through the process of creating your very own pumpkin quilt block, a fantastic project for both seasoned quilters and enthusiastic beginners. Learn the secrets to this beautiful design with easy-to-follow steps, inspired by the wonderful tutorial from The Quilting Compound on YouTube. Let’s dive into your fabric stash and bring this seasonal masterpiece to life!
Materials for Your Pumpkin Quilt Block
Before you begin sewing your charming pumpkin quilt block, gather all your materials. Utilizing fabric scraps for this project not only makes it eco-friendly but also gives each block a unique, patchwork character. Feel free to experiment with different shades and patterns to make your pumpkin truly your own.
- 23 pieces of 2.5″ orange squares: These will form the main body of your pumpkin, providing that iconic autumn hue.
- 2 pieces of 2″ x 2.5″ orange rectangles: Essential for shaping the pumpkin’s contours and adding dimension.
- 2 pieces of 1″ x 2.5″ brown rectangles: Perfect for creating the subtle details of your pumpkin’s stem.
- 1 piece of 2″ x 2.5″ brown rectangle: This larger piece will form the robust base of your pumpkin stem.
- 12 pieces of 2.5″ blue squares: Use a light blue or a complementary color to add visual interest and a unique touch, acting as background or accent in specific areas.
- 6 pieces of 2.5″ white squares for the background: These squares will frame your pumpkin, making its colors pop and defining its shape.
- 1 piece of 2.5″ green square: For the pumpkin’s leaf or vine, bringing a fresh, natural element to the design.
- 2 pieces of 1.5″ white squares: These smaller squares are used for special corner techniques to shape the green leaf.
- 2.5″ white fabric strips: For sashing and filling spaces to complete the quilt block’s overall structure and ensure it finishes at the correct size.
Remember, the beauty of scrap quilting lies in its versatility. Don’t hesitate to substitute colors or patterns from your stash to personalize your pumpkin block!
Step-by-Step Instructions: Crafting Your Pumpkin Quilt Block
Follow these detailed steps carefully to construct your delightful pumpkin quilt block. Precision in cutting and sewing will ensure your finished block is crisp, neat, and ready to be incorporated into your next quilting masterpiece.
Step 1: Constructing the Pumpkin’s Corner Units
Begin by laying out your squares according to the desired pattern. You’ll notice white squares positioned on top of the corners of some orange pumpkin squares, and a blue square atop another orange square for the top corner of what will become a “blue pumpkin” section. This technique is often referred to as “stitch-and-flip” or creating “snowball corners.” Take each top square (the white or blue one) and fold it in half diagonally, creating a visible crease. This crease will serve as your sewing guide. Carefully sew directly along this diagonal line. Once your stitching is complete, trim off the excess fabric from the triangle tip, leaving a precise 1/4-inch seam allowance. Then, press your seams open or towards the darker fabric (the orange or blue square) for a clean finish. The goal is to transform these units into perfect 2.5″ squares with the corner triangle formed, ready to be joined with other pieces.
Step 2: Forming the Pumpkin’s Vertical Segments and Stem Pieces
Now, let’s assemble the smaller components that contribute to the pumpkin’s unique shape and its stem. Take one piece of the 2″ x 2.5″ orange rectangle and one piece of the 1″ x 2.5″ brown rectangle. Carefully align their longer 2.5″ sides and sew them together with a precise 1/4-inch seam allowance. This combination will create a new block that measures 2.5″ when finished. Repeat this process for all remaining matching pieces. After sewing, it’s crucial to press your seams. For these units, press the seams towards the orange fabric. This technique helps to reduce bulk, ensuring a flatter and more professional finish, and also makes it easier to nest seams in subsequent steps when joining rows.
Step 3: Assembling the Pumpkin Body Rows
With your individual units prepared, it’s time to start assembling them into rows to form the main body of the pumpkin. Begin sewing the prepared 2.5″ squares and rectangle units together, constructing the horizontal rows of your pumpkin block. Focus on all rows except for the very first row, which contains the pumpkin’s stem and leaf. As you complete each row, an important step for achieving a flat and smooth quilt block is to press the seam allowances in alternating directions for every consecutive row. For instance, if you press the seams of the first row to the left, press the seams of the second row to the right, and so on. This technique allows the seams to “nest” together when you join the rows, reducing bulk at the intersections and ensuring your finished block lies perfectly flat.
Step 4: Crafting the Pumpkin Stem and Top Row
This step brings together the distinctive top of your pumpkin, including its stem and leaf. First, take the two 1.5″ white squares. Fold each in half diagonally to create a crease. Place these folded squares on two opposite corners (typically top and bottom, or diagonal) of the 2.5″ green square. Stitch along the diagonal crease line you made, then trim off the excess fabric, leaving a 1/4-inch seam allowance. Press these seams down, away from the green square. This technique creates a clean, pointed corner, forming part of the leaf structure. Next, take the 2.5″ brown square (which is the larger brown rectangle from your materials list, now acting as a square for the stem base) and sew it onto one side of your modified green square unit. Carefully align this completed stem-and-leaf unit to the center of what will be the top of your orange pumpkin rows. To complete this first row, sew white fabric strips onto the sides of this combined unit, framing the stem and leaf and ensuring the row matches the width of the subsequent pumpkin body rows. As with the previous rows, press the seam allowances for this top row in the opposite direction to the second row of your pumpkin body, preparing for a smooth join.
Step 5: Final Block Assembly and Completion
With all your rows now constructed and individual units prepared, the final step is to sew them all together to form your complete pumpkin quilt block. Carefully align each row, ensuring that your nested seams (from Step 3 and 4) lock into place. Pin generously at these seam intersections to prevent shifting. Sew the rows together, using your consistent 1/4-inch seam allowance. As you sew, you will naturally fill any remaining spaces with the white fabric strips you prepared, creating a cohesive and beautifully framed block. Give your finished pumpkin quilt block a final press to ensure all seams lie flat and the block is perfectly square. Congratulations, you’ve just created a stunning pumpkin quilt block from fabric scraps!
The Allure of Scrap Quilting: Why Use Fabric Scraps?
Creating a pumpkin quilt block from fabric scraps is more than just a charming seasonal project; it’s a testament to sustainable crafting and creative ingenuity. Scrap quilting offers numerous benefits that appeal to both environmentally conscious makers and those who cherish unique, one-of-a-kind creations:
- Sustainability and Eco-Friendliness: By utilizing leftover fabric pieces, you reduce textile waste and give new life to materials that might otherwise be discarded. It’s a wonderful way to minimize your environmental footprint while indulging in your passion for quilting.
- Cost-Effectiveness: Scrap quilting is incredibly budget-friendly. Instead of purchasing new fabric, you’re making the most of what you already own, allowing you to create beautiful projects without additional expense.
- Unique and Eclectic Aesthetics: Every scrap quilt tells a story. The varied textures, patterns, and colors from different projects combine to create a visually rich and distinctive design that cannot be replicated with pre-coordinated fabric lines. Your pumpkin block will be truly unique!
- Skill Development: Working with various fabric types and sizes hones your piecing skills, encouraging precision and adaptability. It challenges you to think creatively about color placement and design.
- Therapeutic and Rewarding: The process of sorting through scraps, envisioning new combinations, and watching a new pattern emerge from disparate pieces can be incredibly meditative and satisfying. There’s immense joy in seeing your fabric remnants transform into a beautiful, functional item.
Essential Tips for Quilting Success
To ensure your pumpkin quilt block turns out beautifully, keep these helpful quilting tips in mind:
- Accurate Cutting is Key: “Measure twice, cut once” is a quilter’s mantra. Precision in cutting your fabric squares and rectangles to the exact specified dimensions is paramount. Even a slight discrepancy can throw off the alignment of your entire block. Invest in a good rotary cutter, mat, and ruler.
- Consistent Seam Allowance: A perfect 1/4-inch seam allowance is crucial in quilting. Practice sewing with a consistent seam to ensure your pieces fit together precisely. Many quilters use a “scant 1/4 inch,” which is just a hair under 1/4 inch, to account for the thickness of the thread when pressing.
- Pressing vs. Ironing: In quilting, we “press” seams, rather than “ironing” them. Pressing involves lifting and placing the iron down, holding it briefly, then lifting again. This prevents stretching and distorting your fabric. Always press after each seam to keep your work flat and accurate.
- Quality Thread and Needles: Use a good quality 100% cotton thread for piecing, as it is strong and blends well with cotton fabrics. Change your sewing machine needle regularly (every 8-10 hours of sewing) to prevent skipped stitches and ensure smooth piercing through fabric.
- Organization is Your Friend: Especially when dealing with many small pieces, keep your cut fabric organized. Labeling pieces or using small bins can save you time and frustration, ensuring you pick up the correct piece for each step.
- Take Your Time: Quilting is a journey, not a race. Enjoy the process, pay attention to detail, and don’t hesitate to unpick and re-sew if a seam isn’t quite right. Patience will lead to a more satisfying result.
Creative Variations and Personalization
While this tutorial provides a fantastic foundation, don’t be afraid to let your creativity shine! Here are some ideas for personalizing your pumpkin quilt block:
- Color Palettes: Experiment with different color combinations. Instead of traditional orange, try a whimsical blue or purple pumpkin. Use varying shades of green for the leaf, or incorporate patterned fabrics for a more playful look.
- Embellishments: Once your block is complete, consider adding small embellishments. A tiny fabric button on the stem, a bit of embroidery floss for tendrils, or even some decorative stitching can add extra charm.
- Block Size: While this tutorial aims for a specific size, you can adapt the dimensions of your squares and rectangles to create larger or smaller pumpkin blocks, perfect for different project needs.
- Background Fabrics: Instead of plain white, try a subtle tone-on-tone print, a light cream, or even a soft plaid for your background squares and strips to add texture and depth.
- Beyond the Block: Once you’ve mastered this single block, consider making multiple pumpkin blocks to assemble into a full fall-themed quilt, a festive table runner, placemats, or even decorative throw pillows. Imagine a whole pumpkin patch on your couch!
Your Handmade Pumpkin Quilt Block: A Symbol of Autumn
Creating this pumpkin quilt block from fabric scraps is a delightful journey that results in a beautiful, personalized piece of textile art. It’s a wonderful way to honor the fall season, utilize your cherished fabric remnants, and hone your quilting skills. Each stitch carries a bit of your creativity and passion, making your finished block truly special.
Whether you’re making one for a wall hanging, several for a larger quilt, or gifting it to a loved one, your handmade pumpkin quilt block will bring a touch of rustic elegance and autumnal warmth wherever it goes. So, gather your scraps, fire up your sewing machine, and embark on this rewarding quilting adventure. We can’t wait to see your unique pumpkin creations!