
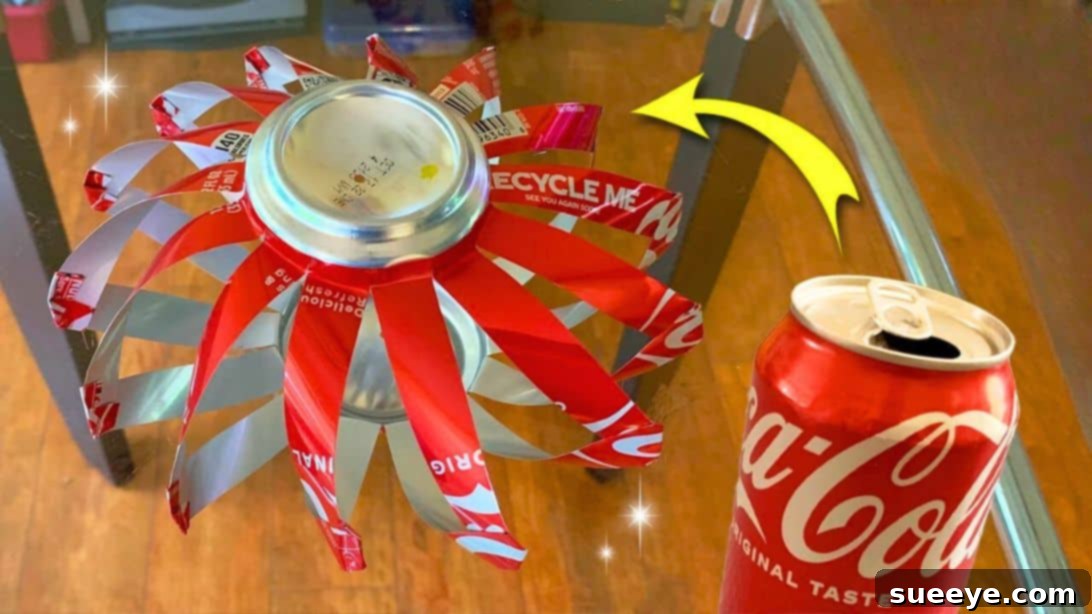
Are you searching for an engaging and sustainable craft project to brighten your outdoor space this summer? Look no further! Transform ordinary empty soda cans into a mesmerizing wind spinner with this comprehensive guide, inspired by the creative insights from Happy Life in Craft. Instead of discarding those used aluminum cans, give them a new purpose and contribute to a greener planet through the art of upcycling. Aluminum cans are incredibly versatile and can be repurposed into a wide array of decorative and functional items, from intricate floral designs and captivating gemstones to stylish planters, unique jewelry, and much more. Among these exciting possibilities, the DIY soda can wind spinner stands out as a truly enchanting and rewarding project, blending artistic expression with environmental consciousness.
Creating this captivating wind spinner at home is not just a craft; it’s a fantastic way to unwind, stimulate your creativity, and produce a beautiful piece of garden art. Imagine stacking vibrant pieces of aluminum, painting them in a riot of bright colors, and embellishing them with shimmering beads – the possibilities for personalization are endless. Let your imagination soar as you design a unique spinner that reflects your personal style and adds a touch of whimsical charm to your garden, patio, or balcony. While the process is incredibly fun, it’s essential to exercise caution, as the edges of cut aluminum can be sharp. We’ll guide you through important safety tips, including how to dull these edges effectively with sandpaper, ensuring a safe and enjoyable crafting experience. Once completed, these charming wind spinners are delightful to behold, gracefully twirling and reflecting light, whether caught in a gentle breeze or standing still on a calm day.
RELATED: Discover another fantastic upcycling project with DIY Soda Can Hot Air Balloons.
Why Craft a DIY Soda Can Wind Spinner?
Beyond the sheer joy of creating something with your own hands, crafting a DIY soda can wind spinner offers a multitude of benefits. Environmentally, it’s a powerful act of upcycling. By repurposing materials that would otherwise end up in landfills, you’re actively reducing waste and minimizing your carbon footprint. This project transforms trash into treasure, giving discarded aluminum a second life as a beautiful piece of outdoor decor. Financially, it’s an incredibly cost-effective craft. Most of the materials you’ll need are either items you already have around your home or inexpensive craft supplies, making it an accessible project for almost any budget.
Aesthetically, these wind spinners are a vibrant addition to any outdoor setting. Their reflective surfaces catch the sunlight, creating dazzling displays of light and movement. As they spin, they add a dynamic element to your garden or porch, drawing the eye and providing a focal point. You can customize them to match your existing outdoor decor or create a striking contrast with bold colors. For families, it’s a wonderful activity to share. With proper supervision, children can participate in the safer aspects of the project, learning about recycling, design, and the satisfaction of completing a hands-on craft. This project fosters creativity, patience, and fine motor skills, making it an enriching experience for all ages.
Essential Materials for Your Easy Soda Can Spinner
Gathering all your materials before you begin will ensure a smooth and enjoyable crafting process. While the list is straightforward, each item plays a crucial role in bringing your soda can wind spinner to life. Remember, safety should always be your top priority when working with aluminum cans.
- 6 Soda Cans: These are your primary building blocks. Choose cans of the same size for a consistent look, or experiment with different sizes for varied visual effects. Ensure they are thoroughly rinsed and dried.
- Stencil Cutter (or Craft Knife): This specialized tool allows for precise and controlled cuts into the aluminum. A sharp craft knife can also work, but always handle with extreme care.
- Sharp Scissors: Essential for refining edges and making smaller, detailed cuts. A good pair of craft scissors will make this step much easier.
- Pliers: Needed for bending and securing the aluminum strips, particularly when connecting pieces and forming loops. Chain-nose pliers or needle-nose pliers are ideal for precision.
- Thin, Sturdy Wire: This will be the central axis of your wind spinner, holding all the assembled pieces together. Craft wire, fishing line, or even thin floral wire can work, provided it’s strong enough to support the weight and movement.
- Decorative Beads: These add weight, visual appeal, and can also help with the spinner’s balance. Choose beads of various colors, sizes, and shapes to personalize your design. Glass, plastic, or wooden beads all work well.
- Sandpaper (fine-grit): Crucial for dulling any sharp edges on the cut aluminum, significantly reducing the risk of accidental cuts.
- Safety Gloves: Always recommended when handling cut aluminum to protect your hands from sharp edges.
- Ruler and Marker: For precise measurements and marking cutting lines on the cans.
Step-by-Step Guide: How to Make a Soda Can Wind Spinner
Follow these detailed instructions carefully to construct your beautiful and unique soda can wind spinner. Remember to prioritize safety at every stage.
Step 1: Preparing the Can for Assembly
Begin by taking one thoroughly cleaned and dried soda can. Using a small drill bit or a sharp awl, carefully create a small center hole on the bottom of the can. This hole will eventually accommodate the thin wire that forms the spinner’s central axis. Ensure the hole is centered as accurately as possible for optimal balance later on.
Step 2: Carefully Removing the Top Section
Next, using your stencil cutter or a sharp craft knife, meticulously cut around the top part of the can, just below the rim where the can starts to curve. Aim for a clean, even cut. Once the top is separated, use your sharp scissors to carefully clean up any rough edges along the cut line. It’s vital to avoid touching these fresh edges directly with your bare hands, as they will be very sharp. Put on your safety gloves for this step. Also, remove the pull tab from the separated top section; you won’t need it for this part of the spinner, but you can save it for future embellishments.
Step 3: Creating the Aluminum Strips
Focus on the larger, bottom part of the can. From the newly opened edge (where you removed the top), use a ruler and a marker to make small marks all the way around the circumference. Each mark should be precisely 0.6 inches (approximately 1.5 cm) away from the next. These marks will guide your cuts. Now, using a stencil cutter or scissors, carefully cut the can into individual strips, following these marks. Crucially, ensure that these strips remain intact at the very bottom of the can, as they will form the core structure of your spinner. Once cut, gently fold each strip flat against itself, then fold just the very end of each strip over, creating a small, secure loop or hook. This folded end will be used for connecting the pieces.
Step 4: Preparing Additional Can Sections
To create a multi-layered wind spinner, repeat steps 1 through 3 for a second soda can, and then for all subsequent cans you intend to use (up to six, as per the materials list). It’s important to aim for the same number of strips (or “flaps”) on each can to ensure a symmetrical and balanced spinner. Consistency in your measurements and cuts will contribute to the overall aesthetic appeal and functionality of your finished project. As you complete each can, take a moment to use fine-grit sandpaper to gently smooth out any sharp edges on the strips, further enhancing safety.
Step 5: Interlocking the Can Sections
This is where your wind spinner starts to take shape! Take one prepared strip from the first can and one from the second can. You will connect these two strips perpendicularly. Insert the tip of one strip into the folded end (the loop) of the other. Once aligned, use your pliers to carefully fold and crimp the corner of the inserted tip, securing it firmly within the loop. This creates a strong, interlocking connection. Repeat this process, connecting each flap from the first can to a corresponding flap from the second can, creating a continuous, interlocked structure. Continue adding and connecting more can sections, following the same perpendicular interlocking method, until all your prepared can pieces are joined. This forms the main body of your wind spinner.
Step 6: Assembling the Central Axis and Embellishments
Now, it’s time to bring all the pieces together and add the finishing touches. Cut a length of your thin, sturdy wire – make sure it’s long enough to pass through all the can sections and allow for hanging. To one end of the wire, attach one of the saved can tabs, securing it with a small loop using your pliers. This will act as a stopper. Begin stringing your chosen decorative beads onto this end of the wire, creating a visually appealing arrangement. Once you have a segment of beads, carefully insert the wire through the center holes of your assembled wind spinner. The spinner should rest on the beads, allowing it to spin freely. Continue adding more beads to the other end of the wire after it exits the spinner, creating a balanced and attractive bottom section. Finally, attach the second can tab to this end of the wire, again securing it with a small loop, to hold all the beads in place. Ensure both ends of the wire are securely fastened, creating a sturdy central axis for your spinner. You can add a loop at the top for hanging, or integrate a swivel hook for even better rotation in the wind.
Personalizing and Displaying Your Soda Can Wind Spinner
The beauty of a DIY project lies in the ability to customize it to your heart’s content. Once your soda can wind spinner is assembled, the real fun of personalization begins! Consider spray painting your cans before cutting them, using outdoor-safe paints in vibrant colors or metallic finishes for a dazzling effect. You can use stencils to add patterns or designs, or even hand-paint intricate details with acrylic paints. Experiment with different types of beads – iridescent, opaque, clear, or multi-faceted – to see how they catch and refract light. You might even add small charms or bells to the bottom for a subtle, musical element, transforming your wind spinner into a wind chime.
When it comes to displaying your finished masterpiece, choose a location where it can truly shine. Gardens, porches, patios, and even large windows are ideal spots. Look for an area that receives a good amount of sunlight to maximize its reflective qualities and where it will catch a consistent, gentle breeze to ensure optimal spinning. Ensure it’s hung securely, away from high-traffic areas where it might be bumped or damaged. Occasionally, you might want to wipe down your spinner with a damp cloth to remove any dust or grime, keeping it looking fresh and vibrant for seasons to come. With proper care, your upcycled soda can wind spinner will provide endless enjoyment and a charming focal point in your outdoor living space.
The Joy of Upcycling and Crafting
This DIY soda can wind spinner project is more than just a craft; it’s an invitation to embrace the principles of upcycling and sustainable living. By transforming everyday waste into something beautiful and functional, you’re not only creating a unique piece of art but also contributing to environmental conservation. It’s a reminder that creativity knows no bounds and that valuable resources can be found in the most unexpected places. So, gather your materials, let your imagination guide you, and embark on this rewarding journey of transforming simple soda cans into a captivating outdoor ornament. Enjoy the process, celebrate your craft, and delight in the whimsical charm your handmade wind spinner brings to your home and garden.