
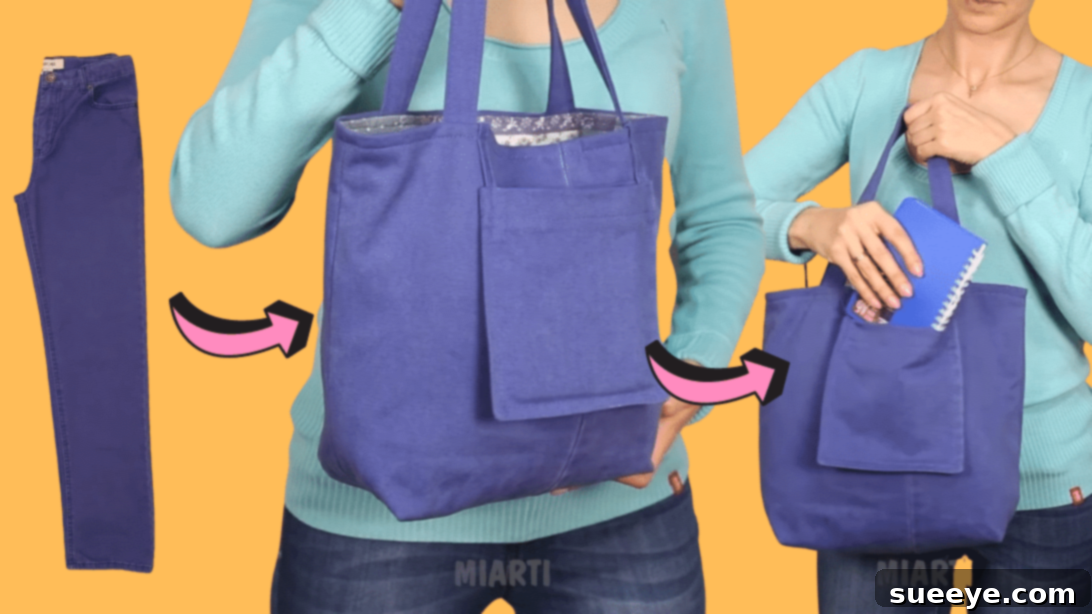
Transform Old Jeans into a Stylish Drawstring Bag: A DIY Upcycling Guide
Do you have a stack of old jeans at home that no longer fit, are out of style, or perhaps have a tear that makes them unwearable? Instead of letting them gather dust or contributing to landfill waste, why not give them a new lease on life? This comprehensive tutorial will guide you step-by-step through the exciting and rewarding process of transforming your unwanted denim into a lovely and practical drawstring bag. It’s a fantastic way to embrace sustainable fashion, express your creativity, and create a unique accessory that’s perfect for a variety of uses.
Making a DIY jeans bag is not only an eco-friendly craft but also an incredibly satisfying sewing project for beginners and experienced crafters alike. You can use your finished drawstring bag as a chic tote, a convenient lunch bag, a charming picnic companion, or even a stylish storage solution. This repurposing idea allows you to create something truly personal and functional from materials you already own. Follow along with our detailed instructions, inspired by the creative insights from Miarti – Reuse, and turn your old denim into a fashionable statement piece.
Why Upcycle Your Old Jeans?
Upcycling, the process of transforming old or discarded materials into something new and useful, offers numerous benefits, especially when it comes to denim. Jeans are a durable and versatile fabric that can withstand a lot of wear, making them ideal for repurposing projects like bags. By choosing to upcycle, you contribute positively to the environment by reducing textile waste and decreasing the demand for new fabric production, which often involves significant resources like water and energy.
Beyond the environmental advantages, upcycling your jeans allows for incredible personalization. Mass-produced bags often lack character, but a handmade denim drawstring bag can reflect your unique style. You can add personal touches like embroidery, patches, or different fabric combinations to make it truly one-of-a-kind. It’s also a cost-effective solution, as you’re making something new without purchasing expensive materials. This project empowers you to be resourceful, creative, and make a tangible difference, all while enjoying a fun sewing experience.
Materials:
- One pair of old jeans (preferably sturdy denim for durability)
- Fabric scraps (for the inner lining and drawstring casing, choose a complementary color or pattern)
- Drawstring cord (approx. 2-3 yards, depending on bag size and desired length)
- Matching sewing thread
Tools You’ll Need:
- Sewing machine (recommended for speed and strength, but can be hand-sewn)
- Sharp fabric scissors or rotary cutter
- Measuring tape or ruler
- Fabric marker or tailor’s chalk
- Straight pins or fabric clips
- Iron and ironing board (essential for crisp seams)
- Safety pin or bodkin (for inserting the drawstring)
- Seam ripper (for correcting mistakes, if needed)
Step-by-Step Instructions:
Step 1: Preparing Your Denim and Lining Fabric
Begin by taking one leg part of your old jeans. Lay it flat and carefully cut it open along one seam to create a flat piece of fabric. Ensure the wrong side of the denim is facing up. Fold this denim piece in half lengthwise, making sure the edges are perfectly aligned. Trim any excess cloth to create a clean rectangular shape. For a generously sized bag, aim for dimensions approximately 28.3 inches (length) by 16.1 inches (width). This will form the main body of your bag. Next, take your chosen fabric scrap for the inner lining and cut a piece to the exact same dimensions as your prepared denim rectangle. The lining will give your bag a neat finish and added structure. Once both pieces are cut, use an iron to flatten out any wrinkles or creases in both the denim and lining fabric. This step is crucial for accurate measuring and precise sewing.
Step 2: Constructing the Main Bag Body
With your denim piece ready, place the inner lining fabric directly on the back (wrong side) of the rectangular jeans piece, ensuring they are perfectly aligned. This creates a more robust single fabric layer to work with. Now, fold this combined piece in half, bringing the two shorter ends together. Pin the raw edges of the sides together. Using your sewing machine, stitch down both sides with a 1/2-inch seam allowance. Backstitch at the beginning and end of your seams for added durability. To create a sturdy, flat bottom for your bag, you’ll now create “box corners.” With the bag still inside out, pinch each bottom corner so that the side seam aligns with the bottom fold, forming a triangle. Measure about 1.5 to 2 inches from the tip of the triangle and draw a line perpendicular to the seam. Stitch along this line, then trim the excess fabric, leaving a 1/2-inch seam allowance. Repeat for the other bottom corner. This technique gives your bag a professional finish and allows it to stand upright.
Step 3: Crafting the Outer Pocket
From the remaining part of the jeans leg, cut two pieces measuring approximately 13.4 x 6.3 inches for the main pocket body and two pieces of 6.3 x 1.2 inches for the pocket’s top edge/casing. Take the two larger pieces, place them right sides together, and sew around three sides, leaving one of the shorter 6.3-inch sides open. Trim the corners and turn the pocket right side out, pressing the seams flat. For the top edge, take one of the smaller 6.3 x 1.2-inch strips. Fold it in half lengthwise and press. Attach this folded strip to the top raw edge of your pocket, sandwiching the raw edge of the pocket inside the fold. Stitch it securely to create a clean finish and a potential casing for a small decorative string if desired, though a simple hem will also suffice. This pocket will be a functional and decorative addition to the exterior of your bag.
Step 4: Attaching Handles and the Outer Pocket
Now, let’s create the handles for your bag. Cut two long rectangular strips from your remaining denim or a sturdy fabric of your choice. A good size for handles might be around 20-24 inches long and 2-3 inches wide (after folding). To make them strong and comfortable, fold each strip lengthwise, pressing the edges inward towards the center, then fold it in half again to conceal all raw edges. Stitch down both long edges of each handle, reinforcing the stitching for durability. Once your handles are prepared, it’s time to attach them. Measure and mark the placement for your handles on the outer denim bag body, ensuring they are evenly spaced and centered. Pin them securely in place. Similarly, determine the ideal placement for your newly crafted outer pocket. Pin the pocket onto the bag body, making sure it’s straight and centered. Stitch the handles and pocket firmly onto the bag, using a strong X-box stitch or multiple lines of stitching at the stress points where the handles meet the bag for extra reinforcement. This ensures they can withstand the weight of your bag’s contents.
Step 5: Creating the Drawstring Casing and Inner Lining for the Top
For the drawstring mechanism, you’ll need additional fabric. Cut one piece measuring 28.3 x 16.1 inches (this will be the main body of the top lining) and two smaller pieces measuring 16.1 x 9.44 inches (these will form the drawstring casing). Take the 28.3 x 16.1-inch piece and create a box lining, similar to how you constructed the main bag body in Step 2. This will form the top interior lining. Now, focus on the two 16.1 x 9.44-inch pieces which will be your drawstring casing. Place one piece on top of the other with their right sides facing each other. Lay the combined fabric horizontally in front of you. Sew approximately half of each side seam, leaving a significant opening in the center of both sides. This opening is crucial for inserting the drawstring later. For the bottom edge of these casing pieces (which will eventually be the top edge of your bag when cinched), fold an inch towards the wrong side and press, then fold another inch and press again to create a neat hem. Stitch along this hem. This channel will house your drawstring.
Step 6: Assembling and Finishing Your Drawstring Bag
With the main bag body still inside out, attach the top raw edge of your 16.1 x 9.44-inch casing piece (the one with the sewn channel) to the top raw edge of the denim bag. Pin it all the way around, ensuring the seams align. Stitch securely. Next, take your larger 28.3 x 16.1-inch inner lining (the one you made into a box shape) and insert it into the bag, aligning its top raw edge with the top of the denim bag and casing, with right sides facing each other. Sew all the way around the top edge, but remember to leave a small opening (about 2-3 inches) unstitched along one of the side seams. This opening is vital for turning the bag right side out. Once stitched, carefully pull the entire bag through this opening, turning it right side out. Gently push out all corners and edges to define the shape. Now, iron the top edge to make it crisp and then sew the opening you left earlier closed with a neat topstitch. Finally, take your drawstring cord. Attach a safety pin to one end and thread it through the channel you created in Step 5, going all the way around until it emerges from the other side. Tie the ends of the drawstring together, or knot each end to prevent it from slipping back into the casing. Your beautifully upcycled denim drawstring bag is now complete!
Tips for Success in Your Denim Upcycling Project
- Choose the Right Denim: While any old jeans can work, sturdier, thicker denim will result in a more durable and structured bag. Consider the color and wash of your denim for the desired aesthetic.
- Pre-Wash Your Jeans: Always wash and dry your old jeans before cutting them. This ensures any shrinking happens before you cut your precise pieces and also cleans the fabric.
- Sharp Tools Are Key: Use sharp fabric scissors or a rotary cutter for clean, accurate cuts. Dull tools can lead to fraying and uneven edges.
- Pressing is Your Friend: Ironing seams flat at each step makes a significant difference in the professional appearance of your finished bag. Don’t skip this step!
- Measure Twice, Cut Once: Accuracy in measuring is crucial, especially for the lining and casing pieces, to ensure everything fits together perfectly.
- Reinforce Stress Points: Always backstitch at the beginning and end of seams, especially where handles and pockets are attached. For handles, an ‘X’ stitch inside a square can provide excellent reinforcement.
- Practice on Scraps: If you’re new to sewing or trying a new technique (like box corners), practice on scrap fabric first to build confidence.
Creative Variations & Customization Ideas
The beauty of a DIY project is the ability to personalize it to your taste. Here are some ideas to make your denim drawstring bag truly unique:
- Add More Pockets: Integrate additional pockets inside for your phone, keys, or small essentials, or on the other side of the exterior for more storage.
- Decorative Embellishments: Attach iron-on patches, embroider unique designs, sew on appliques, or use fabric paint to add splashes of color and personality.
- Mix and Match Fabrics: Instead of using denim for the handles or pocket, consider a contrasting fabric, like a bold patterned cotton or faux leather, for an eye-catching detail.
- Vary the Drawstring: Experiment with different types of cords – thick rope, colorful shoelaces, or even braided fabric strips – to change the bag’s look and feel.
- Different Sizes: Scale up the dimensions to create a large beach bag or scale down for a small pouch perfect for cosmetics or gifts.
- Lining Options: Choose a vibrant, patterned fabric for the inner lining to add a pop of unexpected color and a touch of luxury every time you open your bag.
- Hardware Additions: Consider adding D-rings or lobster clasps to the handles for attaching keys or charms, or even a snap closure inside for extra security.
Frequently Asked Questions About Making a Jeans Bag
- What type of old jeans are best for this project?
- While most denim will work, jeans made from 100% cotton denim are generally easier to sew and offer more structure than those with a high spandex content. Thicker, sturdier denim will result in a more durable bag. Lighter washes are often easier to mark and sew, but dark denim can also create a sleek look.
- Can I hand-sew this drawstring bag instead of using a sewing machine?
- Yes, absolutely! This project can definitely be hand-sewn, though it will require more time and patience. Use a strong needle suitable for denim and a durable thread. Ensure your stitches are small, even, and consistent for both strength and a neat appearance. Hand-sewing can add a beautiful artisanal touch to your finished bag.
- How do I wash the finished denim drawstring bag?
- To maintain the shape and integrity of your handmade bag, it’s best to hand wash it in cold water with a mild detergent, or machine wash on a gentle cycle in cold water. Air dry by hanging it up, or lay it flat. Avoid high heat in a dryer, which can cause denim to shrink or warp, and iron as needed to smooth out wrinkles.
- What if my jeans aren’t large enough to cut a 28.3 x 16.1-inch rectangle?
- No problem! You have a few options. You can adjust the size of your bag to fit the available denim – simply make a slightly smaller bag. Alternatively, you can piece together smaller denim scraps to create the required rectangle. If doing so, ensure seams are strong and flat to avoid bulkiness. You could also use two different denim shades for a patchwork effect, adding to its unique charm.
- Where can I find suitable drawstring cord?
- Drawstring cord can be found at most craft stores, fabric stores, or online retailers. Look for options like cotton cord, parachute cord, macrame cord, or even thick shoelaces. The key is to choose something durable and strong enough to hold the bag closed securely.