
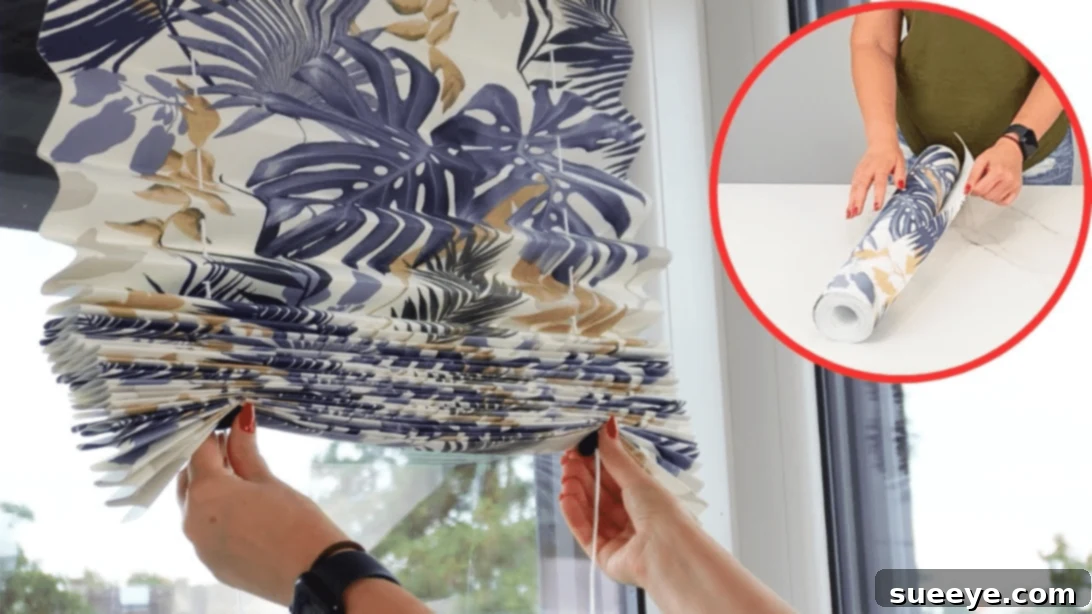
Transform Your Windows: Easy DIY Wallpaper Blinds Tutorial
Windows are essential elements of any home, inviting natural light and offering views of the world outside. However, they also play a crucial role in privacy, temperature regulation, and overall aesthetic. Traditional window treatments, such as custom blinds or shades, often come with a hefty price tag, making them a significant investment for homeowners, especially when outfitting multiple windows or seeking temporary solutions. If you’re looking for an immediate, cost-effective, and stylish way to enhance your windows, block out harsh sunlight, or simply add a touch of privacy, then embarking on a DIY project might be the perfect answer. This comprehensive guide introduces you to the incredibly versatile and budget-friendly world of homemade window blinds using a simple roll of wallpaper!
This ingenious project is ideal for anyone who appreciates creative solutions without breaking the bank. Whether you’re decorating a new space, need a quick fix for unexpected guests, or just want to experiment with different patterns and textures in your home decor, DIY wallpaper blinds offer remarkable flexibility. They are particularly popular among renters who might not be able to install permanent fixtures or homeowners looking for temporary window treatments while saving up for more elaborate options. Even if you don’t have a roll of wallpaper readily available, you can often find attractive and affordable options at dollar stores, craft shops, or even online, making this project accessible to virtually everyone.
Before we dive into the step-by-step instructions, take a moment to consider the potential of this simple craft. Imagine customizing your window treatments to perfectly match your room’s color scheme or seasonal decor, all while knowing you created them with your own hands. It’s not just about saving money; it’s about infusing your home with personal style and pride. This tutorial will walk you through everything you need to know, from selecting your materials to the final installation. For those who prefer visual learning, we highly recommend watching the detailed video tutorial by Clever Hacks on YouTube, which offers additional insights and visual demonstrations to complement these written steps.
Why Opt for DIY Wallpaper Blinds?
The appeal of DIY wallpaper blinds extends far beyond mere cost savings. While undoubtedly one of the most affordable window covering options available, these handmade shades bring a host of other benefits to the table, making them a smart choice for various situations:
- Unbeatable Affordability: The primary draw for many is the low cost. Using an existing roll of wallpaper or purchasing an inexpensive one drastically cuts down expenses compared to custom-made or even off-the-shelf blinds. This allows you to achieve a polished look without the hefty price tag.
- Endless Customization: Wallpaper comes in an astounding array of patterns, colors, and textures. This means you can truly tailor your blinds to your unique style, matching them to your existing decor or using them to introduce a bold new accent. From minimalist patterns to vibrant florals, the design possibilities are virtually limitless.
- Perfect for Temporary Solutions: Renting a home where permanent fixtures aren’t allowed? Or perhaps you need a quick privacy fix while waiting for professional installations? Wallpaper blinds are an excellent temporary solution. They are easy to install and remove without damaging your window frames, making them ideal for short-term needs or seasonal decor changes.
- Easy to Make and Replace: You don’t need to be an expert crafter to make these blinds. The process is straightforward, requiring basic tools and a bit of patience. Should you decide to change your decor, or if a blind gets damaged, replacing them is simple and inexpensive.
- Provides Privacy and Light Control: Despite their simple construction, wallpaper blinds are surprisingly effective at blocking out unwanted light and providing crucial privacy, especially when using thicker wallpaper or choosing darker patterns. You can easily adjust them up or down with the cord system.
- Sustainable and Resourceful: Repurposing leftover wallpaper or choosing eco-friendly paper options makes this a more sustainable choice than constantly buying new plastic or metal blinds. It’s a fantastic way to minimize waste and maximize creativity.
Gather Your Essentials: Materials and Tools for Your Wallpaper Blinds
Before you begin your crafting journey, ensure you have all the necessary items organized. Having everything at hand will make the process smoother and more enjoyable. Most of these materials are readily available at craft stores, hardware shops, or even your local dollar store.
- Wallpaper Roll: This is the star of your project! Select a design and thickness that suits your aesthetic and functional needs. Thicker wallpaper tends to hold pleats better and offers more light blockage.
- Marking Pen or Pencil: Essential for precise measurements and guiding your cuts and folds.
- Ruler or Measuring Tape: Accuracy is key for evenly pleated blinds. A long ruler or a fabric measuring tape will be invaluable.
- Sharp Scissors or Craft Knife: For clean, straight cuts through the wallpaper. If using a craft knife, ensure you have a cutting mat to protect your work surface.
- Durable String or Thin Cord: You’ll need enough length to run through the entire length of your blind and allow for adjustment. Choose a strong, thin cord that slides easily.
- Thin Wire (Optional but Recommended): A thin, sturdy wire can be helpful for threading the string through the pleated paper, especially if your string is flexible.
- Cord Locks: These small devices are crucial for holding your blinds in place at the desired height. You’ll need one for each string.
- Drill and Thin Drill Bit: To create neat holes for your string. Ensure the drill bit is thin enough for your string but not so thin that it tears the wallpaper.
- Strong Adhesive Tape (e.g., Duct Tape or Packing Tape): For securing the string ends to the wallpaper.
- Heavy-Duty Double-Sided Tape: The best option for securely mounting your blinds to the window frame without permanent fixtures. Look for strong, long-lasting adhesive.
Step-by-Step Guide: Crafting Your Own Wallpaper Window Blinds
Now that you have all your materials ready, let’s dive into the creative process. Follow these detailed steps carefully, and remember that precision will lead to a more professional-looking finished product. If any step feels unclear, refer back to the recommended video tutorial for visual guidance.
Step 1: Preparing Your Wallpaper for Pleating
The foundation of your wallpaper blinds lies in accurate measurement and crisp pleats. This step sets the stage for both the functionality and aesthetics of your finished product.
- Measure and Cut Your Wallpaper: Begin by unrolling your wallpaper and measuring 210cm (approximately 83 inches) from one edge. Using your marking pen or pencil and a long ruler, draw a straight line across the width of the wallpaper at this mark. Carefully cut the wallpaper along this line using your scissors or craft knife. This will be the initial length of your blind. You may need to adjust this length based on the height of your window, ensuring it’s slightly longer than the window to allow for overlap and pleats.
- Start Your Pleats: Lay the cut wallpaper piece flat with the patterned side facing down (or the side you want to be visible when the blinds are closed). Measure 3cm (approximately 1 inch) from one of the shorter edges, draw a line, and carefully fold the wallpaper along this line. Press the fold firmly to create a crisp crease. This fold will typically be towards the patterned side.
- Continue Accordion Folding: Now, measure another 3cm (1 inch) from the edge of your previous fold. This time, fold the wallpaper in the opposite direction, creating an “accordion” or “fan” effect. Continue this process of measuring 3cm and folding in alternating directions until you reach the very end of your wallpaper strip. Consistency in your pleat width is crucial for a professional look and smooth operation. Use a straight edge or the ruler to help you get perfectly even pleats.
Step 2: Creating the Cord System for Functionality
This step involves integrating the mechanism that will allow you to raise and lower your DIY blinds, transforming them from a static decoration into a functional window covering.
- Prepare for Drilling: Once your wallpaper is completely pleated, gently compress the accordion folds so that the entire strip forms a compact, thick roll. Place this pleated roll horizontally on a stable work surface.
- Mark and Drill Holes: Measure 10cm (approximately 4 inches) in from each end of the pleated roll. Mark these points clearly. Carefully use your drill with a thin drill bit to create a hole at each of these marked points, drilling straight through all the layers of the pleated wallpaper. Ensure the holes are clean and do not tear the paper.
- Thread the String: Take your chosen string or cord. If it’s difficult to push through, use a thin piece of wire (like floral wire) or a large needle to guide it. Thread one end of the string through one of the drilled holes, pushing it all the way through to the other side. Repeat this for the second hole with a separate piece of string, or if you’re using a continuous loop system (more complex, but possible), thread it appropriately.
- Secure the Cord Locks and Loops: On the side of the blind that will face inwards (the non-patterned side when the blinds are down), attach a cord lock to each end of the strings. Thread the string through the cord lock according to its instructions. Then, tie a secure loop or knot at the very end of each string to ensure it cannot slip back through the hole or out of the cord lock. This loop will also serve as a pull-tab to adjust your blinds.
- Tape the String Ends: To prevent the string from pulling through or shifting within the pleats, secure the end of the string (the one without the cord lock) to the non-patterned side of the wallpaper using strong adhesive tape. Press the tape down firmly over the string and wallpaper to ensure a lasting bond. Repeat for the second string.
Step 3: Installing Your New DIY Blinds with Ease
The final step brings your creation to life, transforming your window with your new, custom-made wallpaper blinds. This method relies on strong adhesive for a non-permanent installation, perfect for renters.
- Prepare for Adhesion: Identify the top edge of your pleated blinds – this is the edge where you secured the string ends with adhesive tape. On the backside of this edge (the side that will face the window pane), stick a generous strip of heavy-duty double-sided tape. Ensure the tape runs along the entire width of the blind for maximum adhesion.
- Mount to the Window Frame: Carefully remove the backing from the double-sided tape. Position your blinds precisely against the top interior frame of your window. Take your time to align it perfectly, ensuring it’s straight and covers the desired area of the window.
- Firmly Press and Secure: Once positioned, press the top of the blinds firmly against the window frame. Apply consistent pressure across the entire taped section to ensure the double-sided tape adheres completely and securely. Leave it undisturbed for a few minutes to allow the adhesive to bond properly.
- Test and Adjust: After the adhesive has had time to set, gently test your new blinds. Use the cord locks to raise and lower them, ensuring they move smoothly and hold their position. Make any minor adjustments to the cords or pleats as needed.
Pro Tips for Perfect DIY Wallpaper Blinds
While the basic steps are straightforward, a few expert tips can elevate your wallpaper blinds from good to great, ensuring durability, aesthetic appeal, and optimal functionality.
- Choosing the Right Wallpaper:
- Thickness Matters: Opt for medium to heavy-weight wallpaper. Thicker paper will create more defined pleats, be less prone to sagging, and offer better light-blocking capabilities.
- Pattern and Scale: Consider the pattern and scale of your chosen wallpaper in relation to your window size and room decor. Large, bold patterns might be overwhelming on a small window, while subtle textures can add elegance.
- Washable Options: If your blinds will be in a high-traffic area or prone to getting dirty (e.g., kitchen, kids’ room), consider wipeable or washable wallpaper for easier maintenance.
- Precise Measurements are Key:
- Window Dimensions: Always measure the exact width and height of your window opening. Add a few inches to the width if you want the blinds to overlap the frame slightly for better light control and privacy.
- Length Calculation: The length of your wallpaper strip should be sufficient to cover the full window height when extended, plus extra for the pleats and a small overlap at the bottom. A general rule is to add about 25-30% to the window height for pleats.
- Achieving Crisp Pleats:
- Score the Folds: For very stiff wallpaper, lightly score your fold lines with a craft knife (don’t cut through!) before folding. This helps create incredibly sharp creases.
- Use a Straight Edge: When folding, consistently use a ruler or other straight edge to guide your folds and ensure they are perfectly parallel and even.
- Ironing (Carefully): On low heat and with a pressing cloth, you can gently iron the pleats after folding to set them, especially if the paper is resistant to creasing. Test on a scrap piece first!
- Enhancing Durability:
- Mod Podge or Sealant: For added protection against moisture and wear, you can apply a thin layer of matte Mod Podge or a clear acrylic sealant to the patterned side of your finished blinds, especially for bathroom or kitchen windows.
- Thicker String/Cord: Use a high-quality, durable string that won’t fray easily with repeated use.
- Customization Ideas:
- Decorative Pulls: Add a decorative bead, button, or tassel to the end of your pull strings for an extra touch of style.
- Layering: For a more layered look, consider installing these wallpaper blinds underneath sheer curtains.
- Painted Edges: Use a contrasting paint color to paint the exposed edges of the pleats for a unique striped effect when the blinds are raised.
Maintaining Your Wallpaper Blinds
To ensure your beautiful DIY wallpaper blinds last as long as possible and continue to look their best, a little maintenance goes a long way. Since they are made of paper, special care is required:
- Dust Regularly: Use a soft feather duster or the brush attachment of your vacuum cleaner on a low setting to gently remove dust from the pleats.
- Spot Clean Only: For small marks, gently dab with a slightly damp cloth. Avoid rubbing vigorously, which could damage the paper or smear the print. Use minimal water.
- Avoid Excessive Moisture: Do not use wet cloths or spray cleaners directly on the blinds, as this can cause the paper to warp, tear, or lose its shape.
- Handle Gently: Always use the pull cords to raise and lower your blinds, avoiding pulling directly on the paper itself, which could cause tears or damage to the pleats.
When Are DIY Wallpaper Blinds Your Best Solution?
While an excellent option for many, DIY wallpaper blinds particularly shine in specific scenarios:
- Budget-Conscious Decorators: For those who need to outfit multiple windows or are working with a tight budget, these blinds are a lifesaver.
- Renters: The non-permanent adhesive installation is perfect for rental properties where you can’t drill holes or make permanent alterations.
- Temporary Needs: Ideal for new homes awaiting permanent window treatments, guest rooms, or seasonal changes in decor.
- Kids’ Rooms: A fun and vibrant way to add color and pattern. Plus, if they get damaged, replacement is inexpensive and easy.
- Trying Out a Look: Want to see how a certain pattern or color looks on your windows before investing in expensive fabric or custom blinds? Wallpaper blinds are a low-commitment way to experiment.
- Quick Privacy Fixes: Perfect for instantly adding privacy to a bathroom or bedroom window.
More DIY Home Decor Inspiration
If you enjoyed crafting these budget-friendly wallpaper blinds, you’ll love exploring other creative home decor projects. Expanding your DIY skills allows you to personalize every corner of your living space without overspending. For another fantastic way to enhance your windows, be sure to check out this related tutorial:
RELATED: Easy Lined Back Tab Curtain Sewing Tutorial
Consider diving into projects like creating custom throw pillows, painting old furniture, or making decorative wall art. Each DIY endeavor not only saves money but also injects your unique personality into your home.
Conclusion: Stylish Savings with Homemade Blinds
Crafting your own DIY wallpaper blinds is more than just a home improvement project; it’s a testament to creativity, resourcefulness, and smart budgeting. In just a few simple steps, you can transform ordinary windows into stylish focal points, gaining privacy and light control without the hefty expense often associated with store-bought options. This project is perfect for beginners and seasoned crafters alike, offering immediate gratification and a tangible sense of accomplishment.
So, gather your materials, choose a wallpaper that sparks joy, and get ready to add a personalized touch to your home. The satisfaction of looking at your beautifully adorned windows, knowing you made those elegant, custom window treatments yourself, is truly priceless. Give this easy DIY a try and discover how simple it can be to achieve high-end style on a budget. Happy crafting!
*All images are credited to Clever Hacks via YouTube. Give her channel a visit and subscribe for more inspiring DIY ideas!