
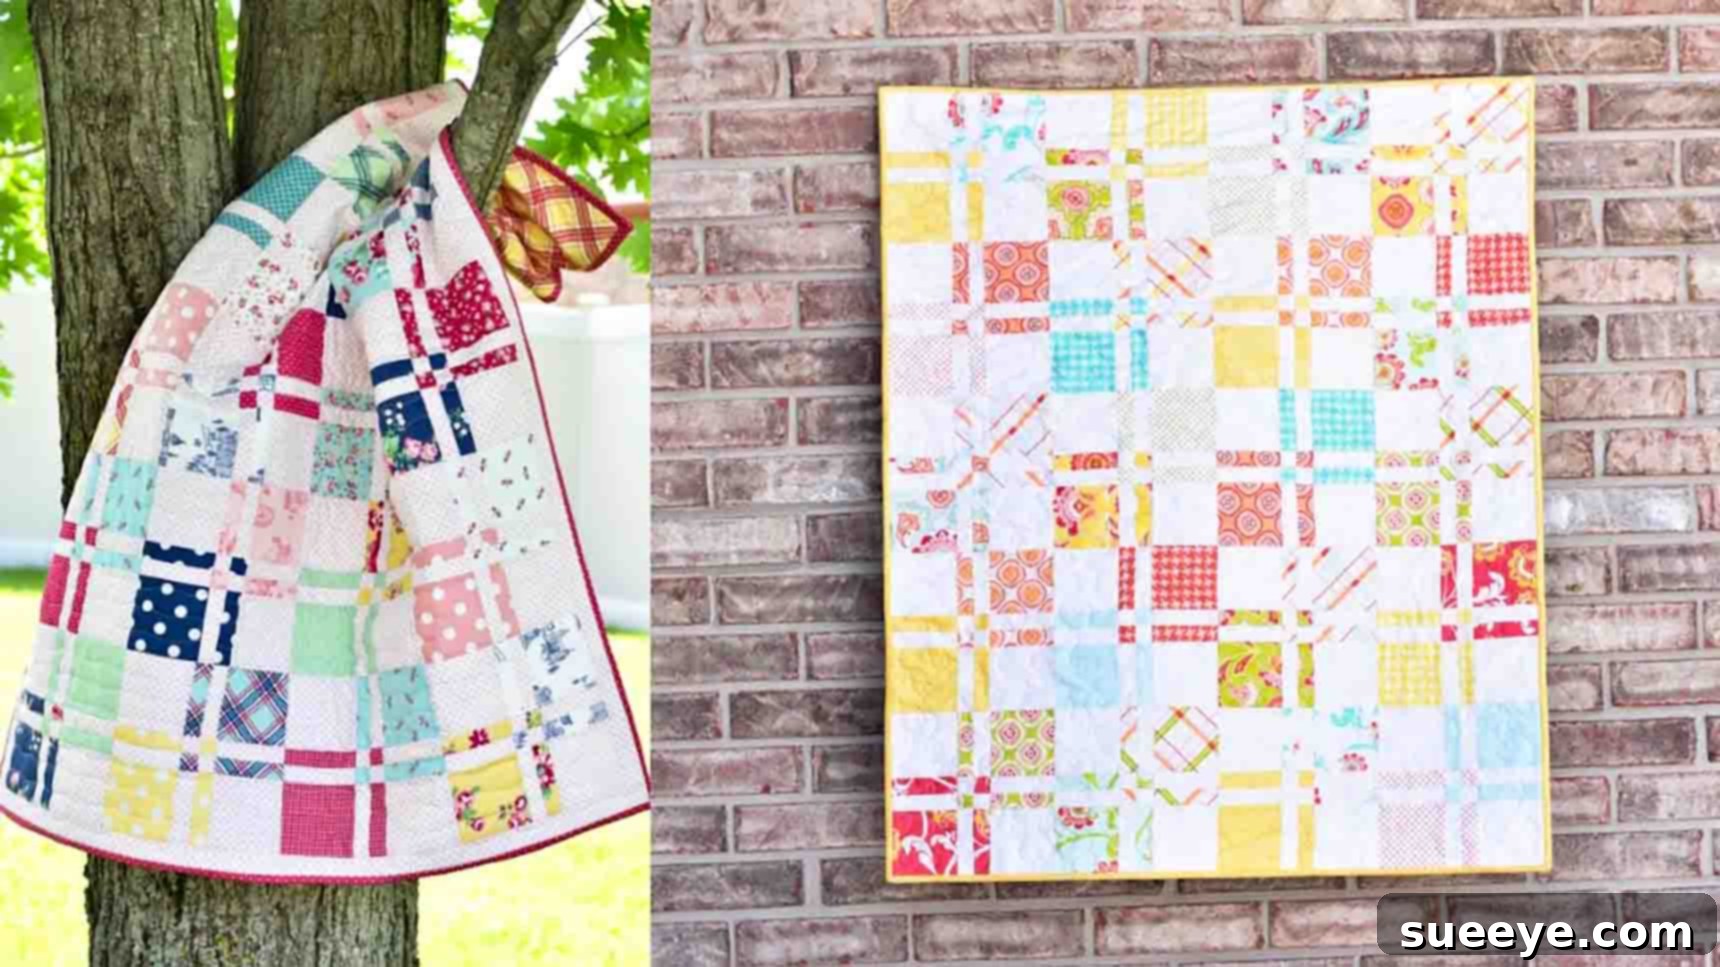
Master the Disappearing Four-Patch Quilt Block: A Beginner-Friendly Guide
Are you searching for a quilting project that’s both enjoyable and straightforward? Look no further than the Disappearing Four-Patch quilt block! This clever design offers an impressive visual effect with surprising simplicity, making it an ideal choice for quilters of all skill levels, especially beginners. If you’re new to quilting or simply want a quick and satisfying make, this block is a fantastic starting point. It’s a wonderful way to showcase your favorite fabrics, particularly pre-cut 5-inch squares, often found in charm packs. Inspired by the excellent tutorial from Material Girl Quilts on YouTube, this guide will walk you through every step to create your own stunning Disappearing Four-Patch quilt.
The beauty of the Disappearing Four-Patch lies in its deceptive complexity. You start with a simple four-patch unit, make a few strategic cuts, and then rearrange the pieces to create a completely new and intricate-looking block. This “disappearing” act transforms a basic grid into a dynamic design with secondary patterns emerging when multiple blocks are joined. Grab your preferred charm pack, fire up your sewing machine, and prepare to be amazed by how easily you can craft a beautiful and unique quilt.
Essential Materials for Your Disappearing Four-Patch Quilt
Gathering your materials before you begin ensures a smooth and enjoyable quilting experience. For a standard 32″ x 40″ baby quilt, which is a perfect size for a first project or a thoughtful gift, you’ll need the following:
For a 32″ x 40″ Baby Quilt:
- 1 – 5″ Charm Pack: A charm pack is a collection of 42 pre-cut 5-inch by 5-inch fabric squares, typically featuring a coordinated range of prints from a single fabric line. Using a charm pack eliminates the need for extensive fabric cutting, allowing you to jump straight into the fun of sewing. For this project, you’ll use these vibrant prints for your main blocks.
- 3/4 Yard Background Fabric: This fabric will provide contrast and help define the “disappearing” effect of your blocks. Choose a solid or a subtle tone-on-tone print that complements your charm pack. A light neutral like white, cream, or a pale gray often works beautifully, making the patterned squares pop.
- Rotary Cutter: An essential tool for precise and efficient fabric cutting. Ensure your blade is sharp for clean cuts.
- Quilting Ruler: A clear acrylic ruler, ideally 6.5″ x 12″ or larger, with accurate measurements and grid lines is crucial for making straight and consistent cuts.
- Rotating Mat (Optional but Recommended): A rotating cutting mat allows you to turn your fabric and block without repositioning yourself, making it easier and safer to achieve accurate cuts from all angles, especially during the “disappearing” cut.
- Sewing Machine: A functional sewing machine capable of a consistent 1/4-inch seam allowance.
- Thread: High-quality cotton thread that matches or blends with your fabrics. A neutral color like white or light gray is often versatile.
- Iron and Ironing Board: Proper pressing is just as important as sewing for crisp, flat quilt blocks.
- Fabric Scissors (Optional): For trimming threads or small adjustments.
- Pins or Fabric Clips: To hold fabric layers together securely while sewing.
Having these tools ready will streamline your quilting process, allowing you to focus on the creative aspects of bringing your Disappearing Four-Patch quilt to life.
Step-by-Step Guide to Crafting Your Disappearing Four-Patch Quilt Block
The magic of the Disappearing Four-Patch truly comes alive in its construction. Follow these detailed steps to create each block and assemble your quilt.
Step 1: Constructing the Basic Four-Patch Unit
The foundation of our “disappearing” block is a simple four-patch. Precision in this initial step is key to a beautiful finished product.
- Select Your Squares: For each individual block, you will need four 5-inch squares: select two print squares from your charm pack and two background squares from your background fabric.
- Arrange for Contrast: Lay out your four squares on your workspace. Position them so that the two print squares are on opposite corners (diagonally across from each other), and similarly, the two background squares are also on opposite corners. This creates a balanced visual appeal and ensures the “disappearing” effect works as intended.
- Sew Into Rows: Take the two squares from the top row and place them right sides together, then sew them along one edge using a consistent 1/4-inch seam allowance. Repeat this for the two squares in the bottom row. You will now have two separate two-square units.
- Pressing the Seams: After sewing each row, it’s crucial to press your seams. For these units, a common practice is to press the seams open, or press them towards the darker fabric to prevent “shadowing” of the seams through lighter fabrics. Smooth, flat seams are vital for accurate subsequent cuts and a neat final block.
- Join the Rows: Now, take your two sewn rows and place them right sides together, aligning the center seam carefully. Pin through the seam intersections to ensure they meet perfectly. Sew these two rows together using your 1/4-inch seam allowance.
- Final Press for the Four-Patch: After joining the rows to form a complete four-patch block, press this final seam. Again, pressing open or to one side (often the darker side, or in this case, you might press towards the outer edges to help with nesting later) will help your block lie flat. You now have a complete 8.5-inch unfinished four-patch block, ready for its transformation.
Step 2: The “Disappearing” Cut – Unleashing the Magic
This is where the magic happens and your simple four-patch unit transforms into something visually striking. Pay close attention to your measurements for precise results.
- Prepare for Cutting: Place your perfectly pressed four-patch block on your cutting mat. Ensure it is squared up and lies flat.
- Measure and Cut: Using your rotary cutter and ruler, you are going to make four strategic cuts. The instruction is to “cut 1 inch on every side of the sewn seams.” This means you will measure 1 inch away from each of the two central seams that crisscross your block. For clarity, if your central seams form a ‘+’ shape, you will cut 1 inch to the left of the vertical seam, 1 inch to the right of the vertical seam, 1 inch above the horizontal seam, and 1 inch below the horizontal seam. This will result in nine distinct pieces: four larger squares in the corners, four rectangular pieces in the middle of each side, and a small four-patch square in the very center.
- Maintain Accuracy: Use your ruler’s grid lines to ensure your cuts are perfectly parallel to the seams. A rotating mat is incredibly helpful here, allowing you to turn the block to make each cut without changing your body position, thus reducing the chance of error.
- Safety First: Always use a sharp rotary blade and keep your fingers away from the cutting path.
Step 3: Reassembling the Disappearing Block
Now that your block is in nine pieces, it’s time to rearrange them to reveal the new design.
- Identify the Pieces: You should have four larger corner squares (these were the original corners of your four-patch), four rectangular middle sections, and one tiny four-patch square in the center.
- The Rotation: Leave the four outside corner squares exactly where they are. They will remain in their original orientation. The trick is to rotate the internal pieces. Take each of the four rectangular sections and rotate them 180 degrees. Do the same for the tiny four-patch in the very center—rotate it 180 degrees. This seemingly small adjustment is what creates the unique Disappearing Four-Patch design.
- Sewing the New Block: Once all your pieces are rotated and laid out to your satisfaction, it’s time to sew them back together. Treat these nine pieces as you would a nine-patch block.
- Sew into Rows: Start by sewing the three pieces of the top row together, then the three pieces of the middle row, and finally the three pieces of the bottom row. Remember to maintain your precise 1/4-inch seam allowance.
- Pressing the Rows: After sewing each row, press the seams. For the top and bottom rows, it’s often helpful to press the seams outwards, towards the larger outside squares. For the center row, press the seams inwards, towards the tiny center four-patch. This alternating pressing technique (also known as “nesting” seams) will help reduce bulk and make it easier to align seams when joining the rows.
- Join the Rows: With your three rows pressed, place the top row and the middle row right sides together, aligning all the seams carefully and pinning at the intersections. Sew them together. Then, take this combined unit and place it right sides together with the bottom row, again aligning and pinning seams. Sew to complete your new Disappearing Four-Patch block.
- Final Press for the Block: Give your completed block one final, thorough press. For the seams joining the rows, pressing them open or towards the wider rows (the top and bottom sections) can help create a flatter block. You will now see the beautiful, intricate design that emerged from your simple cuts and rotations!
Step 4: Assembling Your Quilt Top
Once you’ve made all your individual blocks, the next exciting step is to assemble them into a cohesive quilt top.
- Block Quantity: For the 32″ x 40″ baby quilt, you will need to create a total of 20 Disappearing Four-Patch blocks using the steps above. This means repeating the process of selecting squares, creating the initial four-patch, making the “disappearing” cuts, and reassembling, 20 times.
- Layout Options: This is where you can truly personalize your quilt. Lay all 20 of your completed blocks out on a design wall or on the floor.
- Consistent Direction: You can lay all blocks facing the same direction, creating a uniform and orderly pattern.
- Rotating Blocks: A popular and visually dynamic method is to rotate every other block by 90 degrees. When you do this, it creates “little windows” or secondary patterns where the background squares of adjacent blocks meet, adding depth and interest to your quilt. Experiment with different rotations to see what visual effects you can achieve. You might rotate every other block within a row, or alternate rows completely.
Arrange your blocks into a grid of five rows with four blocks in each row. Step back and admire your layout, ensuring you are happy with the arrangement before you begin sewing.
- Sewing Blocks into Rows: Once your layout is finalized, pick up the blocks from your first row in order. Place the first two blocks right sides together, align carefully, and sew them with a 1/4-inch seam. Continue adding blocks to form your first complete row. Repeat this process for all five rows.
- Pressing Row Seams: After sewing each row, press the seams. A critical technique here for neat quilt tops is to press the seams of alternating rows in opposite directions. For example, press the seams in Row 1 towards the left, seams in Row 2 towards the right, seams in Row 3 towards the left, and so on. This allows the seams to “nest” or butt up against each other when you join the rows, creating perfectly matched intersections and a flatter quilt.
- Joining the Rows: With your rows pressed, it’s time to join them to form the complete quilt top. Place Row 1 and Row 2 right sides together, carefully aligning the nested seams and pinning them securely. Sew them together with a 1/4-inch seam. Continue adding the remaining rows in the same manner.
- Final Pressing of the Quilt Top: Once all rows are joined, give your entire quilt top a final, thorough press. This step is essential for setting all the seams and ensuring your quilt top is flat and square, ready for the next stages of quilting.
Beyond the Quilt Top: Finishing Your Quilt
While this tutorial focuses on creating the quilt top, a finished quilt also includes batting, backing, and binding:
- Batting: The middle layer of your quilt, providing warmth and dimension.
- Backing Fabric: The fabric for the back of your quilt.
- Basting: Temporarily securing the three layers (quilt top, batting, backing) together using pins, spray, or thread.
- Quilting: Stitching through all three layers to hold them together and add texture. This can be done by hand or machine, with simple straight lines or intricate designs.
- Binding: The fabric strip sewn around the edges of the quilt to give it a neat, durable finish.
Tips for Quilting Success with the Disappearing Four-Patch
To ensure your Disappearing Four-Patch quilt project is as successful and enjoyable as possible, consider these tips:
- Accurate Seam Allowance: The 1/4-inch seam allowance is paramount in quilting. Consistent seams ensure your blocks will be the correct size and fit together perfectly. If your seam allowance varies, your blocks will be distorted.
- Press, Don’t Iron: When pressing seams, use an up-and-down motion with your iron, rather than sliding it across the fabric. This prevents stretching and distorting your fabric pieces.
- Sharp Tools are Key: A sharp rotary blade and good quality pins make a significant difference in precision and ease of work.
- Pre-wash Fabrics (Optional): Some quilters prefer to pre-wash fabrics to pre-shrink them and check for colorfastness. This is a personal preference, but if you do pre-wash, remember to do so for all fabrics in your quilt to ensure they shrink consistently.
- Take Your Time: Quilting is a journey, not a race. Enjoy the process, don’t rush, and appreciate each step.
- Practice Cuts: If you’re unsure about the “disappearing” cuts, consider practicing on a scrap four-patch block first to get a feel for the measurements.
Creative Variations and Personalization
The Disappearing Four-Patch is incredibly versatile. Once you master the basic block, feel free to experiment:
- Fabric Choices: Play with different contrasts. Use all solids for a modern look, or mix batiks, florals, or themed prints. The background fabric can also be a print to add more texture.
- Size Variations: Start with larger initial squares (e.g., 6-inch or 10-inch “layer cake” squares) to create bigger blocks and a larger quilt with fewer blocks. Adjust your cutting measurements (e.g., cut 1.5 inches from the seams instead of 1 inch) to explore different visual outcomes.
- Color Placement: Instead of alternating print and background, try using four different prints, or two light prints and two dark prints, for your initial four-patch to see how the “disappearing” effect changes.
- Sashing and Borders: Add sashing (strips of fabric between blocks or rows) or borders around your quilt top to frame your blocks and add extra dimension.
Your Disappearing Four-Patch Quilt Awaits!
Congratulations! You now have a comprehensive guide to creating a beautiful Disappearing Four-Patch quilt block. This project is a testament to how simple techniques, combined with thoughtful design, can yield truly spectacular results. The process of cutting and reassembling creates a visually engaging pattern that looks much more complicated than it actually is, making it a perfect confidence-builder for new quilters.
Whether you’re making a cozy baby quilt, a vibrant lap quilt, or even a decorative wall hanging, the Disappearing Four-Patch block will bring charm and unique character to your creation. Don’t hesitate to refer back to the Material Girl Quilts video tutorial for a visual aid as you work through each step. Embrace the process, enjoy the transformation of your fabrics, and delight in the beautiful quilt you’ve made with your own hands. Happy quilting!