
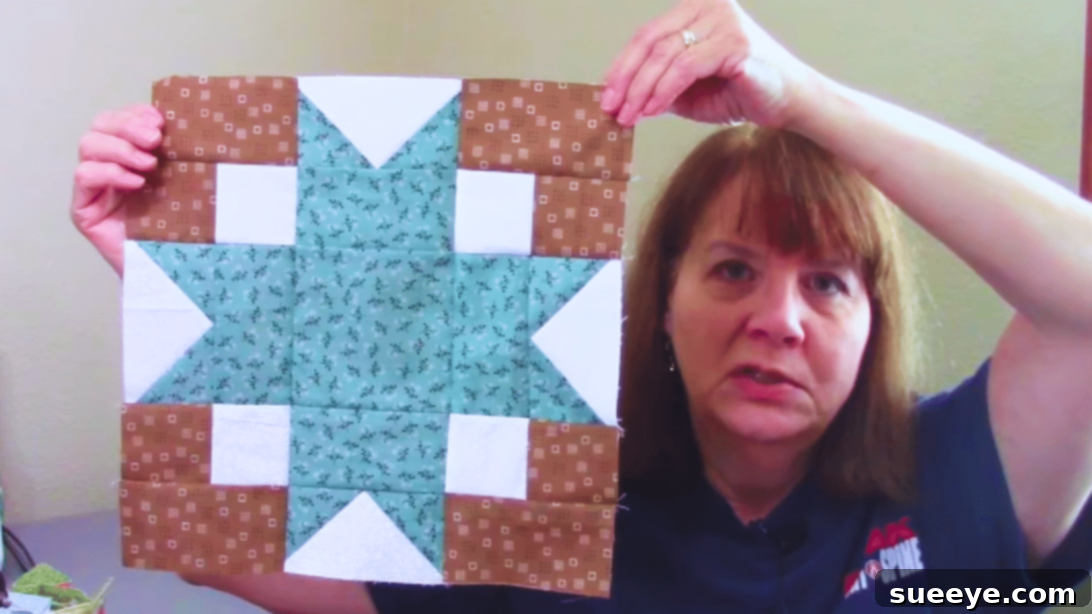
Easy Glory Boxes Quilt Block Tutorial: A Beginner’s Guide to Flying Geese
Embark on a delightful quilting journey with the captivating Glory Boxes Quilt Block. This charming design, expertly presented by Sunrise Quilt Studio on YouTube, serves as an exceptional foundation for aspiring quilters eager to hone their skills. At its heart, this block features the widely loved “flying geese” units, a fundamental technique that is surprisingly simple to master and incredibly versatile. The beauty of this project lies in its adaptability; you’re free to unleash your creativity by selecting any fabrics that speak to your personal style, making each creation uniquely yours.
For those new to the world of quilting, or anyone looking to build confidence in their piecing abilities, this tutorial is an invaluable resource. It comes complete with a complimentary pattern, guiding you through each stage with clarity. The finished block measures a satisfying 12 inches, an ideal size that makes it perfect for a standalone project like a pillow cover, a striking centerpiece for a larger quilt, or as a practice piece to expand your repertoire. Prepare to immerse yourself in the art of quilting and discover the immense satisfaction of creating something beautiful with your own hands.
RELATED: Bento Box Quilt Block Tutorial for Beginners
Discover the Joy of Quilting with the Glory Boxes Block
The Glory Boxes Quilt Block stands out as a fantastic entry point into the world of quilting. Its design, while visually engaging, relies on straightforward techniques that are crucial for building a solid quilting foundation. Beginners will find themselves quickly grasping concepts like accurate cutting, consistent seam allowances, and precise pressing – all fundamental skills that will serve them well in future projects. The satisfaction of seeing your fabric pieces transform into a cohesive and intricate design is truly rewarding, and this block offers that gratification without overwhelming complexity.
At the core of the Glory Boxes design are the iconic “flying geese” units. These dynamic components are essentially rectangles with smaller triangles stitched onto their corners, creating the illusion of geese flying in formation. They are incredibly popular in quilting for their versatility, allowing for countless design variations and patterns. Learning to construct these units accurately is a milestone for any new quilter, and this tutorial breaks down the process into manageable, easy-to-follow steps.
Essential Materials for Your Glory Boxes Quilt Block Journey
Before you dive into stitching, gathering the right tools and materials is paramount to a smooth and enjoyable quilting experience. Quality materials not only make the process easier but also contribute significantly to the longevity and beauty of your finished quilt block. Here’s a detailed look at everything you’ll need for your Glory Boxes Quilt Block:
- Two Contrasting Fabrics: Choose 100% cotton quilting fabric for best results. Select colors and prints that complement each other but offer enough contrast to make the “boxes” and “geese” stand out. A lighter and a darker fabric often work wonderfully together.
- Background Fabric: This fabric will provide the canvas against which your main design elements shine. Opt for a solid or a subtle tone-on-tone print that doesn’t compete with your contrasting fabrics. Again, 100% cotton is recommended.
- Marking Pen, Pencil, or Chalk: Essential for accurately drawing diagonal lines on your fabric squares. Make sure your chosen marker is easily visible on your fabric and will either wash out or disappear with heat.
- Quilting Ruler: A clear acrylic ruler with precise measurements is indispensable for accurate cutting. A ruler at least 6″ x 12″ or larger is highly recommended for squaring up fabric and cutting strips.
- Scissors or Rotary Cutter and a Cutting Mat: While sharp fabric scissors are always useful, a rotary cutter with a self-healing cutting mat will revolutionize your cutting accuracy and speed. Ensure your rotary blade is sharp for clean cuts.
- Fabric Pins: High-quality, sharp pins are crucial for holding fabric layers together securely before stitching. Glass head pins are popular as they can withstand iron heat.
- Needle and Thread: Use a good quality 100% cotton thread that matches or blends with your fabrics. A universal sewing machine needle (size 80/12 or 90/14) is usually sufficient.
- Iron, for Pressing: A good iron is a quilter’s best friend. Pressing seams correctly helps your blocks lie flat and ensures greater accuracy when joining pieces. A dry iron or steam iron can be used, but consistent heat is key.
- Sewing Machine: Any basic sewing machine capable of a straight stitch will work. Ensure it’s clean, oiled, and has a fresh needle for optimal performance. A quarter-inch presser foot can be incredibly helpful for consistent seam allowances.
- Pattern (Click here to download the pattern): This free pattern from Sunrise Quilt Studio will provide all the precise cutting dimensions and block assembly diagrams you need. Always download and print your pattern before starting.
Step-by-Step: Crafting Your Glory Boxes Quilt Block
Now that you have all your materials ready, let’s begin the exciting process of bringing your Glory Boxes Quilt Block to life. Follow these detailed steps carefully, paying close attention to accuracy and pressing, as these are the hallmarks of a beautifully finished quilt block.
Step 1: Precision Cutting and Initial Marking
Begin by cutting all your fabric pieces to the exact dimensions specified in the free pattern. Accuracy in this initial stage is critical, as it directly impacts how well your pieces will fit together later. Once cut, take the fabric squares designated for your flying geese units. On the back (wrong) side of these squares, use your marking pen, pencil, or chalk to draw a diagonal line from one corner to the opposite corner. This line will serve as your stitching guide, ensuring perfectly aligned triangles.
Step 2: Mastering the Flying Geese Units
To construct your flying geese, place one of the marked squares right sides together onto one end of a rectangular fabric piece. Ensure their edges are perfectly aligned. Stitch along the diagonal line you’ve just drawn. After stitching, carefully trim off the excess fabric, leaving a ¼-inch seam allowance from your stitch line. Then, press the seam open or towards the darker fabric. Pressing towards the darker fabric helps prevent the seam allowance from showing through lighter fabrics. Repeat this process for the other end of the rectangle using another marked square, forming a complete flying geese unit. Consistency in your ¼-inch seam allowance here is paramount for accurate block assembly.
Step 3: Assembling Your Quilt Block Components
With your flying geese units complete, it’s time to start building larger sections of your block. Take each flying geese unit and pair it with a print rectangle (as indicated in the pattern). Place these two pieces right sides together, aligning their edges carefully. Stitch them together along one of the long sides, making sure that the points of the triangles on your flying geese unit are facing the correct direction as per the pattern. As you join each pair, stop to press your seams. Pressing as you go helps to keep your fabric flat and prevents distortion, contributing to a crisp, professional finish.
Step 4: Integrating Squares and Rectangles for Pattern Definition
Next, you’ll work with the remaining squares and rectangles to define the “box” elements of your block. Take a print square and a background square, placing them right sides together. Stitch them along one side with a consistent ¼-inch seam. Press the seam open or to the side, whichever creates the flattest result. Repeat this for any remaining individual squares. Now, pair each of these newly formed units (print square + background square) with a print rectangle, again placing them right sides together and stitching them along one side. Press these seams carefully after each join to maintain accuracy and flatness.
Step 5: Final Assembly and Pressing for a Professional Finish
At this stage, all your individual components and sub-units are ready to be assembled into the complete 12-inch Glory Boxes Quilt Block. Refer to the video tutorial and the pattern for the precise layout. Arrange all your stitched pieces according to the diagram. Once satisfied with the arrangement, begin stitching the pieces together row by row. Carefully align the seams between units within each row, often by “nesting” them (pressing adjacent seams in opposite directions so they interlock) to ensure precise points and intersections. After completing each row, press the seams. Finally, join the completed rows to each other, again taking care to match up all the intersecting seams. Give your finished block a final, thorough press to flatten everything out perfectly.
Pro Tips for Beginner Quilters
To ensure your quilting journey is as smooth and successful as possible, keep these invaluable tips in mind, especially when working on projects like the Glory Boxes Quilt Block:
- Master the ¼-inch Seam Allowance: This is the golden rule of quilting. A consistent ¼-inch seam allowance is crucial for ensuring all your pieces fit together perfectly and your blocks measure up to size. Consider investing in a ¼-inch presser foot for your sewing machine.
- Press, Don’t Iron: While often used interchangeably, in quilting, “pressing” involves lifting and placing the iron down, rather than sliding it. This prevents stretching and distorting your fabric pieces. Pressing seams properly is key to flat blocks.
- Chain Piecing for Efficiency: To save time and thread when making multiple identical units (like flying geese), chain piece them! Stitch one unit, then, without cutting the thread, feed the next unit directly under the needle. This creates a chain of stitched units.
- Accuracy is Your Best Friend: “Measure twice, cut once” is a mantra for a reason. Take your time with cutting and marking. Small inaccuracies can compound quickly, leading to “wonky” blocks.
- Use Good Quality Fabric: 100% cotton quilting fabric is recommended because it’s stable, easy to work with, and holds up well over time. Avoid stretchy or slippery fabrics as a beginner.
- Patience and Practice: Quilting is a skill that improves with practice. Don’t be discouraged by imperfections; every quilter, regardless of experience, makes mistakes. Embrace the process and enjoy the learning curve.
- Test Your Stitches: Before sewing your main project, always do a test stitch on a scrap piece of fabric to check your tension and stitch length.
Beyond the Block: What’s Next for Your Glory Boxes Creation?
Completing your first 12-inch Glory Boxes Quilt Block is a significant achievement! But the fun doesn’t have to stop there. A single block can be transformed into a beautiful project all on its own:
- Pillow Cover: Back your block with coordinating fabric, add a zipper or an envelope closure, and create a custom throw pillow.
- Tote Bag Panel: Use your block as a stunning front panel for a handmade tote bag.
- Wall Hanging: Add a simple border, quilt it, and bind it to create a lovely small wall hanging or mini quilt.
- Table Topper: A single block or a set of four arranged in a grid can make an elegant table topper.
If you’re feeling ambitious, this block is also a fantastic component for a larger quilt. Imagine multiple Glory Boxes blocks combined with sashing strips (fabric strips sewn between blocks) and borders to create a visually dynamic throw or bed quilt. You could create several blocks in varying color combinations to achieve a truly unique and personalized quilt top.
Unleash Your Creativity: Design Inspirations
The Glory Boxes Quilt Block, with its strong geometric lines and the striking movement of its flying geese, offers endless possibilities for customization. Don’t hesitate to experiment with different fabric choices to drastically alter the block’s appearance:
- Color Palettes: Try a monochromatic scheme using various shades of one color for a subtle, sophisticated look. Alternatively, go bold with complementary colors for a vibrant, eye-catching effect. Scrappy versions, utilizing a mix of fabrics from your stash, can create a charming, eclectic feel.
- Print Scale: Experiment with mixing large-scale prints with small-scale prints or solids. The interplay of different print sizes can add depth and interest to your block.
- Theme Fabrics: If you’re making a quilt for a specific occasion or person, choose fabrics with a theme – florals for a garden lover, novelty prints for a child, or seasonal prints for holiday decor.
- Arrangement: If you make multiple blocks, try rotating them or arranging them in different layouts before sewing them together. This can reveal unexpected secondary patterns and designs.
The beauty of quilting lies in its ability to blend tradition with personal expression. The Glory Boxes Quilt Block is an excellent canvas for both learning fundamental skills and letting your unique creative vision shine through.
We hope this comprehensive tutorial inspires you to pick up your needle and thread. The journey of creating a quilt block, from selecting fabrics to the final stitch, is incredibly rewarding. With the clear instructions from Sunrise Quilt Studio and these detailed tips, you’re well-equipped to create a stunning Glory Boxes Quilt Block. Enjoy the process, celebrate your progress, and take pride in your beautiful handmade creation!
*All these amazing images and the original tutorial are thanks to Sunrise Quilt Studio via YouTube. We highly recommend visiting her channel for more fantastic quilting videos and inspiration!