
After a demanding day, the universal desire is for profound relaxation and a night of truly restorative sleep. Yet, for many, the elusive promise of deep slumber remains just out of reach. Often, the culprit is accumulated tension and stiffness in our muscles, a natural consequence of daily activities and stress. What if a few simple, gentle techniques could transform your evenings, guiding you effortlessly into the peaceful embrace of sleep? Inspired by the practical wisdom of BRIGHT SIDE, we’re unveiling four incredibly effective tricks designed to melt away physical tension, soothe your mind, and help you sleep like a baby in no time.
The Quest for Restful Sleep: Unwinding Your Body and Mind
Sleep is not merely a pause in our day; it’s a vital, active process crucial for our physical and mental well-being. A good night’s sleep recharges our batteries, repairs our bodies, consolidates memories, and regulates our emotions. Unfortunately, modern life often disrupts this essential cycle, leading to chronic fatigue, irritability, and decreased productivity. Muscle stiffness, a common complaint, is often a physical manifestation of accumulated stress and tension, making it incredibly difficult to truly relax and drift off. Fortunately, incorporating targeted relaxation techniques into your evening routine can make a dramatic difference. These methods focus on gentle stretches and mindful breathing, signaling to your body and mind that it’s time to let go and prepare for restful slumber.
Four Simple Tricks to Achieve Baby-Like Sleep (Inspired by BRIGHT SIDE)
These four accessible techniques, often rooted in gentle yoga and relaxation practices, require no special equipment and can be performed right in the comfort of your home. They are designed to address common obstacles to sleep, from physical discomfort to a racing mind, offering a holistic approach to unwinding before bed.
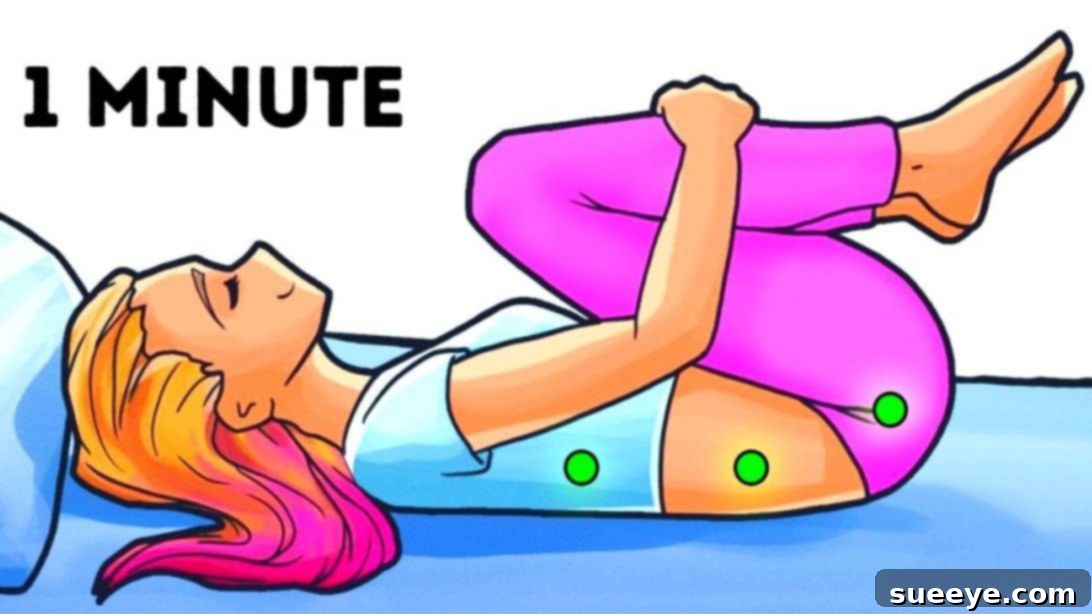
1. Wind-Relieving Pose (Pawanmuktasana) – Gentle Relief for Your Core
The Wind-Relieving Pose, or Pawanmuktasana, is a remarkably simple yet profoundly effective yoga posture known for its ability to bring comfort and release to the entire spine, particularly targeting the often-stressed lower back and the often-tight thighs. Beyond its musculoskeletal benefits, this pose is also celebrated for its gentle massage of the abdominal organs, which can aid in digestion and regulate intestinal function, a crucial factor for comfort when trying to sleep.
Benefits of the Wind-Relieving Pose:
- Spinal Decompression: Gently stretches and decompresses the lower spine, alleviating pressure and stiffness.
- Lower Back Pain Relief: Offers significant relief for mild to moderate lower back discomfort by releasing tension in the lumbar region.
- Hip Flexor Stretch: Stretches the hip flexors and inner thighs, which can become tight from prolonged sitting.
- Digestive Aid: The gentle compression of the abdomen stimulates internal organs, potentially easing bloating, gas, and constipation.
- Calming Effect: The focus on breath and the gentle physical pressure can activate the parasympathetic nervous system, promoting relaxation.
Instructions for Wind-Relieving Pose:
- Starting Position: Lie flat on your back on a comfortable surface, such as a yoga mat or your bed. Allow your body to relax completely, letting your arms rest by your sides and your legs extend naturally.
- Bend Knees: As you inhale deeply, gently bend both knees, bringing your feet flat onto the floor near your buttocks.
- Embrace Your Knees: Reach your hands forward and wrap them around your knees, interlocking your fingers or grasping opposite elbows if comfortable.
- Gentle Press: On the exhale, slowly and gently hug your knees towards your chest, pressing them lightly against your stomach. Feel the gentle compression in your abdomen and the stretch in your lower back.
- Breathe Deeply: While holding this position, close your eyes and focus on your breath. Inhale deeply, feeling your belly expand against your thighs, and exhale slowly, sinking deeper into the stretch.
- Hold and Release: Remain in this soothing position for 8 to 10 deep breaths, which typically takes about 1 minute. After the desired duration, gently release your hands, extend your legs back to the starting position, and rest for a few moments, observing the sensations in your body.
For an added soothing sensation, you can gently rock from side to side while holding your knees, providing a gentle massage to your lower back. This pose is an excellent way to release the day’s physical baggage and prepare your body for a night of undisturbed sleep.
2. Feet on the Wall (Viparita Karani) – Rejuvenate Your Legs and Mind
The Legs-Up-The-Wall Pose, known in yoga as Viparita Karani, is a simple yet incredibly potent restorative posture. This pose is revered for its ability to deeply rest the legs and lower back, providing profound relief from fatigue and swelling. It encourages blood flow from the legs back towards the heart and head, gently reversing the effects of gravity on the lower body. Furthermore, by elevating the legs, it creates a subtle inversion that calms the nervous system, allowing your lungs to be filled more efficiently with oxygen and promoting a state of tranquility essential for sleep.
Benefits of Feet on the Wall:
- Improved Circulation: Helps to drain stagnant fluid from the legs and feet, reducing swelling and fatigue.
- Relieves Lower Back Strain: Gently stretches the hamstrings and provides a passive stretch for the lower back.
- Calms the Nervous System: Activates the parasympathetic nervous system, promoting relaxation, reducing anxiety, and alleviating insomnia.
- Gentle Inversion: Offers the benefits of an inversion (like increased blood flow to the head) without putting strain on the neck or head.
- Restores Energy: Often described as rejuvenating, this pose can help alleviate symptoms of mild depression and headaches.
Instructions for Feet on the Wall:
- Setup Your Space: Begin by placing a folded pillow, a bolster, or a rolled-up blanket next to a wall. If using the end of your bed, position it against the headboard or footboard. This support will be placed under your lower back or sacrum.
- Getting into Position: Sit on the cushion with one hip as close to the wall as possible. Then, gently pivot your body, swinging your legs up the wall as you lie back. Your buttocks should be as close to the wall (or the end of the bed) as is comfortable, resting on the cushion.
- Find Comfort: Adjust your position so that your lower back feels supported and comfortable. Your legs should be extended straight up the wall, or slightly bent at the knees if that feels better for your hamstrings.
- Arm Placement: Allow your arms to spread out to your sides, palms facing upwards, signifying openness and receptivity.
- Relax and Breathe: Close your eyes if comfortable and surrender to the pose. Relax your entire body, from your facial muscles to your toes. Breathe calmly and deeply, allowing each exhale to draw you further into relaxation.
- Hold Duration: Stay in this restorative position for approximately 1 to 2 minutes initially, gradually increasing the duration as you become more comfortable, up to 5-10 minutes.
This pose is a perfect antidote to tired legs and an overactive mind, making it an ideal pre-sleep ritual.
3. Gentle Wave Exercises – Releasing Full-Body Tension
The “Wave Exercises” are a series of subtle, rhythmic movements designed to gently release accumulated tension throughout the body, particularly focusing on the spine, hips, neck, and shoulders. Unlike more vigorous stretches, these exercises emphasize fluidity and gentle oscillation, mimicking the calming motion of waves. This approach helps to lubricate joints, improve circulation, and activate a sense of inner calm, preparing both your physical and mental state for a peaceful transition into sleep.
Benefits of Gentle Wave Exercises:
- Release Spinal Stiffness: Gentle rocking motions help to mobilize the vertebrae and relieve tension along the entire spine.
- Hip and Pelvic Release: Lateral movements of the legs and hips can loosen tight hip flexors and promote mobility in the pelvic region.
- Neck and Shoulder Relaxation: Coordinated head movements, when done gently, can alleviate neck stiffness and tension that often accumulates during the day.
- Mind-Body Connection: The rhythmic nature of the exercises encourages mindfulness, drawing your attention to bodily sensations and away from daily worries.
- Improved Circulation: Gentle movement enhances blood flow without strenuous effort, aiding in muscle recovery and overall relaxation.
Instructions for Gentle Wave Exercises:
Step 1: Supine Waves (Lying on Your Back)
- Setup: Lie flat on your back on a comfortable surface. Place a small, rolled-up towel or thin cushion under your neck for support, and another under the natural curve of your lower back (waist area). This provides gentle lumbar and cervical support.
- Leg Movement: Keeping your legs relaxed, gently swing your feet from one side to the other. Imagine your feet are gently swaying like pendulums.
- Head Movement: Synchronize your head movement with your feet. As your feet swing to the right, gently and slowly turn your head to the left. As your feet swing to the left, turn your head to the right.
- Key Focus: The movement should be fluid, gentle, and entirely without strain on your back or neck. Do not force the range of motion. Relax your jaw, shoulders, and hips completely.
- Duration: Continue this gentle, rhythmic “wave” motion for about 1 minute, focusing on deep, calming breaths throughout.
Step 2: Prone Waves (Lying on Your Stomach)
- Setup: Carefully turn over to lie on your stomach. Place a soft pillow or a folded towel under your forehead to keep your neck in a neutral and comfortable position. Your arms can rest comfortably at your sides, or bent with your hands supporting your head if preferred. Your toes should be resting on the bed or floor.
- Leg Movement: With your upper body relaxed and your head supported, gently shake or sway your feet from side to side. Allow the movement to originate from your hips, creating a subtle, wave-like motion through your legs and lower body.
- Key Focus: Ensure your entire body remains as relaxed as possible. The movement should be gentle and effortless, not forced. Focus on releasing any tension in your hips, glutes, and lower back with each sway.
- Duration: Perform this gentle shaking motion for approximately 1 minute.
These wave exercises are remarkably effective for releasing superficial and deep-seated tension, promoting a sense of lightness and freedom in the body, which is highly conducive to falling asleep.
4. Shavasana (Corpse Pose) – The Ultimate Relaxation
Shavasana, or Corpse Pose, is often considered the most important pose in a yoga practice, serving as the ultimate relaxation. It’s not just about lying down; it’s an active state of conscious relaxation that allows your body and mind to fully absorb the benefits of the preceding exercises and prepare for a deep, restorative sleep. This pose effectively reduces stress and anxiety, calms the nervous system, and promotes complete physical and mental rest.
Benefits of Shavasana:
- Deep Relaxation: Facilitates complete physical and mental relaxation, easing muscle tension and calming an overactive mind.
- Stress and Anxiety Reduction: Helps to lower cortisol levels, reducing feelings of stress and anxiety.
- Improved Sleep Quality: By calming the nervous system, it prepares the body for a deeper, more restorative sleep cycle.
- Blood Pressure Regulation: Can help to lower high blood pressure and promote cardiovascular health.
- Mind-Body Integration: Allows the body to integrate the physical and mental benefits of any preceding exercises or activities.
Instructions for Shavasana:
- Setup: Lie down on your back on a firm yet comfortable surface, such as your bed or a yoga mat.
- Body Alignment: Slightly spread your legs, allowing your feet to fall open naturally to the sides. Let your arms rest comfortably by your sides, a few inches away from your torso, with your palms facing upwards. This open posture signifies receptivity and release.
- Head and Neck Support: Place a small, folded towel or a thin, flat cushion under your head and neck. This support helps maintain the natural curve of your cervical spine and ensures maximum comfort, preventing strain.
- Gradual Relaxation: Begin to relax your body gradually, starting from your toes and moving all the way up to the crown of your head. Pay attention to each body part, consciously releasing any tension you might be holding. Soften your jaw, relax your tongue, release the muscles around your eyes.
- Breathing Practice: Focus on your breath. Begin to count 20 respiratory cycles, gradually prolonging both your inhales and your exhales. Aim for smooth, effortless breaths. Feel your belly rise with each inhale and gently fall with each exhale. The goal is to make your breath as subtle and quiet as possible.
- Surrender: Once you’ve completed your breath cycles, allow your breath to return to its natural rhythm. Let go of any mental effort. Allow yourself to completely surrender to the pose, resting in stillness and peace.
Shavasana is your final gateway to profound relaxation. Even a few minutes in this pose can profoundly impact your ability to fall asleep and stay asleep throughout the night.
Beyond the Poses: Creating Your Ideal Sleep Sanctuary
While these four techniques offer powerful immediate relief, cultivating a truly restorative sleep experience often involves optimizing your entire bedtime routine and environment. Think of your bedroom as a sanctuary dedicated solely to rest and rejuvenation. Here are additional tips to enhance your journey to better sleep:
- Consistent Sleep Schedule: Go to bed and wake up at roughly the same time every day, even on weekends. This helps regulate your body’s natural sleep-wake cycle (circadian rhythm).
- Optimize Your Bedroom Environment: Ensure your bedroom is dark, quiet, and cool. Blackout curtains, earplugs, and a comfortable room temperature (ideally between 60-67°F or 15-19°C) can make a significant difference.
- Limit Screen Time Before Bed: The blue light emitted from phones, tablets, and computers can disrupt melatonin production, a hormone essential for sleep. Aim to put away screens at least an hour before bedtime.
- Mindful Eating and Drinking: Avoid heavy meals, excessive caffeine, and alcohol close to bedtime. While alcohol might initially make you feel drowsy, it can severely disrupt sleep quality later in the night.
- Establish a Pre-Sleep Routine: Engage in calming activities in the hour leading up to sleep. This could include reading a physical book, taking a warm bath or shower, listening to soothing music, or practicing light stretching (like the poses mentioned above).
- Manage Stress: Implement stress-reducing practices throughout your day, such as meditation, journaling, or spending time in nature. Reducing overall stress levels makes it easier to relax at night.
The Journey to Better Sleep Starts Tonight
The promise of sleeping like a baby—deeply, peacefully, and without interruption—is not an unreachable dream. By incorporating these four simple yet incredibly powerful techniques into your daily routine, you can actively reverse the effects of daily stress and muscle tension that often plague our nights. From the spinal relief of the Wind-Relieving Pose to the rejuvenating calm of Feet on the Wall, the tension-melting Wave Exercises, and the ultimate surrender of Shavasana, each step guides you closer to profound relaxation. Consistency is your most powerful ally on this journey. Try these tricks tonight, commit to making them a regular part of your evening ritual, and prepare to awaken feeling refreshed, revitalized, and ready to embrace a new day with renewed energy. Your best sleep awaits.