
Effective DIY Home Remedies: 8 Fast and Easy Ways to Unclog Drains Quickly and Safely
A persistent drain clog can be one of the most frustrating household nuisances, disrupting daily routines and sometimes leading to unpleasant odors. Whether it’s a slow-draining sink or a completely blocked shower, tackling these issues promptly is key. Before calling a professional plumber, many common drain blockages can be resolved with simple, inexpensive, and highly effective DIY methods using items you likely already have at home. This comprehensive guide will walk you through eight proven techniques that can clear your drains in minutes to an hour, saving you time, money, and stress. Learn these essential tricks, inspired by experts like Joy Home Remedies, to keep your plumbing flowing freely.
Drain clogs typically occur due to a buildup of various substances over time. In kitchen sinks, grease, food particles, and soap scum are the primary culprits. Bathroom drains, on the other hand, often fall victim to hair, soap residue, and dental floss. Regardless of the cause, a blocked drain can lead to overflowing sinks, unpleasant smells, and even potential pipe damage if left unaddressed. Fortunately, these home remedies offer a fantastic first line of defense, empowering you to handle minor to moderate clogs with confidence and ease.
Essential Materials for DIY Drain Unclogging
Before you begin, gather these common household items. Having them on hand will ensure you’re prepared for any method you choose.
- Boiling water
- Liquid dish soap
- Baking soda
- White vinegar
- Table salt
- Hydrogen peroxide
- Coca-Cola (regular, not diet)
- Plunger (cup-style for sinks)
- Wire coat hanger
- Duct tape
- Rubber gloves
- Bucket or pail
- Old towels
Step-by-Step DIY Drain Unclogging Methods
1. The Boiling Water and Dish Soap Power Flush
This is often the simplest and least expensive starting point for many clogs, particularly those caused by grease or fatty deposits. The heat from the boiling water helps to melt grease, while the dish soap acts as a lubricant and breaks down the fatty substances, allowing them to wash away.
How to do it:
- Bring approximately 2 liters (about 8 cups) of water to a rolling boil.
- Once boiling, carefully add a couple of teaspoons of liquid dish soap to the hot water. The soap helps emulsify grease.
- Slowly and carefully pour the hot, soapy water directly down the drain. Pouring it slowly allows the hot water to work on the clog rather than just rushing over it.
- Allow the mixture to sit for 15-20 minutes, giving it time to break down the blockage.
- After waiting, flush the drain with hot tap water for a few minutes to see if the clog has cleared.
Tips and Warnings: This method works exceptionally well on grease clogs. However, exercise caution if you have plastic PVC pipes, as extremely hot boiling water can potentially damage or warp them over time. In such cases, use very hot tap water instead of fully boiling water. You may need to repeat this process a few times for the full effect.
2. The Fizzing Power of Baking Soda and Vinegar
This classic home remedy creates a potent chemical reaction that can effectively dislodge grime, hair, and soap scum. The fizzing action helps to break apart and lift stubborn blockages.
How to do it:
- Remove any standing water from the sink.
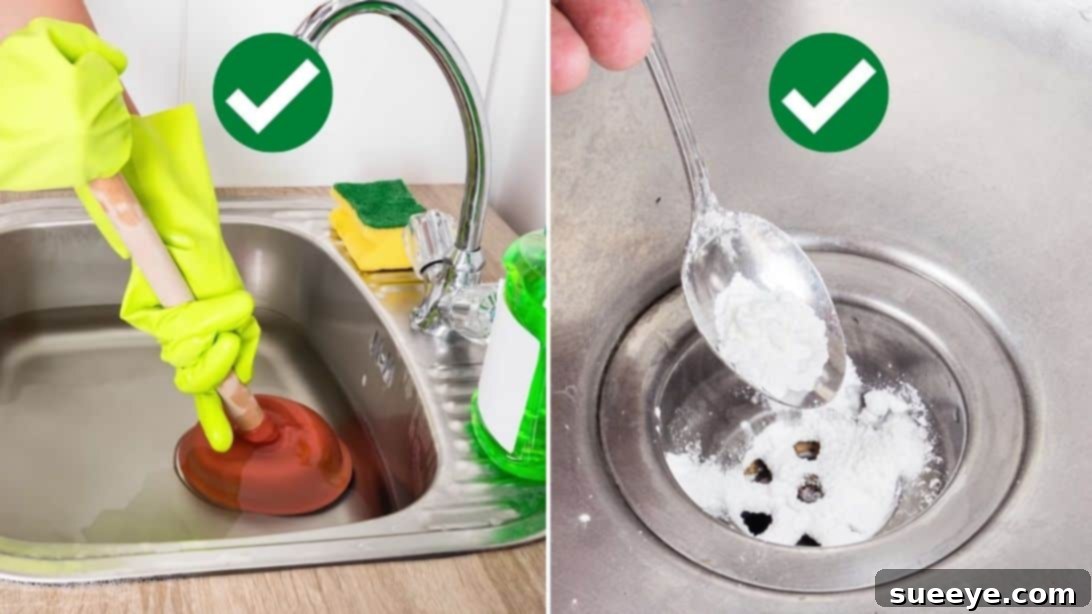
- Pour about 1/3 cup of baking soda directly down the clogged drain.
- Immediately follow with 1/3 cup of white vinegar.
- Quickly cover the drain opening with a stopper or an old rag to contain the fizzing reaction, ensuring it pushes down into the pipes.
- Allow the mixture to sit and work its magic for at least an hour. For best results on tough clogs, you can even let it sit overnight.
- After the waiting period, flush the drain thoroughly with hot tap water (or boiling water if your pipes can handle it) to wash away the loosened debris.
Why it works: Baking soda (a base) and vinegar (an acid) react to produce carbon dioxide gas. This gas creates pressure and a scrubbing action that can break down and dislodge various types of drain blockages.
3. Baking Soda and Salt: A Powerful Drain Odor and Clog Remover
Combining baking soda with salt creates a more abrasive and chemically reactive mixture, making it excellent for tackling stubborn clogs and neutralizing foul drain odors simultaneously.
How to do it:
- Mix half a cup of baking soda with half a cup of table salt in a bowl.
- Carefully pour the entire mixture down the clogged drain.
- Allow the mixture to sit undisturbed for at least a few hours, or ideally, overnight. This gives the ingredients ample time to penetrate and work on the clog.
- Follow up by pouring a large pot of hot water (or boiling water, if appropriate for your pipes) down the drain to flush away the loosened blockage.
Why it works: The salt acts as an abrasive, helping to scour the pipe walls, while both ingredients combined create a strong reaction when mixed with hot water, aiding in the breakdown of organic matter and grease.
4. Hydrogen Peroxide with Baking Soda: Gentle Yet Effective
Hydrogen peroxide is a mild bleaching agent and disinfectant that, when combined with baking soda, can create an oxygenating reaction useful for breaking down organic matter and cleaning pipes.
How to do it:
- Mix 1 cup of hydrogen peroxide (typically 3% solution, found in pharmacies) with a spoonful of baking soda in a non-metal container.
- Pour this mixture directly down the clogged drain.
- You should observe a gentle fizzing action, which indicates the solution is working to break down the blockage.
- Let the mixture sit for about 20-30 minutes.
- Flush the drain thoroughly with hot water.
Benefits: This method is gentler than some harsher chemical cleaners and is also effective at sanitizing and deodorizing the drain.
5. Coca-Cola: An Unexpected Drain Cleaner
While it might sound surprising, regular Coca-Cola can actually be an effective, albeit unconventional, drain cleaner due to its phosphoric acid content. This acid is mild but can help dissolve some types of buildup.
How to do it:
- Purchase a 2-liter bottle of regular Coca-Cola (diet versions are less effective as they lack the sugar and some active ingredients).
- Gently pour the entire bottle of Coca-Cola directly into the clogged drain.
- Allow it to sit undisturbed for at least a few hours. For very stubborn clogs, you can even leave it overnight. The longer it sits, the more time the phosphoric acid has to work on the blockage.
- After the waiting period, flush the drain thoroughly with hot water to wash away the dissolved clog and any remaining soda residue.
Considerations: While less harsh than commercial chemical cleaners, this method is best for minor clogs and should not be relied upon for frequent use or very severe blockages. Always use regular Coke, as the sugar content also contributes to its mild corrosive action.
6. The Classic Plunger Technique
For many clogs, a simple plunger is one of the most effective mechanical tools you can use. There are different types of plungers; for sinks, a standard cup plunger (with a flat base) is ideal.
How to do it:
- First, remove the drain stopper from the sink.
- If the sink is completely clogged and dry, fill it with enough water to cover the rubber cup of the plunger. This water creates a seal and allows the plunger to work effectively.
- Position the plunger directly over the drain opening, ensuring a tight seal around the entire circumference of the drain.
- Using steady, vigorous up-and-down motions, plunge the drain 15-20 times. The goal is to create suction and pressure that pushes and pulls the clog.
- On the final upward motion, quickly pull the plunger off the drain to create a strong suction release.
- Check if the water drains. If not, reposition the plunger and repeat the process several times.
Tips for success: A good seal is crucial for the plunger to work. You might need to add a bit of petroleum jelly to the rim of the plunger to improve the seal, especially on uneven surfaces. If you have a double sink, block off the second drain opening with a wet cloth or stopper to maximize suction.
7. DIY Drain Snake with a Wire Coat Hanger
When plungers fail, a homemade drain snake using a wire coat hanger can often reach and physically pull out hair, food particles, and other obstructions that are just out of reach.
How to do it:
- Take a standard wire coat hanger and straighten it out as much as possible, leaving only the hook at one end.
- To protect your pipes from scratches, wrap the hook end with duct tape. This also helps the hook better grip the clog.
- Have a pail or garbage bag ready nearby for disposing of whatever you extract from the drain.
- Carefully insert the taped hook end into the drain opening. Gently push it down, wiggling it around until you feel resistance from the clog.
- Once you feel the clog, maneuver the hook to try and snag it. Gently pull the hanger back up, hopefully bringing the obstruction with it.
- Repeat this process several times until you no longer extract any debris.
- When finished, pour hot water down the drain to flush away any remaining small particles and ensure the drain is clear.
Safety first: Be gentle to avoid damaging your pipes. This method is particularly effective for hair clogs in bathroom sinks and showers.
8. Removing and Cleaning the Drain Trap (P-Trap)
For stubborn clogs that none of the above methods can clear, the blockage often resides in the drain trap (also known as the P-trap or S-trap), the curved pipe located directly beneath your sink inside the cabinet. This is designed to hold water and prevent sewer gases from entering your home, but it’s also a common collection point for debris.
How to do it:
- Prepare the Area: First, clear out everything from the cabinet beneath the sink. Place a large bucket or pail directly underneath the P-trap to catch any water or debris that will fall out when you disconnect it. Have old towels ready for spills.
- Locate and Loosen Fittings: The P-trap is typically connected by two slip nuts that can be loosened by hand. If they are too tight, use a pair of channel-lock pliers, being careful not to overtighten them when reassembling.
- Carefully Remove the P-Trap: Once the nuts are loose, gently twist and pull the P-trap downwards to disconnect it from both the tailpiece (coming down from the sink) and the waste pipe (going into the wall). Be prepared for residual water to spill into your bucket.
- Clear the Obstruction: Inspect the inside of the P-trap. You’ll likely find a buildup of hair, grease, soap scum, or other debris. Use an old brush, a straightened coat hanger, or even your gloved hand to thoroughly clean out the inside of the trap. You can also rinse it in a utility sink or outside with a hose.
- Check Related Pipes: While the P-trap is off, briefly check the vertical tailpiece and the horizontal waste pipe leading into the wall for any visible obstructions. You might be able to clear minor blockages from these areas with a quick scrape.
- Reattach the P-Trap: Carefully reattach the P-trap, making sure the washers (or gaskets) are properly seated within the slip nuts to prevent leaks. Hand-tighten the slip nuts first, then give them a quarter-turn with pliers if needed, but avoid overtightening.
- Test and Flush: Once reattached, turn on the hot water and let it run for several minutes to flush the pipes and check for any leaks around the newly tightened fittings.
Important: This method can be a bit messy, so wear old clothes and rubber gloves. Knowing how to safely remove and clean your P-trap is a valuable skill for any homeowner.
Preventative Drain Maintenance: Keep Clogs Away
Once your drains are clear, the best strategy is to prevent future clogs from forming. Regular maintenance can save you a lot of hassle and money in the long run.
- Use Drain Screens: Install inexpensive drain screens or hair catchers in all your sink and shower drains. These simple devices effectively catch hair, food particles, and other debris before they enter your pipes.
- Dispose of Grease Properly: Never pour cooking grease or oil down the drain. As it cools, grease solidifies and sticks to pipe walls, accumulating over time to create stubborn blockages. Instead, pour grease into an old container (like a coffee can or glass jar), let it solidify, and then discard it in the trash.
- Avoid Coffee Grounds: Coffee grounds do not dissolve in water and can accumulate in pipes, forming thick, sludgy clogs. Always dispose of them in the trash or compost.
- Flush with Hot Water: Regularly flush your drains with very hot tap water, especially after using the sink for greasy dishes. This helps to melt minor grease buildup before it can become a problem.
- Run Cold Water with Garbage Disposal: When using a garbage disposal, always run cold water before, during, and after to help flush food particles through the system and prevent them from jamming the blades or accumulating in the pipes.
- Occasional Baking Soda and Vinegar Treatment: Even if your drains aren’t clogged, a monthly treatment of baking soda and vinegar can help keep them fresh and clear by breaking down minor buildup.
- Be Mindful of What Goes Down: Avoid flushing anything other than human waste and toilet paper down toilets. For sinks, be cautious with small food scraps, harsh chemicals, or excessive amounts of soap.
When to Call a Professional Plumber
While these DIY methods are highly effective for most common clogs, there are times when it’s best to call in a professional. If you experience any of the following, it’s likely time for expert intervention:
- Persistent Clogs: If you’ve tried multiple DIY methods and the clog still won’t clear, or if it keeps recurring quickly.
- Multiple Clogged Drains: If several drains in your home are clogged simultaneously (e.g., toilet, shower, and sink), this often indicates a deeper blockage in the main sewer line, which requires specialized equipment.
- Foul Odors from Drains: While some odors can be treated at home, persistent strong sewer smells can indicate vent pipe issues or serious main line blockages.
- Water Backing Up: If water is backing up into other fixtures (e.g., flushing the toilet causes water to rise in the shower).
- Gurgling Sounds: Unusual gurgling noises coming from drains or toilets can signify trapped air due to a blockage further down the system.
- Suspected Pipe Damage: If you suspect a broken pipe or serious plumbing issue, avoid further DIY attempts that could worsen the situation.
Tackling a clogged drain doesn’t always require an expensive plumber visit or harsh chemical drain cleaners. With these eight easy and affordable home remedies, you can effectively clear most common blockages using items you already have on hand. Remember, prevention is always the best cure, so incorporate regular maintenance into your routine to keep your drains flowing freely and your home running smoothly. For more fantastic home remedies and DIY tips, be sure to visit Joy Home Remedies on YouTube and subscribe to their channel!
*All images in this article are credited to Joy Home Remedies via YouTube.