
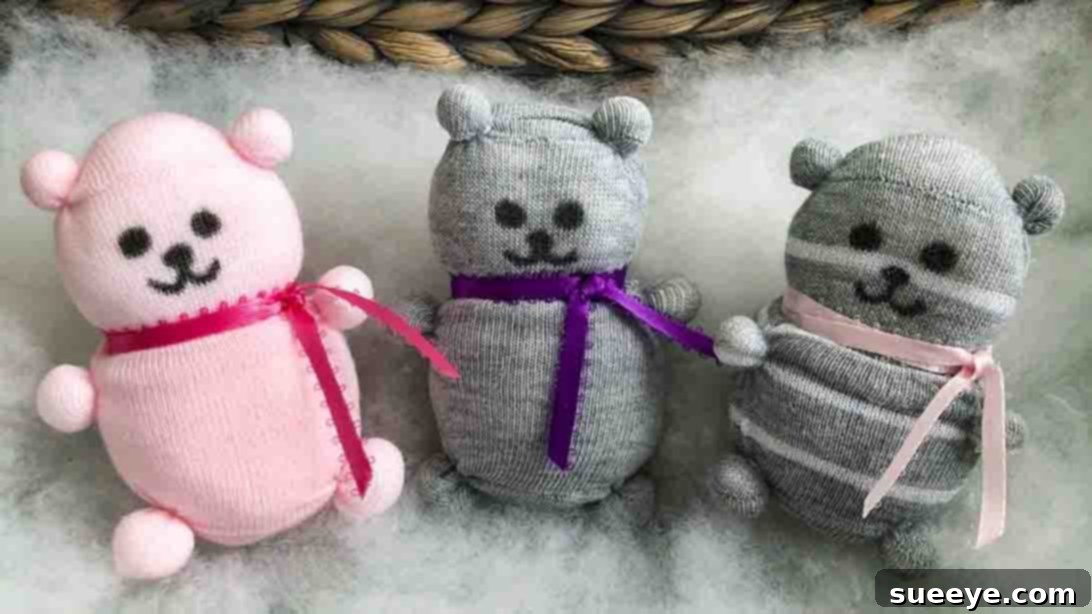
Are you searching for a heartwarming, personalized gift that’s both easy to create and incredibly charming? Look no further! This delightful no-sew sock bear project offers the perfect blend of creativity and simplicity, making it an ideal craft for enthusiasts of all skill levels, especially those who might be new to DIY or prefer projects without needles and thread. You can transform an ordinary pair of socks into an adorable, huggable friend that’s sure to bring a smile to anyone’s face. This craft isn’t just about making a toy; it’s about crafting a memory, a unique piece of home decor, or a thoughtful present that truly comes from the heart.
Inspired by the fantastic tutorial from Theresa Cottone on YouTube, this project emphasizes ease and accessibility. You don’t need any prior sewing experience or special equipment to bring these cute sock bears to life. The step-by-step instructions are designed to be straightforward and enjoyable, ensuring a rewarding crafting experience from start to finish. Imagine the joy of gifting a handmade sock bear, customized with unique features and personality, to friends, family, or even as a special treat for yourself. These adorable creations also make wonderful companions for children, charming additions to nursery decor, or even unique props for photography. Dive into the world of no-sew crafting and discover how simple it is to create something truly special and memorable.
Essential Materials for Your No-Sew Sock Bear
Gathering your materials is the first exciting step in any crafting journey. For this no-sew sock bear project, you’ll find that most items are readily available around your home or at any craft store. The beauty of this craft lies in its simplicity and minimal requirements. Here’s what you’ll need to create your charming sock companion, along with some tips for choosing the best supplies:
- A Pair of Socks: The star of our show! Choose a clean, crew-length sock or a slightly longer one for the main body of the bear. The second sock will be used for the limbs. Consider socks with interesting patterns, colors, or textures to give your bear a unique personality. Thicker socks tend to hold their shape better, but thinner ones can also work if stuffed firmly. Avoid socks that are too worn or have holes.
- Cotton Balls (or other stuffing material): These are crucial for giving your bear its plump, cuddly form. While cotton balls are recommended for their ease of use, you can also use polyester fiberfill, fabric scraps, old t-shirt cuttings, or even rice/beans for a weighted bear (though be mindful of washing implications if using organic fillers). Ensure you have enough to make your bear firm but still squeezable.
- Mini Elastic Bands: These tiny bands are essential for shaping the bear’s features without any sewing. Hair elastics or clear elastic bands work perfectly. You’ll need several to define the ears, head, and arms.
- Scissors: A good pair of sharp scissors will be invaluable for cutting socks and threads neatly. Craft scissors or even household scissors will suffice.
- Cotton Thread: A sturdy piece of cotton thread is used for shaping the head. Choose a color that blends with your sock, or a contrasting color if you want it to be a subtle design element. Embroidery floss can also be used for added strength.
- Ribbon: This is for decorating your bear’s neck, adding a touch of charm and personality. Choose a ribbon that complements the color and pattern of your sock. Satin, grosgrain, or even a thin strip of fabric can work beautifully.
- Fabric Markers: Essential for drawing your bear’s adorable face. Look for permanent fabric markers to ensure the face doesn’t smudge or fade. Black is standard for eyes and nose, but you can experiment with other colors for rosy cheeks or a unique mouth. Alternatively, you could use embroidery floss to stitch features for a more handcrafted look, or small buttons for eyes (ensure they are securely attached if for young children).
Having all your materials ready before you start will ensure a smooth and enjoyable crafting process. Now, let’s get ready to bring your sock bear to life!
Step-by-Step Directions to Craft Your Sock Bear
Step 1: Shaping the Head and Body
This initial stage focuses on forming the fundamental structure of your sock bear: its head, ears, and main body. Precision and care here will set the foundation for a truly adorable creation.
Begin by taking one of your chosen socks. Lay it flat to identify the heel and toe sections. For the ears, we’ll focus on the toe end of the sock. Take a large cotton ball and gently split it into two roughly equal halves. This separation allows for more delicate ear shaping. Position the first half of the cotton ball on one side of the sock, near the toe end, where the seam typically runs. This seam often provides a natural guideline for placement. Once the cotton is correctly positioned inside the sock, gently grab the corresponding area from the outside and secure it tightly with one of your mini elastic bands. Twist the elastic band multiple times to ensure it’s very secure, creating a distinct, rounded ear shape. Repeat this exact process on the opposite side of the sock, using the second half of the cotton ball to form the second ear. Take a moment to adjust both ears, ensuring they are symmetrical and positioned appealingly.
With the ears firmly in place, it’s time to stuff the bear’s body. Begin carefully inserting a generous amount of cotton balls into the sock, starting from the space just below the newly formed ears. As you stuff, continuously check the ear placement and shape, ensuring they remain upright and symmetrical. The goal is to create a plump, firm body that is soft to the touch but holds its shape well. Avoid overstuffing to the point where the sock fabric is strained, or understuffing, which would result in a floppy bear. Work your way down towards the heel of the sock. Once the body is fully stuffed to your satisfaction, gather the remaining fabric at the open end (usually around the heel or ankle cuff) and tie it off tightly with another elastic band. This will create a small ‘tail’ or nub at the back, securing the stuffing. Ensure this knot is robust to prevent any cotton from escaping.
Now, to define the bear’s head. Take a piece of cotton thread, about 10-12 inches long. Locate the ‘neck’ area of your bear – this is typically about a little less than halfway down from the base of the ears. Carefully wrap the thread around this section, pulling it snugly to create a distinct separation between the head and the body. Double-knot the thread securely, ensuring the head shape is well-defined and proportionate to the body. Once the knot is tight and secure, carefully trim off any excess thread close to the knot. Finally, trim the excess fabric from the ‘tail’ part you tied off earlier, leaving a neat, small stub or a rounded finish depending on your preference. This step completes the basic form of your adorable no-sew sock bear, ready for its limbs and personalized features.
Step 2: Adding Limbs, Final Shaping, and Personalization
With the main body and head established, the next stage involves adding the legs, preparing for the arms, and ultimately bringing your bear’s unique character to life with facial features and decorations.
Retrieve your second sock, which will be dedicated to forming the bear’s legs and tail. Just as you did for the ears in Step 1, you’ll repeat a similar process here, but with a slight modification. For each leg, take a full cotton ball (rather than splitting one) and position it towards the toe end of the sock. Secure each cotton ball tightly with an elastic band, creating two distinct, rounded shapes that will serve as the bear’s legs. This method also creates a small central nub that will become the bear’s tail. Once the legs are formed, it’s time to “dress” your bear. Carefully pull this second sock over the main body of your bear, much like pulling on a pair of pants. Guide the bear’s head through the opening of the sock, pulling it up snuggly over the main body and ensuring the newly formed legs align with the bear’s lower half. The goal is for the sock to fit tightly over the first, enhancing the bear’s shape and providing a neat finish.
Next, locate the small nub or excess fabric that you created when tying off the stuffing in the first sock’s tail area. This ‘tail nub’ should now be nested inside the second sock. Grab this nub from the outside of the second sock and tie it off securely with another elastic band. This critical step connects the two sock layers, providing stability and ensuring the second sock remains firmly in place, defining the bear’s lower body and giving it a distinct tail. After securing the tail, gently roll the top edge of the second sock back down towards the middle of the bear’s head. This creates a clean line and covers any raw edges. Once you’re happy with the placement and neatness, carefully trim any excess sock fabric, ensuring a smooth, tailored finish around the bear’s neck and shoulders.
Now, for the arms. Take two additional cotton balls. Place one on each side of the bear’s body where the arms would naturally extend. These spots are typically just below the neck line and slightly to the sides. Once the cotton balls are positioned, carefully tuck in all the excess fabric from the second sock (the part you just trimmed) over and around these cotton balls, molding them into arm shapes. Ensure the fabric is smoothly gathered and tucked to create neat, rounded arms. Secure each arm tightly with an elastic band, wrapping it multiple times to define the arm shape and hold the stuffing firmly. Take a moment to adjust the arms, ensuring they are symmetrical and proportionate to the bear’s body. Finally, to complete your bear’s charming appeal, select a ribbon of your choice and tie it elegantly around the bear’s neck, creating a stylish bow or knot. The ultimate personalization comes with drawing the face. Using your fabric markers, carefully draw eyes, a nose, and a mouth onto your bear’s face. You can opt for simple dots, sleepy eyes, or expressive features to give your bear a unique personality. Experiment with different expressions until you achieve the desired look. Allow the marker ink to dry completely according to the manufacturer’s instructions before handling extensively.
Your Complete DIY No-Sew Sock Bear Tutorial: Crafting Joy, One Sock at a Time
Congratulations! You’ve successfully completed your very own no-sew sock bear! This delightful project is more than just a craft; it’s a testament to how creativity and a few simple materials can bring so much joy. The process of transforming a pair of humble socks into a lovable companion is incredibly satisfying, offering a wonderful sense of accomplishment.
The Enduring Charm of Handmade Gifts
One of the most significant benefits of making a DIY no-sew sock bear is the personal touch it adds to any gift. In an age of mass-produced items, a handmade gift stands out, conveying thoughtfulness and effort. Whether for a birthday, holiday, baby shower, or just because, a sock bear makes a cherished present for friends, family, or children. Each bear is unique, reflecting the care and creativity of its maker, and often becomes a treasured keepsake.
Endless Customization and Creativity
The beauty of this no-sew project extends to its incredible versatility. Don’t stop at just one design! Here are some ideas to spark your creativity and personalize your sock bears:
- Sock Selection: Experiment with different types of socks. Striped socks can create playful patterns, polka dots add a whimsical touch, and solid colors allow for more intricate facial expressions or accessory additions. Fuzzy socks create an extra cuddly bear, while thinner socks can result in a more delicate figure.
- Embellishments: Go beyond just a ribbon! Consider adding small buttons for eyes (ensure they are securely sewn if the bear is for young children), felt cutouts for a nose or cheeks, or even tiny fabric bows for a more intricate touch. You can even stitch on a small felt heart or a monogram for an extra special touch.
- Accessories: Give your bear a tiny scarf, a mini hat, or even a small backpack. These miniature accessories can instantly change your bear’s character and add an element of storytelling.
- Scented Bears: For an added sensory experience, place a sachet of dried lavender or a few drops of essential oil (on a small piece of cotton, away from the outer fabric) inside the stuffing before sealing. This can create a calming or comforting effect, especially if the bear is intended for a bedside companion.
- Different Sizes: Use baby socks for miniature bears perfect for keychains or dollhouse companions, or knee-high socks for a larger, more huggable friend.
A Sustainable and Eco-Friendly Craft
This project is also a fantastic way to embrace sustainability. Instead of discarding old or mismatched socks, you’re repurposing them into something new and beautiful. It’s an eco-friendly craft that minimizes waste and encourages a mindful approach to material usage. You’re giving old items a new lease on life, transforming them from forgotten apparel into beloved toys or decorative pieces.
Share Your Creation!
We encourage you to try this delightful no-sew sock bear tutorial and share your creations! There’s a wonderful community of crafters who love to see the unique twists and personal touches others add to their projects. Whether you make one for yourself, a loved one, or simply for the joy of crafting, remember that every handmade item carries a piece of your spirit. So, grab those socks, unleash your creativity, and start stuffing your way to an adorable new friend!