
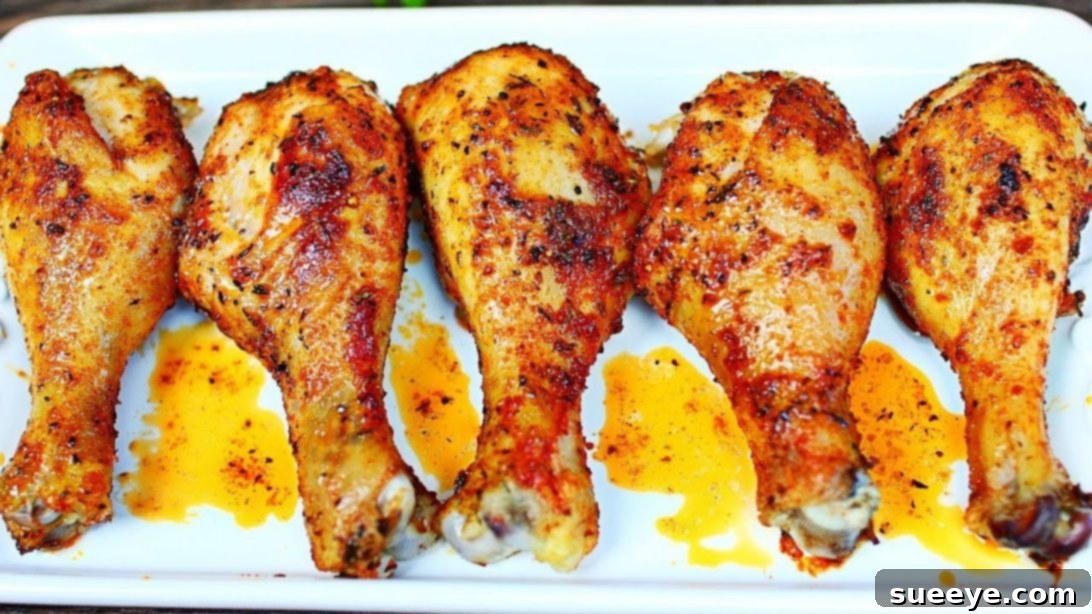
Welcome to a culinary journey that will transform your weeknight dinners! If you’re often short on time but refuse to compromise on flavor, these oven-baked chicken drumsticks are about to become your new favorite. Forget the mess and fuss of frying; this recipe delivers incredibly juicy, tender, and flavor-packed chicken drumsticks straight from your oven. Inspired by the brilliant techniques shared by Cooking With Claudia on YouTube, this dry rub method creates a crispy, seasoned skin and succulent meat that is simply irresistible. Every bite bursts with a harmonious blend of spices, making these the best baked chicken drumsticks you’ll ever try. They are surprisingly easy, quick to prepare, and guaranteed to be a hit with the whole family. Dive in to discover the full instructions and elevate your home cooking with this fantastic recipe!
Ingredients for the Ultimate Baked Chicken Drumsticks
Crafting these delectable chicken drumsticks begins with selecting quality ingredients. The magic truly lies in the dry rub, a blend of common pantry spices that come together to create an extraordinary flavor profile. Here’s everything you’ll need to prepare these mouth-watering drumsticks:
- 10 Chicken Drumsticks: Opt for fresh, plump drumsticks for the best flavor and texture. Ensure they are well-cleaned and trimmed of any excess skin or fat.
- 1 Teaspoon Garlic Powder: A foundational spice, offering a warm, savory aroma that forms the backbone of the rub.
- 1 Teaspoon Onion Powder: Complements the garlic beautifully, adding depth and a subtle sweetness to the overall flavor profile.
- 1 Teaspoon Paprika: Contributes a vibrant red hue and a mild, sweet peppery flavor. For an added layer of complexity, consider using smoked paprika.
- 1/2 Teaspoon Dried Oregano: Adds an earthy, aromatic, and slightly bitter undertone that pairs wonderfully with poultry.
- 1/2 Teaspoon Dried Basil: Imparts a sweet, peppery, and slightly minty flavor, enhancing the overall herbaceous notes of the rub.
- 1/2 Teaspoon Dried Thyme: A classic poultry herb, offering a woody, savory, and subtly floral essence that brightens the blend.
- 1/4 Teaspoon White Pepper: Provides a subtle, clean heat without the visible dark flecks of black pepper, ideal for a pristine finish.
- 1/4 Teaspoon Cayenne Pepper: For those who enjoy a little kick! Adjust this amount to your preferred level of spice.
- Salt and Black Pepper to Taste: Essential for seasoning. Don’t be shy with the salt, as chicken needs a good amount to bring out its full flavor potential.
- 5 Tablespoons Unsalted Butter: Melted butter helps the dry rub adhere evenly to the chicken and is key to achieving an incredibly moist interior with a golden, crispy skin.
Step-by-Step Guide to Perfect Baked Chicken Drumsticks
Achieving perfectly baked chicken drumsticks is simpler than you might think. Follow these detailed steps to ensure every piece comes out tender, juicy, and bursting with flavor, transforming your meal into a culinary triumph.
Step 1: Preheat Your Oven for Optimal Results
Preheating is a critical first step in baking, often overlooked but essential for consistent cooking. Set your oven to 400 degrees Fahrenheit (200 degrees Celsius). Allowing the oven to reach the correct temperature before placing the chicken inside ensures that the drumsticks start cooking immediately and evenly, leading to that desired crispy skin and thorough internal cooking. This initial blast of heat also helps to sear the outside, locking in the juices and preventing the chicken from stewing in its own moisture. A properly preheated oven is the foundation for perfectly roasted poultry.
Step 2: Prepare the Chicken for Seasoning
Start by thoroughly washing the chicken drumsticks under cool running water. This helps remove any impurities and ensures a clean canvas for your spices. Next, carefully trim off any excess skin or visible fat. While some fat is good for flavor and moisture, too much can make the chicken greasy. Once trimmed, it’s crucial to pat each drumstick completely dry with paper towels. This step is vital for achieving crispy skin – moisture is the enemy of crispiness! A dry surface allows the rub to adhere better and the skin to crisp up beautifully. Arrange the prepared drumsticks in a single layer on a large baking tray. For remarkably easy cleanup, line your baking tray with aluminum foil or parchment paper before placing the chicken.
Step 3: Craft Your Irresistible Dry Rub Mixture
Now, let’s create the magic blend! In a medium-sized bowl, combine all the dry rub ingredients: 1 teaspoon of garlic powder, 1 teaspoon of onion powder, 1 teaspoon of paprika, 1/2 teaspoon of dried oregano, 1/2 teaspoon of dried basil, 1/2 teaspoon of dried thyme, 1/4 teaspoon of white pepper, and 1/4 teaspoon of cayenne pepper. Don’t forget to add a generous pinch of salt and black pepper to taste – remember, proper seasoning makes all the difference. Mix these spices thoroughly with a spoon or your fingers until they are well combined and the mixture is uniform. The rich, aromatic fragrance of this homemade rub will already begin to tantalize your senses, promising a delicious outcome!
Step 4: Season and Butter the Drumsticks Generously
This is where the drumsticks truly begin to take on their incredible flavor. Evenly sprinkle the homemade dry rub generously all over the prepared chicken drumsticks. Using your hands, gently pat the seasoning into the skin on all sides. Don’t just sprinkle and leave it; patting ensures that every inch of the chicken is coated, allowing the flavors to penetrate deeply and create a fantastic, flavorful crust. Once all drumsticks are thoroughly seasoned, arrange them again in a single layer on the prepared baking tray, making sure they are not touching each other. This spacing is crucial for allowing hot air to circulate freely around each drumstick, promoting even cooking and optimal crisping. Finally, place about half a tablespoon of unsalted butter on top of each chicken drumstick. As the butter melts during baking, it will baste the chicken, keeping it incredibly moist and contributing significantly to that desirable golden-brown, crispy skin and rich flavor.
Step 5: Bake to Golden Perfection and Serve
Carefully place the baking tray with the seasoned drumsticks into your preheated oven. Roast them for approximately 30 to 45 minutes. The exact baking time can vary depending on the size and thickness of your drumsticks and the calibration of your specific oven, so it’s always best to monitor them closely. For perfectly golden-brown and extra crispy skin, you might consider flipping the drumsticks halfway through the baking time, though it’s not strictly necessary with this recipe. To ensure the chicken is safely cooked and perfectly juicy, check the internal temperature using a reliable meat thermometer. Insert the thermometer into the thickest part of the drumstick, making sure it doesn’t touch the bone, as bone temperature can read higher than the surrounding meat. The chicken is done when it reaches an internal temperature of 170 to 175 degrees Fahrenheit (77 to 79 degrees Celsius). At this temperature, the meat will be fully cooked, incredibly tender, and wonderfully juicy, without any dryness. Once cooked, remove the drumsticks from the oven and allow them to rest for 5-10 minutes on a cutting board or platter, loosely tented with aluminum foil. This crucial resting period allows the juices to redistribute throughout the meat, resulting in an even more succulent and flavorful experience. Once rested, serve immediately and enjoy your perfectly baked chicken drumsticks!
Why These Baked Chicken Drumsticks Are a Must-Try
What makes this particular recipe for baked chicken drumsticks stand out from the rest? It boils down to a few key elements that work in harmony to create an unforgettable meal, guaranteeing success every time. Firstly, the carefully crafted dry rub is a game-changer. It’s not just a random collection of spices; it’s a balanced blend meticulously designed to enhance the chicken’s natural flavor while adding layers of aromatic depth and complexity. The garlic, onion, paprika, and a symphony of dried herbs create a savory foundation, while the cayenne pepper provides a gentle warmth that makes each bite exciting without being overpowering. This rub effectively forms a beautiful, flavorful crust that locks in moisture and boosts overall taste.
Secondly, the baking method at a robust 400°F (200°C) is absolutely ideal for drumsticks. This high temperature ensures that the chicken skin renders beautifully, turning wonderfully golden brown and exquisitely crispy, while the meat cooks through evenly, remaining incredibly tender and juicy inside. Unlike lower temperatures that can leave chicken rubbery or higher temperatures that might char the outside before the inside is thoroughly cooked, 400°F strikes the perfect balance. It provides enough heat for browning and crisping without drying out the meat.
Lastly, the strategic addition of butter is a true secret weapon. As the butter melts over the drumsticks during baking, it serves multiple critical functions. Not only does it help the dry rub adhere even better to the chicken, creating a more robust flavor coating, but it also continuously bastes the chicken. This continuous basting process infuses the meat with richness and critically prevents it from drying out, ensuring every drumstick is succulent from edge to bone. This powerful combination of a robust, aromatic dry rub, an optimal high baking temperature, and the strategic use of butter guarantees a dish that’s both astonishingly simple to prepare and boasts a gourmet taste. It’s a testament to how straightforward ingredients, expertly combined, can yield truly extraordinary results that will have everyone asking for more.
Tips for Achieving Perfect Baked Chicken Every Time
To ensure your baked chicken drumsticks are consistently delicious and truly live up to their “best” title, keep these expert tips in mind. These small details can make a significant difference in the final outcome, elevating your home cooking to restaurant quality:
- Pat Your Chicken Dry Religiously: This cannot be stressed enough! Excess moisture on the chicken skin is the sworn enemy of crispiness. Before applying any seasoning, use paper towels to thoroughly dry each drumstick, removing every bit of surface moisture. A completely dry surface allows the dry rub to adhere perfectly and promotes the development of a beautifully golden, irresistibly crunchy skin.
- Avoid Overcrowding the Pan at All Costs: Give your drumsticks ample space! Arranging them in a single layer with a little room between each piece is absolutely crucial for proper roasting. Overcrowding the baking sheet will trap steam, essentially steaming the chicken rather than roasting it, which leads to soggy skin instead of the desired crispy perfection. If you’re cooking a large batch, it’s always better to use two separate baking sheets to ensure adequate spacing.
- Invest in a Reliable Meat Thermometer: The only surefire way to guarantee perfectly cooked, safe, and juicy chicken is by checking its internal temperature with a quality meat thermometer. Visual cues like “clear juices” can be misleading. Insert the thermometer into the thickest part of the drumstick, making absolutely sure it doesn’t touch the bone, as bone temperature can read higher than the surrounding meat. The ideal safe temperature for chicken is 165°F (74°C), but for drumsticks, cooking to 170-175°F (77-79°C) often results in even more tender meat due to the breakdown of connective tissues, without drying it out.
- Always Let Your Chicken Rest: Once the drumsticks are out of the oven, resist the immediate urge to cut into them. Instead, loosely tent them with aluminum foil and let them rest for 5-10 minutes. This resting period is critical as it allows the juices, which have been driven to the center of the meat during the high-heat cooking process, to redistribute throughout the entire piece. The result is a significantly juicier, more tender, and ultimately more flavorful piece of chicken.
- Adjust Seasoning to Your Liking: The beauty and versatility of a dry rub lie in its customizability. Feel free to adjust the amount of cayenne pepper to dial up or down the heat according to your preference. You can also experiment with other favorite spices – a touch of smoked paprika for an extra layer of depth, or even a small amount of brown sugar for a hint of sweetness and enhanced caramelization on the skin.
Creative Variations and Customizations for Your Drumsticks
While the original recipe for these baked chicken drumsticks is undeniably fantastic on its own, don’t hesitate to unleash your culinary creativity and experiment with variations to make them uniquely yours! The dry rub base is incredibly versatile, allowing for endless customization. Here are a few exciting ideas to help you get started:
- Smoky Sweet Sensation: For a delightful smoky and slightly sweet flavor profile, replace regular paprika with an equal amount of smoked paprika in the dry rub. Then, add a teaspoon of light brown sugar. The sugar will caramelize beautifully during baking, creating a luscious, slightly sticky coating.
- Zesty Lemon Herb Infusion: Introduce a bright, vibrant, and zesty note by adding 1 teaspoon of finely grated lemon zest to your dry rub mixture. The citrus aroma perfectly complements the existing herbs. For an extra burst of freshness, squeeze fresh lemon juice over the cooked drumsticks just before serving.
- Amplify the Spicy Kick: For those who truly love the heat, feel free to increase the cayenne pepper to 1/2 teaspoon or even 3/4 teaspoon, depending on your tolerance. You could also incorporate a pinch of red chili flakes into the rub for a different kind of spicy warmth. A drizzle of your favorite hot sauce after baking can also provide an extra punch.
- Garlic Lover’s Dream Drumsticks: If you adore garlic, you’re in luck! Feel free to increase the garlic powder to 1.5 or even 2 teaspoons in the rub. For an even bolder, fresher garlic flavor, mince 2-3 cloves of fresh garlic very finely, mix them with a tablespoon of olive oil, and rub this mixture over the chicken before applying the dry rub.
- Asian Inspired Glaze: For a completely different twist, omit the butter and, before baking, brush the drumsticks generously with a homemade glaze consisting of soy sauce, honey, grated fresh ginger, and minced garlic. Bake as directed, basting occasionally with the glaze during the last 15-20 minutes of cooking to create a sticky, savory, and irresistible coating.
- Mediterranean Twist: Give your drumsticks a Mediterranean flair by adding dried rosemary and a touch of dried dill to the dry rub. You could serve these flavorful drumsticks alongside a fresh Greek salad, a dollop of creamy tzatziki, or a side of olive-studded couscous for a complete meal experience.
These variations demonstrate that with a solid base recipe, the possibilities for culinary exploration are truly endless. Don’t be afraid to mix and match or come up with your own unique combinations that cater to your personal taste preferences and available ingredients!
Delicious Serving Suggestions to Complement Your Meal
These best baked chicken drumsticks are incredibly versatile and pair wonderfully with a wide array of side dishes, making them perfect for any occasion, from a casual weeknight dinner to a more festive gathering. Here are some ideas to help you complete your meal and create a balanced, delicious plate:
- Classic Comfort Favorites: For a hearty and comforting meal, serve your crispy, juicy drumsticks alongside a generous helping of creamy mashed potatoes and perfectly steamed green beans or tender roasted asparagus. The rich flavors of the chicken will be beautifully complemented by these traditional sides.
- Light & Fresh Options: If you’re looking for something lighter, a crisp garden salad tossed with a bright vinaigrette dressing provides a refreshing contrast to the richness of the chicken. Complement this with a healthy grain salad, such as quinoa or couscous mixed with fresh vegetables, for a satisfying yet lighter meal.
- Roasted Vegetable Medley: Roasting vegetables is an excellent way to add both nutrition and flavor. Broccoli florets, sweet carrots, colorful bell peppers, or cubes of sweet potatoes can be roasted on a separate baking sheet (or even alongside the chicken if space permits and they cook at similar temperatures) until tender and slightly caramelized.
- Fragrant Rice Pilaf: A fragrant rice pilaf, infused with herbs and perhaps some chicken broth, or even a simple plain white or brown rice, can serve as a fantastic base to soak up all the delicious juices and seasonings that collect on your plate from the chicken.
- Seasonal Corn on the Cob: Especially delightful in warmer months, grilled or boiled corn on the cob, lightly buttered and seasoned, makes for a fantastic, naturally sweet accompaniment that complements the savory chicken.
- Homemade Dipping Sauces: While these drumsticks are bursting with flavor on their own, offering a side of homemade barbecue sauce, a tangy honey mustard, a cooling ranch dressing, or a fresh yogurt-based dip can add another delightful dimension to your plate, allowing guests to customize their experience.
The Best Baked Chicken Drumsticks: A Concluding Thought
In conclusion, this recipe for the best baked chicken drumsticks offers a simple yet incredibly rewarding culinary experience. It’s a testament to how basic, readily available ingredients, combined with a thoughtful and straightforward cooking process, can yield truly exceptional results that rival any restaurant dish. From the tantalizing aroma of the custom dry rub filling your kitchen to the satisfying crunch of the perfectly crispy skin and the unparalleled succulence of the meat, every aspect of this dish is designed to delight your senses and satisfy your cravings. Whether you’re a seasoned chef looking for a reliable weeknight meal or a novice home cook eager to impress, these drumsticks are foolproof and guaranteed to become a cherished addition to your recipe repertoire. So, gather your ingredients, follow these easy steps, and prepare to enjoy chicken drumsticks that are truly in a league of their own. Happy cooking!