
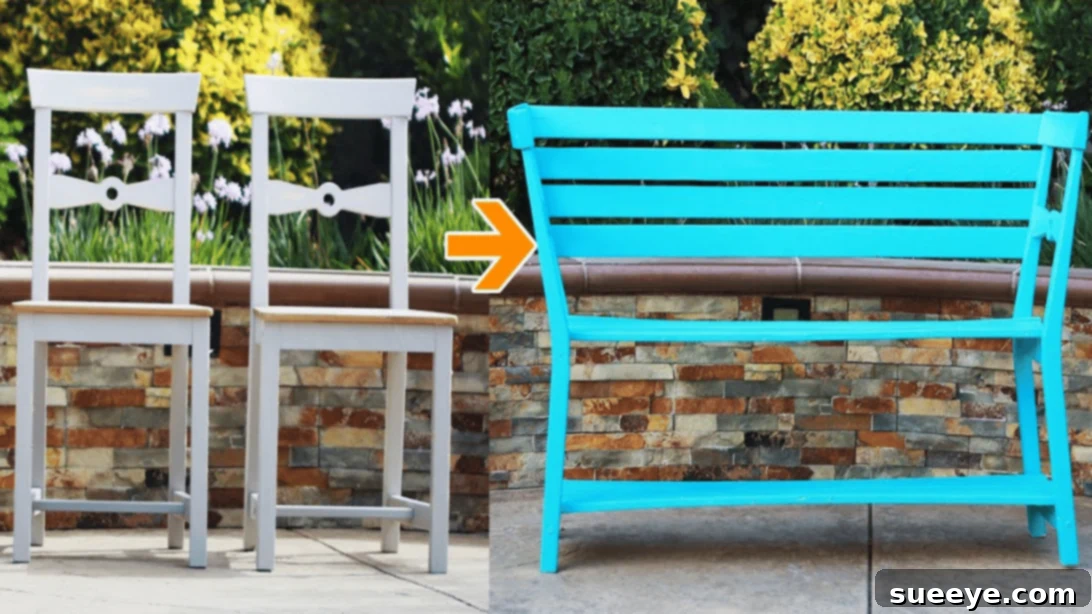
Do you have a pair of old dining chairs gathering dust in your attic or garage, perhaps looking a little worn but still structurally sound? Instead of letting them take up space or heading for the landfill, consider a creative and rewarding DIY project: transforming them into a beautiful, functional bench! This ingenious upcycling idea not only breathes new life into forgotten furniture but also adds a unique, handmade touch to your home or garden.
This fantastic project, inspired by the creative minds at Tasty Home on YouTube, offers a sustainable way to refresh your living spaces. Imagine a charming new bench for your entryway, a cozy seating spot on your patio, or an inviting piece in your garden. Upcycling is a brilliant way to contribute to environmental sustainability while unleashing your inner craftsman. Let’s dive into how you can easily convert two ordinary chairs into an extraordinary bench that will surely become a conversation starter.
Why Upcycle Your Old Chairs into a Bench?
Upcycling furniture is more than just a trend; it’s a smart, sustainable, and satisfying way to decorate your home. By repurposing old dining chairs, you’re preventing them from ending up in a landfill, reducing waste, and lessening the demand for new materials. Economically, it’s a budget-friendly alternative to buying a new bench, allowing you to create a custom piece without the hefty price tag. Aesthetically, an upcycled bench brings character and a personal touch that mass-produced furniture simply cannot replicate. Each repurposed chair tells a story, and together, they create a new narrative for your living space. This project is also incredibly versatile, allowing you to tailor the finish and style to perfectly match your existing decor, whether it’s modern, farmhouse, rustic, or eclectic.
Essential Materials & Tools for Your Upcycled DIY Bench
Before you begin this exciting transformation, gather all the necessary materials and tools. Having everything at hand will make the process smoother and more enjoyable. Safety should always be your top priority, so ensure you have appropriate protective gear.
Materials:
- 2 Dining Chairs: Choose chairs that are sturdy and similar in height and style for the best results. The more identical they are, the more cohesive your final bench will look.
- Wood Planks: Select sturdy lumber suitable for seating. Common choices include pine, oak, or cedar, depending on whether the bench will be indoors or outdoors. Measure the desired length and width for your bench seat beforehand to determine the plank dimensions and quantity.
- Screws: Wood screws of various lengths will be needed for securing different components. Ensure they are appropriate for the thickness of your wood and provide strong, lasting hold.
- Wood Glue (Optional but Recommended): For added strength and stability, a good quality wood glue can be used in conjunction with screws at all major joints.
- Primer: Essential for a smooth, even paint finish, especially if your chairs have an existing finish or uneven surfaces. It helps the paint adhere better and provides a consistent base.
- Paint or Stain: Choose a color and finish that complements your decor. For outdoor use, select exterior-grade paint or stain that offers weather protection.
- Sandpaper (various grits): From coarse to fine, sandpaper will be crucial for stripping old finishes, smoothing rough edges, and preparing surfaces for painting or staining.
Tools:
- Sander: An orbital sander or belt sander will significantly speed up the sanding process, especially for larger areas.
- Dust Mask: Absolutely essential for protecting your respiratory system from wood dust particles during sanding and cutting.
- Eye Protection: Safety glasses or goggles are critical to shield your eyes from flying debris and dust.
- Measuring Tape: For accurate measurements of chair dimensions and wood plank cuts.
- Ruler or Straight Edge: For precise marking and ensuring straight lines before cutting.
- Pencil: For marking cut lines and screw placements.
- Saw: A miter saw or circular saw will provide clean, straight cuts for your wood planks. A hand saw can also work for smaller adjustments.
- Hand Drill: An indispensable tool for pre-drilling pilot holes (to prevent wood splitting) and driving screws.
- Driving Bits: Matching the head of your screws (e.g., Phillips, square drive).
- Drill Bits: Various sizes for creating pilot holes.
- Paint Brushes or Rollers: For applying primer and paint/stain smoothly and evenly.
- Clamps: Useful for holding pieces together while drilling or gluing, ensuring accurate assembly.
How to Build Your Stunning Upcycled DIY Bench: Step-by-Step Guide
Transforming two individual chairs into a cohesive bench requires careful planning and execution. Follow these detailed steps to achieve a sturdy and beautiful result.
Step 1: Prepare and Disassemble the Chairs
Begin by thoroughly cleaning both dining chairs. Remove any dust, grime, or old finishes that might hinder the subsequent steps. Next, carefully remove the seats from both chairs. Most chair seats are attached with screws from underneath; simply unscrew them and set the seats aside. These can often be repurposed or discarded if damaged. Now, choose one chair to become the “center” support and remove its front legs and the connecting front rail. You’ll be left with the backrest and two back legs, plus the side rails. The parts removed from this chair, particularly the front rail (or “beam”), will be crucial for providing additional support for your new bench structure. Keep all salvaged wood pieces.
Step 2: Measure, Plan, and Cut the New Bench Seat Planks
With the chairs prepped, it’s time to determine the dimensions of your new bench seat. Place the two chair frames side-by-side, positioning them at your desired distance apart. This distance will determine the overall length of your bench. Measure the total length from the outer edge of one chair’s back leg to the outer edge of the other chair’s back leg, taking into account the space you want between them. Also, measure the depth of the existing chair frames to ensure your new seat planks will fit appropriately. Carefully mark these measurements on your chosen wood planks. Using your saw, make precise cuts to create the necessary number of planks for your bench seat, ensuring they are all the same length. It’s often beneficial to cut a few extra pieces slightly longer than needed for test fits and adjustments.
Step 3: Construct the Base Support and Connect the Chair Frames
Now, let’s connect the two chair frames to form a single, unified structure. Position the two chair backs facing forward, ready to become the ends of your bench. The distance between them will be bridged by your new seat planks. To ensure stability, we need to create a strong bottom support. Take the front rail (beam) you saved from the first chair in Step 1. This piece will serve as a crucial support beam for the front edge of your bench. Mark the desired height for the bottom layer of your bench on the inside of the front legs of the second chair and the corresponding spot on the first chair’s structure. This is where your front support beam will attach. Using pilot holes to prevent splitting, securely attach this salvaged beam to the inside of the front legs of both chairs with screws, ensuring it’s level and flush. Repeat this process for another support beam on the back if needed, or rely on the existing back rails of the chairs.
Step 4: Install the Bench Seat Planks
With the basic frame established and sturdy, it’s time to add the actual seating surface. Lay your pre-cut wood planks across the top of the connected chair frames. Start by positioning the frontmost plank, ensuring it is flush with the front edge of the bench. Secure this plank to the existing top rail of the first chair’s side frame, using screws driven through the top of the plank into the chair rail below. Continue laying the remaining planks, spacing them evenly across the entire length of the bench. Secure each plank to the available top rails and any newly added support beams using screws. For extra durability, consider applying wood glue to the contact points before screwing the planks down. Ensure all screws are countersunk so their heads are flush with or slightly below the wood surface for a smooth finish.
Step 5: Reinforce and Refine the Bench Structure
To enhance stability and aesthetics, especially if your chairs had open backs, you might want to add a back support panel. Measure the width and height of the back opening between the two chair frames. Cut additional wood planks to fit this space horizontally. Attach these planks to the back of the chair frames, creating a solid or slatted backrest for your bench. This not only adds to the visual appeal but also provides comfortable back support. Once all structural elements are in place, lay the bench on its side or upside down to inspect all connections. Add additional screws or braces if any areas feel wobbly. For instance, if the space between the chairs feels too wide or less stable, you can add a vertical support beam underneath the middle of the seat, attaching it to the bottom of the seat planks and reinforcing it with corner brackets.
Step 6: Sanding, Priming, and Finishing Your Upcycled Masterpiece
Now for the transformation! Start by thoroughly sanding the entire bench. Use a coarse-grit sandpaper (around 80-100 grit) to remove any remaining old finishes, smooth out rough edges, and prepare the wood for painting. Pay close attention to any splinters or sharp areas. Gradually move to a finer grit sandpaper (150-220 grit) for a super smooth finish. After sanding, wipe down the entire bench with a damp cloth to remove all dust. Once dry, apply a high-quality primer. This step is crucial for ensuring uniform color, better paint adhesion, and durability. Allow the primer to dry completely according to the manufacturer’s instructions. Finally, apply two or more thin coats of your chosen paint or stain, allowing adequate drying time between each coat. For outdoor benches, apply a weather-resistant sealant for maximum protection against the elements.
Tips for a Perfect Upcycled Bench Project
- Choose Your Chairs Wisely: Opt for chairs with sturdy frames and similar dimensions. Wooden chairs are generally easier to work with than upholstered ones for this project.
- Precision is Key: Measure twice, cut once! Accurate measurements ensure a professional-looking and stable bench.
- Safety First: Always wear safety glasses, gloves, and a dust mask when cutting and sanding wood. Work in a well-ventilated area.
- Test Fit Before Fastening: Before permanently screwing or gluing pieces together, dry-fit them to ensure everything aligns correctly.
- Consider Wood Type: If your bench will be outdoors, choose pressure-treated wood or naturally weather-resistant species like cedar for the new planks.
- Personalize Your Finish: Beyond paint, consider staining the wood for a natural look, or try distressing techniques for a shabby-chic aesthetic. Add stencils or hand-painted designs for extra flair.
- Add Comfort and Style: Once your bench is complete, enhance its comfort and visual appeal with decorative cushions, throw pillows, or a cozy blanket.
Customization Ideas for Your Upcycled Bench
One of the joys of DIY is the ability to personalize your creation. Here are a few ideas to make your upcycled bench truly unique:
- Storage Solutions: Add a hinged lid to the seat planks to create a hidden storage compartment, perfect for blankets, outdoor toys, or garden tools.
- Integrated Planters: If your bench is destined for the garden, consider building small planter boxes onto the ends, creating a cohesive piece of garden furniture.
- Built-in Side Tables: Extend one or both ends of the seat planks beyond the chair frames to create small, functional side tables for drinks or books.
- Backrest Design: Experiment with different backrest designs. Instead of solid planks, use decorative spindles, a lattice pattern, or even metal grate inserts for an industrial touch.
- Distressed Finish: After painting, lightly sand edges and corners to reveal the wood or previous paint layers, creating a charming, aged look.
- Color Blocking: Use multiple complementary paint colors to highlight different parts of the bench, such as contrasting colors for the chair frames and the seat planks.
With these comprehensive steps and creative ideas, you’re well-equipped to turn those forgotten chairs into a stylish and functional bench. This project is not only rewarding but also a wonderful way to practice sustainable living and add a bespoke piece to your home. So, gather your materials, roll up your sleeves, and get ready to transform!
*All image credit belongs to Tasty Home via YouTube. Follow and subscribe to their channel for more inspiring DIY projects!