
DIY String Light Planters: Create Enchanting Outdoor Ambiance with Ease
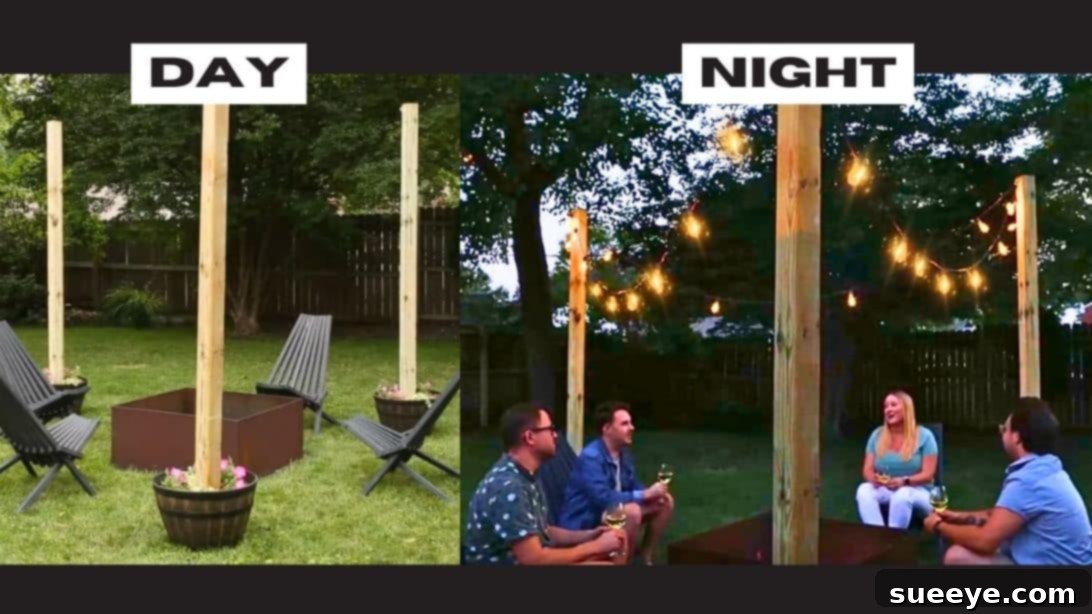
Do you often find yourself looking at an empty space in your yard or patio, envisioning a more vibrant and inviting atmosphere? If so, we have an exceptional idea that will transform your outdoor living area into a magical retreat. Introducing these brilliant DIY string light planters, a fantastic project inspired by the experts at Better Homes and Gardens. This ingenious solution is not only incredibly easy to construct, but it also boasts a significant advantage: absolutely no digging required! Forget the hassle of complicated installations or the limitations of lacking suitable anchor points for your string lights. These versatile planters offer a simple, elegant, and portable way to brighten any outdoor space. They are a beautiful addition to any backyard, especially for those who cherish enjoying the outdoors, making your evenings more enjoyable and your gatherings more memorable. Adding these will undoubtedly illuminate your space, making it feel wonderfully inviting and infinitely more charming.
Why DIY String Light Planters are the Ultimate Outdoor Lighting Solution
Many homeowners dream of adorning their outdoor spaces with the soft, festive glow of string lights, but often encounter a common hurdle: a lack of trees, sturdy beams, or existing structures to hang them from. This innovative DIY project masterfully bypasses that challenge, providing a freestanding and stylish method to suspend your favorite outdoor lights. These planters are much more than mere light stands; they are integral decorative elements that seamlessly blend functionality with natural beauty, incorporating greenery directly into your lighting design. They offer unparalleled flexibility, allowing you to create illuminated zones precisely where you need them most, without permanent alterations to your landscape.
The warm, inviting glow emitted by string lights has a unique power to transform any area into a cozy haven. Imagine gathering around a crackling fire pit, enjoying lively conversations with friends and family, or savoring a quiet evening with a glass of wine or a cold beer, all under the enchanting canopy of your custom-made lights. These planters are perfect for defining outdoor seating areas, adding a romantic touch to an alfresco dining setup, or simply enhancing the overall ambiance of your patio or garden. They are particularly effective for creating a focal point in expansive yards or for illuminating specific zones, such as a barbecue station or a children’s play area. Should you possess a larger outdoor space, the beauty of this project lies in its scalability; you can easily construct more than three planters to occupy and illuminate a greater area, ensuring every corner of your property benefits from their captivating glow. This project elevates your outdoor living experience, making every moment spent outside feel like a special occasion.
RELATED DIY PROJECTS FOR YOUR BACKYARD:
- Easy Dollar Store DIY Backyard Obstacle Course Tutorial
- DIY Backyard Hammock Pergola Tutorial
- DIY Backyard Fire Pit Tutorial
- How to Build a DIY Backyard Connect Four
Essential Materials for Crafting Your Easy Backyard String Light Planters
Before you embark on this exciting project, it’s crucial to gather all your materials. The beauty of these DIY string light planters is that they utilize readily available items, making the process accessible and enjoyable. Here’s a detailed breakdown of what you’ll need, along with some considerations for selecting the best components:
- 3 Wood Posts: Choose sturdy, outdoor-grade lumber such as pressure-treated wood, which is designed to resist rot and insect damage. Common dimensions like 4×4 inches or even 2×4 inches (you might double them up for extra stability) are suitable. Aim for a height of 8 to 10 feet to allow for adequate ground clearance for your string lights while ensuring enough length to be securely embedded in the planter.
- 3 Heavy-Duty Hooks: Select robust, weather-resistant screw-in hooks that can easily support the weight of your chosen string lights, especially when factoring in wind or other environmental stressors. Ensure they are explicitly rated for outdoor use to prevent rust and corrosion.
- 3 Large Planters: The size and material of your planters are paramount for both aesthetics and stability. Opt for substantial planters made from durable materials like thick plastic, glazed ceramic, terracotta, or metal. They should have a wide base to prevent tipping and be deep enough to comfortably accommodate the concrete foundation and a layer of plants.
- 6 Corner Braces: These L-shaped metal brackets play a vital role in securing the wood posts firmly to the base of the planters. Choose galvanized or stainless steel braces for maximum weather resistance. Two braces per post will ensure a secure and wobble-free attachment.
- Fast-Setting Concrete Mix: This is the key ingredient for creating a stable, durable base for your posts. Fast-setting concrete is highly recommended as it cures quickly, significantly reducing the waiting time for your project. Ensure you purchase enough bags to fill the base of all three planters, providing a solid anchor for each post.
- Water: Essential for mixing the concrete according to the manufacturer’s instructions. Have a water source and a mixing container (like a large bucket or wheelbarrow) ready.
- Rocks or Gravel: A layer of coarse rocks or gravel placed above the concrete will provide excellent drainage for your plants, preventing water from pooling and ensuring healthy root growth.
- Potting Soil: Invest in a good quality potting soil that is suitable for outdoor container plants. This will provide the necessary nutrients and proper aeration for your chosen greenery to flourish.
- Plants: Select plants that not only complement your outdoor decor but are also well-suited to your local climate and the amount of sunlight your planters will receive. Consider drought-tolerant options, colorful annuals, or cascading foliage to add visual interest.
- String Lights: The focal point of your project! Choose outdoor-rated string lights (e.g., Edison bulbs, globe lights, LED fairy lights) that match your desired aesthetic and provide sufficient illumination for your space. Always measure the area you intend to cover to ensure you purchase adequate length.
Step-by-Step Guide: How to Make Your Own String Light Planters
Constructing these elegant string light planters is a rewarding and surprisingly straightforward DIY endeavor. By following these detailed instructions, you’ll create sturdy and beautiful lighting features that enhance your outdoor environment for years to come.
Step 1: Prepare Your Wood Posts with Corner Braces
Lay your wood posts horizontally on a stable, flat work surface. For each post, take two corner braces and position them on opposite sides at one end of the post. Ensure the braces are flush with the bottom end. Using a drill and appropriate wood screws, securely attach each brace to the wood post. These strategically placed braces will be instrumental in anchoring the post firmly to the bottom of your planter, preventing any instability once the concrete is added. Repeat this process for all three wood posts.
Step 2: Install the Hooks for Your String Lights
Next, prepare the top end of each post where your string lights will be suspended. Measure down approximately 6 to 12 inches from the very top of each post and mark the exact spot for your hook. This height allows for a graceful drape of lights and keeps them out of the way. Using a drill, create pilot holes at each marked location. Pilot holes are crucial as they prevent the wood from splitting when you screw in the hooks. Once the pilot holes are drilled, firmly screw a heavy-duty hook into each one, ensuring it is securely embedded and capable of bearing the weight of your string lights. Orient the hooks in the direction you anticipate stringing your lights.
Step 3: Secure the Posts within the Planters
Carefully place one of the prepared wood posts inside each of your large planters. It is absolutely essential to ensure that each post is perfectly centered within the planter’s base. This central positioning is key for even weight distribution and overall stability. Once you’re satisfied with the centering, use the pre-attached corner braces. Drill screws through the pre-drilled holes in the braces and into the bottom of the planter. This step physically fastens the post to the planter, creating a strong, immovable unit before the concrete is added. Double-check that each post stands perfectly upright and is rigidly secured to the planter’s base.
Step 4: Pour and Cure the Concrete Base
With your posts securely braced within the planters, it’s time to establish a sturdy foundation using concrete. Carefully pour the fast-setting concrete mix into each planter, filling the space around the base of the post. It is crucial to follow the specific water-to-mix ratio provided on your concrete package instructions. Gradually add water while stirring thoroughly until you achieve a consistent, lump-free mixture. Ensure the concrete fills the planter up to several inches below the top rim, leaving adequate space for your drainage rocks, potting soil, and plants. Once mixed and leveled, allow the concrete to cure completely. This process can take anywhere from a few hours to a full day, depending on the product and environmental conditions. Avoid moving or disturbing the planters during this critical curing period to ensure maximum strength and stability.
Step 5: Create Drainage Holes for Healthy Plants
Once the concrete has fully cured and hardened into a solid mass, the next vital step is to create proper drainage for the plants you’ll be adding. Using a drill with an appropriate bit for your planter material (plastic, ceramic, etc.), carefully drill several drainage holes around the sides of the planters. These holes must be positioned above the concrete line to allow excess water to escape without compromising the concrete base. Good drainage is paramount for preventing waterlogging, which can lead to root rot and unhealthy plants. Aim for at least 3-4 evenly spaced holes per planter to ensure effective water runoff.
Step 6: Layer Rocks and Soil, Then Add Plants
Now, prepare your planters for their green occupants. Begin by placing a substantial layer of rocks or gravel directly on top of the cured concrete in each planter. This rock layer acts as a drainage buffer, allowing water to percolate through and preventing the potting soil from becoming overly saturated. On top of the gravel, fill the planters with your chosen potting soil, leaving a few inches of space from the top rim for watering. Finally, carefully transplant your selected plants into the soil, arranging them aesthetically to create a pleasing visual display. Water them gently immediately after planting to help them settle into their new home.
Step 7: Arrange Your Planters and String the Lights
With your beautiful, completed planters ready, it’s time for the final, magical touch! Carefully transport and position your DIY string light planters in your desired backyard location. A popular and aesthetically pleasing arrangement is a triangle formation, which provides broad light coverage and a sense of enclosure. However, feel free to experiment with other layouts that best suit your specific outdoor space, such as a linear arrangement along a patio edge, a square formation around an outdoor dining table, or scattered placements to highlight different garden features. Once the planters are strategically placed, begin stringing your outdoor lights through each hook. Start from one post, gently draping the lights from hook to hook, ensuring a slight, elegant swag effect without pulling too tightly. Once all lights are strung, plug them in and step back to admire the enchanting transformation of your outdoor living area!
Expert Tips for Maximizing Your DIY String Light Planters
To ensure your DIY string light planters look fantastic and function flawlessly for years to come, consider these expert tips:
- Thoughtful Plant Selection: Beyond aesthetics, choose plants that are well-suited to your local climate and the light conditions of their new home. Consider plants that are relatively low-maintenance, drought-tolerant, or have a trailing habit to soften the edges of the planters and add a lush, natural feel. Incorporating herbs like rosemary or lavender can also add a delightful fragrance to your illuminated space.
- Optimal Light Type: The type of string lights you choose significantly impacts the ambiance. Warm white Edison bulbs offer a vintage, cozy glow, perfect for intimate gatherings. For a more festive and vibrant atmosphere, consider multicolored LED lights. Solar-powered string lights are an excellent energy-efficient option, eliminating the need for outdoor outlets and reducing electricity costs.
- Regular Maintenance: Periodically check the stability of your wood posts and the security of the hooks, especially after strong winds or heavy rain. Maintain your plants by watering them as needed, pruning them to encourage healthy growth, and fertilizing according to their specific requirements. Inspect your string lights for any frayed wires, cracked bulbs, or other signs of wear before each season’s use to ensure safety and longevity.
- Prioritize Safety: Always use string lights and extension cords that are specifically rated for outdoor use and are designed to withstand varying weather conditions. Ensure all electrical connections are weatherproof and kept off the ground. When drilling or working with concrete, wear appropriate personal protective equipment, including safety glasses and gloves, to prevent injury.
- Personalization and Customization: Make these planters truly your own! Consider painting the planters to match your home’s exterior or your existing outdoor furniture. You can also stain or paint the wood posts for a different look. Adding decorative elements like stencils, hanging ornaments, or even small, battery-operated fairy lights intertwined with your plants can enhance their unique charm.
Elevate Your Outdoor Living with DIY Planter Lights
These DIY string light planters offer an incredibly simple yet profoundly impactful way to elevate your outdoor living experience. They ingeniously solve common outdoor lighting challenges, infuse your space with beautiful greenery, and cultivate an atmosphere that invites relaxation, celebration, and connection. Whether your goal is to craft a cozy reading nook, design a vibrant entertaining area, or simply add a touch of everyday magic to your garden, this project delivers on all fronts. Bid farewell to dull, uninspired backyards and welcome an enchanting, illuminated oasis that you’ve proudly crafted with your own hands. Get ready to create countless cherished memories and enjoy unforgettable evenings under the soft, captivating glow of your new, custom-built string light planters. Your dream outdoor retreat is now effortlessly within reach!