
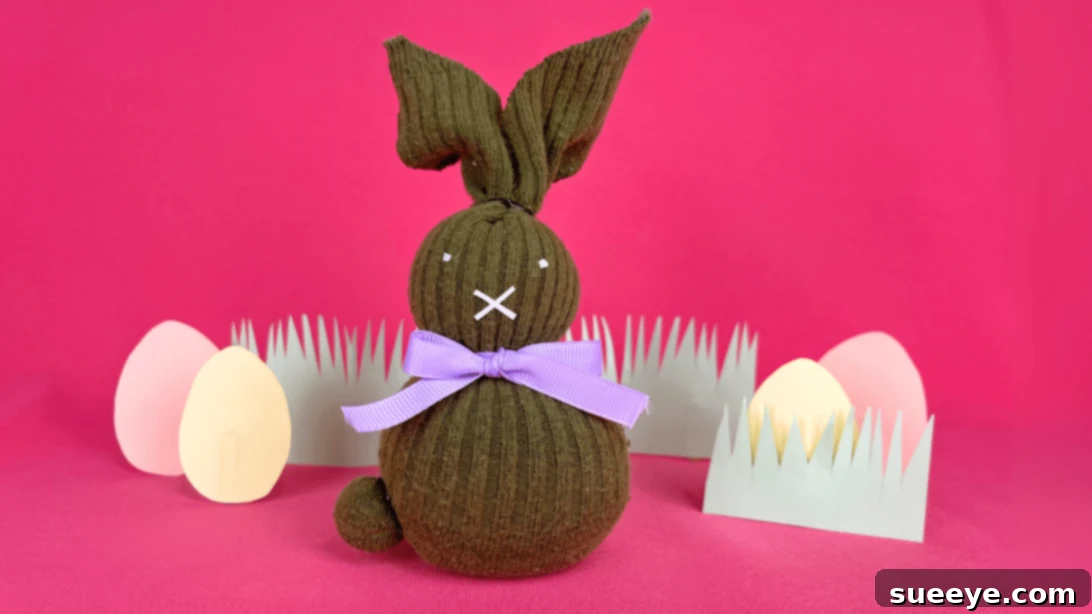
Easter, with its vibrant colors and joyful spirit, is truly one of the most anticipated holidays of the year. It’s a time for family gatherings, delicious treats, and, of course, delightful crafts! If you’re searching for an engaging and creative activity that brings smiles to both adults and children, look no further than these charming DIY sock bunnies. This simple yet rewarding project allows you to transform an ordinary sock into an adorable Easter decoration, making it an absolute favorite among Easter craft ideas. In this comprehensive guide, we’ll walk you through every step to create your very own sock bunny with an easy-to-follow, step-by-step tutorial.
RELATED: No-Sew Easter Chicken Towel – Another Great Holiday Craft!
The best part about this particular project? You don’t need any sewing skills whatsoever! That’s right, this is a truly no-sew Easter bunny project, making it accessible to everyone, regardless of their crafting experience. Forget about needles and thread; this craft relies on simple household items and a few clever techniques to bring your fluffy friends to life. It’s incredibly easy to make and comes together quickly, often in just a few minutes, making it ideal for spontaneous crafting sessions or as a quick holiday activity. The essential materials include a sock, rice, jute twine, scissors, ribbon, and glue. For those using light-colored socks, you can even skip the paper and glue for the facial features, opting instead for a simple marker to draw the eyes and mouth. This DIY Easter bunny craft is a fantastic way to bond with family, foster creativity in children, and create charming decorations for your Easter egg hunt party or festive home decor.
Gather Your Materials: What You’ll Need for Your Adorable Sock Bunny
One of the many advantages of this DIY sock bunny craft is its reliance on readily available and inexpensive materials. You might even have most of these items around your home already! Here’s a detailed list of what you’ll need to get started:
- Sock: Any clean sock will do! Older, mismatched socks are perfect for recycling. Choose a color or pattern that you love – plain white, colorful stripes, or even festive designs can create unique bunnies. The size of the sock will determine the size of your bunny, so a crew sock or knee-high sock works well for a medium-sized rabbit.
- Rice: This will be the main filling for your bunny, providing weight and shape. Any type of rice (white, brown, jasmine) is suitable. Lentils or dried beans can also be used as alternatives if you don’t have rice.
- Jute Twine: Essential for shaping the bunny’s body, head, and securing the filling. String, elastic bands, or even rubber bands can be used as substitutes, though jute twine offers a rustic, charming look.
- Paper: Used for cutting out the eyes and mouth. Construction paper, cardstock, or even recycled paper bags can work.
- Scissors: For cutting the sock ears, paper features, and ribbon. A good, sharp pair will make the process easier.
- Glue: To attach the paper facial features and any other embellishments. Craft glue, fabric glue, or even a hot glue gun (with adult supervision) can be used.
- Ribbon: To tie around your bunny’s neck as a decorative bow, adding a touch of charm. Any color or pattern will work, allowing for personalization.
- Tape (optional): While optional, a roll of tape can be incredibly helpful as a temporary stand to hold your sock open while you fill it with rice, making the process much tidier and easier, especially for little hands.
Having all your materials gathered before you begin will ensure a smooth and enjoyable crafting experience. Let’s get ready to transform these simple items into something truly special!
Step-by-Step Guide: How to Make Your Delightful Sock Rabbits
Now that you have all your materials ready, let’s dive into the fun part: crafting your sock bunny! Follow these straightforward steps to create your adorable Easter friend.
Step 1: Prepare Your Sock for Filling
To begin your no-sew sock bunny creation, take your chosen sock and carefully position it inside the opening of a roll of tape. This clever technique provides a stable base, making the filling process significantly easier and preventing spills, especially when crafting with children. Gently fold the edges of the sock over the rim of the tape roll, ensuring a secure and wide opening. This initial setup is crucial for maintaining cleanliness and efficiency as you move to the next stage.
Step 2: Fill the Sock with Rice
With your sock securely held by the tape, it’s time to add the rice. Carefully pour the rice into the sock. The amount of rice you add will determine the size and shape of your bunny’s body and head. Fill the sock until it has enough volume to form a distinct body and a smaller head, but remember not to fill it all the way to the top. It’s important to leave a significant amount of empty sock material at the top – roughly one-third of the sock’s length – which will be used to create the bunny’s iconic ears. This space is vital for shaping, so resist the urge to overfill.
Step 3: Secure the Base of the Bunny
Once you’ve achieved the desired fullness for the bunny’s body, carefully remove the sock from the tape roll. Gather the top open end of the sock and pinch it together. Take a piece of jute twine and securely tie it around the gathered portion, just above the rice filling. This knot will seal the rice inside and form the top of your bunny’s body, acting as the foundation for where the head and ears will emerge. Make sure the knot is tight enough to hold the rice firmly in place without tearing the sock material.
Step 4: Form the Head and Body
Now it’s time to define the bunny’s distinct shape. Take another separate piece of jute twine. Gently squeeze the rice-filled portion of the sock about one-third of the way down from the top knot, creating a smaller, rounded section for the head. Wrap the new piece of jute twine tightly around this pinched section and tie it securely. This creates a clear division between the bunny’s head and its body, giving your creation its iconic silhouette. Adjust the twine until you’re happy with the proportions of your bunny.
Step 5: Cut the Top for Ears
With the head and body defined, it’s time to create the ears. Look at the empty sock material extending upwards from the top knot (where you first secured the rice). Using your scissors, carefully cut this top part in half, vertically, down the middle towards the first knot. You should now have two distinct flaps of fabric emerging from the bunny’s head, which will soon become its adorable ears. Ensure your cut is even to create balanced ears.
Step 6: Shape the Bunny Ears
Now, take the two halves you just cut and gently shape them into bunny ears. You can round the edges with your scissors or leave them as is for a more rustic look. If you desire longer ears for a more exaggerated or comical bunny, you have a few options: either start with a longer sock from the beginning, or make the body and head of your bunny slightly smaller to leave more fabric for the ears. The beauty of this craft is that you can customize the ear length and shape to your preference, making each bunny unique.
Step 7: Create the Bunny’s Tail
Every good bunny needs a fluffy tail! To create this charming detail, turn your sock bunny around to its back. Gently pinch a small portion of the sock fabric near the bottom of the bunny’s body. Once you have a small, rounded pinch of fabric, secure it tightly with a small elastic band (a hair tie or even a piece of twine can work). This creates a delightful little tuft that serves as your bunny’s tail, adding to its authentic appearance. You can fluff it out slightly for a more pronounced tail.
Step 8: Add a Decorative Ribbon Bow
Now for a touch of elegance and personality! Grab your chosen ribbon and tie it into a beautiful bow. Position this bow around the bunny’s neck, just below its head, where the second piece of jute twine defines the neck. You can secure the ribbon with a dab of glue if you want it to stay perfectly in place, or simply tie a neat knot. This ribbon adds a pop of color and can be chosen to match your Easter decor or the personality you envision for your bunny.
Step 9: Prepare Facial Features
To give your bunny its charming expression, take a piece of paper (or colored felt, if you prefer) and cut out two small circles for the eyes. These can be simple black circles, or you can add tiny white dots for a reflective sparkle. Next, cut out two small strips for the mouth, which can be arranged in a “V” shape or a simple arch. This step allows for a lot of creative freedom, so feel free to experiment with different sizes and shapes to give your bunny a unique personality.
Step 10: Affix the Facial Features and Complete Your Bunny
Finally, bring your bunny to life by carefully gluing the eyes and mouth onto its head. Position the eyes above the mouth, ensuring they are evenly spaced. If you’re using a light-colored sock and prefer not to use paper, you can simply draw on the eyes and mouth directly with a permanent marker. Add a small pink dot for a nose if you wish! Once the glue dries, your adorable DIY sock bunny is complete and ready to hop into your Easter celebrations! Take a moment to admire your handmade creation.

Handy Crafting Tip for Your Sock Bunnies
Elevate your sock bunnies by adding a delightful scent! When you are filling the sock with rice, consider adding a few drops of your favorite essential oil. Lavender, vanilla, or even a spring-themed blend can infuse your bunny with a lovely, subtle fragrance, making it not just a visual delight but also a sensory pleasure. This little touch makes your handmade gift or decoration even more special and inviting.
Why Make DIY Sock Bunnies? Benefits Beyond Just Decor
Beyond being an adorable addition to your Easter decor, crafting DIY sock bunnies offers a multitude of benefits:
- Eco-Friendly Crafting: This project is a fantastic way to upcycle old, mismatched, or worn-out socks, giving them a new life and reducing waste. It promotes sustainable crafting practices by transforming items that might otherwise be discarded.
- Budget-Friendly Fun: With most materials likely already in your home, this craft is incredibly inexpensive, making it a perfect activity for families looking for creative fun without breaking the bank.
- Perfect for All Ages: The no-sew nature and simple steps make it suitable for toddlers (with supervision) to grandparents. It’s a wonderful multi-generational activity that can be enjoyed by everyone.
- Boosts Creativity and Fine Motor Skills: For children, cutting, gluing, and shaping helps develop fine motor skills and encourages imaginative play. Adults can enjoy the creative outlet and relaxation it provides.
- Personalized Gifts & Decor: Each sock bunny you make will be unique, reflecting the sock choice and the crafter’s personal touch. They make heartfelt handmade gifts or charming additions to Easter baskets.
- Stress Relief: Engaging in simple, repetitive crafts like this can be a meditative and calming experience, offering a break from daily stress.
Creative Variations & Customization Ideas for Your Sock Bunnies
The basic sock bunny tutorial is just the beginning! Here are some ideas to customize your creations and make them truly one-of-kind:
- Sock Selection: Experiment with different types of socks. Fuzzy socks create soft, cuddly bunnies. Striped or polka-dotted socks add immediate personality. Novelty socks with patterns can make truly unique characters.
- Embellishments: Instead of paper eyes, consider gluing on small buttons, googly eyes, or felt cutouts. Add a tiny pom-pom for a fluffy tail. Fabric paint pens can be used to draw whiskers, freckles, or intricate patterns on the sock itself.
- Fillings: While rice is excellent, you can also use dried beans, lentils, or even fiberfill stuffing for a lighter, softer bunny. If using stuffing, you might want to add a few pebbles at the bottom for stability.
- Accessories: Give your bunny a tiny felt vest, a mini flower crown, or a tiny carrot made from orange felt. You can even glue small magnets to their backs to make them fridge decorations.
- Scented Bunnies: As mentioned in our handy tip, adding a few drops of essential oil to the rice filling will create a wonderfully scented bunny, perfect for placing in drawers or on nightstands.
Displaying Your Handmade Easter Creations
Once your charming collection of sock bunnies is complete, you’ll want to display them proudly! Here are some ideas:
- Easter Baskets: Tuck a handmade bunny into each Easter basket for a personalized touch alongside eggs and treats.
- Table Centerpieces: Arrange a group of bunnies on your dining table as a whimsical centerpiece for Easter brunch. Add some faux grass, flowers, and colorful eggs for a complete look.
- Shelf Decor: Line them up on a mantelpiece, bookshelf, or windowsill to bring a festive touch to any room.
- Gift Toppers: Instead of a traditional bow, tie a small sock bunny onto a gift package for an extra special presentation.
- Kid’s Room Decor: These soft bunnies are perfect companions for a child’s bedroom or play area, adding a touch of handmade charm.
Watch the Full Tutorial: Easter Sock Rabbit Craft Video
For a visual demonstration of each step, be sure to watch our detailed Easter Sock Rabbit Craft Video on YouTube. Seeing the process in action can be incredibly helpful, especially for those new to crafting or for younger crafters following along. The video provides clear, concise instructions that complement this written tutorial, ensuring you can create your perfect sock bunny with ease.
Creating these DIY sock bunnies is more than just a craft; it’s an opportunity to create cherished memories, personalize your holiday decor, and enjoy a simple, rewarding activity. Whether you’re making one for yourself or a dozen with your loved ones, these no-sew Easter bunnies are sure to bring joy and a touch of handmade charm to your home this spring. Happy crafting!