
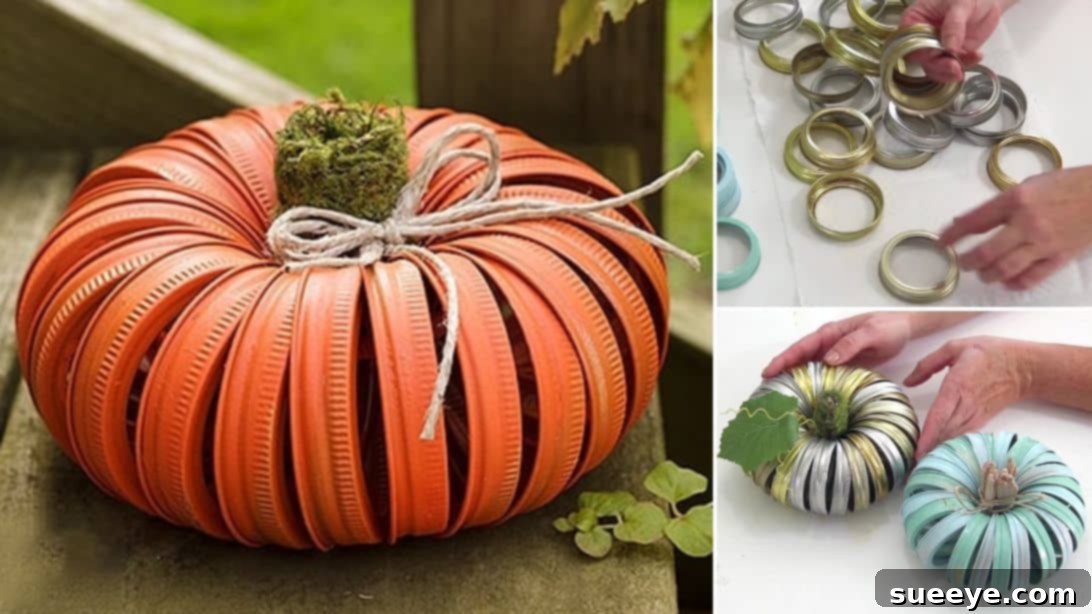
Easy DIY Mason Jar Lid Pumpkin Tutorial: Crafting Charming Autumn Decor
As the leaves begin to turn and a crispness fills the air, thoughts naturally drift towards cozy home decor that celebrates the beauty of autumn. If you’re looking to infuse your living space with personalized fall charm, beyond the traditional wreath, then this delightful DIY mason jar lid pumpkin project is an absolute must-try! This craft is not only incredibly easy and quick to assemble, making it perfect for last-minute decorating ideas, but it also offers a unique, rustic touch to any seasonal display. We owe this clever and inspiring DIY decor video tutorial to the creative mind of Amanda Formaro on YouTube, whose ingenuity brings simple materials to life.
Why Choose This DIY Mason Jar Lid Pumpkin? Transform Your Fall Decor
Creating your own fall decorations offers a myriad of benefits. Firstly, it allows for unparalleled personalization, ensuring your home truly reflects your unique style. Secondly, DIY projects like this mason jar lid pumpkin are often budget-friendly, utilizing common household items or inexpensive craft supplies. This particular pumpkin craft stands out for its simplicity and the charming, rustic aesthetic it provides. It’s an ideal project for crafters of all skill levels, from beginners looking for an easy win to seasoned DIY enthusiasts seeking a quick and satisfying seasonal make. Imagine these handmade pumpkins gracing your mantelpiece, adorning your dining table as a centerpiece, or adding a welcoming touch to your entryway. They also make thoughtful, handcrafted gifts for friends and family during the harvest season.
Gather Your Crafting Essentials: Materials List
Before you dive into the fun of crafting, make sure you have all the necessary materials ready. The beauty of this project lies in its use of readily available items, ensuring a smooth and enjoyable crafting experience. Here’s what you’ll need to create your very own charming mason jar lid pumpkin:
- Protective Covering: A piece of old cloth, plastic sheeting, or newspaper to protect your work surface from paint.
- Canning Jar Bands: Also known as mason jar rings. You’ll need approximately 25-30 pieces, depending on the desired fullness of your pumpkin.
- Spray Paint: Choose your favorite autumn colors. Traditional orange, rustic brown, antique white, or even metallic gold can create stunning effects. Matte or satin finishes often work best for a natural look.
- Jute String: A sturdy piece of natural jute or twine for assembling the pumpkin base.
- Wooden Cork: A standard wine cork works perfectly for the pumpkin stem.
- Artificial Moss: Green decorative moss to wrap around the cork, giving it an authentic, earthy feel.
- Scissors: For cutting string and moss.
- Hot Glue Gun and Glue Sticks: Essential for securing the stem and any additional embellishments.
- Pumpkin Leaf: An artificial pumpkin leaf or any fall-themed leaf to add a realistic touch to your pumpkin.
Step-by-Step Guide: Crafting Your Mason Jar Lid Pumpkin
Follow these detailed steps to bring your beautiful mason jar lid pumpkin to life. Precision and patience in each stage will ensure a flawless and durable finished product.
Step 1: Preparing and Painting Your Jar Bands
Begin by preparing your workspace. Lay down a generous piece of old cloth, plastic sheeting, or newspaper over your work surface. This protective layer is crucial to catch any overspray or drips from the paint, preventing stains on your tables or floors. Next, arrange your canning jar bands or mason jar rings on the protected surface. Ensure they are laid out in a single layer, not touching each each other, and with ample space between them. This allows for even paint application and prevents the rings from sticking together as they dry. Now, it’s time to transform them with color! Take your chosen spray paint and begin applying light, even coats across all the bands. Hold the can at the recommended distance (usually 8-12 inches) and use a sweeping motion to achieve smooth coverage. Avoid applying too much paint at once, as this can lead to drips and an uneven finish. Instead, opt for several thin coats. Allow each coat to dry completely before applying the next. Drying times can vary based on paint type and humidity, so always refer to the instructions on your spray paint can. Once you’re content with the color and coverage, and the paint is fully dry to the touch, carefully gather your painted jar bands. Before moving to the next step, double-check that all bands are dry and free from tackiness to prevent smudging.
Step 2: Assembling Your Pumpkin Base
With your painted jar bands ready, it’s time to assemble the core of your pumpkin. Take a length of jute string – about 2-3 feet should be sufficient, allowing for extra length to tie a secure knot. Carefully thread this jute string through the center of each jar band. As you thread them, make sure that all the bands are facing in the same direction. This consistency is important for the final pumpkin shape. Continue threading until you have about 25 to 30 pieces of jar bands on your string. The exact number can be adjusted based on how full and plump you want your pumpkin to appear. Once all the bands are threaded, bring the two ends of the jute string together. Pull the string tightly, cinching the jar bands together until they form a tight circle. As you pull, the bands will naturally arrange themselves into a charming, rounded, donut-like shape – the perfect base for your pumpkin. Secure the jute string with several strong, tight knots to ensure the structure holds firm. Trim any excess string, leaving just enough to secure the knot.
Step 3: Creating and Attaching the Pumpkin Stem
Now, let’s craft the stem that will give your creation its unmistakable pumpkin identity. Take your wooden cork. This will serve as the sturdy base for your stem. Next, cut a piece of artificial moss that is large enough to completely wrap around the cork. Apply a thin layer of hot glue to the cork and carefully wrap the moss around it, pressing firmly to secure it in place. Ensure the moss covers the cork fully for a natural, rustic appearance. Once your moss-covered stem is ready, it’s time to attach it to your mason jar lid pumpkin base. Locate the center opening created by the cinched jar bands. Apply a generous amount of hot glue to the bottom of your moss-covered cork stem. Carefully insert the stem into the center opening of the jar bands, pressing it down firmly until the glue sets. Hold it in place for a few moments to ensure a strong bond. The stem should sit securely in the center, protruding upwards.
Step 4: Adding the Finishing Touches and Embellishments
With the stem securely in place, your pumpkin is nearly complete! The final step involves adding a touch of natural beauty with a leaf. Take your chosen pumpkin leaf (artificial or even a preserved real one) and apply a small dot of hot glue to its base. Carefully attach the leaf to the base of the pumpkin stem, ensuring it lies flat against the jar bands or slightly curls around the stem, mimicking a natural pumpkin. This small detail instantly elevates the realism and charm of your creation. Now, this is where your creativity can truly shine! While the pumpkin is lovely as is, you can always add more embellishments as desired. Consider gluing on a small twine bow, a few mini artificial berries, tiny pinecones, or even a sprinkle of glitter for a touch of sparkle. You could also wrap a thin piece of raffia or ribbon around the stem for added texture. Once all your embellishments are in place and the glue has dried, your beautiful DIY mason jar lid pumpkin is all done and ready to display!
Tips for Success and Customization
To ensure your DIY mason jar lid pumpkin project is a resounding success and perfectly matches your personal style, consider these helpful tips and customization ideas:
- Varying Sizes: Experiment with different sizes of canning jar bands (regular mouth vs. wide mouth) to create a set of pumpkins in various dimensions. You can also adjust the number of rings used to make smaller or larger pumpkins.
- Color Palette: Don’t limit yourself to traditional orange. Try metallic gold, silver, or bronze for a glamorous touch, or use distressed white, sage green, or deep burgundy for a farmhouse-inspired look. Ombre effects with spray paint can also be stunning.
- Stem Alternatives: If you don’t have a wooden cork, a short, sturdy twig from your yard, a small piece of cinnamon stick, or even a rolled-up piece of brown felt can serve as a charming alternative for the stem.
- Leaf Choices: While an artificial pumpkin leaf works perfectly, consider using fabric leaves, dried hydrangeas, or even a sprig of dried eucalyptus for a unique twist.
- Embellishment Extravaganza: Beyond the basic leaf, think about adding small bells, personalized tags, tiny acorns, or even painting subtle designs onto the jar bands once the base color is dry. Glitter glue can add shimmering accents.
- Outdoor Durability: If you plan to display your pumpkins outdoors, ensure your spray paint is specifically rated for outdoor use and consider applying a clear sealant or protective topcoat for added weather resistance.
- Groupings and Displays: Arrange pumpkins of different sizes and colors together for a dynamic centerpiece. Place them on a wooden tray with pinecones, faux fall leaves, and small candles for an inviting vignette.
- Kids’ Activity: This is a fantastic craft to do with older children. They can help with painting (with supervision), threading the bands, and choosing embellishments, making it a wonderful family bonding activity.
Bringing Your Autumn Vision to Life: Display Ideas
Once your charming mason jar lid pumpkins are complete, the fun continues with discovering the perfect spots to display them. These versatile decorations can enhance almost any area of your home, bringing a touch of handmade warmth and seasonal cheer. Consider placing a cluster of varying-sized pumpkins on your dining table as an eye-catching centerpiece, perhaps surrounded by a scattering of artificial fall leaves and some flameless LED candles for a cozy glow. They look equally stunning arranged along a mantelpiece, interspersed with family photos and other cherished autumn tokens. For an inviting entryway, set a few pumpkins on a console table alongside a rustic wooden sign or a fragrant fall potpourri. Don’t forget the shelves in your living room or study; a small pumpkin tucked amongst books or decorative accents adds an unexpected pop of seasonal color. These creations also make wonderful additions to covered porches or outdoor seating areas, instantly elevating your curb appeal and welcoming guests with a festive spirit. Their durability allows for flexible placement, ensuring your autumn vision comes to life beautifully throughout your home.
This simple yet highly rewarding DIY project offers a delightful way to embrace the autumn season and personalize your home decor. With just a few basic materials and a touch of creativity, you can transform ordinary canning jar bands into an enchanting collection of fall pumpkins. We extend our gratitude once more to Amanda Formaro via YouTube for sharing such an inspiring and accessible tutorial. Dive into the joy of crafting and create beautiful, lasting fall memories with these charming mason jar lid pumpkins!
*These amazing images are all credited to Amanda Formaro via YouTube. Check her other content and follow for more!