
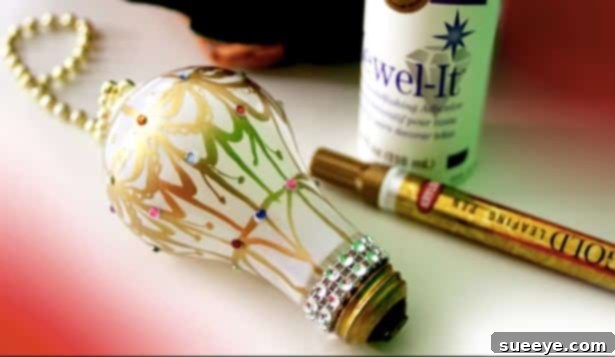
Transform Used Light Bulbs into Stunning DIY Ornaments: Your Ultimate Guide to Eco-Friendly Holiday Decor
In a world increasingly focused on sustainability and mindful consumption, the joy of crafting takes on a deeper meaning. Instead of discarding seemingly useless items, imagine giving them a vibrant new purpose, transforming them into cherished pieces of art. This very philosophy is at the heart of our exciting DIY project today: repurposing used light bulbs into spectacular, personalized ornaments. Not only does this practice align with eco-friendly principles, but it also unlocks a boundless realm of creativity, allowing you to adorn your home with decorations that tell a unique story and reflect your personal touch.
When the festive season approaches, a natural surge of creativity often inspires us to seek out new ways to celebrate and decorate. While store-bought embellishments are convenient, there’s an unparalleled satisfaction that comes from creating something beautiful with your own hands. The simple, unassuming shape of a light bulb provides an ideal canvas for an array of imaginative designs, making it a perfect project for crafters of all skill levels. From whimsical hot air balloons that seem to float among your branches to classic festive characters like jolly snowmen and cheerful Santas, these upcycled ornaments are guaranteed to spark delight and conversation. Get ready to turn your burnt-out bulbs into brilliant decorations!
Why Choose DIY Light Bulb Ornaments? The Myriad Benefits of Upcycled Crafting
Embracing the art of crafting ornaments from used light bulbs offers a multitude of advantages, extending beyond mere decoration. It’s a holistic approach to holiday preparation that benefits your wallet, the planet, and your family’s bonding experience. Discover why this craft is not just fun, but also incredibly rewarding.
1. Sustainability and Eco-Friendliness: A Green Approach to Holiday Decor
Every year, countless light bulbs are discarded, contributing significantly to landfill waste. By repurposing them, you actively participate in reducing waste and promoting a circular economy. This small yet impactful act of upcycling makes a tangible difference, turning potential waste into a beautiful resource. It’s an excellent way to teach children about environmental responsibility, the importance of recycling, and the value of giving items a second life. By choosing to craft with old bulbs, you’re making a conscious choice for a greener holiday season.
2. Cost-Effectiveness: Decorate More, Spend Less this Festive Season
Holiday decorating can often be an expensive endeavor, with specialty ornaments and unique decor items adding up quickly. Crafting your own ornaments from items you already have on hand, such as used light bulbs, significantly cuts down on costs. Instead of purchasing new baubles, you’re transforming materials that would otherwise be thrown away into unique, high-quality treasures. This allows you to allocate your budget to other festive delights, such as delicious holiday meals or meaningful gifts, or simply save for future needs. It’s smart, creative, and budget-friendly!
3. Uniqueness and Personalization: Decorations with a Story and Soul
Unlike mass-produced ornaments found in every store, handmade light bulb creations are inherently unique. Each brushstroke, every piece of glitter, and every chosen design reflects your personal style and creativity. These ornaments aren’t just decorations; they’re expressions of your individuality, imbued with memories of the crafting process. They become conversation starters, pieces that evoke warmth, a sense of personal connection, and a story about their creation. Imagine the pride you’ll feel when guests admire a decoration you’ve brought to life!
4. Family Activity and Bonding: Crafting Priceless Memories Together
DIY projects are wonderful opportunities for family bonding and creating cherished memories. Gathering around a table to paint and embellish light bulbs creates lasting memories and fosters a sense of togetherness. Children, in particular, will revel in the chance to contribute to the holiday decor, proudly pointing out “their” creations on the tree for years to come. It’s an activity that transcends age, allowing everyone from toddlers (with supervision) to grandparents to participate and unleash their inner artist, strengthening family ties in the process.
5. Therapeutic Benefits of Crafting: Mindful Creation for Well-being
Engaging in creative endeavors like painting and crafting can be incredibly therapeutic. It offers a mindful escape from daily stresses, allowing you to focus on the task at hand and experience the calming rhythm of creation. The concentration required for detailed work, combined with the sensory experience of colors and textures, can be profoundly relaxing. The satisfaction of seeing a project come to life under your hands is immensely rewarding, boosting mood, fostering a sense of accomplishment, and providing a healthy outlet for self-expression.
Unleashing Creativity: Popular Light Bulb Ornament Designs to Inspire You
The beauty of light bulb ornaments lies in their incredible versatility. While the idea of a hot air balloon is captivating, the possibilities for transforming these humble objects are virtually endless. Let’s explore some popular and inspiring designs that you can easily replicate or use as a springboard for your own unique ideas.
The Whimsical Hot Air Balloon Ornament: A Touch of Magic
This design is an absolute showstopper! Transforming an ordinary light bulb into a miniature hot air balloon captures a sense of wonder, adventure, and playful elegance. The rounded shape of many traditional incandescent bulbs perfectly mimics the balloon’s canopy, making it an ideal starting point. With a little paint for vibrant patterns and a small, cleverly crafted “basket” suspended below, you can create a charming ornament that appears to float magically among your Christmas tree branches. Imagine an entire collection of these, each in a different color scheme or pattern, adding a delightful, airy touch to your holiday display or serving as a truly unique, handmade gift for someone special.
Classic Festive Characters: Santas, Snowmen, and More Cheer
The classic, bulbous shape of an incandescent light bulb is also ideally suited for painting beloved holiday characters. A simple white base coat can quickly become a jolly snowman with tiny black dots for eyes, an orange triangle for a carrot nose, and a cozy painted scarf. Similarly, a red base with a white brim transforms effortlessly into Santa’s iconic hat and rosy face. You can also paint adorable reindeer with antlers made from pipe cleaners or tiny elves peeking out from festive designs. These charming characters bring a traditional warmth and a playful spirit to your holiday display, perfect for evoking nostalgic childhood memories.
Sparkling Glamour: Glitter and Spray Paint Creations for Dazzling Effect
For those who prefer a less detailed artistic approach or simply love a bit of sparkle and shine, glitter and spray paint offer quick yet stunning results. A coat of metallic spray paint in gold, silver, bronze, or even a vibrant jewel tone can instantly elevate a plain light bulb into a sophisticated, modern ornament. For a dazzling, eye-catching effect, apply an even layer of craft glue (like Mod Podge) to the bulb’s surface and then generously roll it in fine glitter powder. The way these glittered ornaments catch and reflect the twinkling lights on your Christmas tree is truly mesmerizing, adding an undeniable festive glow and luxurious touch to your decor.
Abstract Art and Patterns: Modern and Chic Light Bulb Designs
Don’t feel limited to traditional characters or a specific theme. Light bulbs can also become canvases for abstract art, geometric patterns, or simple, elegant color blocks. Use painter’s tape or masking tape to create crisp, clean lines for stripes, chevrons, or plaid designs. Experiment with marbling techniques by swirling different paint colors in water and carefully dipping the bulb for a unique, organic pattern. These modern designs can complement a contemporary aesthetic or add an unexpected artistic flair and sophisticated touch to any decor theme, proving that even a simple light bulb can be transformed into a piece of avant-garde art.
Crafting Your Own Hot Air Balloon Light Bulb Ornament: A Detailed Step-by-Step Guide
Let’s dive into creating that magnificent hot air balloon ornament, a project that is both incredibly rewarding and visually captivating. You’ll be amazed at how easily a simple, forgotten light bulb can be transformed into a miniature marvel that will enchant everyone who sees it.
Materials You’ll Need:
- Used incandescent light bulbs (standard A19 shapes work best, but various sizes can add visual interest)
- Acrylic craft paints in your desired colors (ensure they are suitable for glass or multi-surface)
- Small paintbrushes (fine tips for details, flat brushes for base coats, sponge brushes for smooth application)
- Mod Podge or a clear acrylic spray sealant (optional, but highly recommended for durability and a professional finish)
- Hot glue gun and plenty of glue sticks
- Small “basket” components: excellent options include miniature plastic cups, bottle caps, acorn caps, small wooden beads, tiny sections of toilet paper or paper towel rolls (cut and painted), or even small thimbles.
- Twine, strong thread, thin ribbon, or embroidery floss for the hanging loop and basket strings
- Optional embellishments: tiny bows, small buttons, decorative beads, fabric scraps, sequins, fine glitter
- Newspaper, old towels, or a craft mat to protect your work surface
- Rubbing alcohol and a cotton pad or paper towel (for cleaning the bulbs)
- A drying rack or a simple setup (e.g., a piece of floral foam or a cardboard box with holes) for drying painted bulbs
Step-by-Step Instructions:
1. Prepare Your Light Bulbs Safely and Thoroughly
Safety first! Ensure your light bulbs are completely cool and detached from any power source before handling. Gently clean each bulb thoroughly with rubbing alcohol and a cotton pad or paper towel. This crucial step removes any residual grease, dust, oils, or fingerprints, ensuring that your paint adheres smoothly, evenly, and without peeling. Allow the bulbs to dry completely before proceeding to the next step. A clean surface is paramount for a lasting finish.
2. Apply Your Base Coat with Care and Precision
Using a flat paintbrush or sponge brush, apply an even base coat of your chosen main color to the main glass body of the light bulb. You will likely need two or three thin coats to achieve opaque and vibrant coverage, allowing each layer to dry thoroughly in between applications. Patience during drying is key to avoiding smudges and achieving a smooth finish. Consider light, cheerful colors like sky blue, soft yellow, pastel pink, or even a vibrant rainbow for a classic hot air balloon look. You can create a simple drying rack by sticking the metal screw base of the bulb into a small piece of floral foam or a cardboard box with a hole.
3. Add Intricate Details and Engaging Patterns
Once the base coat is completely dry, it’s time to unleash your inner artist! Use fine-tipped brushes to paint intricate stripes, playful polka dots, bold chevron patterns, elegant swirls, or even tiny landscape elements or clouds onto your balloon. You could also sketch out your design lightly with a pencil first to guide your hand. This is where your hot air balloon truly comes to life and gains its unique personality. Don’t rush this stage; precision and patience will yield the most impressive and professional-looking results. Let your imagination soar!
4. Seal Your Design for Protection and Longevity (Optional but Highly Recommended)
To protect your painted masterpiece from chips, scratches, and everyday wear, and to ensure its longevity as a cherished ornament, apply a thin, even coat of Mod Podge or a clear acrylic spray sealant once all paint layers are completely dry. This step not only adds a durable protective layer but also imparts a professional, finished look to your creation. Choose between a glossy, satin, or matte finish depending on your preference. As with painting, allow adequate drying time for the sealant to cure fully.
5. Construct and Prepare the Miniature Basket
Take your chosen “basket” component (e.g., a miniature plastic cup, bottle cap, or painted toilet paper roll section). If desired, paint it to match or complement your balloon’s colors. For instance, a small plastic cup can be painted brown or tan to realistically resemble a woven wicker basket. You could even wrap it in thin twine for added texture. Allow it to dry completely before proceeding.
6. Attach the Hanging Loop and Basket Suspension Strings
Cut a length of twine, ribbon, or sturdy thread (approximately 6-8 inches) and fold it in half to create a loop for hanging. Securely hot glue the cut ends of this loop to the metal screw base of the light bulb. This will be how your ornament hangs from the tree. Next, cut four equal lengths of thinner twine, thread, or embroidery floss. Using your hot glue gun, carefully attach one end of each string evenly spaced around the base of the light bulb, just above the metal screw part where the glass begins. Gather the other ends of these four strings and hot glue them securely inside your prepared “basket,” ensuring the basket hangs straight and evenly beneath the balloon. Trim any excess string.
7. Embellish and Personalize Your Masterpiece
This is the final, exciting touch! Add any desired embellishments to further personalize your hot air balloon ornament. Perhaps a tiny bow glued to the very top of the balloon, a small decorative button on the basket, or a delicate sprinkle of fine glitter for extra sparkle and enchantment. You can even write a small initial, a special message, or the year on the bottom of the basket to commemorate its creation or the person it’s for. Let all glue dry completely before handling or hanging. Your unique hot air balloon ornament is now ready to take flight!
Essential Tips for Successful Light Bulb Crafting
To ensure your light bulb ornament projects are both safe and successful, keep these practical tips in mind:
- Safety First: Always Handle Glass with Care: Light bulbs are made of glass and can break. Handle them gently to avoid breakage and potential cuts. If working with children, supervise closely or consider using plastic or LED bulb casings for younger kids as a safer alternative.
- Ensure Adequate Ventilation, Especially with Sprays: If you choose to use spray paints or spray sealants, always work in a well-ventilated area, preferably outdoors. Wear a mask if recommended by the product instructions to avoid inhaling fumes.
- Choose the Right Paint Types: Acrylic craft paints are excellent for light bulbs as they adhere well to glass and offer a vast spectrum of colors. Glass paints can also be used for a more translucent, stained-glass effect. Ensure your chosen paints are non-toxic, especially if children are involved.
- Patience is Key: Allow Ample Drying Time: This cannot be stressed enough. Allow each coat of paint and every application of glue to dry completely before adding the next layer, handling the ornament extensively, or applying a sealant. Rushing this step often leads to smudges, uneven finishes, and longer overall project times.
- Protect Your Workspace Diligently: Lay down newspaper, old towels, a plastic tablecloth, or a dedicated craft mat to prevent paint or glue from damaging your tables or floors. Accidental spills happen, and preparation saves cleanup time.
- Get Creative with Bulb Bases and Shapes: Don’t limit yourself to traditional incandescent bulbs. Explore different shapes and sizes of defunct bulbs for varied and interesting results. Oddly shaped bulbs can inspire unique character designs or abstract forms.
- Involve the Kids Safely and Creatively: Assign age-appropriate tasks when crafting with children. Younger children can help with applying base coats, painting large areas, or sprinkling glitter, while older children can tackle more intricate designs, detailed painting, or glue gun work under strict supervision.
Beyond the Tree: Creative Uses and Thoughtful Gifting Ideas
While these light bulb ornaments are absolutely perfect for adorning your Christmas tree, their utility and charm extend far beyond the holiday season. They make exquisite, heartfelt gifts for friends, family, teachers, and colleagues, showcasing the effort and love you’ve poured into their creation. Imagine a set of themed hot air balloon ornaments as a whimsical baby shower gift, or personalized festive characters for each family member as a memorable, annual keepsake. They can also be strung together to create a unique garland for a mantelpiece or doorway, hung individually in windows to catch the light, or used as charming table centerpieces for a festive dinner, perhaps nestled among some evergreens and fairy lights. Their adaptability means they can brighten any corner of your home, bringing a touch of handmade warmth, individuality, and sustainable elegance wherever they are displayed, long after the holidays are over.
Start Collecting and Creating Today! Your Artistic Journey Awaits
The next time a light bulb burns out in your home, don’t rush to toss it away. See it not as waste, but as a blank canvas awaiting your artistic touch. Embark on this delightful journey of upcycling and transform those forgotten bulbs into dazzling hot air balloons, cheerful snowmen, whimsical creatures, or any enchanting design your imagination conjures. This project is more than just crafting; it’s an invitation to embrace sustainability, express boundless creativity, and forge beautiful, lasting memories with loved ones. Gather your supplies, clear your workspace, and get ready to illuminate your holidays with unique, handmade charm and a sense of accomplishment. Happy crafting, and may your creations bring joy and sparkle!