
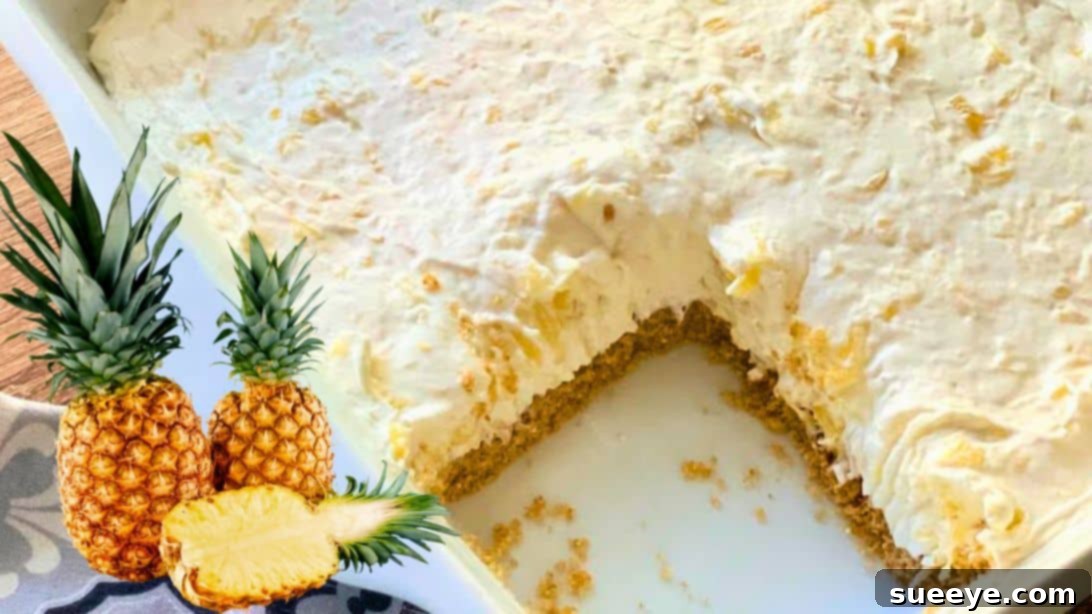
Easy No-Bake Pineapple Dream Dessert: Your New Favorite Tropical Treat
Prepare to delight your taste buds with an incredibly simple yet utterly delicious dessert that requires absolutely no baking! This No-Bake Pineapple Dream Dessert, inspired by Joanne Pimentel, is a true culinary gem, boasting a perfect harmony of sweet, tangy, and lusciously creamy textures. It’s the ultimate solution for anyone craving a homemade treat without spending hours in the kitchen, making it ideal for busy weekdays, spontaneous gatherings, or even those wonderfully lazy weekends. If you’re searching for a hassle-free recipe that promises impressive results and a refreshing tropical escape in every bite, then look no further. This comprehensive guide will walk you through each effortless step to create a dessert that will have everyone asking for seconds. Get ready to transform simple ingredients into a dream-worthy creation that is both quick to prepare and incredibly satisfying!
Why This No-Bake Pineapple Dream Dessert is a Must-Try
This delightful recipe stands out for numerous reasons, making it an instant favorite for dessert lovers everywhere. Here’s why you’ll want to whip up this pineapple dream dessert today:
- Effortless Preparation: Forget about preheating ovens or complex baking techniques. This recipe is designed for maximum simplicity, making it accessible even for beginner cooks who want to impress.
- No Oven Required: Perfect for warm weather when you want to avoid heating up your kitchen, or simply when you prefer a quick, no-fuss dessert option that saves energy and time.
- Refreshing Tropical Flavor: The star of the show, crushed pineapple, delivers a vibrant, tangy sweetness that beautifully complements the rich creaminess of the filling. Every bite is like a mini-vacation to a tropical paradise!
- Rich and Creamy Texture: A decadent blend of cream cheese, butter, and Cool Whip creates an irresistibly smooth and velvety filling that melts in your mouth, leaving a delightful lingering taste.
- Perfect Balance of Sweet and Tart: The inherent tartness of the pineapple cuts through the sweetness of the cream, creating a perfectly balanced flavor profile that is never cloying, ensuring a refreshing experience.
- Quick to Assemble: While it requires essential chilling time, the active preparation takes minimal effort, allowing you to enjoy more of your day without being tied to the kitchen.
- Crowd-Pleaser: This dessert is universally loved! Its appealing flavor and texture make it an undeniable hit at potlucks, family dinners, backyard barbecues, and all kinds of celebrations.
- Versatile for Any Occasion: From a simple weeknight treat to an elegant party dessert, its charming simplicity and delicious taste fit seamlessly into any setting or gathering.
Essential Ingredients for Your Dreamy Pineapple Creation
Crafting this incredible no-bake dessert requires a few readily available ingredients that are likely already in your pantry or easily found at any grocery store. The beauty lies in their simplicity and how they come together to form something truly extraordinary. Remember, using quality ingredients at the right temperature is key to achieving the best results and the most satisfying texture.
For the Irresistible Graham Cracker Crust:
- 1 1/2 cups of graham cracker crumbs: These form the classic, buttery, and slightly sweet base of our dessert. You can buy pre-crushed crumbs for convenience or easily crush about 12 full graham cracker sheets yourself using a food processor or by placing them in a Ziploc bag and crushing with a rolling pin. They provide a delightful texture and a subtle, comforting sweetness.
- 1/3 cup of granulated sugar: Adds a touch of extra sweetness to the crust, enhancing its flavor profile and helping it bind together more effectively when combined with the butter.
- 1/2 cup or 1 stick of unsalted butter (melted): The essential binder for our crust. Melted butter thoroughly coats the crumbs, holding them together firmly and ensuring a delicious base that won’t crumble apart when sliced. Using unsalted butter allows you to control the overall saltiness of the dessert.
For the Luscious Pineapple Cream Filling:
- 8 oz bar of cream cheese (softened): The cornerstone of our creamy filling. It is crucial to ensure it’s fully softened to room temperature before mixing for a smooth, lump-free mixture. It provides a rich, tangy base that pairs perfectly with the sweet-tart pineapple.
- 1/2 cup or 1 stick of unsalted butter (softened): Working in harmony with the cream cheese, softened butter adds extra richness and helps create that desirable velvety texture for the filling. As with the cream cheese, ensure it’s at room temperature for optimal blending and a consistent, smooth result.
- 1 to 2 cups of powdered sugar (confectioners’ sugar): This finely milled sugar dissolves easily, ensuring a silky-smooth filling without any grainy texture. You can adjust the amount within this range to achieve your preferred level of sweetness.
- 20 oz can of crushed pineapple (drain the juice well): The star flavor of our dessert! Make sure to drain the pineapple exceptionally well – excess moisture is the enemy here and can make your filling watery, preventing it from setting properly. Press it firmly in a fine-mesh sieve or use paper towels to absorb extra liquid.
- 8 oz container Cool Whip (thawed): This light and airy whipped topping gives the filling its signature fluffy texture and helps lighten the richness of the cream cheese and butter mixture. Ensure it’s thawed in the refrigerator before use, but avoid letting it sit at room temperature for too long.
Step-by-Step Instructions: Crafting Your Pineapple Dream Dessert
Follow these simple, detailed steps to bring your delightful No-Bake Pineapple Dream Dessert to life. Precision and patience, especially during the crucial chilling phase, will yield the best and most delicious results.
Step 1: Prepare the Graham Cracker Crust Mixture
Begin by taking a large mixing bowl. Add 1 1/2 cups of your graham cracker crumbs, 1/3 cup of granulated sugar, and 1/2 cup (one stick) of melted unsalted butter. Using a fork or a spatula, mix these ingredients thoroughly until they are well combined. The mixture should resemble wet sand, with all the crumbs evenly coated in butter and sugar. This ensures a cohesive, flavorful, and sturdy crust for your dessert.
Step 2: Form and Chill the Crust
Carefully transfer the graham cracker crumb mixture into the bottom of a 9×9 inch baking dish. Alternatively, an 8×8 inch dish will yield a thicker crust, or a 9×13 inch dish for a thinner crust and more servings. Spread the mixture evenly across the bottom of the pan. Now, using the back of a spoon or the bottom of a flat glass, firmly press the mixture down to create a compact and even crust. This crucial step prevents the crust from falling apart when served. Once pressed, place the dish with the crust into the refrigerator to chill while you prepare the creamy pineapple filling. Chilling allows the butter to solidify, effectively setting the crust and making it firm.
Step 3: Create the Creamy Filling Base
In a separate medium-sized mixing bowl, add the 8 oz of softened cream cheese and 1/2 cup (one stick) of softened unsalted butter. Using an electric mixer (handheld or stand mixer) on medium speed, beat these two ingredients together until they are light, fluffy, and thoroughly combined. This might take 2-3 minutes. Make sure to scrape down the sides of the bowl as needed to ensure everything is incorporated smoothly. Next, gradually add 1 to 2 cups of powdered sugar, starting with one cup and adding more to taste. Mix again until the sugar is fully incorporated and the mixture is smooth, creamy, and completely free of lumps.
Step 4: Fold in the Drained Pineapple
To the creamy base you just prepared, add the well-drained crushed pineapple. It’s absolutely vital that the pineapple is drained exceptionally well to prevent a watery filling that won’t set. Use a spatula to gently fold the crushed pineapple into the cream cheese mixture. Continue folding until the pineapple is evenly distributed throughout the cream, ensuring every single bite will have that wonderful tropical burst of flavor. Be gentle during this step to maintain the airy texture of the cream.
Step 5: Incorporate the Cool Whip for Lightness
Finally, add the 8 oz container of thawed Cool Whip to the pineapple and cream cheese mixture. Using your spatula, gently fold the Cool Whip into the mixture until it is just combined and no streaks remain. Avoid overmixing at all costs, as this can deflate the Cool Whip and reduce the fluffy, light texture of your filling. The goal is a light, airy, and uniform consistency that will hold its shape beautifully.
Step 6: Assemble and Chill for Perfection
Retrieve your chilled graham cracker crust from the refrigerator. Carefully spoon the entire cool whip cream cheese mixture evenly over the crust. Use a spatula or the back of a spoon to spread it smoothly from edge to edge, ensuring a consistent layer. Once the filling is evenly spread, cover the dish tightly with plastic wrap. Return the dessert to the refrigerator and chill for at least a few hours, or ideally, overnight. Chilling is crucial as it allows the filling to set properly, firm up, and ensures all the flavors meld beautifully, resulting in a perfectly sliceable and enjoyable dessert.
Step 7: Slice, Serve, and Savor
Once thoroughly chilled and perfectly set, take your No-Bake Pineapple Dream Dessert out of the refrigerator. For the cleanest slices, use a sharp knife dipped in hot water and wiped clean between each cut. This technique creates neat, professional-looking edges. Serve immediately and enjoy the delightful combination of a buttery, crunchy crust, a velvety-smooth, creamy filling, and the refreshing tang of pineapple. This dessert is unequivocally best enjoyed chilled, offering a cool and satisfying treat.
Expert Tips for a Flawless No-Bake Pineapple Dream Dessert
To ensure your dessert turns out perfectly every single time, achieving that ideal texture and flavor, keep these professional tips in mind:
- Room Temperature Ingredients are Key: For the cream cheese and butter, always allow them to soften at room temperature for at least 30-60 minutes before you begin mixing. This ensures a smooth, lump-free filling that blends beautifully and incorporates air effectively. Cold ingredients will result in a clumpy, less appealing texture.
- Drain Pineapple Thoroughly: This cannot be stressed enough! Excess liquid from the crushed pineapple is the most common culprit for a runny filling that fails to set properly. Use a fine-mesh sieve and press out as much juice as possible. For extra precaution, you can even pat the pineapple dry with paper towels after draining to remove any lingering moisture.
- Don’t Overmix the Cool Whip: When incorporating the Cool Whip, fold it gently and slowly until it is just combined. Overmixing can cause the Cool Whip to lose its airy volume, resulting in a denser, less fluffy filling.
- Chill Adequately: The chilling time is absolutely crucial for the dessert to set completely and for the flavors to fully meld together. While a few hours might suffice in a pinch, chilling overnight (8+ hours) is highly recommended for the firmest texture, best flavor development, and easiest slicing. Plan accordingly for your event!
- For Cleaner Slices: Before each cut, dip your knife in hot water and wipe it clean. This simple trick creates clean, sharp edges, making your dessert look as good as it tastes and presenting beautifully.
- Garnish for Extra Flair: Before serving, consider garnishing with a few fresh pineapple chunks, a sprinkle of toasted coconut flakes, a sprig of fresh mint, or even a dollop of extra Cool Whip topped with a maraschino cherry for a pop of color and added visual appeal.
- Proper Storage: Store any leftovers tightly covered with plastic wrap or in an airtight container in the refrigerator for up to 3-4 days. The crust may soften slightly over time, but the flavor will remain excellent.
Creative Variations and Customizations for Your Tropical Treat
While the classic No-Bake Pineapple Dream Dessert is perfect as is, feel free to get creative and customize it to your liking. Here are a few ideas to inspire you and make this recipe truly your own:
- Alternative Crusts:
- Vanilla Wafer Crust: Substitute graham cracker crumbs with crushed vanilla wafers for a slightly different sweet flavor profile and a lighter color.
- Shortbread Crust: Crushed shortbread cookies can offer a richer, more buttery base with a delicate crumb, providing an elegant twist.
- Coconut Macaroon Crust: For an extra tropical twist that complements the pineapple beautifully, use crushed coconut macaroons for the crust.
- Ginger Snap Crust: For a hint of spice, try using crushed ginger snap cookies, which pair surprisingly well with pineapple.
- Add-ins for the Filling:
- Toasted Coconut: Fold in some toasted shredded coconut into the filling for added texture, a deeper tropical flavor, and a satisfying chewiness.
- Chopped Nuts: A small amount of finely chopped pecans or walnuts can add a pleasant crunch and earthy undertone.
- Citrus Zest: A teaspoon of fresh lemon or lime zest can brighten the flavors and add a zesty, aromatic kick to the creamy filling, enhancing the tartness.
- Vanilla Extract: A splash of good quality vanilla extract (1 tsp) can subtly enhance the overall sweetness and complexity of the cream filling, providing a comforting depth of flavor.
- Cream of Coconut: For an even richer, more intensely tropical flavor, consider adding a tablespoon or two of cream of coconut to the filling mixture (adjust sugar accordingly).
- Individual Servings:
- Instead of a large dish, prepare this dessert in individual ramekins, elegant dessert glasses, or small mason jars for charming single servings. Simply layer the crust and filling, then chill. These are perfect for parties or portion control.
- Layered Dessert Parfait:
- Create an impressive visual by layering the crushed graham cracker mixture and the pineapple cream filling in tall clear glasses, ending with a dollop of Cool Whip and a garnish.
Frequently Asked Questions (FAQs)
Here are answers to some common questions about making this delightful no-bake dessert, addressing typical concerns and providing helpful insights:
- Can I use fresh pineapple instead of canned?
While canned crushed pineapple is convenient and typically preferred for its consistent moisture content and texture, you *could* use fresh pineapple. However, you’d need to very finely dice it and ensure it’s extremely well-drained and patted dry, as fresh pineapple has a higher water content. Be aware that fresh pineapple contains an enzyme (bromelain) that can sometimes break down dairy proteins, potentially leading to a softer or less stable filling over time. Canned pineapple has this enzyme neutralized by the canning process, making it a safer bet for stability. - What can I use if I don’t have Cool Whip?
You can substitute Cool Whip with homemade whipped cream. To do this, whip 1 1/2 cups of heavy cream with 2-3 tablespoons of powdered sugar and 1/2 teaspoon of vanilla extract until stiff peaks form. However, homemade whipped cream tends to be less stable than Cool Whip, so your dessert might not be as firm and should be served more quickly after chilling. - How long does this dessert last in the refrigerator?
When stored properly in an airtight container or tightly covered with plastic wrap, this No-Bake Pineapple Dream Dessert will last for 3 to 4 days in the refrigerator. The graham cracker crust may soften slightly over time, but the flavors will continue to be delicious. - Can I freeze this dessert?
Yes, you can freeze this dessert! To do so, cover the dish tightly with plastic wrap and then wrap it again with aluminum foil to prevent freezer burn. It can be frozen for up to 1-2 months. Thaw it in the refrigerator overnight before serving. The texture may change slightly upon thawing, becoming a little softer. - Can I make this dessert ahead of time for an event?
Absolutely! In fact, making it a day ahead is highly recommended as it allows ample time for the dessert to chill and set completely, and for all the delicious flavors to fully meld together. This makes it a perfect, stress-free make-ahead option for parties, potlucks, and gatherings. - What size baking dish should I use?
A 9×9 inch baking dish is ideal for the proportions listed in this recipe, yielding a good thickness. An 8×8 inch dish will result in an even thicker dessert, while a 9×13 inch dish will produce a thinner dessert but provide more servings. Choose based on your preference for thickness and the number of servings you need. - Can I reduce the sugar in the recipe?
Yes, you can adjust the amount of powdered sugar in the filling to suit your taste, especially if you prefer a less sweet dessert. Start with 1 cup and add more gradually. However, be mindful that sugar also contributes to the filling’s texture and stability.
Concluding Thoughts on Your No-Bake Pineapple Dream
There you have it – a comprehensive guide to creating a truly spectacular No-Bake Pineapple Dream Dessert. This recipe brilliantly proves that you don’t need complicated techniques, an oven, or fancy equipment to whip up an unforgettable, crowd-pleasing treat. With its perfectly crisp and buttery graham cracker crust, a velvety-smooth, tangy-sweet pineapple cream filling, and the delightful ease of preparation, it’s destined to become a staple in your recipe collection for years to come.
Whether you’re looking for a refreshing summer dessert to beat the heat, a quick and impressive party contribution, or simply a comforting and delicious treat to enjoy at home, this No-Bake Pineapple Dream delivers on all fronts. So, gather your simple ingredients, follow these straightforward steps, and get ready to experience a burst of tropical bliss that will leave everyone wanting more. Don’t hesitate to give this delightful recipe a try; you’ll be amazed at how effortlessly you can create such a dreamy, delicious dessert that is both easy and incredibly satisfying!