
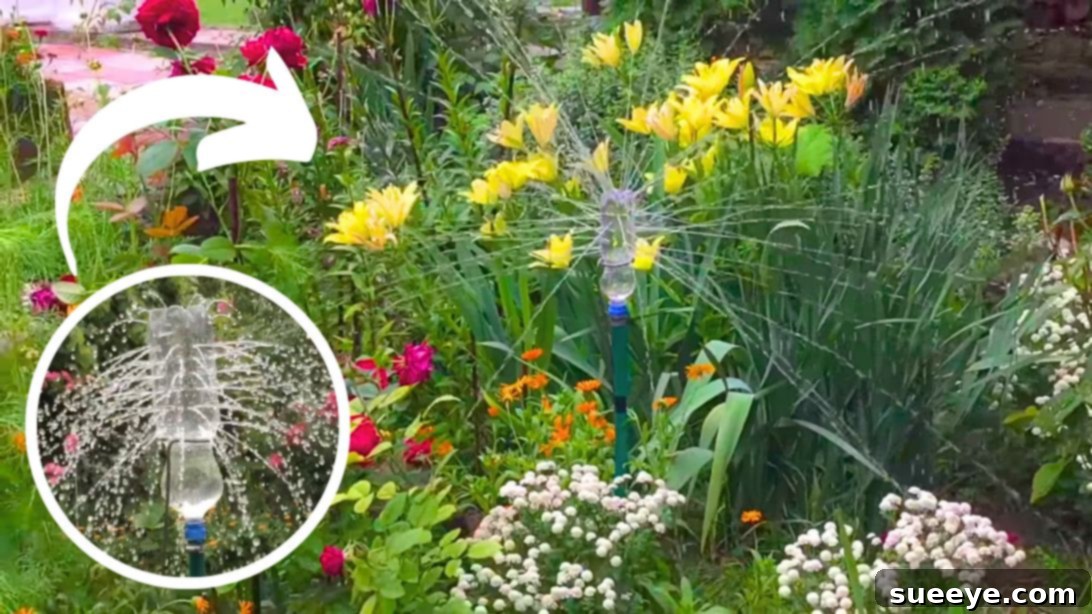
Transform Your Garden: Effortless DIY Sprinkler System Using Plastic Bottles
Are you a gardening enthusiast looking for smarter, more efficient ways to keep your plants thriving without breaking the bank? Or perhaps you’ve just started your gardening journey and realized that manual watering can be a tedious and time-consuming chore. We’ve all been there, dreaming of a simpler solution that delivers consistent hydration to our beloved plants.
The good news is, achieving a lush and well-watered garden doesn’t require complex, expensive irrigation systems. In fact, one of the most ingenious and budget-friendly solutions can be found right in your recycling bin! We recently stumbled upon an incredibly simple yet effective video tutorial by Yuri Ostr on YouTube that completely revolutionized our approach to garden watering. This brilliant DIY sprinkler idea uses nothing more than an empty plastic bottle, a drill, and a few common garden supplies. It’s so straightforward, you can install multiple sprinklers across your garden or yard in no time, transforming your watering routine from a chore into a breeze.
Beyond its simplicity, this DIY sprinkler system offers a fantastic opportunity to repurpose plastic waste, aligning perfectly with sustainable gardening practices. If you’re ready to embrace a more efficient, eco-friendly, and cost-effective way to water your garden, then keep reading. We’ll guide you through the materials, detailed instructions, and provide valuable tips to customize and optimize your very own plastic bottle sprinkler.
Why Choose a DIY Plastic Bottle Sprinkler?
Before we dive into the “how-to,” let’s explore why this homemade sprinkler is an absolute game-changer for gardeners of all levels:
- Unbeatable Cost-Effectiveness: The primary components are an empty plastic bottle and a few standard hose attachments, significantly reducing the expense associated with traditional sprinkler systems.
- Eco-Friendly Repurposing: Give plastic bottles a second life, reducing waste and contributing to a greener planet. It’s a fantastic example of upcycling in action.
- Simplicity and Speed of Installation: Forget complicated plumbing or electrical work. This sprinkler can be assembled and installed in minutes, even by beginners.
- Customizable Watering: Adjust the spray pattern and water pressure by varying the size and number of holes you drill, tailoring the irrigation to your specific plants’ needs.
- Portability and Flexibility: Easily move your sprinkler to different areas of your garden as needed, ensuring every corner receives adequate hydration.
- Ideal for Small to Medium Gardens: While large landscapes might require multiple units, this solution is perfect for targeted watering in smaller garden beds, vegetable patches, or newly seeded lawns.
- Educational Project: It’s a great activity for families and children to learn about water conservation, engineering, and sustainable living.
Materials You’ll Need:
Gathering your materials is the first and easiest step. Most items are likely already in your home or readily available at any hardware store or garden center.
- An Empty Plastic Bottle: Any standard plastic soda or water bottle (e.g., 1-liter, 2-liter) will work. Clear bottles are often preferred as you can see the water flow, but opaque ones are perfectly fine. Ensure it’s clean and dry.
- Drill: A standard electric drill is perfect.
- Thin Metal Rod: This will serve as the stake to hold your sprinkler upright. A garden stake, a sturdy wire hanger straightened out, or even a piece of rebar can be adapted. Choose one that’s strong enough to support the bottle and withstand being pushed into the soil.
- Hose: Your standard garden hose for water supply.
- Hose Attachments: You’ll need an adapter that screws onto the mouth of your plastic bottle and connects to your garden hose. These are commonly found as part of hose repair kits or in the garden irrigation section of hardware stores. Look for a “male” threaded adapter for the bottle and a “female” threaded connector for the hose end.
- Optional but Recommended: Small drill bits (various sizes), marker, safety glasses, gloves.
Step-by-Step Directions to Create Your DIY Sprinkler:
Follow these straightforward steps, and you’ll have a functional garden sprinkler in no time. Remember to always prioritize safety when using tools.
Step 1: Preparing Your Plastic Bottle for Spray
This step involves transforming your ordinary plastic bottle into an effective water dispenser.
- Select Your Bottle: Choose a clean, empty plastic bottle. The size of the bottle can impact the overall coverage and how long it takes to empty if used in a drip-like fashion, but for a sprinkler, it primarily acts as a vessel for the spray nozzles.
- Mark Your Drilling Area: Using a marker, delineate the area on the bottom half of the bottle where you want the water to spray from. This usually encompasses the lower 3 to 4 inches of the bottle.
- Drill the Holes: Put on your safety glasses. Using your drill, create small holes all over the marked bottom half of the bottle. The key here is to experiment:
- Smaller holes will result in higher water pressure and a finer mist or longer, thinner streams, ideal for delicate plants or areas needing gentle watering.
- Larger holes will produce a softer, wider spray with less pressure, suitable for established plants or broader coverage.
- Varying hole sizes and patterns can create unique spray effects. Consider drilling some holes horizontally for lateral spray and others at a slight upward angle for a more parabolic trajectory.
Space the holes about 1/2 to 1 inch apart to ensure even water distribution without compromising bottle integrity.
- Attach the Hose Connector: Take your hose attachment (the one designed to screw onto a bottle mouth). Screw it tightly onto the mouth of the plastic bottle. Ensure it forms a secure, watertight seal. If it feels loose, you might need a different size adapter or some plumber’s tape for an extra seal.
- Connect to Your Garden Hose: Attach the other end of the hose attachment securely to your garden hose. Tighten any locking mechanisms or screw connections firmly to prevent leaks once the water is turned on.
Step 2: Installing Your Sprinkler and Enjoying the Water Flow
With the bottle prepared, it’s time for installation and testing.
- Prepare the Metal Rod: Take your thin metal rod. Shape one end into a coil-like or hooked shape. This coil will comfortably cradle or hang the plastic bottle, holding it securely in place. Ensure the coil is large enough to accommodate the bottle’s base or body without slipping, but snug enough to provide stability. Alternatively, you can create a simple loop or bend that the bottle can rest against or be tied to.
- Insert the Bottle onto the Rod: Carefully insert the plastic bottle into the coil or resting against the shaped part of the metal rod, as demonstrated in the original video tutorial. The bottle should hang or sit securely, allowing it to be positioned at the desired height.
- Position Your Sprinkler: Carry the assembled sprinkler and rod to the area in your garden where you want the sprinkler to operate. Push the straight end of the metal rod firmly down into the soil until it is stable and the bottle is at an optimal height for spraying your plants. Consider the desired coverage area and the height of your plants when positioning. For taller plants, the bottle might need to be higher to clear foliage; for ground cover, a lower position might be more effective.
- Turn On the Water: Once everything is securely in place, slowly turn on the water supply to your garden hose. Watch as your DIY plastic bottle sprinkler comes to life, gently (or vigorously, depending on your holes!) watering your garden.
- Adjust and Optimize: Observe the spray pattern. If the coverage isn’t ideal, you can adjust the height of the rod, move the sprinkler, or even add more holes to the bottle.
Tips for Optimizing Your DIY Bottle Sprinkler
To get the most out of your homemade irrigation system, consider these expert tips:
- Vary Hole Sizes for Targeted Watering: Use tiny holes for delicate seedlings or plants that prefer a fine mist. Employ slightly larger holes for established plants or areas needing a heavier soak.
- Create Multiple Sprinklers: For larger gardens or unevenly shaped beds, create several bottle sprinklers and connect them using a hose splitter or a simple PVC pipe manifold to achieve comprehensive coverage.
- Consider Water Pressure: If you have very high water pressure, even small holes might produce a powerful jet. You can partially close the tap or use a pressure regulator to soften the flow. For low pressure, ensure your holes aren’t too large, as this can dissipate the limited pressure too quickly.
- Strategic Placement: Place sprinklers in areas that need the most water, typically closer to the root zones of plants. Avoid overspraying paved areas or pathways.
- Use a Timer: For truly automated watering, connect your hose to an inexpensive garden hose timer. This allows you to set precise watering schedules, saving even more time and ensuring consistent hydration.
- Regular Cleaning: Over time, mineral deposits or debris from your water supply might clog the small holes. Periodically inspect and clean the holes with a thin wire or needle.
- Protect from UV Rays: Prolonged exposure to sunlight can degrade plastic bottles. While they are usually replaced often, consider using slightly thicker plastic bottles or providing some partial shade for the sprinkler to extend its life.
- Alternative Stands: If a metal rod isn’t available, sturdy bamboo stakes, wooden dowels, or even sections of PVC pipe can be used to support your bottle sprinkler.
Troubleshooting Common Issues
While this DIY sprinkler is incredibly simple, you might encounter a few minor hiccups. Here’s how to address them:
- Uneven Spray Pattern: This often results from unevenly drilled holes or some holes being clogged. Inspect the holes and clear any blockages. You might need to drill a few more holes or slightly enlarge existing ones to balance the spray.
- Leaks at the Hose Connection: Ensure your hose attachment is screwed on tightly and that its internal washer is intact. If leaks persist, try adding plumber’s tape around the bottle neck threads before screwing on the adapter.
- Bottle Falling Over: The metal rod might not be deep enough in the soil or the coil/hook isn’t secure. Push the rod deeper or reshape the coil to hold the bottle more firmly. Consider using a thicker or longer rod for better stability.
- Low Water Pressure/Weak Spray: Check if your hose is kinked or if the main water tap isn’t fully open. If the pressure is generally low, try reducing the number or size of the holes in your bottle to concentrate the available pressure.
Embracing Sustainable Gardening Practices
This DIY plastic bottle sprinkler is more than just a convenient watering tool; it’s a testament to sustainable living. By transforming discarded plastic bottles into a functional garden utility, you are actively participating in:
- Waste Reduction: Diverting plastic from landfills and oceans, giving it a practical second life.
- Water Conservation: When positioned correctly, homemade sprinklers can deliver water directly to the plant root zone, minimizing evaporation and runoff compared to overhead watering with a standard hose.
- Reduced Carbon Footprint: Less reliance on manufacturing new products means fewer resources consumed and less energy expended in production and transportation.
Ready to Hydrate Your Garden?
With these simple instructions and tips, you’re now equipped to create an efficient, cost-effective, and environmentally friendly watering solution for your garden. This project is a fantastic entry point into the world of DIY gardening, proving that ingenious solutions don’t have to be complicated or expensive.
Give this easy DIY sprinkler a try and witness the difference it makes in your gardening routine and the health of your plants. It’s a satisfying project that yields tangible benefits, allowing you to spend less time watering and more time enjoying your beautiful outdoor space. Don’t forget to visit Yuri Ostr’s YouTube channel for the original inspiration and more fantastic gardening ideas. Happy gardening!
*Many thanks to Yuri Ostr via YouTube for sharing this brilliant idea and providing the images used here. If you found this project helpful, we highly recommend checking out his other videos for more creative and practical solutions!