
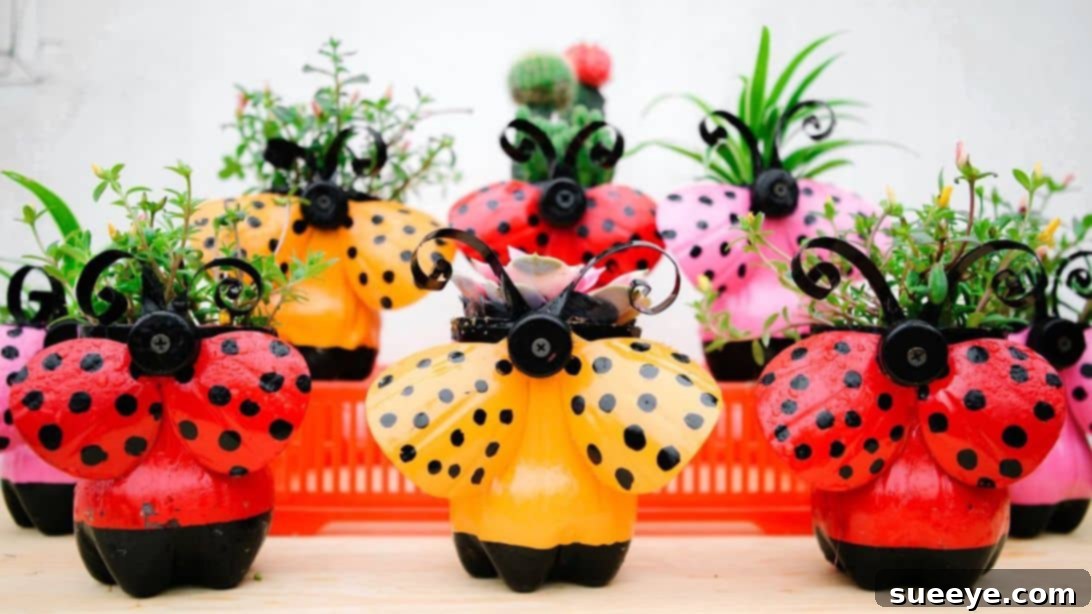
Are you looking for a creative, eco-friendly way to add a touch of whimsy to your home or garden? Imagine transforming ordinary plastic bottles, which often end up in landfills, into charming and colorful decorative items! This delightful DIY project allows you to repurpose common household waste into adorable ladybug flower pots, perfect for housing small plants or succulents. Not only is it a fun and engaging craft for all ages, but it also promotes sustainability by giving plastic a second life. Inspired by the ingenious ideas shared by 5T1 Garden on Youtube, these vibrant ladybug planters are sure to bring a smile to your face and a pop of color to any space. Let’s dive into creating these captivating ladybug flower pots from plastic bottles, combining a love for crafting with a commitment to our planet.
Embracing the art of upcycling has never been more rewarding. This project is a fantastic opportunity to unleash your creativity, experiment with different colors, and even involve your family in a meaningful activity. Beyond their aesthetic appeal, these handmade planters serve as a gentle reminder of the power of repurposing and the impact small actions can have on environmental conservation. Get ready to gather your materials and embark on a crafting journey that’s both enjoyable and impactful. You’ll be amazed at how easily you can transform simple plastic bottles into these bright, cute, and utterly charming ladybug flower pots!
Materials You’ll Need for Your Ladybug Flower Pots
Before you begin this exciting craft project, gathering all your materials beforehand will ensure a smooth and enjoyable experience. Most of these items are readily available, either around your home or at a local craft store.
- Plastic Bottle: The star of our project! Look for sturdy plastic bottles, such as those used for soda, water, or milk. Larger bottles will yield larger pots, offering versatility for different plant sizes. Ensure it’s clean and dry before use.
- Blade or Craft Knife: Essential for precise initial cuts. Always handle with extreme care and use on a protected surface. Adult supervision is highly recommended if children are involved.
- Scissors: For refining cuts and shaping the smaller plastic pieces. A sharp pair will make the process much easier.
- Marker: A permanent marker works best for drawing guide lines on the plastic. Choose a color that stands out against the bottle.
- Black and Red Paint: These are the classic ladybug colors. Acrylic paints are ideal as they adhere well to plastic and are water-soluble for easy cleanup. Feel free to experiment with other vibrant colors for unique ladybug variations!
- Painter’s Tape: Crucial for creating clean, crisp lines when painting different sections of the ladybug. Low-tack tape is best to avoid lifting paint.
- Screw (or awl/drill): This is for creating drainage holes in the bottom of your pot. A heated screw can melt through plastic easily and safely (with caution).
- Paint Brush: Various sizes can be helpful – a larger one for broad strokes and a smaller one for detailed work like dots.
- Strong Adhesive (e.g., hot glue gun or super glue): While not explicitly listed, you will need this for attaching the wings, antennae, and the bottle cap head securely.
Having these items ready will set you up for success, allowing you to focus on the creative process without interruption. Remember, safety first, especially when working with cutting tools!
Step-by-Step Instructions: Crafting Your Ladybug Flower Pots
Follow these detailed instructions carefully to bring your adorable ladybug flower pots to life. Take your time with each step, especially the cutting and painting, for the best results.
Step 1: Prepare the Plastic Bottle for Its New Life
Begin by thoroughly cleaning your chosen plastic bottle. Remove any labels and wash it inside and out with soap and water. Allow it to dry completely. This ensures that paint will adhere properly and your pot will be hygienic for plants. Next, using your blade or craft knife, carefully cut off the bottom part of the bottle. Many bottles have a natural line or groove where the bottom curves, which can serve as a guide. Aim for a clean, even cut. This will form the main body of your ladybug pot. Then, cut off the top part of the bottle, just below the neck where it begins to widen. This section will be used to create the ladybug’s wings. Always exercise extreme caution when using a blade; consider wearing protective gloves and cutting on a stable, non-slip surface.
Step 2: Crafting the Iconic Ladybug Wings
Take the top part of the bottle that you cut in the previous step. Carefully cut the neck portion off, leaving just the wider, curved plastic. Now, cut this piece into two equal halves lengthwise. These two pieces will become your ladybug’s wings. On each half, use your marker to draw two vertical lines extending downwards from the top edge, and then connect them with a curved line at the bottom, creating a shape reminiscent of a ladybug wing. The image below provides a visual reference for this shape. Precision here will contribute to the overall aesthetic of your finished ladybug. Once you’re satisfied with your drawings, carefully cut along these lines with your scissors. Repeat this process for the second piece to create a matching pair of wings.
Step 3: Laying Down the Base Coat of Color
Now comes the fun part: painting! Take the bottom part of the bottle (which will be the main body of the ladybug) and paint it with your preferred color. While classic ladybugs are red, feel free to get creative with pink, orange, yellow, or even blue for a unique twist. Apply thin, even coats of paint to avoid drips and ensure a smooth finish. Do the same with the two wing pieces you just cut out. Applying multiple thin coats is often better than one thick coat, allowing for better adhesion and a more professional look. Place all painted pieces aside in a well-ventilated area to dry completely. Patience is key here, as rushing this step can lead to smudging or an uneven finish.
Step 4: Defining the Ladybug’s Body with Black Details
Once the base coat is thoroughly dry, it’s time to add the distinguishing black features. Apply painter’s tape around the bottom part of your pot. Place one strip just below the top edge, and another just above the curved base. This creates a clean, unpainted strip in the middle. Carefully paint the exposed top and bottom sections of the pot black. These black sections will represent the ladybug’s head and tail/lower body. The painter’s tape acts as a stencil, ensuring crisp, professional-looking lines. Allow the black paint to dry completely before proceeding to the next step. This is crucial to prevent smudging when the tape is removed.
Step 5: Crafting the Delicate Ladybug Antennae
To give your ladybug its characteristic feelers, grab another plastic bottle. Cut out the middle cylindrical part of this bottle, then cut it in half lengthwise. From this flattened plastic sheet, carefully cut two small, thin strips. These strips will serve as the antennae. The length and thickness are up to your preference, but aim for a size proportionate to your ladybug body. For a realistic touch, gently roll one end of each strip to create a small, curved tip. Once shaped, paint both antennae strips black. Let them dry completely. If you find cutting and shaping plastic strips challenging, pipe cleaners or even sturdy black wire can be excellent alternatives for antennae.
Step 6: Adding the Finishing Touches: Head and Spots
Take a plastic bottle cap and paint it entirely black. This will form the distinct head of your ladybug. While this dries, return to your painted wings. Using a smaller brush, a Q-tip, or even the back of a pencil, carefully paint several black dots onto the wings. The number and size of the dots can vary – typically, ladybugs have symmetrical spots, but feel free to express your unique artistic vision. Ensure these dots are also allowed ample time to dry completely to prevent smudging.
Step 7: The Grand Reveal: Removing Painter’s Tape
Once all the paint, especially the black sections, is completely dry to the touch, it’s time for a satisfying reveal. Gently and slowly remove the painter’s tape from the body of your ladybug pot. Peel it back at a sharp angle to ensure clean, crisp lines without lifting any paint. This step often highlights the neatness of your painting work and truly brings the ladybug shape to life.
Step 8: Assembly and Preparing for Your Plant
With all components dry, it’s time for assembly. Using a strong adhesive (like a hot glue gun or super glue), carefully attach the black antennae to the inner edge of the painted black ‘head’ section of your pot. Next, securely glue the two painted wings onto the back of the pot, allowing them to overlap slightly at the top, just like real ladybug wings. Finally, glue the black painted bottle cap onto the front of the pot, centered over the black ‘head’ section you created with tape, positioning it to look like the ladybug’s head. Now, for the practical part: using a heated screw (carefully!) or a small drill bit, create a few small drainage holes in the very bottom of your plastic pot. This is crucial for the health of your plant, preventing waterlogging. Add a layer of well-draining soil, gently place your chosen small plant or succulent, and water as needed. Your beautiful, handcrafted ladybug flower pot is now complete and ready to adorn your space!
Why This Ladybug Craft is More Than Just a DIY Project
Crafting these ladybug flower pots from plastic bottles offers a multitude of benefits that extend beyond simply creating a decorative item. It’s a project that combines creativity, environmental consciousness, and personal satisfaction.
Embrace Sustainability and Reduce Waste
One of the most significant advantages of this DIY project is its contribution to sustainability. By repurposing plastic bottles, you’re actively participating in reducing landfill waste and minimizing your environmental footprint. Instead of discarding plastic that takes hundreds of years to decompose, you transform it into something useful and beautiful. This act of upcycling highlights the potential for ordinary items to have extraordinary second lives.
Unleash Your Creativity and Personalize Your Space
This project is a fantastic outlet for creative expression. While the classic red and black ladybug is charming, you’re encouraged to experiment with different color schemes, patterns, and even alternative embellishments. Imagine a family of ladybugs in varying sizes and colors, each reflecting a unique personality. These personalized planters can add a unique, handmade touch to your home, office, or garden, making your space truly your own.
A Fun and Educational Activity for All Ages
This craft is perfect for families, offering an engaging activity that children and adults can enjoy together. Kids can develop fine motor skills, learn about recycling, and experience the satisfaction of creating something with their own hands. It’s a wonderful way to foster creativity and teach valuable lessons about environmental responsibility in a fun, hands-on manner. Plus, nurturing a plant in a pot they made themselves can be incredibly rewarding for children.
Budget-Friendly and Accessible
You don’t need expensive materials or specialized tools to create these charming planters. Most of the items required are either household discards or inexpensive craft supplies. This makes the ladybug flower pot project an incredibly accessible and budget-friendly way to engage in crafting and enhance your decor without breaking the bank.
Thoughtful and Unique Gifts
Handmade gifts always carry a special sentiment. A ladybug flower pot, complete with a small plant, makes a thoughtful and personalized gift for friends, family, or teachers. It shows care, creativity, and a commitment to sustainability, making it a truly unique present for birthdays, holidays, or just because.
Tips for Success and Creative Variations
To ensure your ladybug flower pots turn out perfectly and to inspire further creativity, consider these additional tips and variations:
- Safety First: Always prioritize safety when using sharp blades or hot glue guns. If children are involved, ensure close adult supervision.
- Ventilation for Painting: Work in a well-ventilated area when painting to avoid inhaling fumes, especially if using spray paints or oil-based markers.
- Choosing the Right Paint: Acrylic craft paints are generally excellent for plastic. For better adhesion and durability, you might consider specific plastic-bonding paints or using a plastic primer first.
- Even Paint Coats: Apply multiple thin coats of paint rather than one thick layer. This prevents drips, ensures even coverage, and helps the paint cure properly.
- Patience is a Virtue: Allow each layer of paint to dry completely before applying the next or handling the piece. Rushing can lead to smudges and an uneven finish.
- Drainage Holes are Key: For the health of your plants, never skip creating drainage holes. Without them, roots can rot from standing water.
- Experiment with Bottle Sizes: Use different sized plastic bottles to create a varied collection of ladybug planters, suitable for various small plants or as decorative groupings.
- Color Palette Exploration: Don’t limit yourself to red and black. Try yellow and black for a bee-inspired pot, or blue with white dots for a whimsical look. Pastel colors can also create a soft, charming aesthetic.
- Add Embellishments: Consider adding glitter, small googly eyes (for a more cartoonish look), or even tiny plastic beads for extra texture and sparkle.
- Different Insects: Once you master the ladybug, you can adapt the technique to create other insect-themed planters, like bumblebees, butterflies, or even frogs!
- Consider Indoor vs. Outdoor Use: If your planters will be outdoors, consider using outdoor-specific paints or applying a clear sealant for weather protection to prevent fading and chipping.
By following these tips and exploring creative variations, your ladybug flower pots will not only be functional planters but also delightful pieces of art that reflect your unique style and commitment to sustainable living.
How to Make Ladybug Flower Pots From Plastic Bottles: Your Eco-Friendly Craft Journey
Transforming plastic bottles into these charming ladybug flower pots is a truly rewarding endeavor. It’s a fantastic way to engage in sustainable crafting, unleash your creativity, and add a personal, whimsical touch to your home or garden decor. From selecting your bottles to the final placement of your plant, each step in this DIY project is an opportunity to create something beautiful and meaningful from materials that might otherwise be discarded.
Whether you’re a seasoned crafter or just starting your DIY journey, this project is accessible, enjoyable, and delivers a delightful result. The simple joy of seeing these bright, cute ladybugs bringing life to your plants is immeasurable. So, next time you finish a bottle of soda or water, think twice before tossing it. With a little imagination and a few basic supplies, you can turn that discarded plastic into an adorable, eco-friendly planter that brightens your day and contributes to a greener planet. Get creative, have fun, and enjoy the satisfaction of making your very own ladybug flower pots!