
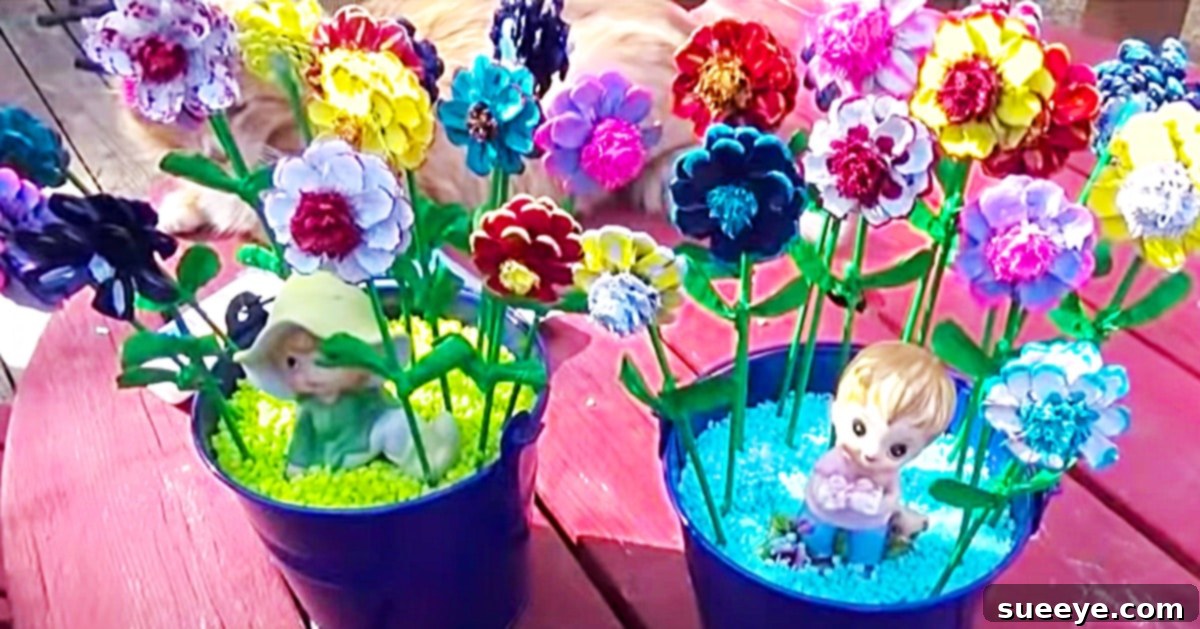
Transforming Nature’s Bounty: How to Create a Stunning DIY Pinecone Flower Bouquet
Growing up in a region celebrated for its abundant pine forests, pinecones were more than just natural debris; they were an endless source of creative inspiration and joy for countless families, including my own. Our front and backyards were always dotted with these natural treasures, perfect for a myriad of do-it-yourself projects that brought a touch of rustic charm into our homes. Recently, I stumbled upon an absolutely brilliant pinecone flower bouquet video tutorial by Janie 2 Shoes on YouTube, and it instantly sparked a nostalgic yearning. I found myself wishing I had known about this wonderful DIY craft all those years ago, imagining the beautiful bouquets we could have created. The beauty of this project lies not only in its stunning results but also in its incredible accessibility: the materials are remarkably inexpensive and widely available. In fact, if you live in an area with pine trees, you likely already have the star component – pinecones – right at your fingertips.
This tutorial offers a fantastic opportunity to transform simple elements of nature into an eye-catching decorative piece. Whether you’re a seasoned crafter or just looking for a simple, rewarding project, making a pinecone flower bouquet is a delightful way to bring the outdoors in. It’s an eco-friendly craft that celebrates the natural beauty of pinecones, giving them a vibrant new life as everlasting blooms. Forget the fleeting beauty of fresh flowers; these pinecone creations offer enduring charm and a unique aesthetic that can be tailored to any decor style. Let’s dive into how you can create your very own stunning arrangement.
Why Pinecone Flowers Are Your Next Must-Try DIY Project
Beyond their undeniable visual appeal, pinecone flowers offer a host of benefits that make them an ideal crafting choice. Firstly, they are incredibly cost-effective. Unlike fresh flowers that require regular purchases, pinecones can often be collected for free, making this an excellent budget-friendly decor option. Secondly, their longevity is unparalleled. These “flowers” won’t wilt or fade; they retain their beauty indefinitely, serving as a lasting centerpiece or accent in your home. This makes them perfect for seasonal decorations that you can reuse year after year, saving both money and time.
Furthermore, crafting with pinecones taps into a unique sense of natural artistry. Each pinecone is distinct, meaning every “flower” you create will have its own unique character, adding a genuine, handmade touch to your decor. They embody a rustic charm that can beautifully complement farmhouse, bohemian, or traditional interior design themes. The process itself is also incredibly therapeutic and satisfying, allowing you to engage with nature in a creative and mindful way. It’s a project that yields beautiful results with minimal expense, maximum impact, and a personal touch that store-bought decor simply can’t replicate.
Gathering Your Treasures: Essential Materials for Your Pinecone Masterpiece
One of the most appealing aspects of this DIY is the simplicity and affordability of the materials. Most items can be found around your home, at a local craft store, or even in your own backyard!
- Pinecones: The star of our show! Look for pinecones of varying sizes and shapes to add dimension to your bouquet. Ensure they are dry and relatively intact. If you’re collecting them fresh, it’s a good idea to bake them on a low temperature (around 200°F or 90°C for 30-60 minutes) to open them up fully, dry out any sap, and eliminate any tiny critters. This also helps to ensure they are clean and free of moisture.
- Spray Paint (in any colors you choose): Spray paint is excellent for quick, even coverage, especially for larger batches of pinecones. Consider matte or glossy finishes to achieve different effects. Choose colors that complement your home decor or reflect a specific season (e.g., metallics for winter holidays, pastels for spring).
- Craft Paint (in any colors you choose): Craft paint offers more control for detailed work, such as painting the tips of the “petals” or adding intricate designs. Acrylic craft paints are versatile and come in a vast array of colors. You might use these for accent colors or for painting specific parts of the pinecone flower after the base color is applied with spray paint.
- Bamboo Kebab Skewers (from the grocery store): These make perfect sturdy stems for your pinecone flowers. They are inexpensive and can be cut to varying lengths to create a dynamic arrangement. Alternatively, you could use floral wire (wrapped in green floral tape) for bendable stems, or even sturdy twigs for an even more rustic look.
- A Hot Glue Gun: An essential tool for securely attaching the pinecone flowers to their “stems.” Ensure your glue gun is in good working order and always practice safety when handling hot glue.
- Glue Sticks: Stock up on plenty of glue sticks to ensure you don’t run out mid-project.
- A Flower Pot or Vase: This will be the foundation for your bouquet. Choose a pot that complements your chosen colors and the overall aesthetic of your pinecone flowers. Terracotta pots, ceramic vases, or even repurposed containers can all work beautifully.
- Foam (Floral or Craft Foam): A block of floral foam or craft foam will serve as the base inside your pot, securely holding the “stems” in place. This allows you to arrange your pinecone flowers at various heights and angles.
- Pebbles, Moss, or Decorative Filler: These are used to cover the foam base in your pot, adding stability and a finished, polished look. Small decorative pebbles, Spanish moss, or even shredded paper can be excellent choices to enhance the overall aesthetic of your display.
Step-by-Step Guide to Crafting Your Stunning Pinecone Flower Bouquet
Creating these charming pinecone flowers is a straightforward process, broken down into a few enjoyable steps. The instructional video by Janie 2 Shoes on YouTube provides excellent visual guidance, but here’s a detailed breakdown to help you along the way.
Step 1: Preparing Your Pinecone “Blooms”
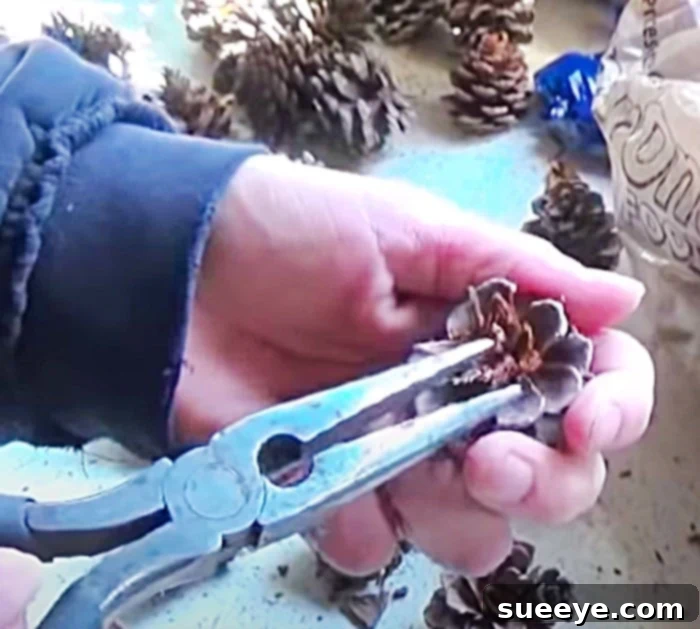
The first crucial step is to transform the traditional pinecone shape into something resembling a blooming flower. This involves a bit of trimming and shaping. Begin by carefully examining your pinecones. You’ll notice that the scales (or “leaves”) at the very top of the pinecone are typically tighter and less spread out than those towards the base. Your goal is to reveal the beautiful, open “petals” that lie beneath.
Using a strong pair of sharp scissors, garden pruners, or even a utility knife (exercise extreme caution if using a knife), carefully cut away the topmost, smallest scales of the pinecone. You’re aiming to expose the wider, more open scales beneath, which will form the “petals” of your flower. This process is quite simple once you get the hang of it; as the top layers are removed, the naturally radial pattern of the pinecone scales will begin to resemble a chrysanthemum or a dahlia. Don’t worry about perfection; the organic nature of each pinecone ensures a unique and beautiful outcome.
Step 2: Infusing Color – Painting Your Pinecone Flowers
Once your pinecones have been trimmed into their new floral shapes, it’s time to bring them to life with color. This is where your creativity can truly shine! Gather your chosen spray paints and/or craft paints. If using spray paint, work in a well-ventilated area, preferably outdoors or in a garage with open doors, and lay down newspaper or a drop cloth to protect surfaces. Apply light, even coats of spray paint, allowing each coat to dry thoroughly before applying the next. This prevents drips and ensures a smooth finish.
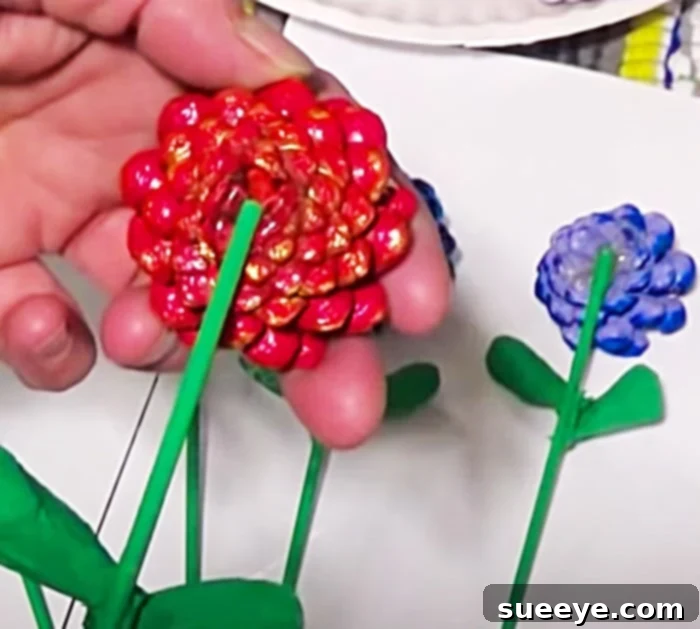
For craft paint, you can use brushes to meticulously paint each “petal” or simply dip the pinecone “flower” into a shallow dish of paint for a more uniform coating. Experiment with different techniques: you could paint the entire pinecone one solid color, or try dry-brushing a contrasting color on the tips of the scales to highlight their texture. Ombre effects, where colors subtly blend from light to dark, can also create a stunning visual impact. Consider using metallic paints (gold, silver, copper) for an elegant touch, or vibrant, playful colors for a more whimsical feel. Let your painted pinecone flowers dry completely before moving on to the next step, which may take several hours depending on the paint type and humidity.
Step 3: Crafting Stems and Leaves
Now that your pinecone “flowers” are beautifully colored, it’s time to give them stems. Take your bamboo kebab skewers and decide on varying lengths to create an interesting arrangement in your bouquet. You can paint the skewers green to mimic natural stems, or choose a color that complements your pinecone flowers for a more stylized look. Once the paint on the skewers is dry, carefully apply a generous dollop of hot glue to the flat, cut base of each pinecone flower. Immediately insert the blunt end of a painted skewer into the hot glue, pressing firmly and holding it in place until the glue sets and forms a strong bond. Ensure the skewer is centered and straight.
For an added touch of realism or decorative flair, you can create “leaves.” The simplest method is to use stray pinecone scales that you trimmed off earlier. You can paint these scales green and hot glue them along the skewer, just below the pinecone flower, to simulate leaves. Alternatively, you can cut leaf shapes from green felt, craft foam, or even sturdy paper, and glue those to the stems. This step truly elevates the authenticity and visual richness of your pinecone bouquet.
Step 4: Assembling Your Stunning Bouquet
With all your individual pinecone flowers ready, it’s time for the exciting final assembly. Take your chosen flower pot or vase and place a block of floral or craft foam inside. Ensure the foam fits snugly or secure it with a bit of hot glue to prevent it from shifting. This foam will act as the anchor for your flower stems.
Begin inserting your pinecone flowers into the foam, starting with the tallest ones in the center or back, and gradually working your way down and outwards with shorter stems. Play around with the arrangement, turning the pot and adjusting the placement of each flower until you achieve a balanced and aesthetically pleasing bouquet. Varying heights and angles will add depth and visual interest. Once you’re satisfied with the arrangement, cover the exposed foam with your chosen filler material – whether it’s decorative pebbles, dried moss, or even small pine needles for a truly natural look. This step not only conceals the foam but also adds a professional and finished touch to your beautiful, handcrafted pinecone flower bouquet.
Creative Variations and Display Ideas for Your Pinecone Flowers
While a bouquet is a classic way to display your pinecone flowers, their versatility extends far beyond a simple pot. These unique blooms can be incorporated into a wide range of creative projects to enhance your home decor or create thoughtful gifts. Consider hot gluing individual pinecone flowers onto wreaths for seasonal displays, especially stunning for autumn or winter themes. They can be strung together to form garlands for mantels or staircases, or even used as unique ornaments for a Christmas tree. Imagine scattering them as table decor for a rustic wedding or crafting them into small individual place settings for a festive dinner party.
For a unique centerpiece, combine your pinecone flowers with other natural elements like berries, twigs, or faux leaves. You can also experiment with different types of pinecones; larger ones create dramatic focal points, while smaller varieties can add delicate accents. Don’t limit yourself to traditional flower colors; neon shades, metallics, or even glow-in-the-dark paints can open up a world of whimsical possibilities. These enduring blooms make fantastic, personalized gifts for friends and family, showing off your crafting skills and a touch of nature’s beauty.
Keeping Your Pinecone Blooms Beautiful: Maintenance Tips
One of the greatest advantages of pinecone flowers is their incredible longevity. Unlike fresh flowers, they don’t require water or constant care. However, a little maintenance can ensure they remain vibrant and beautiful for years to come. To keep them dust-free, gently brush them with a soft brush, a feather duster, or use the brush attachment on your vacuum cleaner on a low setting. If your flowers are very dusty, a light misting with a gentle air compressor or canned air can work wonders, but avoid excessive moisture which could affect the paint finish.
To preserve their painted colors, it’s best to keep your pinecone bouquet out of direct, prolonged sunlight, as UV rays can cause colors to fade over time. When storing them, especially if they are part of a seasonal display, place them in a box with tissue paper or bubble wrap to protect them from crushing and dust. With these simple tips, your handcrafted pinecone flower bouquet will continue to bring natural charm and a touch of artistic flair to your space season after season.
This is truly such a cute, easy, and incredibly rewarding DIY project. I genuinely wish I had known about this wonderful craft all those years ago, but as the saying goes, it is never too late to learn something new and create something beautiful. Embrace the natural beauty of pinecones and transform them into an everlasting bouquet that will brighten any room and serve as a testament to your creativity. Happy crafting!